centos7下利用qemu搭建arm模拟器
1 目的
在centos7下使用qemu搭建arm模拟器。
参考博客:
centos下利用qemu搭建arm模拟器 - 寒水司天 - 博客园 (cnblogs.com)
从零使用qemu模拟器搭建arm运行环境_海枫的专栏-CSDN博客_qemu模拟arm
用Qemu模拟vexpress-a9 (一) --- 搭建Linux kernel调试环境 - 摩斯电码 - 博客园 (cnblogs.com)
2 环境
centos7版本:Linux version 3.10.0-693.el7.x86_64 (builder@kbuilder.dev.centos.org) (gcc version 4.8.5 20150623 (Red Hat 4.8.5-16) (GCC) ) #1 SMP Tue Aug 22 21:09:27 UTC 2017
涉及到以下工具的使用:
arm交叉编译工具:arm-none-linux-gnueabi-gcc version 4.8.3
QEMU:qemu-2.11.0
uboot:u-boot-2018.01
Linux内核:linux-4.1.38
busybox:busybox-1.24.1
3 arm交叉工具安装
我下载的版本是:arm-2014.05-29-arm-none-linux-gnueabi-i686-pc-linux-gnu,直接解压缩之后就可以使用,不需要安装。
下载地址:
arm-none-linux-gnueabi-gcc 下载地址 - 代码天地 (codetd.com)
安装步骤:
1、解压缩:
tar -vxf arm-2014.05-29-arm-none-linux-gnueabi-i686-pc-linux-gnu.tar.bz2
我是放在了/usr/local/arm路径下。
2、编辑vim /etc/profile
在文件末尾加上:
export PATH=$PATH:/usr/local/arm/arm-2014.05/bin
注意,上面的等号“=”是英文的,而不是中文的,否则会出现以下的错误。

-bash: export: `PATH=/usr/local/sbin:/usr/local/bin:/sbin:/bin:/usr/sbin:/usr/bin:/root/bin:/usr/local/arm/arm-2014-05/bin': not a valid identifier
3、执行
source /etc/profile
4、测试
查看版本信息,这里遇到了一些问题,记录如下:

$ arm-none-linux-gnueabi-gcc -v

-bash: /usr/local/arm/arm-2014-05/bin/arm-none-linux-gnueabi-gcc: /lib/ld-linux.so.2: bad ELF interpreter: No such file or directory
提示少了so格式不对,根据网友说法,安装glibc.i686之后解决了:
$ sudo yum install glibc.i686
查看版本信息:
$ arm-none-linux-gnueabi-gcc -v

... ...

Thread model: posix

gcc version 4.8.3 20140320 (prerelease) (Sourcery CodeBench Lite 2014.05-29)
可以看出,安装的版本是:gcc version 4.8.3 20140320
4 安装QEMU
下载地址:
Index of / (qemu.org),我下载的是2.11.0版本。
安装步骤:
1、解压缩:
tar -vxf qemu-2.11.0.tar.xz
2、配置编译选项:
./configure --enable-kvm --enable-debug --enable-vnc --enable-werror --target-list=arm-softmmu --audio-drv-list=
configure脚本用于生成Makefile,其选项可以用./configure --help查看,这里使用到的选项含义如下:
--enable-kvm:编译KVM模块,使QEMU可以利用KVM来访问硬件提供的虚拟化服务。
--enable-vnc:启用VNC。
--enalbe-werror:编译时,将所有的警告当作错误处理。
--target-list:选择目标机器的架构。默认是将所有的架构都编译,但为了更快的完成编译,指定需要的架构即可。
这一步,出现了一些错误:
$ ./configure --enable-kvm --enable-debug --enable-vnc --enable-werror  --target-list=arm-softmmu --audio-drv-list=

ERROR: zlib check failed

       Make sure to have the zlib libs and headers installed.
缺少zlib开发包,需要安装好对应的版本:
$ yum install ghc-zlib-devel.x86_64
重新执行配置,报错:
$ ./configure --enable-kvm --enable-debug --enable-vnc --enable-werror  --target-list=arm-softmmu --audio-drv-list=

ERROR: glib-2.22 gthread-2.0 is required to compile QEMU
需要安装glib-2.22库:
$ yum install glib2-devel.x86_64
重新执行配置,报错:
$ ./configure --enable-kvm --enable-debug --enable-vnc --enable-werror  --target-list=arm-softmmu --audio-drv-list=

ERROR: pixman >= 0.21.8 not present.

       Please install the pixman devel package.
需要安装pixman:
$ yum install pixman-devel.x86_64
再次执行,终于成功了。
3、编译
$ make -j8
4、安装
$ make install

... ...

install -d -m 0755 "/usr/local/bin"

install -c -m 0755 qemu-system-arm  "/usr/local/bin"
5 安装uboot
下载地址:
Index of /pub/u-boot/ (denx.de)
我下载的是:u-boot-2018.01.tar.bz2
安装步骤:
1、解压缩:
tar jvxf u-boot-2018.01.tar.bz2
2、进入uboot源文件目录,执行:
export ARCH=arm

export CROSS_COMPILE=arm-none-linux-gnueabi-

make vexpress_ca9x4_defconfig

make
3、会提示gcc版本过低:
$ make

scripts/kconfig/conf  --silentoldconfig Kconfig

  CHK     include/config.h

  CFG     u-boot.cfg

  GEN     include/autoconf.mk

  GEN     include/autoconf.mk.dep

*** Your GCC is older than 6.0 and is not supported
可以选择一个高版本的GCC重新安装,或者修改uboot源文件的配置。
这里选择修改uboot源文件的配置:
$ vim arch/arm/config.mk
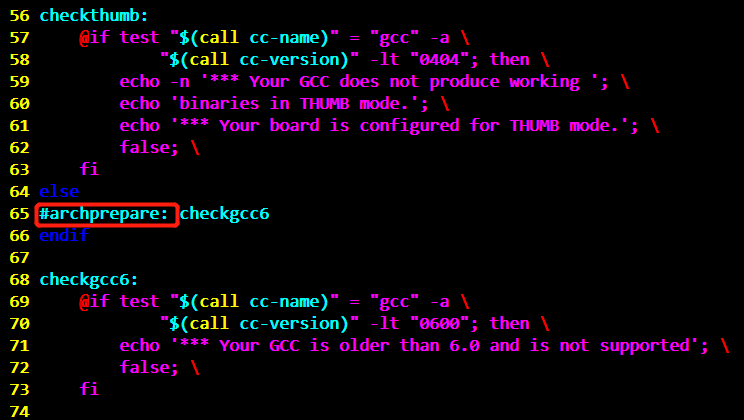
注释掉了65行。
4、编译
直接执行make:
$ make
编译完成后,如果目录下生成 u-boot 文件,则说明编译成功。
5、在U-Boot源码目录下编写脚本 run.sh
qemu-system-arm \

                -M vexpress-a9 \

                    -nographic \

                    -m 512M \

                    -kernel u-boot
然后 chmod +x run.sh 增加文件执行权限。
6、最后执行 ./run.sh
可以看到启动了bootloader,但是会提示没有映像文件。
Wrong Image Format for bootm command

ERROR: can't get kernel image!
6 编译内核
下载地址:
Index of /pub/linux/kernel/v4.x/
我下载的是linux-4.1.38。
编译步骤:
1、从arch/arm/configs下找到需要编译内核的配置文件vexpress_defconfig,复制到源码根目录下。
$ cp arch/arm/configs/vexpress_defconfig ./
2、执行命令
export ARCH=arm

export CROSS_COMPILE=arm-none-linux-gnueabi-

make vexpress_defconfig

make zImage

make modules

make dtbs
3、编译后生成 在 arch/arm/boot 目录下生成 zImage 文件,则说明编译成功。
$ ls arch/arm/boot/

bootp/  compressed/  dts/  Image*  install.sh  Makefile  zImage*
这个时候可以直接用QEMU来执行测试一下内核是否正常:
$ qemu-system-arm -M vexpress-a9 -m 512M -kernel ./linux-4.1.38/arch/arm/boot/zImage -dtb ./linux-4.1.38/arch/arm/boot/dts/vexpress-v2p-ca9.dtb -nographic -append "console=ttyAMA0"
这里简单介绍下qemu命令的参数:
-M vexpress-a9 模拟vexpress-a9单板,你可以使用-M ?参数来获取该qemu版本支持的所有单板

-m 512M 单板运行物理内存512M

-kernel ./linux-4.1.38/arch/arm/boot/zImage  告诉qemu单板运行内核镜像路径

-nographic 不使用图形化界面,只使用串口

-append "console=ttyAMA0" 内核启动参数,这里告诉内核vexpress单板运行,串口设备是那个tty。
看到内核的打印,说明内核正常,但是这时候没有文件系统,内核起不来。
此时只能通过杀死qemu-system-arm这个进程来退出。
ps -A | grep qemu-system-arm | awk '{print $1}' | xargs sudo kill -9
7 编译busybox
下载地址:
Index of /downloads (busybox.net)
我下载的是:busybox-1.24.1.tar.bz2。
操作步骤:
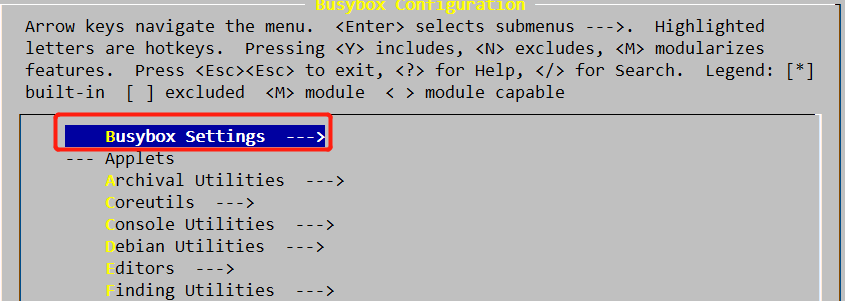
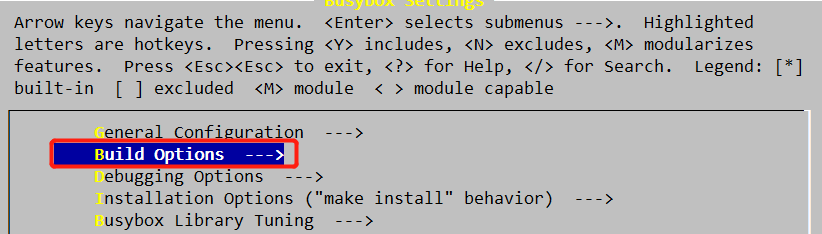
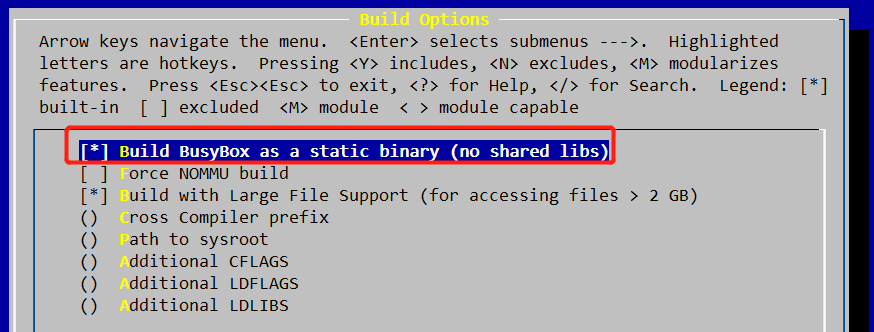
1、进入 Busybox 源文件目录下执行 make menuconfig。
$ cd busybox-1.24.1/

$ make menuconfig
选择上Build BusyBox as a static binary (no shared libs)。
2、执行make和make install
$ make

LINK    busybox_unstripped

Static linking against glibc, can't use --gc-sections

Trying libraries: crypt m

 Library crypt is not needed, excluding it

 Library m is needed, can't exclude it (yet)

Final link with: m

  DOC     busybox.pod

  DOC     BusyBox.txt

  DOC     busybox.1

  DOC     BusyBox.html
$ make install

--------------------------------------------------

You will probably need to make your busybox binary

setuid root to ensure all configured applets will

work properly.

--------------------------------------------------
_install 目录下生成 需要的文件 bin linuxrc sbin usr 。
$ ls _install/

bin/  linuxrc@  sbin/  usr/
该目录下的程序就是单板运行所需要的命令。
8 制作根文件系统
制作的根文件系统使用的是ext3文件格式。
先在Centos7主机环境下,形成目录结构,里面存放的文件和目录与单板上运行所需要的目录结构完全一样,然后再打包成镜像(在开发板看来就是SD卡),这个临时的目录结构称为根目录。
操作步骤:
1、创建rootfs目录(作为根目录),根文件系统内的文件全部放到这里。
sudo mkdir -p rootfs/proc/

sudo mkdir -p rootfs/sys/

sudo mkdir -p rootfs/tmp/

sudo mkdir -p rootfs/root/

sudo mkdir -p rootfs/var/

sudo mkdir -p rootfs/mnt/
sudo cp etc rootfs/ -arf
etc目录的下载地址:https://files.cnblogs.com/files/pengdonglin137/etc.tar.gz
2、拷贝busybox命令到根目录下
cp ../qemu/busybox/busybox-1.24.1/_install/* -r ./
3、从工具链中拷贝运行库到lib目录下
cp -arf /usr/local/arm/arm-2014-05/arm-none-linux-gnueabi/lib rootfs/

rm rootfs/lib/*.a

arm-none-linux-gnueabi-strip rootfs/lib/*
4、创建4个tty端终设备
sudo mknod rootfs/dev/tty1 c 4 1

sudo mknod rootfs/dev/tty2 c 4 2

sudo mknod rootfs/dev/tty3 c 4 3

sudo mknod rootfs/dev/tty4 c 4 4
5、生成32M大小的镜像
dd if=/dev/zero of=a9rootfs.ext3 bs=1M count=32
6、格式化成ext3文件系统
mkfs.ext3 a9rootfs.ext3
7、将文件拷贝到镜像中
mkdir tmpfs

mount -t ext3 a9rootfs.ext3 tmpfs/ -o loop

cp -r rootfs/*  tmpfs/

umount tmpfs
8、运行
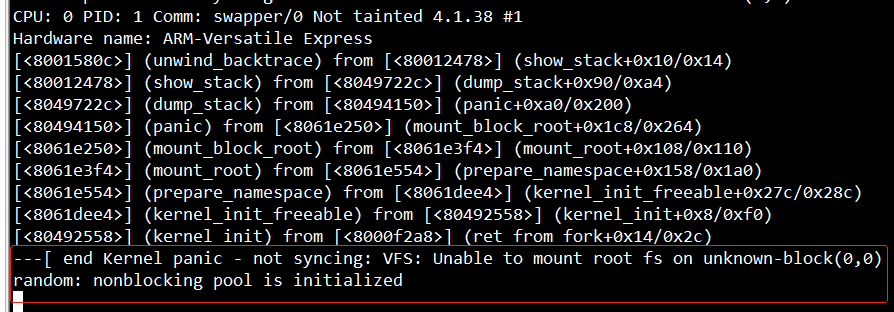
qemu-system-arm -M vexpress-a9 -m 512M -kernel /home/qemu/kernel/linux-4.1.38/arch/arm/boot/zImage -dtb /home/qemu/kernel/linux-4.1.38/arch/arm/boot/dts/vexpress-v2p-ca9.dtb -nographic -append "root=/dev/mmcblk0 console=ttyAMA0" -sd a9rootfs.ext3
完整的启动日志:
$ qemu-system-arm -M vexpress-a9 -m 512M -kernel /home/qemu/kernel/linux-4.1.38/arch/arm/boot/zImage -dtb /home/qemu/kernel/linux-4.1.38/arch/arm/boot/dts/vexpress-v2p-ca9.dtb  -nographic -append "root=/dev/mmcblk0 rw console=ttyAMA0" -sd a9rootfs.ext3

WARNING: Image format was not specified for 'a9rootfs.ext3' and probing guessed raw.

         Automatically detecting the format is dangerous for raw images, write operations on block 0 will be restricted.

         Specify the 'raw' format explicitly to remove the restrictions.

Booting Linux on physical CPU 0x0

Initializing cgroup subsys cpuset

Linux version 4.1.38 (root@localhost.localdomain) (gcc version 4.8.3 20140320 (prerelease) (Sourcery CodeBench Lite 2014.05-29) ) #1 SMP Sun Dec 26 16:34:51 CST 2021

CPU: ARMv7 Processor [410fc090] revision 0 (ARMv7), cr=10c5387d

CPU: PIPT / VIPT nonaliasing data cache, VIPT nonaliasing instruction cache

Machine model: V2P-CA9

Memory policy: Data cache writeback

CPU: All CPU(s) started in SVC mode.

PERCPU: Embedded 11 pages/cpu @9fbc0000 s16192 r8192 d20672 u45056

Built 1 zonelists in Zone order, mobility grouping on.  Total pages: 130048

Kernel command line: root=/dev/mmcblk0 rw console=ttyAMA0

log_buf_len individual max cpu contribution: 4096 bytes

log_buf_len total cpu_extra contributions: 12288 bytes

log_buf_len min size: 16384 bytes

log_buf_len: 32768 bytes

early log buf free: 14916(91%)

PID hash table entries: 2048 (order: 1, 8192 bytes)

Dentry cache hash table entries: 65536 (order: 6, 262144 bytes)

Inode-cache hash table entries: 32768 (order: 5, 131072 bytes)

Memory: 512652K/524288K available (4849K kernel code, 154K rwdata, 1376K rodata, 260K init, 148K bss, 11636K reserved, 0K cma-reserved)

Virtual kernel memory layout:

    vector  : 0xffff0000 - 0xffff1000   (   4 kB)

    fixmap  : 0xffc00000 - 0xfff00000   (3072 kB)

    vmalloc : 0xa0800000 - 0xff000000   (1512 MB)

    lowmem  : 0x80000000 - 0xa0000000   ( 512 MB)

    modules : 0x7f000000 - 0x80000000   (  16 MB)

      .text : 0x80008000 - 0x8061c6a8   (6226 kB)

      .init : 0x8061d000 - 0x8065e000   ( 260 kB)

      .data : 0x8065e000 - 0x80684a00   ( 155 kB)

       .bss : 0x80687000 - 0x806ac1f8   ( 149 kB)

SLUB: HWalign=64, Order=0-3, MinObjects=0, CPUs=4, Nodes=1

Hierarchical RCU implementation.

        Additional per-CPU info printed with stalls.

        RCU restricting CPUs from NR_CPUS=8 to nr_cpu_ids=4.

RCU: Adjusting geometry for rcu_fanout_leaf=16, nr_cpu_ids=4

NR_IRQS:16 nr_irqs:16 16

GIC CPU mask not found - kernel will fail to boot.

GIC CPU mask not found - kernel will fail to boot.

L2C: platform modifies aux control register: 0x02020000 -> 0x02420000

L2C: DT/platform modifies aux control register: 0x02020000 -> 0x02420000

L2C-310 enabling early BRESP for Cortex-A9

L2C-310 full line of zeros enabled for Cortex-A9

L2C-310 dynamic clock gating disabled, standby mode disabled

L2C-310 cache controller enabled, 8 ways, 128 kB

L2C-310: CACHE_ID 0x410000c8, AUX_CTRL 0x46420001

sched_clock: 32 bits at 24MHz, resolution 41ns, wraps every 89478484971ns

clocksource arm,sp804: mask: 0xffffffff max_cycles: 0xffffffff, max_idle_ns: 1911260446275 ns

Console: colour dummy device 80x30

Calibrating delay loop... 400.58 BogoMIPS (lpj=2002944)

pid_max: default: 32768 minimum: 301

Mount-cache hash table entries: 1024 (order: 0, 4096 bytes)

Mountpoint-cache hash table entries: 1024 (order: 0, 4096 bytes)

CPU: Testing write buffer coherency: ok

CPU0: thread -1, cpu 0, socket 0, mpidr 80000000

Setting up static identity map for 0x60008280 - 0x600082d8

Brought up 1 CPUs

SMP: Total of 1 processors activated (400.58 BogoMIPS).

CPU: All CPU(s) started in SVC mode.

devtmpfs: initialized

VFP support v0.3: implementor 41 architecture 3 part 30 variant 9 rev 0

clocksource jiffies: mask: 0xffffffff max_cycles: 0xffffffff, max_idle_ns: 19112604462750000 ns

NET: Registered protocol family 16

DMA: preallocated 256 KiB pool for atomic coherent allocations

cpuidle: using governor ladder

cpuidle: using governor menu

of_amba_device_create(): amba_device_add() failed (-19) for /memory-controller@100e0000

of_amba_device_create(): amba_device_add() failed (-19) for /memory-controller@100e1000

of_amba_device_create(): amba_device_add() failed (-19) for /watchdog@100e5000

of_amba_device_create(): amba_device_add() failed (-19) for /smb/motherboard/iofpga@7,00000000/sysctl@01000

of_amba_device_create(): amba_device_add() failed (-19) for /smb/motherboard/iofpga@7,00000000/wdt@0f000

hw-breakpoint: debug architecture 0x4 unsupported.

Serial: AMBA PL011 UART driver

10009000.uart: ttyAMA0 at MMIO 0x10009000 (irq = 38, base_baud = 0) is a PL011 rev1

console [ttyAMA0] enabled

1000a000.uart: ttyAMA1 at MMIO 0x1000a000 (irq = 39, base_baud = 0) is a PL011 rev1

1000b000.uart: ttyAMA2 at MMIO 0x1000b000 (irq = 40, base_baud = 0) is a PL011 rev1

1000c000.uart: ttyAMA3 at MMIO 0x1000c000 (irq = 41, base_baud = 0) is a PL011 rev1

SCSI subsystem initialized

usbcore: registered new interface driver usbfs

usbcore: registered new interface driver hub

usbcore: registered new device driver usb

Advanced Linux Sound Architecture Driver Initialized.

Switched to clocksource arm,sp804

NET: Registered protocol family 2

TCP established hash table entries: 4096 (order: 2, 16384 bytes)

TCP bind hash table entries: 4096 (order: 3, 32768 bytes)

TCP: Hash tables configured (established 4096 bind 4096)

UDP hash table entries: 256 (order: 1, 8192 bytes)

UDP-Lite hash table entries: 256 (order: 1, 8192 bytes)

NET: Registered protocol family 1

RPC: Registered named UNIX socket transport module.

RPC: Registered udp transport module.

RPC: Registered tcp transport module.

RPC: Registered tcp NFSv4.1 backchannel transport module.

hw perfevents: enabled with armv7_cortex_a9 PMU driver, 1 counters available

futex hash table entries: 1024 (order: 4, 65536 bytes)

squashfs: version 4.0 (2009/01/31) Phillip Lougher

jffs2: version 2.2. (NAND)  2001-2006 Red Hat, Inc.

9p: Installing v9fs 9p2000 file system support

io scheduler noop registered (default)

clcd-pl11x 10020000.clcd: PL111 rev2 at 0x10020000

clcd-pl11x 10020000.clcd: /clcd@10020000 hardware, 1024x768@59 display

Console: switching to colour frame buffer device 128x48

clcd-pl11x 1001f000.clcd: PL111 rev2 at 0x1001f000

clcd-pl11x 1001f000.clcd: /smb/motherboard/iofpga@7,00000000/clcd@1f000 hardware, 640x480@59 display

40000000.flash: Found 2 x16 devices at 0x0 in 32-bit bank. Manufacturer ID 0x000000 Chip ID 0x000000

Intel/Sharp Extended Query Table at 0x0031

Using buffer write method

40000000.flash: Found 2 x16 devices at 0x0 in 32-bit bank. Manufacturer ID 0x000000 Chip ID 0x000000

Intel/Sharp Extended Query Table at 0x0031

Using buffer write method

Concatenating MTD devices:

(0): "40000000.flash"

(1): "40000000.flash"

into device "40000000.flash"

libphy: smsc911x-mdio: probed

smsc911x 4e000000.ethernet eth0: attached PHY driver [Generic PHY] (mii_bus:phy_addr=4e000000.etherne:01, irq=-1)

smsc911x 4e000000.ethernet eth0: MAC Address: 52:54:00:12:34:56

isp1760 4f000000.usb: bus width: 32, oc: digital

isp1760 4f000000.usb: NXP ISP1760 USB Host Controller

isp1760 4f000000.usb: new USB bus registered, assigned bus number 1

isp1760 4f000000.usb: Scratch test failed.

isp1760 4f000000.usb: can't setup: -19

isp1760 4f000000.usb: USB bus 1 deregistered

usbcore: registered new interface driver usb-storage

mousedev: PS/2 mouse device common for all mice

rtc-pl031 10017000.rtc: rtc core: registered pl031 as rtc0

mmci-pl18x 10005000.mmci: Got CD GPIO

mmci-pl18x 10005000.mmci: Got WP GPIO

mmci-pl18x 10005000.mmci: No vqmmc regulator found

mmci-pl18x 10005000.mmci: mmc0: PL181 manf 41 rev0 at 0x10005000 irq 34,35 (pio)

input: AT Raw Set 2 keyboard as /devices/platform/smb/smb:motherboard/smb:motherboard:iofpga@7,00000000/10006000.kmi/serio0/input/input0

ledtrig-cpu: registered to indicate activity on CPUs

usbcore: registered new interface driver usbhid

usbhid: USB HID core driver

mmc0: new SD card at address 4567

mmcblk0: mmc0:4567 QEMU! 32.0 MiB

aaci-pl041 10004000.aaci: ARM AC'97 Interface PL041 rev0 at 0x10004000, irq 33

aaci-pl041 10004000.aaci: FIFO 512 entries

oprofile: using arm/armv7-ca9

NET: Registered protocol family 17

9pnet: Installing 9P2000 support

Registering SWP/SWPB emulation handler

rtc-pl031 10017000.rtc: setting system clock to 2021-12-26 13:20:20 UTC (1640524820)

ALSA device list:

  #0: ARM AC'97 Interface PL041 rev0 at 0x10004000, irq 33

input: ImExPS/2 Generic Explorer Mouse as /devices/platform/smb/smb:motherboard/smb:motherboard:iofpga@7,00000000/10007000.kmi/serio1/input/input2

kjournald starting.  Commit interval 5 seconds

EXT3-fs (mmcblk0): using internal journal

EXT3-fs (mmcblk0): mounted filesystem with writeback data mode

VFS: Mounted root (ext3 filesystem) on device 179:0.

Freeing unused kernel memory: 260K (8061d000 - 8065e000)

random: nonblocking pool is initialized

Please press Enter to activate this console.
centos7下利用qemu搭建arm模拟器的更多相关文章
- centos下利用qemu搭建arm模拟器
有点繁琐,整理一下,系统环境centos6.6,虚拟机以及实际系统中测试通过. 一.交叉编译器的下载与安装1.下载地址:http://blog.csdn.net/dldw8816/article/de ...
- 【MIT6.828】centos7下使用Qemu搭建xv6运行环境
title:[MIT6.828]centos7下使用Qemu搭建xv6运行环境 date: "2020-05-05" [MIT6.828]centos7下搭建xv6运行环境 1. ...
- centos7下利用nfs搭建wordpress
拓扑环境 web1 192.168.198.110 web2 192.168.198.120 mysql 192.168.198.130 DNS 192.168.198.10 NFS 192.168. ...
- Qemu搭建ARM vexpress开发环境(二)----通过u-boot启动Linux内核
Qemu搭建ARM vexpress开发环境(二)----通过u-boot启动Linux内核 标签(空格分隔): Qemu ARM Linux 在上文<Qemu搭建ARM vexpress开发环 ...
- Qemu搭建ARM vexpress开发环境(三)----NFS网络根文件系统
Qemu搭建ARM vexpress开发环境(三)----NFS网络根文件系统 标签(空格分隔): Qemu ARM Linux 经过上一篇<Qemu搭建ARM vexpress开发环境(二)- ...
- Qemu搭建ARM vexpress开发环境(一)
Qemu搭建ARM vexpress开发环境(一) 标签(空格分隔): Qemu ARM Linux 嵌入式开发离不开硬件设备比如:开发板.外设等,但是如果只是想学习研究Linux内核,想学习Linu ...
- centos7下git服务器端搭建
git的安装: yum 源仓库里的 Git 版本更新不及时,最新版本的 Git 是 1.8.3.1,但是官方最新版本已经到了 2.9.2.想要安装最新版本的的 Git,只能下载源码进行安装. 1. 查 ...
- centos7下git服务器端搭建(转)
git的安装: yum 源仓库里的 Git 版本更新不及时,最新版本的 Git 是 1.8.3.1,但是官方最新版本已经到了 2.9.2.想要安装最新版本的的 Git,只能下载源码进行安装. 1. 查 ...
- CentOS 7 利用qemu模拟ARM vexpress A9开发板
听说qemu用于仿真arm很不错,今日就来试了一把.由于刚刚开始,了解的并不多.本文仅仅记录Qemu装载Linux kernel和busybox根文件系统的过程.后续将会深入了解仿真的其他内容. 先上 ...
- ubuntu下使用qemu模拟ARM(六)------驱动程序【转】
转自:http://blog.csdn.net/rfidunion/article/details/54709843 驱动程序分为在ubuntu上运行和在ARM开发板上运行两种,我们分别来进行测试 1 ...
随机推荐
- CAP 8.1 版本发布通告
前言 我们很高兴宣布 CAP 发布 8.1 版本正式版,我们在这个版本中主要是添加了一些新的配置项支持,并且根据用户反馈做了一些功能调整,同时在这个版本开始默认禁用了从7.2版本引入的并行发布消息. ...
- Windows 系统上如何安装 Python 环境(详细教程)
Windows 系统上如何安装 Python 环境(详细教程) 目前,Python有两个版本,一个是2.x版,一个是3.x版,这两个版本是不兼容的.由于2.x版官方只维护到2020年,所以以3.x版作 ...
- MySQL 分析查询与来源机器
当前分析针对版本:MariaDB 10.5 线上出现报错:can't create more than max_prepared_stmt_count statements.造成这个错误的直接原因就是 ...
- 力扣262(MySQL)-行程和用户(困难)
题目: 表:Trips 表:Users 取消率 的计算方式如下:(被司机或乘客取消的非禁止用户生成的订单数量) / (非禁止用户生成的订单总数). 写一段 SQL 语句查出 "2013-10 ...
- 怀里橘猫柴犬,掌上代码江湖——对话阿里云 MVP郭旭东
简介: 跟郭旭东聊过之后,我对程序员的敬佩又多一分.这个92年的开发者,难能可贵地兼备朝气蓬勃的技术能量与长远深刻的行业洞见.独自承担DevOps平台从0到1的所有工作,我打趣说超级开发者不过如此,他 ...
- 国内唯一连续入选Gartner,Quick BI是如何做到的?
简介:阿里云Quick BI凭借灵活的公共云部署,私有化独立部署能力.无缝对接各类云上数据库和自建数据库.可视化搭建分析.高效数据处理能力与强大数据计算能力,使得在2022年持续入选Gartner ...
- DDD as Code:如何用代码诠释领域驱动设计?
简介: 相较于常规的MVC架构,DDD更抽象.更难以理解,各个开发者对DDD的解释也不尽相同.那么哪种设计方式才更好?在学习时如何知道哪种DDD更正统,没有被别人带歪?本文尝试使用"DDD ...
- [FAQ] Truffle Deployer 合约传参问题: Invalid number of parameters for "undefined". Got 0 expected 1!
在使用 `truffle migrate` 时,如果合约的构造函数需要传参,而部署脚本里没有传的时候,就会报这个错. 未传参时: const Migrations = artifacts.requir ...
- linux 环境下idea 注册过期或激活异常解决
//@desn:linux 环境下idea 注册过期或激活异常解决 //@desn:码字不宜,转载请注明出处 //@author:张慧源 <turing_zhy@163.com> //@ ...
- Modelsim使用指南
Modelsim使用指南 本文讲述Modelsim的使用步骤. 添加一个测试文件,比如modulename.v. 编辑这个Verilog模块. 为了方便讲述,顶层模块名命名为"top&quo ...