二维码、条形码扫描——使用Google ZXing
我在项目中用到了二维码扫描的技术,用的是Google提供的ZXing开源项目,它提供二维码和条形码的扫描。扫描条形码就是直接读取条形码的内容,扫描二维码是按照自己指定的二维码格式进行编码和解码。
可以到http://code.google.com/p/zxing/下载ZXing项目的源码,然后按照官方文档进行开发,我这里使用的ZXing是经过简化版的,去除了一些一般使用不必要的文件,项目工程截图如下:

其中encoding包是我
在它的基础上自己加上去的,功能是根据传入的字符串来生成二维码图片,返回一个Bitmap,其余的包是ZXing项目自带的。另外对扫描界面的布局我也
进行了修改,官方的扫描界面是横向的,我改成了纵向的,并加入了顶部的Tab和取消按钮(camera.xml),另外还需要的一些文件是
colors.xml、ids.xml,这些都是原本ZXing项目中自带的,最后就是libs下面的jar包。
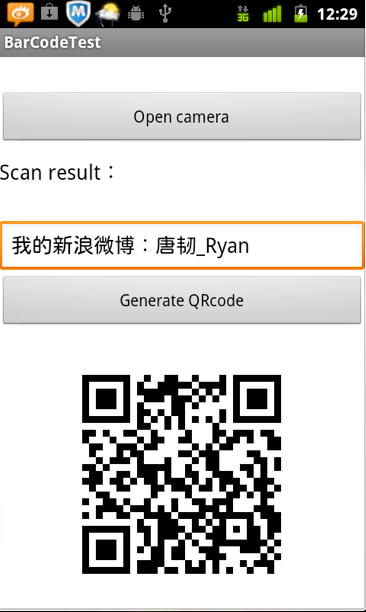
先来看看最后的效果:
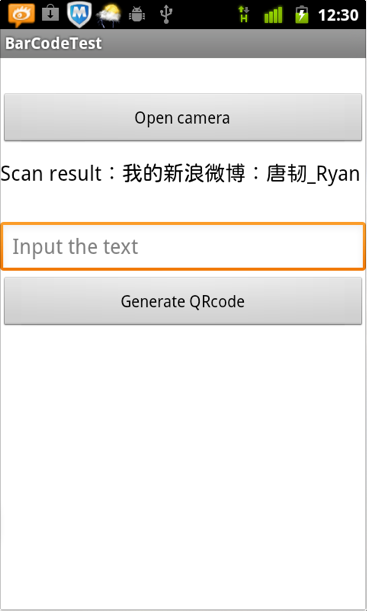
首先是根据输入的字符串生成二维码图片(左图),然后扫描二维码图片可以在界面上显示扫描结果(右图):
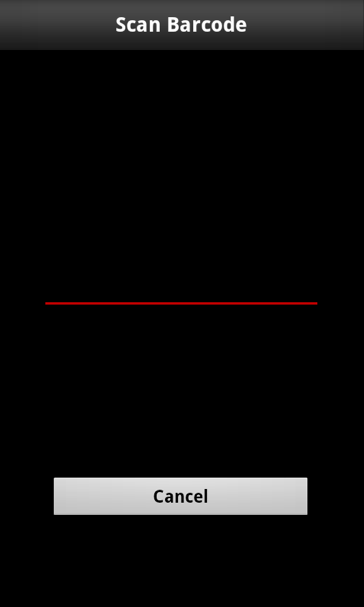
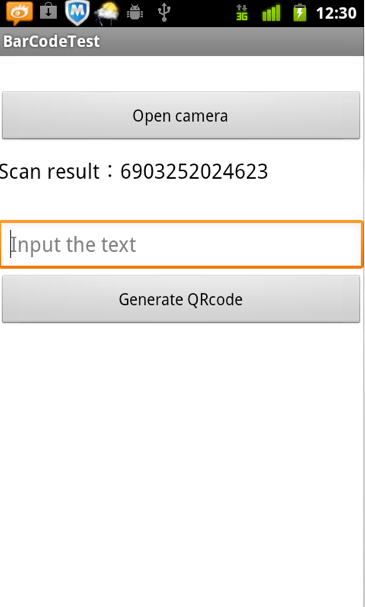
点击Open Camera按钮代开扫描框(左图),扫描条形码结果如下(右图):
接下来看如何使用,首先是把ZXing项目中的一些文件拷贝到我们自己的项目中,然后在Mainifest文件中进行配置权限:
- <uses-permission android:name="android.permission.VIBRATE" />
- <uses-permission android:name="android.permission.CAMERA" />
- <uses-feature android:name="android.hardware.camera" />
- <uses-feature android:name="android.hardware.camera.autofocus" />
还有就是扫描界面Activity的配置:
- <activity
- android:configChanges="orientation|keyboardHidden"
- android:name="com.zxing.activity.CaptureActivity"
- android:screenOrientation="portrait"
- android:theme="@android:style/Theme.NoTitleBar.Fullscreen"
- android:windowSoftInputMode="stateAlwaysHidden" >
- </activity>
接下来是我自己项目的布局文件:
- <?xml version="1.0" encoding="utf-8"?>
- <LinearLayout xmlns:android="http://schemas.android.com/apk/res/android"
- android:layout_width="fill_parent"
- android:layout_height="fill_parent"
- android:background="@android:color/white"
- android:orientation="vertical" >
- <Button
- android:id="@+id/btn_scan_barcode"
- android:layout_width="fill_parent"
- android:layout_height="wrap_content"
- android:layout_marginTop="30dp"
- android:text="Open camera" />
- <LinearLayout
- android:orientation="horizontal"
- android:layout_marginTop="10dp"
- android:layout_width="fill_parent"
- android:layout_height="wrap_content">
- <TextView
- android:layout_width="wrap_content"
- android:layout_height="wrap_content"
- android:textColor="@android:color/black"
- android:textSize="18sp"
- android:text="Scan result:" />
- <TextView
- android:id="@+id/tv_scan_result"
- android:layout_width="fill_parent"
- android:textSize="18sp"
- android:textColor="@android:color/black"
- android:layout_height="wrap_content" />
- </LinearLayout>
- <EditText
- android:id="@+id/et_qr_string"
- android:layout_width="fill_parent"
- android:layout_height="wrap_content"
- android:layout_marginTop="30dp"
- android:hint="Input the text"/>
- <Button
- android:id="@+id/btn_add_qrcode"
- android:layout_width="fill_parent"
- android:layout_height="wrap_content"
- android:text="Generate QRcode" />
- <ImageView
- android:id="@+id/iv_qr_image"
- android:layout_width="wrap_content"
- android:layout_height="wrap_content"
- android:layout_marginTop="10dp"
- android:layout_gravity="center"/>
- </LinearLayout>
下面是主Activity的代码,主要功能是打开扫描框、显示扫描结果、根据输入的字符串生成二维码图片:
- public class BarCodeTestActivity extends Activity {
- /** Called when the activity is first created. */
- private TextView resultTextView;
- private EditText qrStrEditText;
- private ImageView qrImgImageView;
- @Override
- public void onCreate(Bundle savedInstanceState) {
- super.onCreate(savedInstanceState);
- setContentView(R.layout.main);
- resultTextView = (TextView) this.findViewById(R.id.tv_scan_result);
- qrStrEditText = (EditText) this.findViewById(R.id.et_qr_string);
- qrImgImageView = (ImageView) this.findViewById(R.id.iv_qr_image);
- Button scanBarCodeButton = (Button) this.findViewById(R.id.btn_scan_barcode);
- scanBarCodeButton.setOnClickListener(new OnClickListener() {
- @Override
- public void onClick(View v) {
- //打开扫描界面扫描条形码或二维码
- Intent openCameraIntent = new Intent(BarCodeTestActivity.this,CaptureActivity.class);
- startActivityForResult(openCameraIntent, 0);
- }
- });
- Button generateQRCodeButton = (Button) this.findViewById(R.id.btn_add_qrcode);
- generateQRCodeButton.setOnClickListener(new OnClickListener() {
- @Override
- public void onClick(View v) {
- try {
- String contentString = qrStrEditText.getText().toString();
- if (!contentString.equals("")) {
- //根据字符串生成二维码图片并显示在界面上,第二个参数为图片的大小(350*350)
- Bitmap qrCodeBitmap = EncodingHandler.createQRCode(contentString, 350);
- qrImgImageView.setImageBitmap(qrCodeBitmap);
- }else {
- Toast.makeText(BarCodeTestActivity.this, "Text can not be empty", Toast.LENGTH_SHORT).show();
- }
- } catch (WriterException e) {
- // TODO Auto-generated catch block
- e.printStackTrace();
- }
- }
- });
- }
- @Override
- protected void onActivityResult(int requestCode, int resultCode, Intent data) {
- super.onActivityResult(requestCode, resultCode, data);
- //处理扫描结果(在界面上显示)
- if (resultCode == RESULT_OK) {
- Bundle bundle = data.getExtras();
- String scanResult = bundle.getString("result");
- resultTextView.setText(scanResult);
- }
- }
- }
其中生成二维码图片的代码在EncodingHandler.java中:
- public final class EncodingHandler {
- private static final int BLACK = 0xff000000;
- public static Bitmap createQRCode(String str,int widthAndHeight) throws WriterException {
- Hashtable<EncodeHintType, String> hints = new Hashtable<EncodeHintType, String>();
- hints.put(EncodeHintType.CHARACTER_SET, "utf-8");
- BitMatrix matrix = new MultiFormatWriter().encode(str,
- BarcodeFormat.QR_CODE, widthAndHeight, widthAndHeight);
- int width = matrix.getWidth();
- int height = matrix.getHeight();
- int[] pixels = new int[width * height];
- for (int y = 0; y < height; y++) {
- for (int x = 0; x < width; x++) {
- if (matrix.get(x, y)) {
- pixels[y * width + x] = BLACK;
- }
- }
- }
- Bitmap bitmap = Bitmap.createBitmap(width, height,
- Bitmap.Config.ARGB_8888);
- bitmap.setPixels(pixels, 0, width, 0, 0, width, height);
- return bitmap;
- }
- }
最后是在哪里对扫描结果进行解码,进入CaptureActivity.java找到下面这个方法便可以对自己对结果进行操作:
- /**
- * Handler scan result
- * @param result
- * @param barcode
- */
- public void handleDecode(Result result, Bitmap barcode) {
- inactivityTimer.onActivity();
- playBeepSoundAndVibrate();
- String resultString = result.getText();
- //FIXME
- if (resultString.equals("")) {
- Toast.makeText(CaptureActivity.this, "Scan failed!", Toast.LENGTH_SHORT).show();
- }else {
- // System.out.println("Result:"+resultString);
- Intent resultIntent = new Intent();
- Bundle bundle = new Bundle();
- bundle.putString("result", resultString);
- resultIntent.putExtras(bundle);
- this.setResult(RESULT_OK, resultIntent);
- }
- CaptureActivity.this.finish();
- }
- 转自:http://blog.csdn.net/tangren03/article/details/7831826
二维码、条形码扫描——使用Google ZXing的更多相关文章
- java二维码生成-谷歌(Google.zxing)开源二维码生成学习及实例
java二维码生成-谷歌(Google.zxing)开源二维码生成的实例及介绍 我们使用比特矩阵(位矩阵)的QR码编码在缓冲图片上画出二维码 实例有以下一个传入参数 OutputStream ou ...
- iOS系统原生二维码条形码扫描
本文讲述如何用系统自带的东东实现二维码扫描的功能:点击当前页面的某个按钮,创建扫描VIEW.细心的小伙伴可以发现 title被改变了,返回按钮被隐藏了.这个代码自己写就行了,与本文关系不大...绿色的 ...
- IOS原声二维码条形码扫描实现
本文讲述如何用系统自带的东东实现二维码扫描的功能:点击当前页面的某个按钮,创建扫描VIEW.细心的小伙伴可以发现 title被改变了,返回按钮被隐藏了.这个代码自己写就行了,与本文关系不大...绿色的 ...
- zxing解析带logo二维码会报com.google.zxing.NotFoundException
参考原文:https://blog.csdn.net/cyl1226541/article/details/70557232 //复杂模式,开启PURE_BARCODE模式(☆☆☆) HINTS.pu ...
- iOS雪花动画、音频图、新闻界面框架、2048游戏、二维码条形码扫码生成等源码
iOS精选源码 粒子雪花与烟花的动画 iOS 2048游戏 JHSoundWaveView - 简单地声波图.音波图 一个可快速集成的新闻详情界面框架,类似今日头条,腾讯新闻 二维码/条形码扫描及扫描 ...
- 【转】 Android 基于google Zxing实现对手机中的二维码进行扫描--不错
原文网址:http://blog.csdn.net/xiaanming/article/details/14450809 转载请注明出处:http://blog.csdn.net/xiaanming/ ...
- Android高级控件(三)—— 使用Google ZXing实现二维码的扫描和生成相关功能体系
Android高级控件(三)-- 使用Google ZXing实现二维码的扫描和生成相关功能体系 摘要 现在的二维码可谓是烂大街了,到处都是二维码,什么都是二维码,扫一扫似乎已经流行到习以为常了,今天 ...
- Android 基于google Zxing实现对手机中的二维码进行扫描
转载请注明出处:http://blog.csdn.net/xiaanming/article/details/14450809 有时候我们有这样子的需求,需要扫描手机中有二维码的的图片,所以今天实现的 ...
- Android高级控件(三)—— 使用Google ZXing实现二维码的扫描和生成相关功能体系
Android高级控件(三)-- 使用Google ZXing实现二维码的扫描和生成相关功能体系 摘要 如今的二维码可谓是烂大街了.到处都是二维码.什么都是二维码,扫一扫似乎已经流行到习以为常了,今天 ...
- QRCode 扫描二维码、扫描条形码、相册获取图片后识别、生成带 Logo 二维码、支持微博微信 QQ 二维码扫描样式
目录 功能介绍 常见问题 效果图与示例 apk Gradle 依赖 布局文件 自定义属性说明 接口说明 关于我 功能介绍 根据之前公司的产品需求,参考 barcodescanner 改的,希望能帮助到 ...
随机推荐
- lucas定理 +证明 学习笔记
lucas定理 p为素数 \[\dbinom n m\equiv\dbinom {n\%p} {m\%p} \dbinom {n/p}{m/p}(mod p)\] 左边一项直接求,右边可递归处理,不包 ...
- VMware锁定文件失败开启模块diskearly的操作失败未能启动虚拟机
删除虚拟机目录下的(如图中标明的就是D:\VMWorks\YeZiZxWeb这个目录)三个 *.lck文件夹,启动正常
- 模仿锤子手机的bigbang效果
<!DOCTYPE html> <html style="height: 100%"> <head> <meta http-equiv=& ...
- 标准C程序设计七---52
Linux应用 编程深入 语言编程 标准C程序设计七---经典C11程序设计 以下内容为阅读: <标准C程序设计>(第7版) 作者 ...
- 首次远程安装 GlassFish 后以远程 Web 方式访问其后台管理系统出现错误的解决方法(修订)
首次远程安装 GlassFish 服务后,如果以远程 Web 方式访问其后台管理系统,会提示 Secure Admin must be enabled to access the DAS remote ...
- 简单的 "双缓冲" 绘图的例子
http://www.cnblogs.com/del/archive/2010/04/19/1715779.html 所谓双缓冲就是先画到内存画布(如: TBitmap), 然后再转帖到目的地. 譬如 ...
- [原创][FPGA]时钟分频之奇分频(5分频)
0. 简介 有时在基本模块的设计中常常会使用到时钟分频,时钟的偶分频相对与奇分频比较简单,但是奇分频的理念想透彻后也是十分简单的,这里就把奇分频做一个记录. 1. 奇分频 其实现很简单,主要为使用两个 ...
- Light oj 1085 - All Possible Increasing Subsequences (简单dp + 离散化 + BIT)
题目链接:http://www.lightoj.com/volume_showproblem.php?problem=1085 题意: 问你有多少个上升子序列. 思路: dp[i]表示以第i个数结尾的 ...
- House Robber(动态规划)
思路: 代码: class Solution { public: int rob(vector<int> &num) { ; int size=num.size(); ) ]; v ...
- VS2010 + WinDDK 搭建驱动开发环境(转)
因工作需要,需要研究一下Windows驱动开发.我们知道,编译驱动程序主要是通过两种方案:第一种是通过WinDDK提供的build命令+source文件进行编译:另外一种是通过VC的IDE进行编译. ...