Referenced:http://www.petenetlive.com/KB/Article/0000869
Problem
I had to set this up for a client this week, I’ve setup a DMZ on a 5505 before and I’ve setup other VLANs to do other jobs, e.g. visitor Internet access. But this client needed a secondary VLAN setting up for IP Phones. In addition I needed to route traffic between both the internal VLANs.
I did an internet search and tried to find some configs I could reverse engineer, the few I found were old (Pre version 8.3) ones and the little info I got were more people in forums asking why theirs did not work. So I built a firewall with 8.2 code, then worked out how to do it, then upgraded the firewall to version 9.1. Finally I picked out the relevant parts of the upgraded config.
Here's the scenario I'm going to use for this example.
Solution
Before we start, yes I know the ASA is a firewall not a router! A better solution would be to have either a router behind the firewall or, (as is more common) a switch that is layer 3 capable, i.e it can route.
Your ASA MUST have a Security Plus licence to be able to do this. Check your license version.
The commands you use will be different if your firewall is running an operating system earlier than 8.3, check your ASA version and proceed to the correct set of commands.
For Firewalls running an Operating System OLDER than 8.3 go here
How to Setup VLAN Routing on an ASA 5505 (Version 8.3 and Newer)
1. Connect to the firewall, go to enable mode, then go to configure terminal mode.
User Access Verification
Password: Type help or '?' for a list of available commands. Petes-ASA> enable Password: ******** Petes-ASA# configure terminal Petes-ASA(config)#
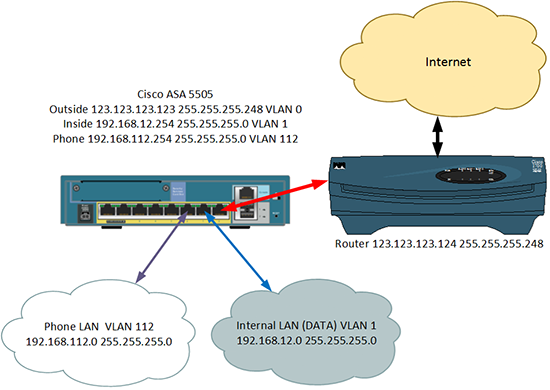
2. As in the diagram (above) I have three VLANs, VLAN 0 is outside and will be connected to Ethernet 0/0. VLAN 1 is inside and will be connected to Ethernet 0/1. VLAN 112 is for my phones and will be connected to Ethernet 0/2. Here I setup the IP addresses, and add the VLANs to the physical interfaces.
Note: I don't need to Add VLAN 1 to Ethernet 0/1, because all ports are in VLAN 1 by default.
Petes-ASA(config)# interface Ethernet0/0 Petes-ASA(config-if)# switchport access vlan 2 Petes-ASA(config-if)# interface Ethernet0/2 Petes-ASA(config-if)# switchport access vlan 112 Petes-ASA(config-if)# interface Vlan1 Petes-ASA(config-if)# nameif inside Petes-ASA(config-if)# security-level 100 Petes-ASA(config-if)# ip address 192.168.12.254 255.255.255.0 Petes-ASA(config-if)# interface Vlan2 Petes-ASA(config-if)# nameif outside Petes-ASA(config-if)# security-level 0 Petes-ASA(config-if)# ip address 123.123.123.123 255.255.255.248 Petes-ASA(config-if)# interface Vlan112 Petes-ASA(config-if)# nameif PHONE_VLAN_112 Petes-ASA(config-if)# security-level 100 Petes-ASA(config-if)# ip address 192.168.112.254 255.255.255.0
3. To get traffic working to the internet you will need to specify a 'route' to your outside router.
Petes-ASA(config)# route outside 0.0.0.0 0.0.0.0 123.123.123.124
4. Turn on 'Hair Pinning' (the ability to route traffic back out of the same interface it came in through) and allow traffic to pass between interfaces.
Petes-ASA(config)# same-security-traffic permit inter-interface Petes-ASA(config)# same-security-traffic permit intra-interface
5. Out of the box, if you have not configured any access-lists then you can skip this step, as traffic will flow from a more secure interface (the inside and the phone one) to a less secure interface (the outside one). Here I'm going to use an ACL and allow all traffic anyway.
Petes-ASA(config)# access-list VLAN112_outbound extended permit ip 192.168.112.0 255.255.255.0 any Petes-ASA(config)# access-list outbound extended permit ip 192.168.12.0 255.255.255.0 any Petes-ASA(config)# access-group outbound in interface inside Petes-ASA(config)# access-group VLAN112_outbound in interface PHONE_VLAN_112
6. Now setup 'dynamic' NAT so that all traffic leaving both the inside VLAN and the Phone VLAN network get NATTEDto the public IP address.
Petes-ASA(config)# object network obj_any Petes-ASA(config-network-object)# subnet 0.0.0.0 0.0.0.0 Petes-ASA(config-network-object)# nat (inside,outside) dynamic interface Petes-ASA(config-network-object)# object network obj_any-01 Petes-ASA(config-network-object)# subnet 0.0.0.0 0.0.0.0 Petes-ASA(config-network-object)# nat (PHONE_VLAN_112,outside) dynamic interface
7. Now setup 'static' NAT so that traffic travelling between the inside VLAN and the phone VLAN does NOT getNATTED.
Petes-ASA(config)# object network obj-192.168.12.0 Petes-ASA(config-network-object)# subnet 192.168.12.0 255.255.255.0 Petes-ASA(config-network-object)# nat (inside,PHONE_VLAN_112) static 192.168.112.0 Petes-ASA(config-network-object)# object network obj-192.168.112.0 Petes-ASA(config-network-object)# subnet 192.168.112.0 255.255.255.0 Petes-ASA(config-network-object)# nat (PHONE_VLAN_112,inside) static 192.168.112.0
8. Enable routing, and set the MTU for all three VLANs.
Petes-ASA(config)# router eigrp 500 Petes-ASA(config-router)# network 192.168.12.0 255.255.255.0 Petes-ASA(config-router)# network 192.168.112.0 255.255.255.0 Petes-ASA(config-router)# passive-interface outside Petes-ASA(config-router)# exit Petes-ASA(config)# mtu inside 1500 Petes-ASA(config)# mtu outside 1500 Petes-ASA(config)# mtu PHONE_VLAN_112 1500
9. Save the changes, and give it a test.
Petes-ASA(config)# write memory Building configuration... Cryptochecksum: aab5e5a2 c707770d f7350728 d9ac34de [OK] Petes-ASA(config)#
Full Config for you to Copy and Paste;
interface Ethernet0/0 switchport access vlan 2 ! interface Ethernet0/1 ! interface Ethernet0/2 switchport access vlan 112 ! interface Vlan1 nameif inside security-level 100 ip address 192.168.12.254 255.255.255.0 ! interface Vlan2 nameif outside security-level 0 ip address 123.123.123.123 255.255.255.248 ! interface Vlan112 nameif PHONE_VLAN_112 security-level 100 ip address 192.168.112.254 255.255.255.0 ! same-security-traffic permit inter-interface same-security-traffic permit intra-interface ! access-list VLAN112_outbound extended permit ip 192.168.112.0 255.255.255.0 any access-list outbound extended permit ip 192.168.12.0 255.255.255.0 any ! object network obj-192.168.12.0 subnet 192.168.12.0 255.255.255.0 nat (inside,PHONE_VLAN_112) static 192.168.112.0 object network obj-192.168.112.0 subnet 192.168.112.0 255.255.255.0 nat (PHONE_VLAN_112,inside) static 192.168.112.0 object network obj_any subnet 0.0.0.0 0.0.0.0 nat (inside,outside) dynamic interface object network obj_any-01 subnet 0.0.0.0 0.0.0.0 nat (PHONE_VLAN_112,outside) dynamic interface ! mtu inside 1500 mtu outside 1500 mtu PHONE_VLAN_112 1500 ! access-group outbound in interface inside access-group VLAN112_outbound in interface PHONE_VLAN_112 ! router eigrp 500 network 192.168.12.0 255.255.255.0 network 192.168.112.0 255.255.255.0 passive-interface outside ! route outside 0.0.0.0 0.0.0.0 123.123.123.124
How to Setup VLAN Routing on an ASA 5505 (Pre Version 8.3)
1. Connect to the firewall, go to enable mode, then go to configure terminal mode.
User Access Verification
Password: Type help or '?' for a list of available commands. Petes-ASA> enable Password: ******** Petes-ASA# configure terminal Petes-ASA(config)#
2. 2. As in the diagram (above) I have three VLANs, VLAN 0 is outside and will be connected to Ethernet 0/0. VLAN 1 is inside and will be connected to Ethernet 0/1. VLAN 112 is for my phones and will be connected to Ethernet 0/2. Here I setup the IP addresses, and add the VLANs to the physical interfaces.
Note: I don't need to Add VLAN 1 to Ethernet 0/1 because all ports are in VLAN 1 by default.
Petes-ASA(config)# interface Ethernet0/0 Petes-ASA(config-if)# switchport access vlan 2 Petes-ASA(config-if)# interface Ethernet0/2 Petes-ASA(config-if)# switchport access vlan 112 Petes-ASA(config-if)# interface Vlan1 Petes-ASA(config-if)# nameif inside Petes-ASA(config-if)# security-level 100 Petes-ASA(config-if)# ip address 192.168.12.254 255.255.255.0 Petes-ASA(config-if)# interface Vlan2 Petes-ASA(config-if)# nameif outside Petes-ASA(config-if)# security-level 0 Petes-ASA(config-if)# ip address 123.123.123.123 255.255.255.248 Petes-ASA(config-if)# interface Vlan112 Petes-ASA(config-if)# nameif PHONE_VLAN_112 Petes-ASA(config-if)# security-level 100 Petes-ASA(config-if)# ip address 192.168.112.254 255.255.255.0
3. To get traffic working to the internet you will need to specify a 'route' to your outside router.
Petes-ASA(config)# route outside 0.0.0.0 0.0.0.0 123.123.123.124
4. Turn on 'Hair Pinning' (the ability to route traffic back out of the same interface it came in through). and allow traffic to pass between interfaces.
Petes-ASA(config)# same-security-traffic permit inter-interface Petes-ASA(config)# same-security-traffic permit intra-interface
5. Out of the box, if you have not configured any access-lists then you can skip this step, as traffic will flow from a more secure interface (the inside and the phone one) to a less secure interface (the outside one). Here I'm going to use an ACL and allow all traffic anyway.
Petes-ASA(config)# access-list VLAN112_outbound extended permit ip 192.168.112.0 255.255.255.0 any Petes-ASA(config)# access-list outbound extended permit ip 192.168.12.0 255.255.255.0 any Petes-ASA(config)# access-group outbound in interface inside Petes-ASA(config)# access-group VLAN112_outbound in interface PHONE_VLAN_112
6. Enable NAT so that all traffic leaving both the inside VLAN and the Phone VLAN network get NATTED to the publicIP address.
Petes-ASA(config)# global (outside) 1 interface Petes-ASA(config)# nat (inside) 1 0.0.0.0 0.0.0.0 Petes-ASA(config)# nat (PHONE_VLAN_112) 1 0.0.0.0 0.0.0.0
7. Now setup 'static' NAT so that traffic travelling between the inside VLAN and the phone VLAN does NOT getNATTED.
Petes-ASA(config)# static (inside,PHONE_VLAN_112) 192.168.112.0 192.168.12.0 netmask 255.255.255.0 Petes-ASA(config)# static (PHONE_VLAN_112,inside) 192.168.112.0 192.168.112.0 netmask 255.255.255.0
8. Enable routing, and set the MTU for all three VLANs.
Petes-ASA(config)# router eigrp 500 Petes-ASA(config-router)# network 192.168.12.0 255.255.255.0 Petes-ASA(config-router)# network 192.168.112.0 255.255.255.0 Petes-ASA(config-router)# passive-interface outside Petes-ASA(config-router)# exit Petes-ASA(config)# mtu inside 1500 Petes-ASA(config)# mtu outside 1500 Petes-ASA(config)# mtu PHONE_VLAN_112 1500
9. Save the changes, and give it a test.
Petes-ASA(config)# write memory Building configuration... Cryptochecksum: aab5e5a2 c707770d f7350728 d9ac34de [OK] Petes-ASA(config)#
Full Config for you to Copy and Paste;
interface Vlan1 nameif inside security-level 100 ip address 192.168.12.254 255.255.255.0 ! interface Vlan2 nameif outside security-level 0 ip address 123.123.123.123 255.255.255.248 ! interface Vlan112 nameif PHONE_VLAN_112 security-level 100 ip address 192.168.112.254 255.255.255.0 ! interface Ethernet0/0 switchport access vlan 2 ! interface Ethernet0/1 ! interface Ethernet0/2 switchport access vlan 112 ! same-security-traffic permit inter-interface same-security-traffic permit intra-interface ! access-list VLAN112_outbound extended permit ip 192.168.112.0 255.255.255.0 any access-list outbound extended permit ip 192.168.12.0 255.255.255.0 any ! mtu inside 1500 mtu outside 1500 mtu PHONE_VLAN_112 1500 ! global (outside) 1 interface nat (inside) 1 0.0.0.0 0.0.0.0 nat (PHONE_VLAN_112) 1 0.0.0.0 0.0.0.0 ! static (inside,PHONE_VLAN_112) 192.168.112.0 192.168.12.0 netmask 255.255.255.0 static (PHONE_VLAN_112,inside) 192.168.112.0 192.168.112.0 netmask 255.255.255.0 ! access-group outbound in interface inside access-group VLAN112_outbound in interface PHONE_VLAN_112 ! router eigrp 500 network 192.168.12.0 255.255.255.0 network 192.168.112.0 255.255.255.0 passive-interface outside ! route outside 0.0.0.0 0.0.0.0 123.123.123.124
- CISCO ASA 5505 经典配置案例
nterface Vlan2 nameif outside ----------------------------------------对端口命名外端口 security-level 0 -- ...
- Cisco ASA 5505配置详解(v8.3之前版本)
在配ASA 5505时用到的命令 2009-11-22 22:49 nat-control命令 在6.3的时候只要是穿越防火墙都需要创建转换项,比如:nat:static等等,没有转换项是不能穿越防火 ...
- Cisco ASA intra-interface routing
LAN1和LAN2的默认路由指向各自的ASA,各ASA中设置对方LAN的静态路由指向ROUTER,打开ASA的intra-interface traffic,关闭LAN1和LAN2地址互相访问的NAT ...
- Cisco ASA 配置案例---anyconnect拨通后所有流量从服务器端出去
一.目的: 1.Cisco ASA之Lan端能正常上网. 2.anyconnect端所有流量从Cisco ASA的Outside出去. 3.anyconnect端能访问Cisco ASA的Inside ...
- Cisco ASA使用证书加密
使用ASDM配置HTTPS证书加密anyconnect连接 一.在没有使用证书的情况下每次连接VPN都会出现如下提示 ASA Version: 8.4.(1) ASDM Version: 6.4.(7 ...
- Cisco ASA端口映射
Cisco ASA 端口映射设置 1.使用ASDM进入到配置页面,点开NAT Rules,然后新增Network Object,NAT选项如下图所示设定. 下图设定外网IP映射到内网IP地址192.1 ...
- Cisco ASA 高级配置
Cisco ASA 高级配置 一.防范IP分片攻击 1.Ip分片的原理: 2.Ip分片的安全问题: 3.防范Ip分片. 这三个问题在之前已经详细介绍过了,在此就不多介绍了.详细介绍请查看上一篇文章:I ...
- Cisco asa 5510升级IOS和ASDM
asa asa(config)# dir ...
- cisco ASA ios升级或恢复
cisco ASA ios升级或恢复 一.升级前准备工作 1.准备好所要升级的IOS文件及对应的ASDM文件 2.在一台电脑上架设好tftp,设置好目录,与防火墙进行连接(假设电脑IP为192.168 ...
随机推荐
- Android 反编译工具简介
Android 反编译工具: 所需工具:1 apktool : 用于获取资源文件 2 dex2Jar : 用于将classes.dex转化成jar文件 2 jd-gui: 将jar文件转化成java文 ...
- nyoj------79拦截导弹
拦截导弹 时间限制:3000 ms | 内存限制:65535 KB 难度:3 描述 某国为了防御敌国的导弹袭击,发展中一种导弹拦截系统.但是这种导弹拦截系统有一个缺陷:虽然它的第一发炮弹能够到 ...
- web标准常见问题整理
1.超链接访问过后hover样式就不出现的问题 2.FF下如何使连续长字段自动换行 3.ff下为什么父容器的高度不能自适应 4. IE6的双倍边距BUG 5. IE6下绝对定位的容器内文本无法正常选择 ...
- sql server中局部变量与全局变量的 申明与赋值(转)
来源:http://www.111cn.net/database/mssqlserver/36734.htm 例子:http://www.cnblogs.com/sunxi/p/4497493.htm ...
- HDU 4123(树的直径+单调队列)
Bob’s Race Time Limit: 5000/2000 MS (Java/Others) Memory Limit: 32768/32768 K (Java/Others)Total ...
- mysql把查询的结果格式成日期
SELECT *,FROM_UNIXTIME(addtime, '%Y-%m-%d %H:%i:%S') as riqi FROM `test`
- js中获得当前时间是年份和月份
js中获得当前时间是年份和月份,形如:201208 //获取完整的日期 var date=new Date; var year=date.getFullYear(); var month ...
- mysql启动报错
查看报错日志: 131023 15:02:59 [ERROR] Can't start server: Bind on TCP/IP port: No such file or directory13 ...
- ASP.NET MVC 上传大文件时404
前一段时间会员的上传组件改用FLASH的swfupload来上传,既能很友好的显示上传进度,又能完全满足大文件的上传. 后来服务器升级到windows 2008,改为IIS7后,上传文件一旦超过30M ...
- 修改Widows网络设置提升网速
可能很多用户不知道,我们在使用Windows系统连接Internet,系统默认保留20%的带宽,也就是说我们进行网络数据传输所能使用的带框仅为实际带宽的80%,但是我们修改网络设置或的最大带宽. 1. ...