Lab 6-1
LABS
The goal of the labs for this chapter is to help you to understand the overall functionality of a program by analyzing code constructs. Each lab will guide you through discovering and analyzing a new code construct. Each lab builds on the previous one, thus creating a single, complicated piece of malware with four constructs. Once you’ve finished working through the labs, you should be able to more easily recognize these individual constructs when you encounter them in malware.
Lab 6-1
In this lab, you will analyze the malware found in the file Lab06-01.exe.
Questions and Short Answers
What is the major code construct found in the only subroutine called by main?
A: The major code construct is an
ifstatement located at 0x401000.What is the subroutine located at 0x40105F?
A:
printfis the subroutine located at 0x40105F.What is the purpose of this program?
A: The program checks for an active Internet connection. If an active connection is found, it prints “Success: Internet Connection.” If a connection is not found, it prints “Error 1.1: No Internet.” This program can be used by malware to check for a connection before attempting to connect to the Internet.
Detailed Analysis
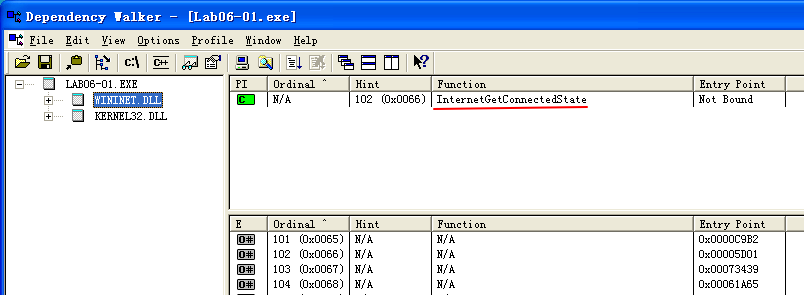
We begin by performing basic static analysis on this executable. Looking at the imports, we see that the DLL WININET.dll and the function InternetGetConnectedState are imported. The Windows Internet (WinINet) API enables applications to interact with HTTP protocols to access Internet resources.
Using MSDN (InternetGetConnectedState), we learn this Windows API function checks the status of the Internet connection for the local system. The strings Error 1.1: No Internet and Success: Internet Connection hint that this program may check for an active Internet connection on the system.
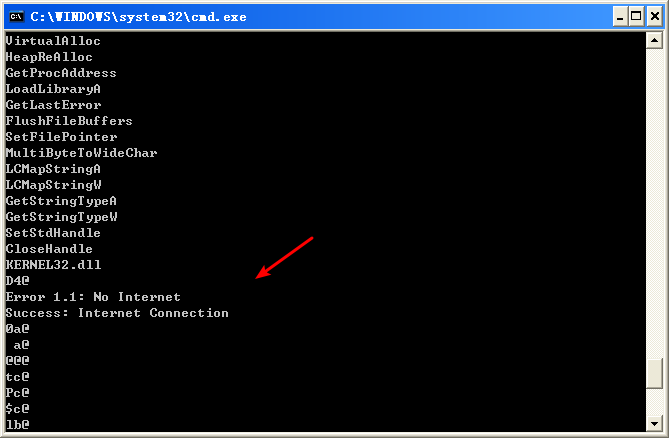
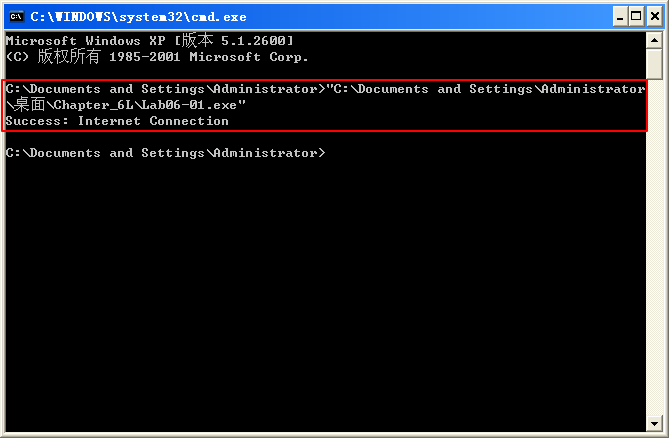
Next, we perform basic dynamic analysis on this executable. Nothing overly exciting happens when this executable is run from the command line. It simply prints “Success: Internet Connection” and then terminates.
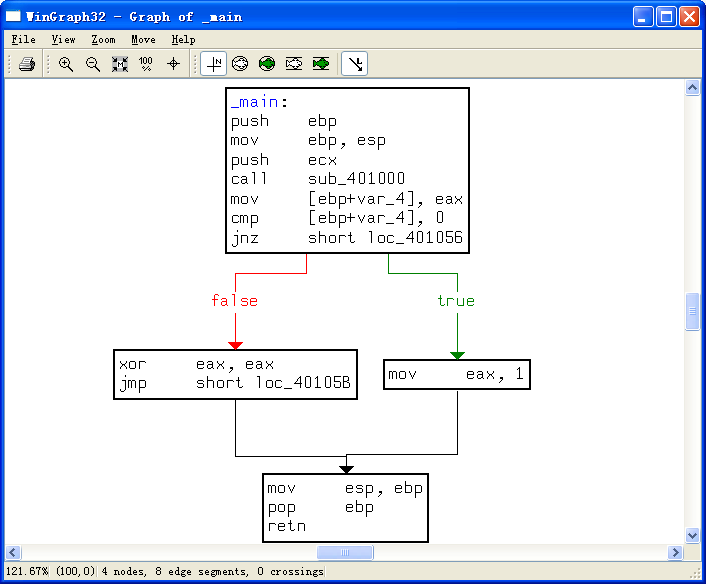
Finally, we load the file into IDA Pro for full analysis. Much of this disassembly is generated by the compiler, so we need to be careful to avoid going down rabbit holes of irrelevant code. Therefore, we start from the main function, which is typically where the code written by the malware author begins. In this case, the main function starts at 0x401040. The main function calls the function at 0x401000, which appears to be a key function of interest because it is the only one called by main. Figure 6-1L shows a flow graph of this function.
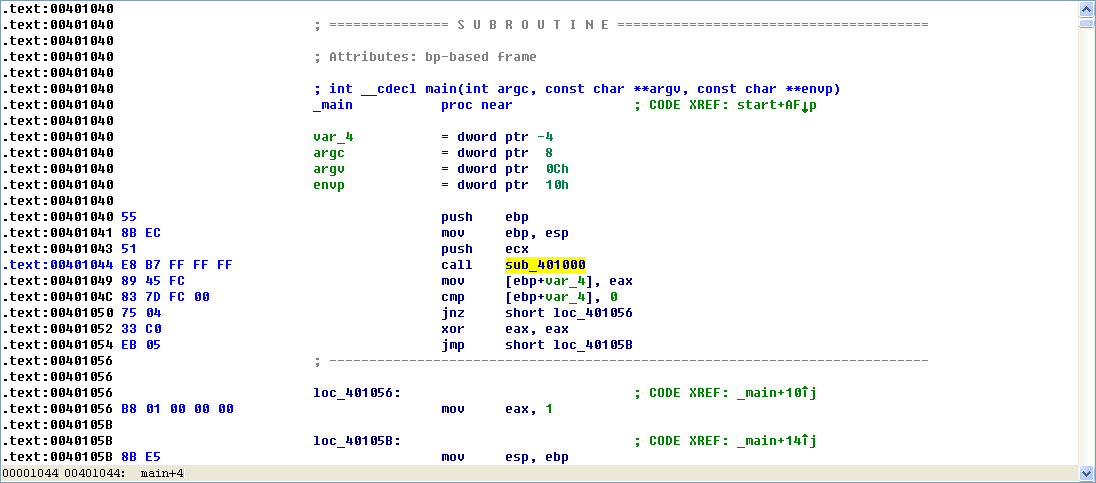
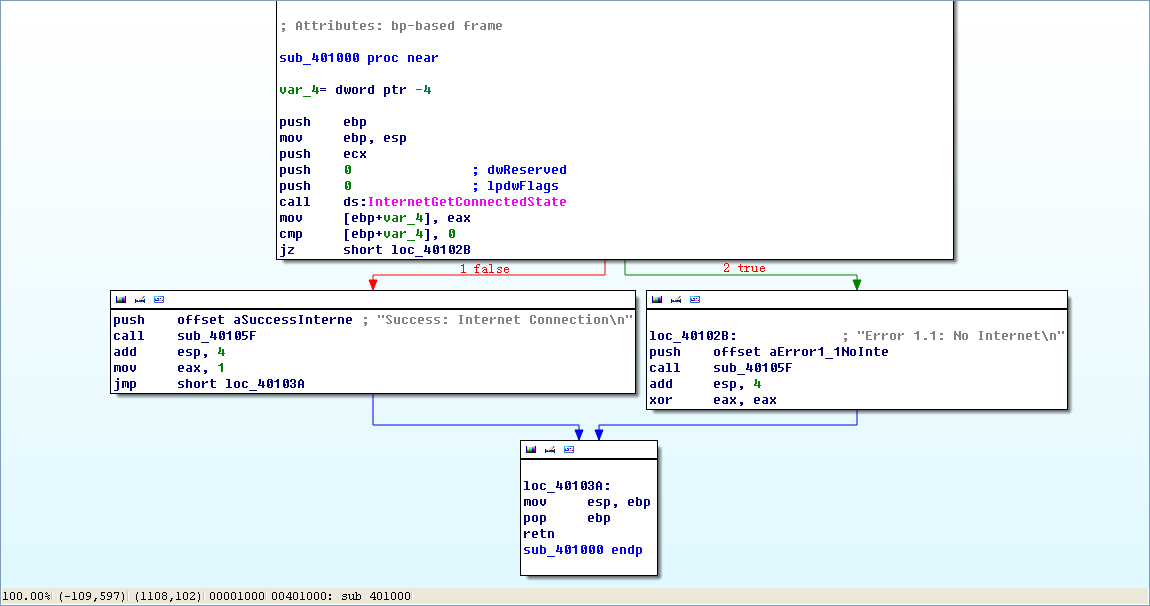
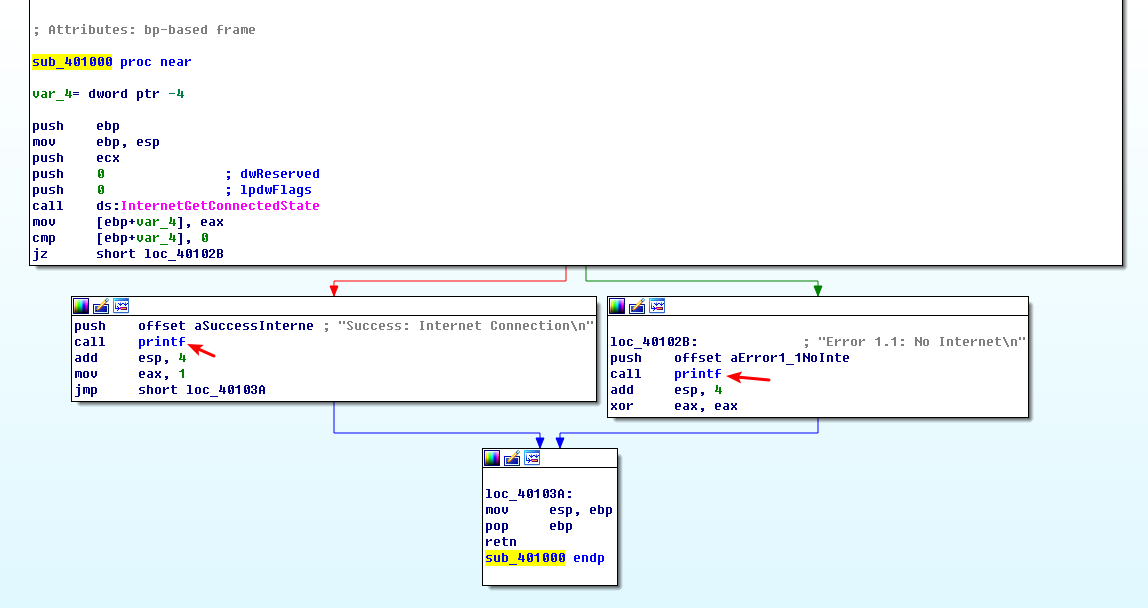
Figure 6-1L: Disassembly flow graph of the function at 0x401000
Now we graph this function in IDA Pro using View -> Graphs -> Flow chart. Looking at this graph and code, we see a common code construct: two different code paths depend on the result of the call to InternetGetConnectedState. The cmp instruction is used to compare the result contained in EAX to 0, and then the jz instruction is used to control the flow.
The MSDN page on InternetGetConnectedState further states that the function returns 1 if there is an active Internet connection; otherwise it returns 0. Therefore, the code will take the false branch at \({\color{red}1}\) if the result is 0 because the zero flag (ZF) will be clear; otherwise, it will take the true branch at \({\color{red}2}\). The code construct used in this function is an if statement.
The function calls the subroutine at 0x40105F in two locations, but if we dive into that function, we will quickly get lost in a rabbit hole. This function is printf. Surprisingly, both the IDA Pro commercial and freeware versions will not always recognize and label the printf function. Therefore, we must look for certain signals that hint at an unlabeled call to printf. One easy way to tell is by identifying parameters pushed onto the stack before the call to the subroutine. Here, in both cases, a format string is pushed onto the stack. The \n at the end of a string denotes a line feed. Also, given the context and the string itself, we can deduce that the function is printf. Therefore, we rename the function to printf, so that it is marked as such throughout the code, as shown in Figure 6-1L. Once the printf function is called, we see that EAX is set to either 1 or 0 before the function returns.
To summarize, this function checks for an active Internet connection, and then prints the result of its check, followed by returning a 1 if it is connected and 0 if it is not. Malware often performs a similar check for a valid Internet connection.
Preference
Lab 6-1的更多相关文章
- MIT 6.828 JOS学习笔记18. Lab 3.2 Part B: Page Faults, Breakpoints Exceptions, and System Calls
现在你的操作系统内核已经具备一定的异常处理能力了,在这部分实验中,我们将会进一步完善它,使它能够处理不同类型的中断/异常. Handling Page Fault 缺页中断是一个非常重要的中断,因为我 ...
- MIT 6.828 JOS学习笔记17. Lab 3.1 Part A User Environments
Introduction 在这个实验中,我们将实现操作系统的一些基本功能,来实现用户环境下的进程的正常运行.你将会加强JOS内核的功能,为它增添一些重要的数据结构,用来记录用户进程环境的一些信息:创建 ...
- MIT 6.828 JOS学习笔记16. Lab 2.2
Part 3 Kernel Address Space JOS把32位线性地址虚拟空间划分成两个部分.其中用户环境(进程运行环境)通常占据低地址的那部分,叫用户地址空间.而操作系统内核总是占据高地址的 ...
- MIT 6.828 JOS学习笔记15. Lab 2.1
Lab 2: Memory Management lab2中多出来的几个文件: inc/memlayout.h kern/pmap.c kern/pmap.h kern/kclock.h kern/k ...
- MIT 6.828 JOS学习笔记10. Lab 1 Part 3: The kernel
Lab 1 Part 3: The kernel 现在我们将开始具体讨论一下JOS内核了.就像boot loader一样,内核开始的时候也是一些汇编语句,用于设置一些东西,来保证C语言的程序能够正确的 ...
- MIT 6.828 JOS学习笔记7. Lab 1 Part 2.2: The Boot Loader
Lab 1 Part 2 The Boot Loader Loading the Kernel 我们现在可以进一步的讨论一下boot loader中的C语言的部分,即boot/main.c.但是在我们 ...
- python opencv 利用Lab空间把春天的场景改为秋天
前一段时间实现了Reinhard颜色迁移算法,感觉挺有意思的,然后在代码上随意做了一些更改,有了一些发现,把Lab通道的a通道值改为127左右,可以将绿色改为黄色,而对其他颜色的改动非常小,因此可以将 ...
- Acadia Lab 228 + Lab 222
又是一对串烧实验,布好线后非常方便就可以一起完成. 连线方案一模一样: Lab 228 数码管骰子 核心代码如下: def loop() : global cnt global btn_read,se ...
- Acadia Lab 203 + Lab 231
在做完 Lab 6 之后,惊觉选做实验缺口很大,于是遍历了一遍夏任务,找到了一条最省力的路线. 做完 Lab 6 的连线不用拆,可以接下来做以下两个实验: Lab 203 网络时钟 核心代码如下: v ...
- GJM : 【技术干货】给The Lab Renderer for Unity中地形添加阴影
感谢您的阅读.喜欢的.有用的就请大哥大嫂们高抬贵手"推荐一下"吧!你的精神支持是博主强大的写作动力以及转载收藏动力.欢迎转载! 版权声明:本文原创发表于 [请点击连接前往] ,未经 ...
随机推荐
- Shell脚本,更改Info.plist中的日期等
#!/bin/bashroot_src=$(dirname $(PWD)) bundle_name='RandomDebbot.bundle' target_path=$root_src/ecovac ...
- Junit 的Assertions的使用
import static org.hamcrest.CoreMatchers.allOf; import static org.hamcrest.CoreMatchers.anyOf; import ...
- Bootstrap3基础 navbar 导航条 简单示例
内容 参数 OS Windows 10 x64 browser Firefox 65.0.2 framework Bootstrap 3.3.7 editor ...
- utf-8并不"兼容" gb2312, gb18030
注意 utf-8 并不是 向下 兼容"gb2312 gb18030"等编码, 也并不是说, utf-8就是比 gb2312等高级的编码! 比如在terminal中, 你开始使用的 ...
- Shiro源码分析
1.入口类:AbstractAuthenticator 用户输入的登录信息经过其authenticate方法: public final AuthenticationInfo authenticate ...
- Python之Requests的高级用法
# 高级用法 本篇文档涵盖了Requests的一些更加高级的特性. ## 会话对象 会话对象让你能够跨请求保持某些参数.它也会在同一个Session实例发出的所有请求之间保持cookies. 会话对象 ...
- pyhon 之 数据类型详解
目录1.字符串2.布尔类型3.整数4.浮点数5.数字6.列表7.元组8.字典9.日期 1.字符串1.1.如何在Python中使用字符串a.使用单引号(')用单引号括起来表示字符串,例如:str='th ...
- Oracle 基础学习笔记
知识点 一.登陆数据库: 登陆数据库: sqlplus system/oracle123456 二.新建用户.授权(连接数据库.创建表.表空间.查询某用户下的表) 语法: create user [用 ...
- 51Nod—1174 区间中最大的数 线段树模版
在大佬们题解的帮助下算是看懂了线段树吧...在这mark下防一手转头就忘. #include<iostream> #include<stdio.h> using namespa ...
- windows下的安装及使用 python
出处 https://www.cnblogs.com/daysme/ - 2017-12-30 本文只讲在 vscode 中如何运行起 python - 2017-12-30 ## windows下的 ...