
android:ListView bbs Demo
我们制 作的 message_left.9.png 可以作为收到消息的背景图,那么毫无疑问你还需要再制作一张 message_right.9.png 作为发出消息的背景图。
图片都提供好了之后就可以开始编码了,首先还是编写主界面,修改 activity_main.xml
中的代码,如下所示:
<LinearLayout xmlns:android="http://schemas.android.com/apk/res/android"

    xmlns:android1="http://schemas.android.com/apk/res/android"

    android:layout_width="match_parent"

    android:layout_height="match_parent"

    android:background="#d8e0e8"

    android:orientation="vertical" >

    <ListView

        android1:id="@+id/msg_list_view"

        android1:layout_width="match_parent"

        android1:layout_height="0dp"

        android:layout_weight="1"

        android:divider="#0000"

        >

    </ListView>

    <LinearLayout

        android1:layout_width="match_parent"

        android:layout_height="wrap_content" >

        <EditText

android:id="@+id/input_text"

android:layout_width="0dp"

android:layout_height="wrap_content"

android:layout_weight="1"

android:hint="Type somthing here"

android:maxLines="2" />

        <Button

android:id="@+id/send"

android:layout_width="wrap_content"

android:layout_height="wrap_content"

android:text="Send" />

    </LinearLayout>

</LinearLayout>
这里在主界面中放置了一个 ListView 用于显示聊天的消息内容,又放置了一个 EditText 用于输入消息,还放置了一个 Button 用于发送消息。ListView 中用到了一个 android:divider 属性,它可以指定 ListView 分隔线的颜色,这里#0000 表示将分隔线设为透明色。其他用到 的所有属性都是我们之前学过的,相信你理解起来应该不费力。
然后我们来定义消息的实体类,新建 Msg,代码如下所示:
package com.example.uibestpractice;

//defined message class

public class Msg {

    //message content

    private String content;

    //message type

    private int type;

    //defined message type value

    public static final int TYPE_RECEIVE = 0;

    public static final int TYPE_SEND = 1;

    //defined constructor

    public Msg(String content , int type){

        this.content = content;

        this.type = type;

    }

    //function use to getcontent

    public String getContent(){

        return content;

    }

    //function use to gettype

    public int getType(){

        return type;

    }

}
Msg 类中只有两个字段,content 表示消息的内容,type 表示消息的类型。其中消息类型 有两个值可选,TYPE_RECEIVED 表示这是一条收到的消息,TYPE_SENT 表示这是一条发 出的消息。
接着来编写 ListView 子项的布局,新建 msg_item.xml,代码如下所示:
<?xml version="1.0" encoding="utf-8"?>

<LinearLayout xmlns:android="http://schemas.android.com/apk/res/android"

    android:layout_width="match_parent"

    android:layout_height="match_parent"

    android:orientation="vertical"

    android:padding="10dp" >

    <LinearLayout

        android:id="@+id/left_layout"

        android:layout_width="wrap_content"

        android:layout_height="wrap_content"

        android:layout_gravity="left"

        android:background="@drawable/message_left" >

        <TextView

android:id="@+id/left_msg"

android:layout_width="wrap_content"

android:layout_height="wrap_content"

android:layout_gravity="center"

android:layout_margin="10dp"

android:textColor="#fff" />

</LinearLayout>

     <LinearLayout

         android:id="@+id/right_layout"

         android:layout_width="wrap_content"

         android:layout_height="wrap_content"

         android:layout_gravity="right"

         android:background="@drawable/message_right" >

        <TextView

            android:id="@+id/right_msg"

            android:layout_width="wrap_content"

            android:layout_height="wrap_content"

            android:layout_gravity="center"

            android:layout_margin="10dp"

            android:textColor="#fff" />

</LinearLayout>

</LinearLayout>
这里我们让收到的消息居左对齐,发出的消息居右对齐,并且分别使用 message_left.9.png
和 message_right.9.png 作为背景图。你可能会有些疑虑,怎么能让收到的消息和发出的消息 都放在同一个布局里呢?不用担心,还记得我们前面学过的可见属性吗,只要稍后在代码中 根据消息的类型来决定隐藏和显示哪种消息就可以了。
接下来需要创建 ListView 的适配器类,让它继承自 ArrayAdapter,并将泛型指定为 Msg
类。新建类 MsgAdapter,代码如下所示:
package com.example.uibestpractice;

import java.util.List;

import android.content.Context;

import android.view.LayoutInflater;

import android.view.View;

import android.view.ViewGroup;

import android.widget.ArrayAdapter;

import android.widget.LinearLayout;

import android.widget.TextView;

public class MsgAdapter extends ArrayAdapter<Msg> {

    private int resourceId;

    //context,listview sub item layoutid, listview data

    public MsgAdapter(Context context, int textViewResourceId,

            List<Msg> objects) {

        super(context, textViewResourceId, objects);

        // TODO Auto-generated constructor stub

        resourceId = textViewResourceId;

    }

    @Override

    public View getView(int position, View convertView, ViewGroup parent) {

        // TODO Auto-generated method stub

        //return super.getView(position, convertView, parent);

        //get current item Msg

        Msg msg = getItem(position);

        //through LayoutInflater for current sub item  load layout;

        if(convertView == null){

            convertView = LayoutInflater.from(getContext()).inflate(resourceId, parent,false);

        }

        //though viewhoder model to optimization listview

        //get layout object

        LinearLayout leftLinearLayout = ViewHolder.get(convertView, R.id.left_layout);

        LinearLayout rightLinearLayout = ViewHolder.get(convertView, R.id.right_layout);

        //though msg object type set linearlayout is visible

        if(msg.getType() == Msg.TYPE_RECEIVE){

            //this is receive message , show left linearlayout and hide right linearlayout

            leftLinearLayout.setVisibility(View.VISIBLE);

            rightLinearLayout.setVisibility(View.GONE);

            //show receive message content

            TextView leftTextView = ViewHolder.get(convertView, R.id.left_msg);

            leftTextView.setText(msg.getContent());

        }

        else if(msg.getType() == msg.TYPE_SEND){

            //this is send message , show right linearlayout and hide right linearlayout

            leftLinearLayout.setVisibility(View.GONE);

            rightLinearLayout.setVisibility(View.VISIBLE);

            //show receive message content

            TextView rightTextView = ViewHolder.get(convertView, R.id.right_msg);

            rightTextView.setText(msg.getContent());

        }

        return convertView;

    }

}
以上代码你应该是非常熟悉了,和我们学习 ListView 那一节的代码基本是一样的,只不 过在 getView()方法中增加了对消息类型的判断。如果这条消息是收到的,则显示左边的消 息布局,如果这条消息是发出的,则显示右边的消息布局。
最后修改 MainActivity 中的代码,来为 ListView 初始化一些数据,并给发送按钮加入事 件响应,代码如下所示:
package com.example.uibestpractice;

import java.util.ArrayList;

import java.util.List;

import android.app.Activity;

import android.os.Bundle;

import android.view.View;

import android.view.Window;

import android.widget.Button;

import android.widget.EditText;

import android.widget.ListView;

public class MainActivity extends Activity {

    private List<Msg> msgList = new ArrayList<Msg>();

    private MsgAdapter msgAdapter ;

    //defined message edittext control

    private EditText editText;

    //defined send button control

    private Button sendButton;

    //defined listview control;

    private ListView listView;

    @Override

    protected void onCreate(Bundle savedInstanceState) {

        super.onCreate(savedInstanceState);

        //hide app title

        requestWindowFeature(Window.FEATURE_NO_TITLE);

        setContentView(R.layout.activity_main);

        //init message data

        initMsgs();

        //init MsgAdapter

        msgAdapter = new MsgAdapter(MainActivity.this, R.layout.msg_item, msgList);

        //get layout control

        editText = (EditText)findViewById(R.id.input_text);

        sendButton = (Button)findViewById(R.id.send);

        listView = (ListView)findViewById(R.id.msg_list_view);

        //give listview control set adapter;

        listView.setAdapter(msgAdapter);

        //set sendbutton onclick event

        sendButton.setOnClickListener(new View.OnClickListener() {

            @Override

            public void onClick(View v) {

                // TODO Auto-generated method stub

                //set listview control to show input message content

                String content = editText.getText().toString();

                //if content is not null

                if(content.length() > 0){

                    //init msg object

                    Msg msg = new Msg(content, Msg.TYPE_SEND);

                    //add msg object to msglist data

                    msgList.add(msg);

                    //if new message is send, refresh listview control

                    msgAdapter.notifyDataSetChanged();

                    //position to the listview last line

                    listView.setSelection(msgList.size());

                    //clear input text content

                    editText.setText("");

                }

            }

        });

    }

    //init message data

    private void initMsgs(){

        Msg msg1 = new Msg("Hello guy.", Msg.TYPE_RECEIVE);

        msgList.add(msg1);

        Msg msg2 = new Msg("Hello. Who is that?", Msg.TYPE_SEND);

        msgList.add(msg2);

        Msg msg3 = new Msg("This is Tom. Nice talking to you. ", Msg.TYPE_RECEIVE);

        msgList.add(msg3);

    }

}
在 initMsgs()方法中我们先初始化了几条数据用于在 ListView 中显示。然后在发送按钮
的点击事件里获取了 EditText 中的内容,如果内容不为空则创建出一个新的 Msg 对象,并把 它添加到 msgList 列表中去。之后又调用了适配器的 notifyDataSetChanged()方法,用于通知 列表的数据发生了变化,这样新增的一条消息才能够在 ListView 中显示。接着调用 ListView 的 setSelection()方法将显示的数据定位到最后一行,以保证一定可以看得到最后发出的一条 消息。最后调用 EditText 的 setText()方法将输入的内容清空。
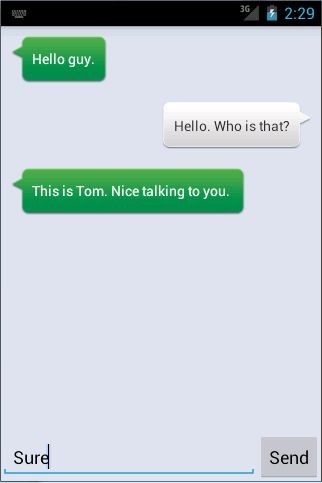
这样所有的工作就都完成了,终于可以检验一下我们的成果了,运行程序之后你将会看 到非常美观的聊天界面,并且可以输入和发送消息,如图 3.43 所示。
android:ListView bbs Demo的更多相关文章
- Android ListView分页载入(服务端+android端)Demo
Android ListView分页载入功能 在实际开发中经经常使用到,是每一个开发人员必须掌握的内容,本Demo给出了服务端+Android端的两者的代码,并成功通过了測试. 服务端使用MyEcli ...
- Android --ListView分页
参考博客:Android ListView分页加载(服务端+android端)Demo 监听OnScrollListener事件 class OnListScrollListener implemen ...
- android ListView优化
android ListView通过优化重用历史缓存实现.listview相应的数据适配器一般使用自己定义BaseAdapter子类,重用历史缓冲区来提高性能. 例如,下面的示例代码演示: 1.lis ...
- Android学习小Demo(19)利用Loader来实时接收短信
之前写过一篇文章<Android学习小Demo(13)Android中关于ContentObserver的使用>,在里面利用ContentOberver去监測短信URI内容的变化.我们先来 ...
- [置顶]
android ListView包含Checkbox滑动时状态改变
题外话: 在xamarin android的开发中基本上所有人都会遇到这个小小的坎,的确有点麻烦,当时我也折腾了好一半天,如果你能看到这篇博客,说明你和我当初也是一样的焦灼,如果你想解决掉这个小小的坎 ...
- xamarin android listview的用法
listview也许是用的非常频繁的一个控件之一,下面我写一个xamarin的listview栗子,大家尝一尝xamarin android开发的乐趣.原谅我的大小写吧. listview绑定自定义的 ...
- Android 演示 Android ListView 和 github XListView(3-3)
本文内容 环境 项目结构 演示 1:简单 XListView 演示 2:XListView + Fragment 演示 3:XListView + ViewPager + Fragment 本文三个演 ...
- Android 演示 Android ListView 和 github XListView(1-3)
本文内容 环境 项目结构 演示 1:ListView 演示 2:简单 XListView 演示 3:音乐列表 XListView 演示 4:另一个音乐列表 XListView 本文四个演示,循序渐进. ...
- TensorFlow 在android上的Demo(1)
转载时请注明出处: 修雨轩陈 系统环境说明: ------------------------------------ 操作系统 : ubunt 14.03 _ x86_64 操作系统 内存: 8GB ...
随机推荐
- Expm 4_1 多段图中的最短路径问题
[问题描述] 建立一个从源点S到终点T的多段图,设计一个动态规划算法求出从S到T的最短路径值,并输出相应的最短路径. 解 package org.xiu68.exp.exp4; public cl ...
- JDK1.5引入的concurrent包
并发是伴随着多核处理器的诞生而产生的,为了充分利用硬件资源,诞生了多线程技术.但是多线程又存在资源竞争的问题,引发了同步和互斥,并带来线程安全的问题.于是,从jdk1.5开始,引入了concurren ...
- JDBC辅助类封装 及应用
一:代码图解: 二:配置文件: driverClassName=com.mysql.jdbc.Driver url=jdbc\:mysql\://127.0.0.1\:3306/xlzj_sh_new ...
- Z-index研究 opacity和z-index一起使用
Z-index研究 opacity和z-index一起使用 关于z-index的真正问题是,很少有人理解它到底是怎么用.其实它并不复杂,但是如果你从来没有花一定时间去看具体的z-index相关文档 ...
- Laravel API 限速异常 HTTPException Too Many Attemps
最近线上 Laravel 错误日志发现了一个异常 HTTPException Too Many Attemps 而我一个同事在本地开发的过程中也频繁遇到这个异常.测试环境:Laravel 5.5. 网 ...
- java根据word模板导出word文件
1.word模板文件处理,如下图所示在word 文档中填值的地方写入占位变量 2.将word文档另存为xml文件.编辑如下图,找到填写的占位,修改为${bcrxm}格式 3.将文件后缀名改为.ftl文 ...
- WebService简介-02
WebService-面向服务编程SOA WebService-远程通信 运行效果: 1:添加服务器引用http://www.webxml.com.cn/WebServices/WeatherWebS ...
- 《剑指offer》-中序遍历下一个节点
题目描述 给定一个二叉树和其中的一个结点,请找出中序遍历顺序的下一个结点并且返回.注意,树中的结点不仅包含左右子结点,同时包含指向父结点的指针. /* struct TreeLinkNode { in ...
- HDU 4763 求最大长度的串A,使得S满足APAQA
给一个串,让你找一个子串,形如EAEBE,就是一个串在开头结尾中间各出现一次,问这个E最长是多少 Sample Input5xyabcaaaaaaabaaaxoaaaaa Sample Output0 ...
- guava常用
教程: http://www.yiibai.com/guava/ http://ifeve.com/google-guava/ optional 注意java8同样提供optional,区分 意义: ...