
ssm整合快速入门程序(二)
下面我们配置serivce层到项目中
1.service包中创建ItemsService.java接口,和service.imp包中创建一个service实现类ItemsServiceImpl.java
package cn.my.ssm.serive;

import java.util.List;

import cn.my.ssm.po.Items;

public interface ItemsService {

      List<Items> selectFind(Items items) throws Exception;

}
package cn.my.ssm.service.impl;

import java.util.List;

import org.springframework.beans.factory.annotation.Autowired;

import org.springframework.stereotype.Service;

import cn.my.ssm.mapper.ItemsMapper;

import cn.my.ssm.po.Items;

import cn.my.ssm.serive.ItemsService;

@Service

public class ItemsServiceImpl implements ItemsService {

    @Autowired

    private ItemsMapper itemDao;

    @Override

    public List<Items> selectFind(Items items) throws Exception {

        return itemDao.selectFind(items);

    }

}
2.在spring包中创建一个applicationContext-service.xml文件,为了测试我们暂时会将applicationContext-dao.xml引入到applicationContext-service.xml中
<?xml version="1.0" encoding="UTF-8"?>

<beans xmlns="http://www.springframework.org/schema/beans"

    xmlns:xsi="http://www.w3.org/2001/XMLSchema-instance" xmlns:mvc="http://www.springframework.org/schema/mvc"

    xmlns:context="http://www.springframework.org/schema/context"

    xmlns:aop="http://www.springframework.org/schema/aop" xmlns:tx="http://www.springframework.org/schema/tx"

    xsi:schemaLocation="http://www.springframework.org/schema/beans

        http://www.springframework.org/schema/beans/spring-beans-3.2.xsd

        http://www.springframework.org/schema/mvc

        http://www.springframework.org/schema/mvc/spring-mvc-3.2.xsd

        http://www.springframework.org/schema/context

        http://www.springframework.org/schema/context/spring-context-3.2.xsd

        http://www.springframework.org/schema/aop

        http://www.springframework.org/schema/aop/spring-aop-3.2.xsd

        http://www.springframework.org/schema/tx

        http://www.springframework.org/schema/tx/spring-tx-3.2.xsd ">

        <!-- service层我们使用组件扫描 -->

        <context:component-scan base-package="cn.my.ssm.service.impl"></context:component-scan>

        <!-- 1、配置事物管理器 -->

        <bean id="transactionManager" class="org.springframework.jdbc.datasource.DataSourceTransactionManager">

            <property name="dataSource" ref="dataSource"></property>

        </bean>

        <!-- 2、配置事物管理器驱动 -->

        <tx:annotation-driven transaction-manager="transactionManager"/>

        <import resource="applicationContext-dao.xml"/>

</beans>
下面测试service整合是否成功
    @Test

    public void testService() throws Exception{

        ItemsService userService = (ItemsService) context.getBean("itemsServiceImpl");

        List<Items> list = userService.selectFind(null);

        System.out.println(list);

    }

测试结果

[Items [id=1, name=台式机, price=3000.0, pic=null, createtime=Tue Oct 03 23:22:36 CST 2017, detail=该电脑质量非常好!!!!111], Items [id=2, name=笔记本, price=7000.0, pic=null, createtime=Tue Oct 03 23:23:06 CST 2017, detail=笔记本性能好,质量好!!!!!], Items [id=3, name=背包, price=1200.0, pic=null, createtime=Tue Oct 03 23:23:21 CST 2017, detail=名牌背包,容量大质量好!!!!]]
下面我们就需要整合springmvc了
首先在cn.my.ssm.controller包中创建一个ItemsController.java
package cn.my.ssm.controller;

import java.util.List;

import org.springframework.beans.factory.annotation.Autowired;

import org.springframework.stereotype.Controller;

import org.springframework.web.bind.annotation.RequestMapping;

import org.springframework.web.servlet.ModelAndView;

import cn.my.ssm.po.Items;

import cn.my.ssm.serive.ItemsService;

@Controller

@RequestMapping("/Items")

public class ItemsController {

    @Autowired

    private ItemsService itemsService;

    @RequestMapping("/queryItems")

    public ModelAndView ItemsList() throws Exception{

        ModelAndView mav = new ModelAndView();

        List<Items> itemsList = itemsService.selectFind(null);

        mav.addObject("itemsList", itemsList);

        mav.setViewName("items/itemsList");

        return mav;

    }

}
spring包中创建一个springmvc.xml文件
<?xml version="1.0" encoding="UTF-8"?>

<beans xmlns="http://www.springframework.org/schema/beans"

    xmlns:xsi="http://www.w3.org/2001/XMLSchema-instance" xmlns:p="http://www.springframework.org/schema/p"

    xmlns:context="http://www.springframework.org/schema/context"

    xmlns:mvc="http://www.springframework.org/schema/mvc"

    xsi:schemaLocation="http://www.springframework.org/schema/beans http://www.springframework.org/schema/beans/spring-beans-4.0.xsd

        http://www.springframework.org/schema/mvc http://www.springframework.org/schema/mvc/spring-mvc-4.0.xsd

        http://www.springframework.org/schema/context http://www.springframework.org/schema/context/spring-context-4.0.xsd">

       <!--  扫描组件 -->

        <context:component-scan base-package="cn.my.ssm.controller"></context:component-scan>

       <!--  配置静态资源解析器 -->

       <mvc:resources location="/js/" mapping="/js/**"/>

        <!-- 配置映射器和适配器 -->

        <mvc:annotation-driven></mvc:annotation-driven>

</beans>
创建一个jsp文件itemsList.jsp
<%@ page language="java" contentType="text/html; charset=UTF-8"

    pageEncoding="UTF-8"%>

<%@ taglib uri="http://java.sun.com/jsp/jstl/core" prefix="c" %>

<%@ taglib uri="http://java.sun.com/jsp/jstl/fmt"  prefix="fmt"%>

<!DOCTYPE html PUBLIC "-//W3C//DTD HTML 4.01 Transitional//EN" "http://www.w3.org/TR/html4/loose.dtd">

<html>

<head>

<meta http-equiv="Content-Type" content="text/html; charset=UTF-8">

<title>查询商品列表</title>

</head>

<body>

<form action="${pageContext.request.contextPath }/item/queryItem.action" method="post">

查询条件:

<table width="100%" border=1>

<tr>

<td><input type="submit" value="查询"/></td>

</tr>

</table>

商品列表:

<table width="100%" border=1>

<tr>

    <td>商品名称</td>

    <td>商品价格</td>

    <td>生产日期</td>

    <td>商品描述</td>

    <td>操作</td>

</tr>

<c:forEach items="${itemsList }" var="item">

<tr>

    <td>${item.name }</td>

    <td>${item.price }</td>

    <td><fmt:formatDate value="${item.createtime}" pattern="yyyy-MM-dd HH:mm:ss"/></td>

    <td>${item.detail }</td>

    <td><a href="${pageContext.request.contextPath }/items/editItems.action?id=${item.id}">修改</a></td>

</tr>

</c:forEach>

</table>

</form>

</body>

</html>
现在基本配置都完成了,还差最后一个web.xml里面配置了。
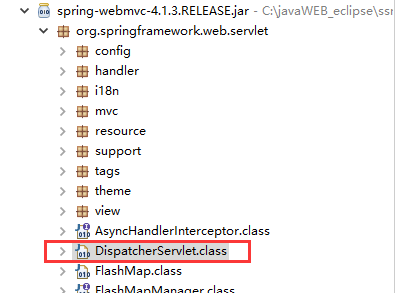
springmvc有一个前端控制器(必须要配置)和三大组件,基本上都不需要自己开发,自己开发的只有handler(controller)和视图渲染这块(jsp)
<?xml version="1.0" encoding="UTF-8"?>

<web-app xmlns:xsi="http://www.w3.org/2001/XMLSchema-instance" xmlns="http://java.sun.com/xml/ns/javaee" xsi:schemaLocation="http://java.sun.com/xml/ns/javaee http://java.sun.com/xml/ns/javaee/web-app_2_5.xsd" id="WebApp_ID" version="2.5">

  <display-name>ssm-002</display-name>

  <welcome-file-list>

    <welcome-file>index.html</welcome-file>

    <welcome-file>index.htm</welcome-file>

    <welcome-file>index.jsp</welcome-file>

    <welcome-file>default.html</welcome-file>

    <welcome-file>default.htm</welcome-file>

    <welcome-file>default.jsp</welcome-file>

  </welcome-file-list>

  <!-- 加载spring容器 -->

  <context-param>

      <param-name>contextConfigLocation</param-name>

      <param-value>/WEB-INF/classes/spring/applicationContext-*.xml</param-value>

  </context-param>

  <!-- 配置监听器 -->

  <listener>

      <listener-class>org.springframework.web.context.ContextLoaderListener</listener-class>

  </listener>

  <!-- 前端控制器 -->

  <servlet>

      <servlet-name>springmvc</servlet-name>

      <servlet-class>org.springframework.web.servlet.DispatcherServlet</servlet-class>

      <init-param>

          <param-name>contextConfigLocation</param-name>

          <param-value>classpath:spring/springmvc.xml</param-value>

      </init-param>

  </servlet>

  <!-- 拦截器 -->

  <servlet-mapping>

      <servlet-name>springmvc</servlet-name>

      <url-pattern>*.action</url-pattern>

  </servlet-mapping>

</web-app>
记住要去掉applicationContext-service.xml中引入的dao.xml文件
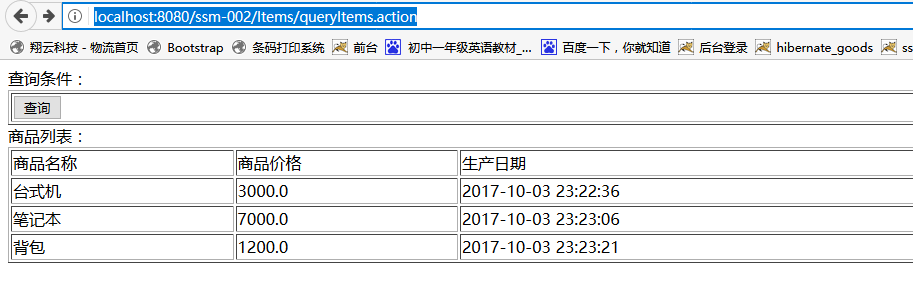
然后启动tomcat,输入地址http://localhost:8080/工程名/Items/queryItems.action,因为我只配置了.action为后缀的
运行结果
顺便提一下@RequestMapping
RequestMapping是一个用来处理请求地址映射的注解,可用于类或方法上。用于类上,表示类中的所有响应请求的方法都是以该地址作为父路径。
RequestMapping注解有六个属性value, method, consumes,produces,params,headers
value: 指定请求的实际地址,指定的地址可以是URI Template 模式(后面将会说明);
method: 指定请求的method类型, GET、POST、PUT、DELETE等;
consumes: 指定处理请求的提交内容类型(Content-Type),例如application/json, text/html;
produces: 指定返回的内容类型,仅当request请求头中的(Accept)类型中包含该指定类型才返回;
params: 指定request中必须包含某些参数值是,才让该方法处理。
headers: 指定request中必须包含某些指定的header值,才能让该方法处理请求。
如果大家有疑问的可以加群号581591235或者留言,咱们一起讨论。或者加微信群,

ssm整合快速入门程序(二)的更多相关文章
- ssm整合快速入门程序(一)
整合基础说明 spring 是一个开放源代码的设计层面框架,他解决的是业务逻辑层和其他各层的松耦合问题,因此它将面向接口的编程思想贯穿整个系统应用.Spring是于2003 年兴起的一个轻量级的Jav ...
- ssm整合快速入门程序(三)之Data类型转换器
今天就写写springmvc配置Data类型转换器 首先在创建一个转换器的包cn.my.ssm.controller.converter,创建一个CustomDateConverter类实现Conve ...
- Vue.js+vue-element搭建属于自己的后台管理模板:Vue.js快速入门(二)
Vue.js+vue-element搭建属于自己的后台管理模板:Vue.js快速入门(二) 前言 上篇文章对Vue.js有了初步理解,接下来我们把Vue.js基础语法快速的过一遍,先混个脸熟留个印象就 ...
- IDEA工具下Mybaties框架快速入门程序
本篇文章介绍在IDEA工具下mybatis快速入门程序分为以下五步 1 添加依赖包 2 编写pojo对象 3 编写映射文件 4 编写核心配置文件 5 测试框架 详细如下 建立Mod ...
- JS快速入门(二)
目录 JS快速入门(二) 结构图 BOM window对象 open() window子对象 location对象 history对象(了解) navigator 对象 screen对象 BOM 定时 ...
- MySQL快速入门(二)
目录 MySQL快速入门(二) 约束条件 自增 自增的特性 主键 外键 级联更新/删除 表与表之间的关系 外键约束 操作表方法 查询关键字 练习数据 select··from where 筛选 gro ...
- ssm框架整合快速入门
写在前面: 公司一直都是使用ssh框架(Struts2,Spring,Hibernate)来开发,但是现在外面的公司大多数都是使用的ssm框架,所以也有必要多学习一下外面的新技术.这里就快速搭建一个小 ...
- SuperSocket快速入门(二):启动程序以及相关的配置
如何快速启动第一个程序 既然是快速入门,所以,对于太深奥的知识点将不做讲解,会在后续的高级应用章节中,会对SS进行拆解.所有的实例90%都是来自SS的实例,外加本人的注释进行讲解. 一般应用而言,你只 ...
- Spring Boot 2 快速教程:WebFlux 快速入门(二)
摘要: 原创出处 https://www.bysocket.com 「公众号:泥瓦匠BYSocket 」欢迎关注和转载,保留摘要,谢谢! 02:WebFlux 快速入门实践 文章工程: JDK 1.8 ...
随机推荐
- NSData 与 NSString 的转化
1 NSString * str = @"hello, world!"; 2 NSData * data = [str dataUsingEncoding:NSUTF8String ...
- MySQL创建带有编码的数据库
mysql> create database chao default character set utf8 collate utf8_general_ci;
- display 的 32 种写法
从大的分类来讲, display的 32种写法可以分为 6个大类,再加上 1个全局类,一共是 7大类: 外部值 内部值 列表值 属性值 显示值 混合值 全局值 外部值 所谓外部值,就是说这些值只会直接 ...
- java-redis初探
一.Redis 简介 Redis 是完全开源免费的,遵守BSD协议,是一个高性能的key-value数据库. Redis 与其他 key - value 缓存产品有以下三个特点: Redis支持数据的 ...
- Js中的subStr和subString的区别
/** * Created by lonecloud on 16/9/8. */ var str="HelloWorld"; /** * 这里的两个参数第一个是从0到第几个开始第二 ...
- Windows下使用Sublime text3快速编辑Linux文件,写Shell
所需要配合的工具是WinSCP 添加完毕之后直接在目录下双击要编辑的shell脚本文件,即可弹出Sublime Text的编辑器 然后咱通过Putty看看Linux虚拟机上的文件有没有发生变化
- 如何架构一个合适的企业API网关
API Gateway(API GW / API 网关),顾名思义,是出现在系统边界上的一个面向API的.串行集中式的强管控服务,这里的边界是企业IT系统的边界,主要起到隔离外部访问与内部系统的作用. ...
- mac上搭建appium+IOS自动化测试环境(一)
阅读须知 由于OS X系统最近才开始接触,所以有些东西也不是很清楚,这里只提供方法不提供原理,能解释清楚的我也会尽量解释.可能也有一些地方说的不严谨或有错的,还望大家指点一二. 实验环境 操作系统: ...
- flask中jinjia2模板引擎详解3
接上文 模板继承 Jinji2中的模板继承是jinjia2比较强大的功能之一. 模板继承可以定义一个父级公共的模板,把同一类的模板框架定义出来共享. 这样做一方面可以提取共享代码,减少代码冗余和重复的 ...
- openstack-ocata-网络服务5
一. 网络服务概述 Networking(neutron),允许创建.插入接口设备,这些设备由其他的OpenStack服务管理.插件式的实现可以容纳不同的网络设备和软件,为OpenStack架构与部署 ...