搭建dnsmasq服务器,局域网内部解析
系统:centos6.5
公司内部需求一台dns server,解析内部域名(该域名不需要在公网上解析)
安装了"bind bind-utils"包,配置里设置转发到外部电信dns,dhcp服务设置分发dns服务为该服务器。然后解析内部很通畅,但是到外部(如百度,163,新浪)等网站很慢。
不知道是不是配置有问题,找不出。
所以就使用dnsmasq试试。
下面是安装操作步骤
===================
1,yum 安装
|
1
|
yum install dnsmasq -y |
或者源码安装
|
1
2
3
|
cd /tmp && wget http://www.thekelleys.org.uk/dnsmasq/dnsmasq-2.71.tar.gztar -zxvf dnsmasq-2.71.tar.gz && cd dnsmasq-2.71make install |
|
1
2
|
cp dnsmasq.conf.example /etc/dnsmasq.confmkdir -p /etc/dnsmasq.d #这个目录备用 |
2,dnsmasq配置
|
1
2
3
4
5
6
|
#主要有三个文件:#/etc/dnsmasq.conf#/etc/dnsmasq.d/resolv.dnsmasq.conf#/etc/dnsmasq.d/dnsmasq.hosts #第一个是系统默认必须的,后面两个可以自行建立,放置的路径也可以根据自己需要定义。 |
|
1
2
3
4
5
6
7
8
9
10
11
12
13
14
15
16
17
18
|
vi /etc/dnsmasq.conf#ITGeeker每次开启都提示错误,目的是让dnsmasq读取目录内所有配置文件#conf-dir=/etc/dnsmasq.d#让dnsmasq读取你设定的resolv-file#no-resolvresolv-file=/etc/dnsmasq.d/resolv.dnsmasq.confno-pollstrict-order#不读取系统hosts,读取你设定的no-hostsaddn-hosts=/etc/dnsmasq.d/dnsmasq.hosts#dnsmasq日志设置log-querieslog-facility=/var/log/dnsmasq.log#dnsmasq缓存设置cache-size=1024#单设置127只为本机使用,加入本机IP为内部全网使用listen-address=127.0.0.1,10.19.21.249 |
#在/etc/dnsmasq.d目录下新建2个文件
|
1
2
3
4
5
6
7
8
9
|
vi /etc/dnsmasq.d/resolv.dnsmasq.conf#nameserver 127.0.0.1 不应该添加nameserver 202.96.209.5nameserver 202.96.209.133nameserver 223.5.5.5nameserver 223.6.6.6nameserver 114.114.114.114nameserver 8.8.4.4#nameserver 8.8.8.8 |
|
1
2
|
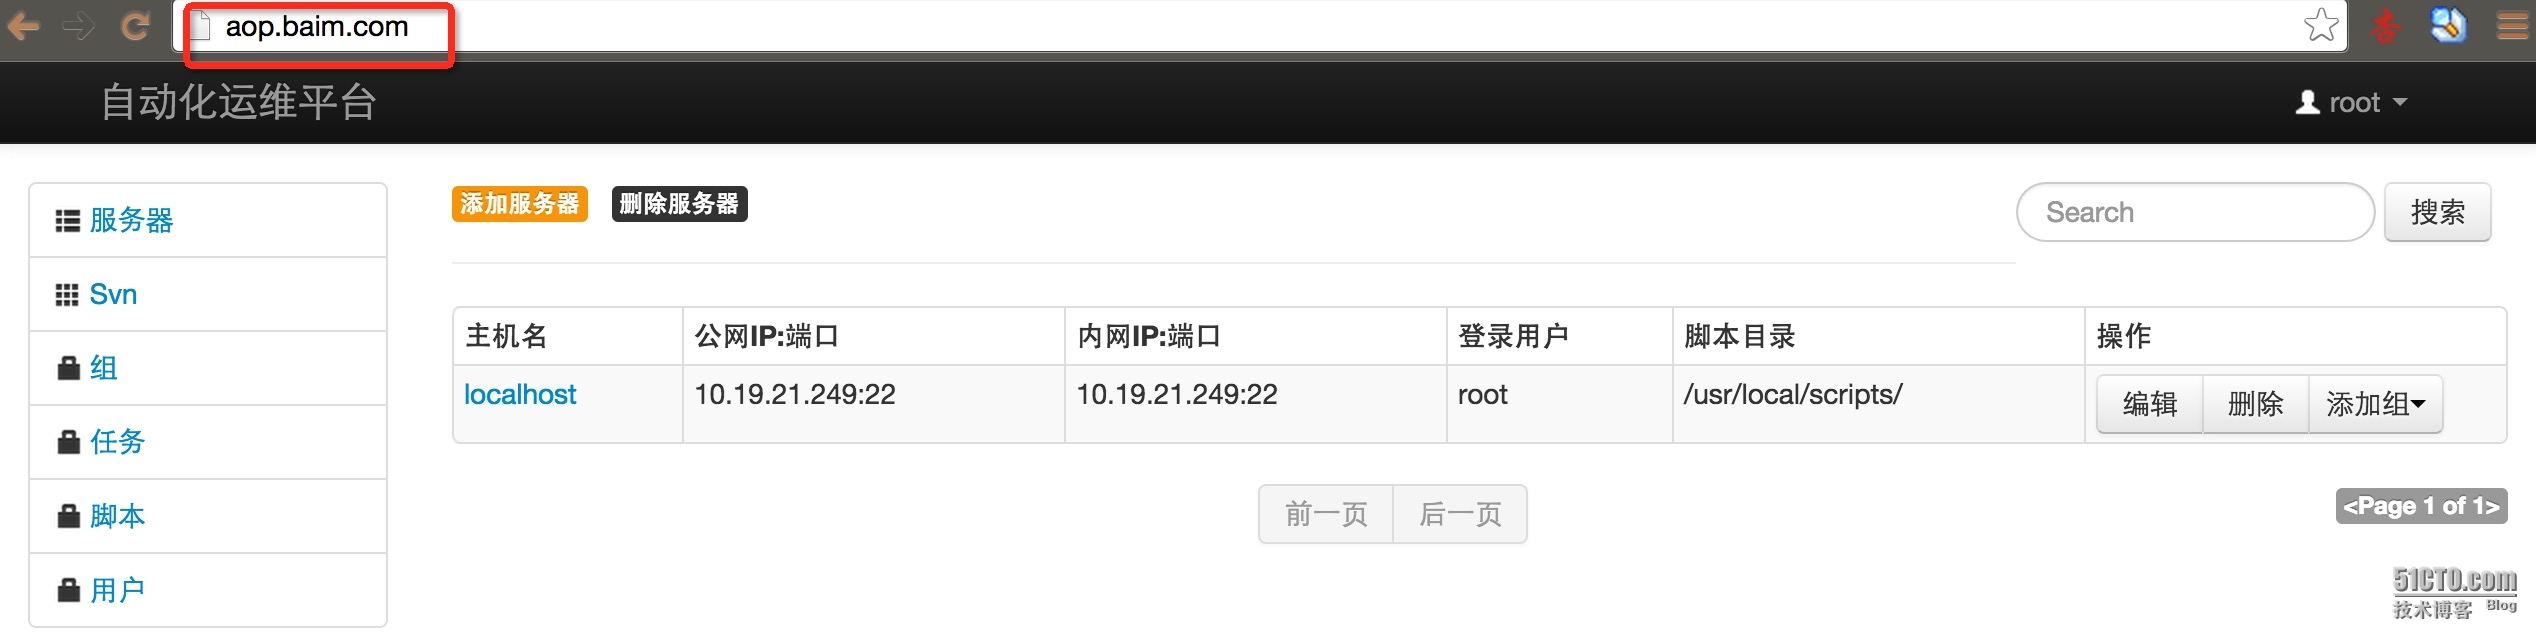
vi /etc/dnsmasq.d/dnsmasq.hosts10.19.21.249 aop.baim.com |
3,启动服务
|
1
2
3
4
5
6
7
|
/etc/init.d/dnsmasq startchkconfig dnsmasq on#如果是源码编译安装的启动: /usr/local/sbin/dnsmasq验证:netstat -tunlp|grep 53关闭:killall -KILL dnsmasq重启: pkill -9 dnsmasp && /usr/local/sbin/dnsmasq -h |
|
1
2
3
4
5
6
7
8
9
10
11
12
13
14
15
16
17
18
19
20
21
22
23
24
25
26
27
28
29
30
31
32
33
34
35
36
37
38
39
40
41
42
43
44
45
46
47
48
49
50
51
52
53
54
55
56
57
58
59
60
61
62
63
64
65
66
67
68
69
70
71
72
73
74
|
#服务启动脚本vi /etc/init.d/dnsmasq#!/bin/sh## Startup script for the <span class='wp_keywordlink_affiliate'><a href="http://itgeeker.net/tag/dns/" title="View all posts in DNS" target="_blank">DNS</a></span> caching server## chkconfig: - 49 50# description: This script starts your DNS caching server# processname: dnsmasq# pidfile: /var/run/dnsmasq# Source function library.. /etc/rc.d/init.d/functions# Source networking configuration.. /etc/sysconfig/network# Check that networking is up.[ ${NETWORKING} = "no" ] && exit 0dnsmasq=/usr/local/sbin/dnsmasq[ -f $dnsmasq ] || exit 0RETVAL=0# See how we were called.case "$1" instart)if [ $UID -ne 0 ] ; thenecho "User has insufficient privilege."exit 4fiecho -n "Starting dnsmasq: "daemon $dnsmasq $OPTIONSRETVAL=$?echo[ $RETVAL -eq 0 ] && touch /var/lock/subsys/dnsmasq;;stop)if test "x`pidof dnsmasq`" != x; thenecho -n "Shutting down dnsmasq: "killproc dnsmasqfiRETVAL=$?echo[ $RETVAL -eq 0 ] && rm -f /var/lock/subsys/dnsmasq /var/run/dnsmasq.pid;;status)status dnsmasqRETVAL=$?;;reload)echo -n "Reloading dnsmasq: "killproc dnsmasq -HUPRETVAL=$?echo;;force-reload)# new configuration takes effect only after restart$0 stop$0 startRETVAL=$?;;restart)$0 stop$0 startRETVAL=$?;;condrestart)if test "x`/sbin/pidof dnsmasq`" != x; then$0 stop$0 startRETVAL=$?fi;;*)echo "Usage: $0 {start|stop|restart|reload|condrestart|status}"exit 2esacexit $RETVAL |
|
1
2
3
4
5
6
|
#如果你是本地编辑上传的,提示找不到文件记得set ff=unix#再赋予执行的权限chmod +x /etc/init.d/dnsmasq/etc/init.d/dnsmasq startchkconfig dnsmasq on |
注:完成后需要在DHCP服务端设置DNS服务器地址,然后客户端会自动获取到该DNS地址。需要重客户端本地网络。
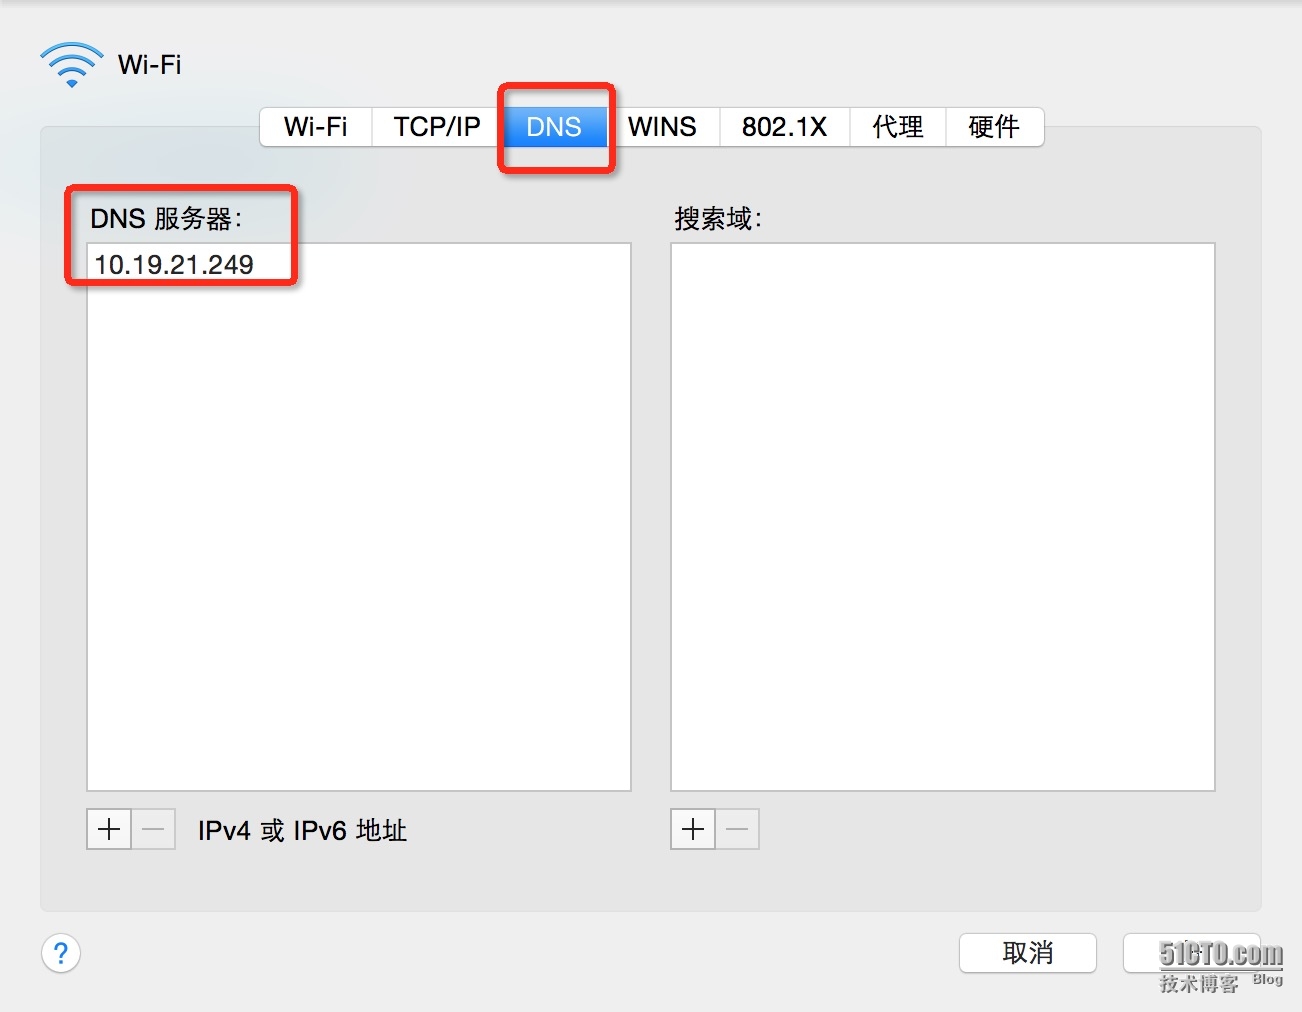
查看本地dns,是否能够获取地址。
然后访问域名,是否能够解析。
本文出自 “charlie_cen” 博客,请务必保留此出处http://charlie928.blog.51cto.com/3741218/1671914
参考文章:http://charlie928.blog.51cto.com/3741218/1671914
搭建dnsmasq服务器,局域网内部解析的更多相关文章
- 本地搭建SVN服务器 局域网
http://blog.csdn.net/sunbaigui/article/details/8466310
- 不搭建git服务器对git仓库进行局域网内共享多人合作开发项目
有时候在一个临时局域网内没有搭建git服务器,但是又想多人开发一个项目,此时只要每个人电脑安装有git客户端,参考一下方法即可尝试建一个本地化的远程仓库进行多人开发工作. 远程仓库通常只是一个裸仓库( ...
- [转]实用教程:搭建FTP服务器以实现局域网飞速传输文件
原文地址:https://www.ithome.com/html/win10/304059.htm 相信很多人都面临过这样的问题:一个局域网下有很多设备,我们想在这些设备之间互传文件,有些文件非常大, ...
- Python一秒搭建ftp服务器,帮助你在局域网共享文件【华为云技术分享】
版权声明:本文为博主原创文章,遵循CC 4.0 BY-SA版权协议,转载请附上原文出处链接和本声明. 本文链接:https://blog.csdn.net/devcloud/article/detai ...
- Python一秒搭建ftp服务器,帮助你在局域网共享文件
"老板 来碗面" "要啥面?" "内牛满面.." 最近项目上的事情弄得人心累,本来是帮着兄弟项目写套入口代码,搞着搞着就被拉着入坑了.搞开发 ...
- 搭建Minisipserve服务器实现局域网内IOS客户端idoubs的通信
idoubs是IOS设备开发的第一款全功能并开放源码的3GPP IMS客户端,它同时专为IOS平台开发设计的voIP测试版客户端,以doubango为框架,能实现当前最先进的多媒体功能,主要功能有:语 ...
- Windows Server 2003搭建邮件服务器
Windows Server 2003搭建邮件服务器 由于Windows Server 2003默认是没有安装我们搭建邮件服务器所需要的POP3和SMTP服务的,因此需要我们自己来安装.方法如下: 1 ...
- 自己家里搭建NAS服务器有什么好方案?
转自:https://www.zhihu.com/question/21359049 作者:陈二发链接:https://www.zhihu.com/question/21359049/answer/6 ...
- 绕过校园网的共享限制 win10搭建VPN服务器实现--从入门到放弃
一.开篇立论= =.. 上次说到博主在电脑上搭建了代理服务器来绕过天翼客户端的共享限制,然而经过实际测试还不够完美,所以本着生命不息,折腾不止的精神,我又开始研究搭建vpn服务器= =... (上次的 ...
随机推荐
- WdatePicker设置时间区间时,对开始时间和结束时间限制
<input id="startDate" name="startDate" type="text" readonly=" ...
- 关于Vue的各个UI框架(elementUI、mint-ui、VUX)
elementUI 官网:http://element.eleme.io/ 使用步骤: 1.安装完vue-cli后,再安装 element-ui 命令行:npm i element-ui -D 相当于 ...
- 一步步部署基于Windows系统的Jenkins持续集成环境
如题:本文将介绍如何在Windows环境下运用Jenkins部署持续集成环境.之所以写本文,是因为在最近工作当中,学习使用Jenkins时,确实遇到了一些问题,而大多数教程文档都是基于Mac或是Lin ...
- NSDate的常用用法
1. 创建或初始化可用以下方法 用于创建NSDate实例的类方法有 + (id)date; 返回当前时间 + (id)dateWithTimeIntervalSinceNow:(NSTimeInter ...
- jquery 导出Excel表格
仅在 table 中应用过!适用于导出简单的excel <script type="text/javascript" src="jquery.table2excel ...
- Web Magic 总体架构
1.2 总体架构 WebMagic的结构分为Downloader.PageProcessor.Scheduler.Pipeline四大组件,并由Spider将它们彼此组织起来.这四大组件对应爬虫生命周 ...
- MS SQL 日志记录管理
MS SQL的日志信息/日志记录,可能对你来说,既熟悉又陌生,熟悉是因为你可能一直都在使用,查看.关注一些日志信息/记录,例如,作业历史记录:陌生是因为你可能从不关注日志信息/记录的管理,这里我一直用 ...
- Hibernate (三)
1 一对多的单向 示例:一个已经存在的学生,新建一个班级,然后将该学生加入到该班级之下 设置inverse="false" <?xml version="1.0&q ...
- Matlab产生TestBeach所需要的波形数据
在用vivado仿真的时候,很多情况下需要自己产生波形来代替AD采样波形.以前的做法都是用DDS内部产生所需要的波形来模仿外部输入,后来发现这种做法不仅麻烦,而且不易修改,对仿真很不友好.于是改用ma ...
- CURL模拟post请求上传文件
贴一段醍醐灌顶的话: 逻辑很简单,设置POST变量$post_data,其中upload指向需要发送的文件.这里要注意,我们之前使用POST都是发送一个字符串,然后在服务器端使用file_get_co ...