
4.React生命周期
4.React生命周期
4.1引出生命周期
    class Life extends React.Component {

        state = {

            opacity:0.5

        }

        death = () => {

            // 卸载定时器

            // clearInterval(this.timer)

            // 卸载组件

            ReactDOM.unmountComponentAtNode(document.getElementById('test'))

        }

        // 生命周期钩子函数

        // 组件挂载完调用

        componentDidMount(){

            this.timer = setInterval(()=>{

                // 获取原状态

                let {opacity} = this.state

                // 减小0.1

                opacity -= 0.1

                // 设置新的透明度

                if (opacity <= 0) opacity = 1

                this.setState({opacity})

            }, 200)

        }

        // 组件将要卸载操作

        componentWillUnmount(){

            // 卸载定时器

            clearInterval(this.timer)

        }

        render(){

            return (

                <div>

                    <h2 style={{opacity: this.state.opacity}}>yeyang is da hanbi</h2>

                    <button onClick={this.death}>don't life</button>

                </div>

            )

        }

    }
4.2 react生命周期(旧)(17.0版本之前)
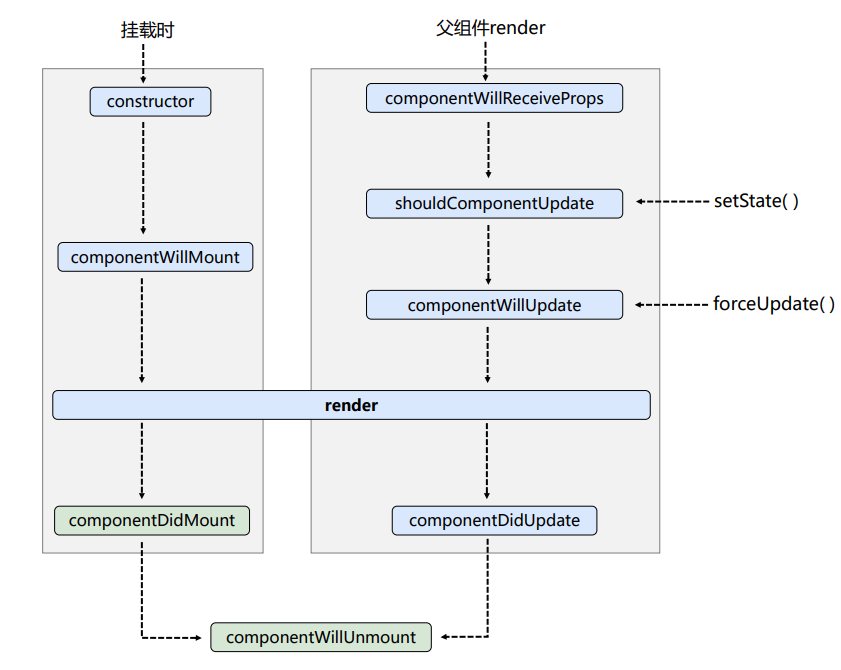
    /*

    1. 初始化阶段: 由ReactDOM.render()触发---初次渲染

        1.	constructor()

        2.	componentWillMount()

        3.	render()

        4.	componentDidMount() ====> 常用

                ---  一般在这个钩子做一些初始化的事,例如:开启定时器,发送网络请求,订阅消息

	2. 更新阶段: 由组件内部this.setSate()或父组件重新render触发

        1.	shouldComponentUpdate()

        2.	componentWillUpdate()

        3.	render()  ====>  必须使用的一个

        4.	componentDidUpdate()

	3. 卸载组件: 由ReactDOM.unmountComponentAtNode()触发

        1.	componentWillUnmount() ====> 常用

                ----  一般在这个钩子中做一些收尾的事,如关闭定时器、取消订阅消息

     */

    class Count extends React.Component {

        constructor(props) {

            console.log('Count---constructor')

            super(props);

            this.state = {

                count: 0

            }

        }

        // state = {

        //     count: 0

        // }

        add = () => {

            const {count} = this.state

            this.setState({

                count: count+1

            })

        }

        death = () => {

            ReactDOM.unmountComponentAtNode(document.getElementById('test'))

        }

        force = () => {

            this.forceUpdate()  // 强制更新钩子

        }

        // 组件将要挂载的钩子

        componentWillMount(){

            console.log('Count---componentWillMount')

        }

        // 组件挂载完成的钩子

        componentDidMount(){

            console.log('Count---componentDidMount')

        }

        // 组件将要卸载时的钩子

        componentWillUnmount(){

            console.log('Count---componentWillUnmount')

        }

        // 控制组件更新的阀门: 是否更新组件钩子

        shouldComponentUpdate(){

            console.log('Count---shouldComponentUpdate')

            return true

        }

        // 组件将要更新的钩子

        componentWillUpdate(){

            console.log('Count---componentWillUpdate')

        }

        // 组件更新完的钩子

        componentDidUpdate(){

            console.log('Count---componentDidUpdate')

        }

        render(){

            console.log('Count---render')

            const {count} = this.state

            return (

                <div>

                    <h2> 当前求和为{count}</h2>

                    <button onClick={this.add}>点我+1</button>

                    <button onClick={this.death}>卸载组件</button>

                    <button onClick={this.force}>强制更新</button>

                </div>

            )

        }

    }

    // 父组件A

    class A extends React.Component{

        state = {

            carName: 'benz'

        }

        changeCar = () => {

             this.setState({

                 carName: 'bmw'

             })

        }

        render(){

            return (

                <div>

                  <div>我是A组件</div>

                    <button onClick={this.changeCar}>换车</button>

                    <B carName={this.state.carName}/>

                </div>

            )

        }

    }

    // 子组件B

    class B extends React.Component{

        // 组件将要接收新的props的钩子

        componentWillReceiveProps(props){

            console.log('B---componentWillReceiveProps', props)

        }

        shouldComponentUpdate(){

            console.log('B---shouldComponentUpdate')

            return true

        }

        // 组件将要更新的钩子

        componentWillUpdate(){

            console.log('B---componentWillUpdate')

        }

        // 组件更新完的钩子

        componentDidUpdate(){

            console.log('B---componentDidUpdate')

        }

        render(){

            return (

                <div>

                     我是B组件, 接收的车是:{this.props.carName}

                </div>

            )

        }

    }

    // ReactDOM.render(<Count />, document.getElementById('test'))

    ReactDOM.render(<A />, document.getElementById('test'))
4.3 react生命周期(新)(17.0版本之后)
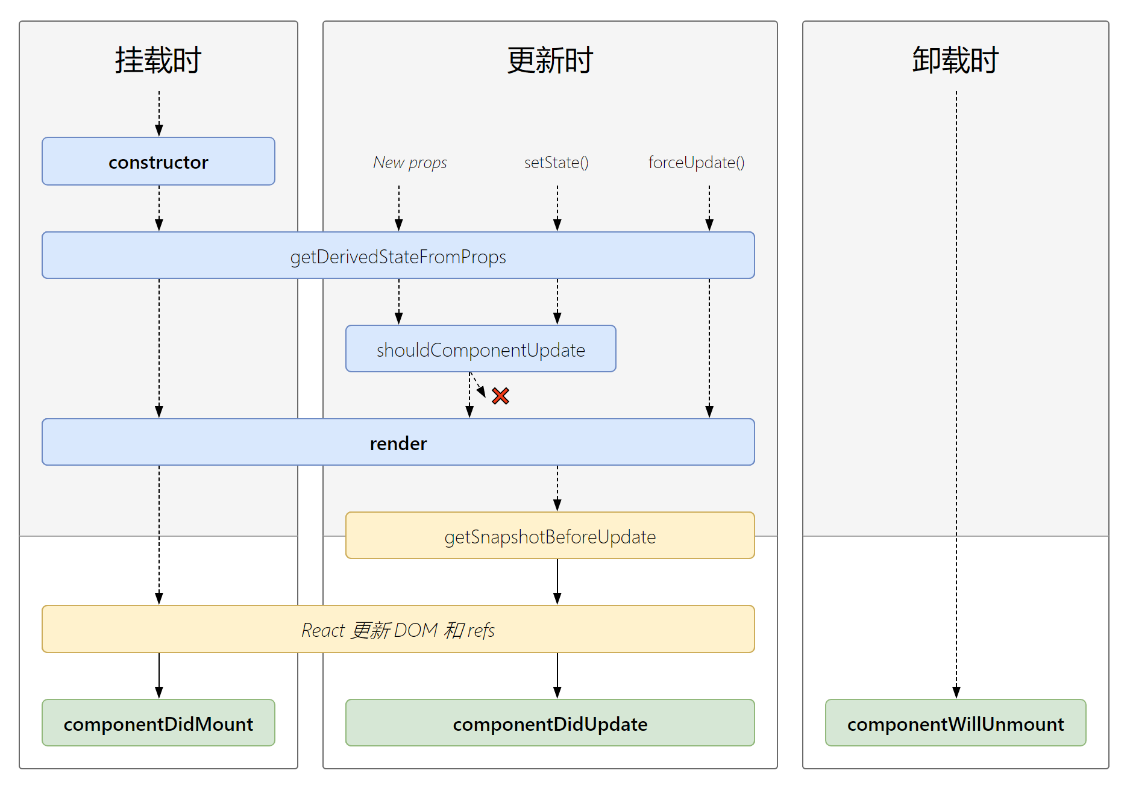
    /*

    1. 初始化阶段: 由ReactDOM.render()触发---初次渲染

        1.	constructor()

        2.	getDerivedStateFromProps

        3.	render()

        4.	componentDidMount()

	2. 更新阶段: 由组件内部this.setSate()或父组件重新render触发

        1.	getDerivedStateFromProps

        2.	shouldComponentUpdate()

        3.	render()

        4.	getSnapshotBeforeUpdate

        5.	componentDidUpdate()

	3. 卸载组件: 由ReactDOM.unmountComponentAtNode()触发

        1.	componentWillUnmount()

    */

    class Count extends React.Component {

        constructor(props) {

            console.log('Count---constructor')

            super(props);

            this.state = {

                count: 0

            }

        }

        // state = {

        //     count: 0

        // }

        add = () => {

            const {count} = this.state

            this.setState({

                count: count+1

            })

        }

        death = () => {

            ReactDOM.unmountComponentAtNode(document.getElementById('test'))

        }

        force = () => {

            this.forceUpdate()  // 强制更新钩子

        }

        // 若state的值在任何时候都取决于props,可以使用该方法

        static getDerivedStateFromProps(props ,state){

            console.log('Count---getDerivedStateFromProps', props, state)

            return null   // 返回 state对象或者null

        }

        // 在更新之前获取快照

        getSnapshotBeforeUpdate(){

            console.log('Count---getSnapshotBeforeUpdate')

            return 'abc'

        }

        // 组件挂载完成的钩子

        componentDidMount(){

            console.log('Count---componentDidMount')

        }

        // 组件将要卸载时的钩子

        componentWillUnmount(){

            console.log('Count---componentWillUnmount')

        }

        // 控制组件更新的阀门: 是否更新组件钩子

        shouldComponentUpdate(){

            console.log('Count---shouldComponentUpdate')

            return true

        }

        // 组件更新完的钩子

        componentDidUpdate(preProps, preState, snapshotValue){

            console.log('Count---componentDidUpdate', preProps, preState, snapshotValue)

        }

        render(){

            console.log('Count---render')

            const {count} = this.state

            return (

                <div>

                    <h2> 当前求和为{count}</h2>

                    <button onClick={this.add}>点我+1</button>

                    <button onClick={this.death}>卸载组件</button>

                    <button onClick={this.force}>强制更新</button>

                </div>

            )

        }

    }

    ReactDOM.render(<Count count={199}/>, document.getElementById('test'))
4.4 getSnapshotBeforeUpdate使用场景
拖动滚动条让滚动条停留在当前数据位置
    class NewList extends React.Component {

        state = {

            newsArr: []

        }

        componentDidMount() {

            setInterval(() => {

                // 获取原状态

                const {newsArr} = this.state

                // 模拟一条新闻

                const news = '新闻' + (newsArr.length + 1)

                // 更新状态

                this.setState({

                    newsArr: [news, ...newsArr]

                })

            }, 1000)

        }

        getSnapshotBeforeUpdate() {

            return this.refs.list.scrollHeight

        }

        componentDidUpdate(preProps, preState, height) {

            console.log(preProps, preState, height)

            console.log(this.refs.list.scrollTop) // 当前距离滚动条顶端的距离

            this.refs.list.scrollTop += (this.refs.list.scrollHeight - height)

            // this.refs.list.scrollTop += 30

        }

        render() {

            console.log('NewList---render')

            const {newsArr} = this.state

            return (

                <div className="list" ref='list'>

                    {

                        newsArr.map((n, index) => {

                            return <div key={index} className="news">{n}</div>

                        })

                    }

                </div>

            )

        }

    }

    ReactDOM.render(<NewList/>, document.getElementById('test'))
4.React生命周期的更多相关文章
- React生命周期
在react生命周期中,分2段执行,一个挂载的生命周期,一个是组件发生了数据变动,或者事件触发而引发的更新生命周期. 注:react生命周期很重要,对于很多组件场景的应用发挥重要作用,而且不熟悉生命周 ...
- React 生命周期
前言 学习React,生命周期很重要,我们了解完生命周期的各个组件,对写高性能组件会有很大的帮助. Ract生命周期 React 生命周期分为三种状态 1. 初始化 2.更新 3.销毁 初始化 1.g ...
- React生命周期详解
React生命周期图解: 一.旧版图解: 二.新版图解: 从图中,我们可以清楚知道React的生命周期分为三个部分: 实例化.存在期和销毁时. 旧版生命周期如果要开启async rendering, ...
- React生命周期简单详细理解
前言 学习React,生命周期很重要,我们了解完生命周期的各个组件,对写高性能组件会有很大的帮助. Ract生命周期 React 生命周期分为三种状态 1. 初始化 2.更新 3.销毁 初始化 1.g ...
- 22.1 、react生命周期(一)
在每个react组件中都有以下几个生命周期方法~我们需要在不同阶段进行讨论 组件生命周期概述 1.初始化 在组件初始化阶段会执行 constructor static getDerivedStateF ...
- react 生命周期钩子里不要写逻辑,否则不生效
react 生命周期钩子里不要写逻辑,否则不生效,要把逻辑写在函数里,然后在钩子里调用函数,否则会出现问题.
- react复习总结(2)--react生命周期和组件通信
这是react项目复习总结第二讲, 第一讲:https://www.cnblogs.com/wuhairui/p/10367620.html 首先我们来学习下react的生命周期(钩子)函数. 什么是 ...
- React生命周期执行顺序详解
文章内容转载于https://www.cnblogs.com/faith3/p/9216165.html 一.组件生命周期的执行次数是什么样子的??? 只执行一次: constructor.compo ...
- vue生命周期和react生命周期对比
一 vue的生命周期如下图所示(很清晰)初始化.编译.更新.销毁 二 vue生命周期的栗子 注意触发vue的created事件以后,this便指向vue实例,这点很重要 <!DOCTYPE ht ...
- react生命周期知识点
react生命周期知识点 一个React组件的生命周期分为三个部分:实例化.存在期和销毁时. 实例化 组件在客户端被实例化,第一次被创建时,以下方法依次被调用: 1.getDefaultProps2. ...
随机推荐
- 我眼中的java线程池实现原理
最近在看java线程池实现方面的源码,在此做个小结,因为网上关于线程池源码分析的博客挺多的,我也不打算重复造轮子啦,仅仅用纯语言描述的方式做做总结啦! 个人认为要想理解清楚java线程池实现原理,明白 ...
- C#曲线分析平台的制作(三,三层构架+echarts显示)
本文依据CSDN另一位网友关于三层构架的简单搭建,基于他的源码进行修改.实现了三层构架合理结构,以及从数据库中传递数值在echarts显示的实验目的. 废话不多说,show me codes: 具体构 ...
- 用AutoHotkey的热字串功能启动常用电脑程序软件 Version 2 Build 20191214
; 用AutoHotkey的热字串功能启动常用电脑程序软件 Version 2 Build 20191214 ; 电脑上的快捷键太多了,记都记不住,容易冲突和搞混,所以做了个热字串启动; 用法:运行此 ...
- 用 Java 实现常见的 8 种内部排序算法
一.插入类排序 插入类排序就是在一个有序的序列中,插入一个新的关键字.从而达到新的有序序列.插入排序一般有直接插入排序.折半插入排序和希尔排序. 1. 插入排序 1.1 直接插入排序 /** * 直接 ...
- PaddlePaddle之猫狗大战(本地数据集)
新手入门PaddlePaddle的一个简单Demo--猫狗大战 主要目的在于整体了解PP用卷积做图像分类的流程,以及最最重要的掌握自定义数据集的读取方式 猫狗数据集是从网络上下载到工作目录的. 本项目 ...
- Using Evernote with Wine on Mint
Install Evernote Install Evernote in Wine: wine Evernote_xxx.exe; Backup Evernote Database File Loca ...
- Spring学习03(Bean的自动装配)
6.Bean的自动装配 6.1 自动装配说明 自动装配是使用spring满足bean依赖的一种方法 spring会在应用上下文中为某个bean寻找其依赖的bean. Spring中bean的三种装配机 ...
- CF上部分树形DP练习题
本次 5 道题均来自Codeforce 关于树形DP的算法讲解:Here 791D. Bear and Tree Jumps 如果小熊每次能跳跃的距离为1,那么问题变为求树上任意两点之间距离之和. 对 ...
- Razor Pages
学习Razor Pages笔记 学习内容:https://learnrazorpages.com Razor页面都是以.cshtml结尾,其中内容页面必须具有以下三个特征: 1,文件名首位不能是下划线 ...
- 带头撸抽奖系统,DDD + RPC 开发分布式架构!
作者:小傅哥 博客:https://bugstack.cn 沉淀.分享.成长,让自己和他人都能有所收获! 一.咋,撸个项目? 总有粉丝伙伴问傅哥,有没有能上手练习技术的项目,现在学了这么多技术知识.看 ...