
微信小程序自定义导航栏组件
1.首先,要在json文件中设置为自定义的形式
"navigationStyle": "custom"
2.计算相关值
导航栏分为状态栏和标题栏,只要能算出每台手机的导航栏高度问题就迎刃而解
- 导航栏高度 = 胶囊按钮高度 + 状态栏到胶囊按钮间距 * 2 + 状态栏高度
注:由于胶囊按钮是原生组件,为表现一致,其单位在各种手机中都为 px,所以我们自定义导航栏的单位都必需是 px(切记不能用 rpx),才能完美适配。
因为在不同的手机型号头部那条栏目高度可能不一致,所以为了我们适配更多型号,我们需要计算3个值:
如下图:

1. 整个导航栏的高度;
2. 胶囊按钮与顶部的距离;
3. 胶囊按钮与右侧的距离。
小程序可以通过 wx.getMenuButtonBoundingClientRect() 获取胶囊按钮的信息 和 wx.getSystemInfo() 获取设备信息。
如下图:
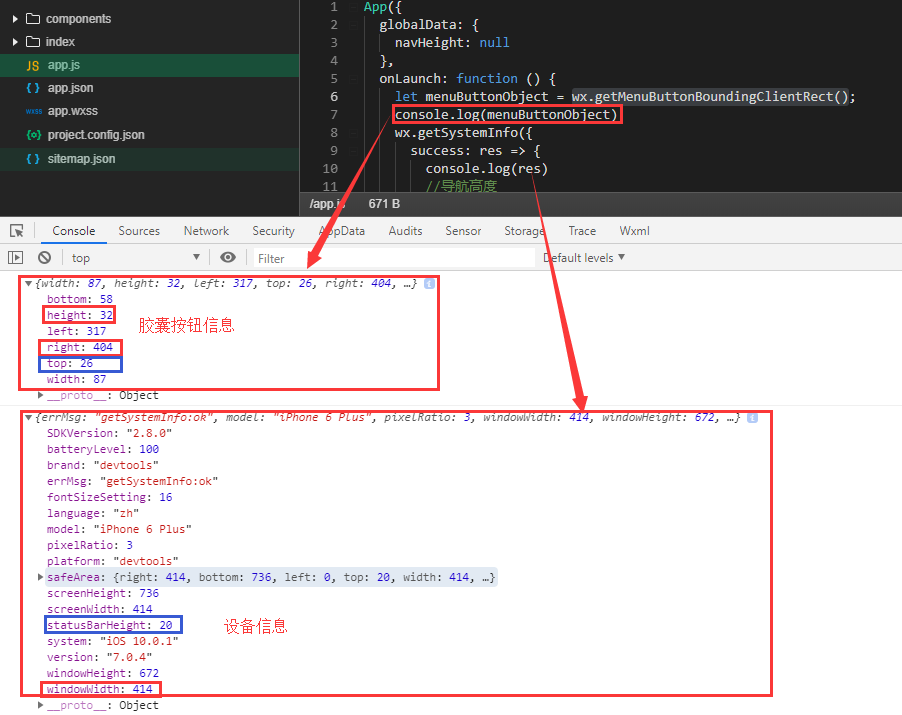
通过这些信息我们可以计算出上面说的3个值:
1. 整个导航栏高度 = statausBarHeight + height + (top-statausBarHeight )*2;
2. 胶囊按钮与顶部的距离 = top;
3.胶囊按钮与右侧的距离 = windowWidth - right。
现在我们明白了原理,可以利用胶囊按钮的位置信息和 statusBarHeight 高度动态计算导航栏的高度,贴一个实现此功能最重要的方法
let systemInfo = wx.getSystemInfoSync();

let rect = wx.getMenuButtonBoundingClientRect ? wx.getMenuButtonBoundingClientRect() : null; //胶囊按钮位置信息

    wx.getMenuButtonBoundingClientRect();

    let navBarHeight = (function() { //导航栏高度

            let gap = rect.top - systemInfo.statusBarHeight; //动态计算每台手机状态栏到胶囊按钮间距

            return 2 * gap + rect.height;

          })();
gap 信息就是不同的手机其状态栏到胶囊按钮间距,具体更多代码实现和使用 demo 请移步下方代码仓库,代码中还会有输入框文字跳动解决办法,安卓手机输入框文字飞出解决办法,左侧按钮边框太粗解决办法等等
App.js 代码如下:
App({

  globalData: {

  },

  onLaunch: function () {

    let menuButtonObject = wx.getMenuButtonBoundingClientRect();

    wx.getSystemInfo({

      success: res => {

        let statusBarHeight = res.statusBarHeight,

          navTop = menuButtonObject.top,//胶囊按钮与顶部的距离

          navHeight = statusBarHeight + menuButtonObject.height + (menuButtonObject.top - statusBarHeight)*2;//导航高度

        this.globalData.navHeight = navHeight;

        this.globalData.navTop = navTop;

        this.globalData.windowHeight = res.windowHeight;

      },

      fail(err) {

        console.log(err);

      }

    })

  }

})
3.因为这个头部导航是公共的,所以我们最好把它设置成一个组件,命名为navbar
index.wxml
<view class="navbar custom-class" style='height:{{navHeight}}px;background-color:{{bgColor}}'>

  <view wx:if="{{showNav}}" class="navbar-action-wrap navbar-action-group row item-center" style='top:{{navTop}}px;background-color:rgba(255,255,255,.6)'>

      <ss-icon name="back" color="{{iconColor}}" size="15px" block="{{true}}" class="navbar-action_item" bind:click="_navBack"></ss-icon>

      <ss-icon name="index" color="{{iconColor}}" size="15px" block="{{true}}" class="navbar-action_item last" bind:click="_toIndex"></ss-icon>

  </view>

  <view class='navbar-title' style='top:{{navTop}}px'>

    {{pageName}}

  </view>

</view>
index.js:
// components/navbar/index.js

const App = getApp();

Component({

  options: {

    addGlobalClass: true,

  },

  /**

   * 组件的属性列表

   */

  properties: {

    pageName:String,

    showNav:{

      type:Boolean,

      value:true

    },

    showHome: {

      type: Boolean,

      value: true

    }

  },

  /**

   * 组件的初始数据

   */

  data: {

  },

  lifetimes: {

    attached: function () {

      this.setData({

        navH: App.globalData.navHeight

      })

     }

  },

  /**

   * 组件的方法列表

   */

  methods: {

    //回退

    navBack: function () {

        wx.navigateBack({

          delta: 1

        })

    },

    //回主页

    toIndex: function () {

      wx.navigateTo({

        url: '/pages/admin/home/index/index'

      })

    },

  }

})
index.wxss:
/* components/navbar/index.wxss */

.navbar {

  width: 100%;

  overflow: hidden;

  position: relative;

  top: 0;

  left: 0;

  z-index: 10;

  flex-shrink: 0;

}

.navbar-title {

  width: 100%;

  box-sizing: border-box;

  padding-left: 115px;

  padding-right: 115px;

  height: 32px;

  line-height: 32px;

  text-align: center;

  position: absolute;

  left: 0;

  z-index: 10;

  color: #333;

  font-size: 16px;

  font-weight: bold;

  text-overflow: ellipsis;

  overflow: hidden;

  white-space: nowrap;

}

.navbar-action-wrap {

  display: -webkit-flex;

  display: flex;

  -webkit-box-align: center;

  -ms-flex-align: center;

  -webkit-align-items: center;

  align-items: center;

  position: absolute;

  left: 10px;

  z-index: 11;

  line-height: 1;

  padding-top: 4px;

  padding-bottom: 4px;

}

.navbar-action-group {

  border: 1px solid #f0f0f0;

  border-radius: 20px;

  overflow: hidden;

}

.navbar-action_item {

  padding: 3px 0;

  color: #333;

}

.navbar-action-group .navbar-action_item {

  border-right: 1px solid #f0f0f0;

  padding: 3px 14px;

}

.navbar-action-group .last {

  border-right: none;

}
index.json:
{

  "component": true,

  "usingComponents": {

    "ss-icon": "../icon/index"

  }

}
组件已创建完毕,现在说下该组件的使用方法:
假设我们需要在index.wxml中需要调用这个组件,
1.在index.json中引用该组件:
{

  "usingComponents": {

    "navbar": "/components/navbar/index"

  }

}
2.在index.wxml中使用该组件:
<view class='view-page'>

  <navbar page-name="你当前页面的名字"></navbar>

  <view class='page-content'>

    <!--这里放你的内容-->

  </view>

</view>
最后的结果如下图所示:

3.参数说明

胶囊信息报错和获取不到
问题就在于 getMenuButtonBoundingClientRect 这个方法,在某些机子和环境下会报错或者获取不到,对于此种情况完美可以模拟一个胶囊位置出来
try {

  rect = Taro.getMenuButtonBoundingClientRect ? Taro.getMenuButtonBoundingClientRect() : null;

  if (rect === null) {

    throw 'getMenuButtonBoundingClientRect error';

  }

  //取值为0的情况

  if (!rect.width) {

    throw 'getMenuButtonBoundingClientRect error';

  }

  //取值为0的情况

  if (!rect.width) {

    throw 'getMenuButtonBoundingClientRect error';

  }

} catch (error) {

  let gap = ''; //胶囊按钮上下间距 使导航内容居中

  let width = 96; //胶囊的宽度,android大部分96,ios为88

  if (systemInfo.platform === 'android') {

    gap = 8;

    width = 96;

  } else if (systemInfo.platform === 'devtools') {

    if (ios) {

      gap = 5.5; //开发工具中ios手机

    } else {

      gap = 7.5; //开发工具中android和其他手机

    }

  } else {

    gap = 4;

    width = 88;

  }

  if (!systemInfo.statusBarHeight) {

    //开启wifi的情况下修复statusBarHeight值获取不到

    systemInfo.statusBarHeight = systemInfo.screenHeight - systemInfo.windowHeight - 20;

  }

  rect = {

    //获取不到胶囊信息就自定义重置一个

    bottom: systemInfo.statusBarHeight + gap + 32,

    height: 32,

    left: systemInfo.windowWidth - width - 10,

    right: systemInfo.windowWidth - 10,

    top: systemInfo.statusBarHeight + gap,

    width: width

  };

  console.log('error', error);

  console.log('rect', rect);

}
还有一种写法是胶囊按钮那部分的高度设置为40,导航栏的高度用动态的头加上40
参考1: https://www.cnblogs.com/sese/p/9761713.html
参考2: https://juejin.im/post/6844903916963004423
微信小程序自定义导航栏组件的更多相关文章
- 微信小程序自定义导航栏组件,完美适配所有手机,可实现各种功能和情况
背景 在做小程序时,关于默认导航栏,我们遇到了以下的问题: Android.IOS 手机对于页面 title 的展示不一致,安卓 title 的显示不居中 页面的 title 只支持纯文本级别的样式控 ...
- 微信小程序——自定义导航栏
微信头部导航栏可能通过json配置: 但是有时候我们项目需求可能需要自定义头部导航栏,如下图所示: 现在具体说一下实现步骤及方法: 步骤: 1.在 app.json 里面把 "navigat ...
- 微信小程序自定义导航栏
微信小程序需要自定义导航栏,特别是左上角的自定义设置,可以设置返回按钮,菜单按钮,配置如下: 1.在app.json的window属性中增加: navigationStyle:custom 顶部导航栏 ...
- 微信小程序 - 自定义导航栏(提示)
点击下载: 自定义导航栏示例
- 微信小程序 自定义导航组件 nav头部 全面屏设计
nav-dynamic 微信小程序自定义nav头部组件:适配全面屏设计: 实现功能 初始进入页面时,展示初始状态下的nav样式: 页面滚动时,监听页面滚动事件,展示滚动状态下的nav样式: 根据配置字 ...
- 获取不同机型微信小程序状态栏+导航栏高度
获取不同机型微信小程序状态栏+导航栏高度 一. 前言 很多时候我们开发微信小程序,都需要先知道状态栏和导航栏的高度,才能去做其他功能 二. 获取微信小程序状态栏高度 用wx.getSystemInfo ...
- Taro 小程序 自定义导航栏
在小程序中,有的页面需求可能需要我们做一个自定义的导航栏, 今天就来踩一踩坑 首先需要在app.js 中给全局的导航栏隐藏, // app.js window: { navigationStyle: ...
- 微信小程序底部导航栏部署
在微信小程序开发app.json(app.json它是定义全局页面) 只是用来部署微信底部的图标,最多不能大于五个 "tabBar":{ "selectedColor&q ...
- 微信小程序底部导航栏(tabbar)
在app.json处设置“tabBar”,例子如下: { "pages": [ "pages/index/index", "pages/pages1/ ...
随机推荐
- selenium: where to get ChromeDriver?
address: http://npm.taobao.org/mirrors/chromedriver
- 『学了就忘』Linux服务管理 — 77、RPM包安装基于xinetd的服务的管理
目录 1.基于xinetd服务的启动管理 (1)telnet服务安装 (2)telnet服务启动 2.基于xientd服务的自启动管理 现在Linux系统中基于xinetd的服务越来越少了,但Linu ...
- DevOps到底是什么意思?
目录 一.方法论 二.DevOps的起源 三.DevOps到底是什么 四.DevOps的发展现状 五.DevOps与虚拟化.容器.微服务 一.方法论 提到DevOps这个词,我相信很多人一定不会陌生. ...
- [手写系列] Spirit带你实现防抖函数和节流函数
前言 防抖函数和节流函数,无论是写业务的时候还是面试的时候,想必大家已经听过很多次了吧.但是大家在用到的时候,有了解过他们之间的区别嘛,他们是如何实现的呢?还是说只是简单的调用下像lodash和und ...
- dart系列之:实时通讯,在浏览器中使用WebSockets
目录 简介 dart:html中的WebSockets 创建一个WebSocket WebSocket的状态 发送消息 处理WebSocket事件 总结 简介 web客户端和服务器端通信有两种方式,一 ...
- PMP过程组与知识领域
过程组知识领域 启动 规划 执行 监控 结尾 整合管理 制定项目章程 制定项目计划 指导与管理项目工作 监控项目工作 结束项目过程或阶段 项目管理知识 实施整体变更控制 范围管理 规划范围管理 确认范 ...
- M语言中的引用(Power Query 之 M 语言)
名词 查询表 函数 行{}/列[] 单元格 表(Table) 列表(List) 记录(Record) 引用[查询表] =查询表表名 引用[应用的步骤] =步骤名 引用表中的[单元格](深化) =表{行 ...
- 资源日历关联(Project)
<Project2016 企业项目管理实践>张会斌 董方好 编著 其实,[日历]并不是[任务]的唯一,他还有另一个老相好:[资源]. 是啊,就像张同学给的例子那样,得为一个专门的外聘专家这 ...
- Dubbo配置注册中心设置application的name使用驼峰命名法存在的隐藏项目启动异常问题
原创/朱季谦 首先,先提一个建议,在SpringBoot+Dubbo项目中,Dubbo配置注册中心设置的application命名name的值,最好使用xxx-xxx-xxx这样格式的,避免随便使用驼 ...
- FFmpeg开发笔记(十):ffmpeg在ubuntu上的交叉编译移植到海思HI35xx平台
FFmpeg和SDL开发专栏(点击传送门) 上一篇:<FFmpeg开发笔记(九):ffmpeg解码rtsp流并使用SDL同步播放>下一篇:敬请期待 前言 将ffmpeg移植到海思H ...