
spring boot + mybatis + mybatis逆向工程 --- 心得
1.前言
以前用惯了springMVC框架 ,以SSM 框架 来开发项目 ,现在因为需要,使用spring boot框架,那么mybatis该如何与spring boot结合呢?
结构区别不大,但是配置文件的写法却改变了很多。
2.环境
spring boot 2.1.6.RELEASE
mysql 5.5.28*win64
jdk 1.8.0_221
3.操作
(1)目录结构

(2)pom.xml
<?xml version="1.0" encoding="UTF-8"?>

<project xmlns="http://maven.apache.org/POM/4.0.0" xmlns:xsi="http://www.w3.org/2001/XMLSchema-instance"

         xsi:schemaLocation="http://maven.apache.org/POM/4.0.0 https://maven.apache.org/xsd/maven-4.0.0.xsd">

    <modelVersion>4.0.0</modelVersion>

    <parent>

        <groupId>org.springframework.boot</groupId>

        <artifactId>spring-boot-starter-parent</artifactId>

        <version>2.1.6.RELEASE</version>

        <relativePath/> <!-- lookup parent from repository -->

    </parent>

    <groupId>com.example</groupId>

    <artifactId>provider-mybatis-8002</artifactId>

    <version>0.0.1-SNAPSHOT</version>

    <name>provider-mybatis-8002</name>

    <description>Demo project for Spring Boot</description>

    <properties>

        <java.version>1.8</java.version>

    </properties>

    <dependencies>

        <dependency>

            <groupId>org.springframework.boot</groupId>

            <artifactId>spring-boot-starter-web</artifactId>

        </dependency>

        <dependency>

            <groupId>org.springframework.boot</groupId>

            <artifactId>spring-boot-starter-test</artifactId>

            <scope>test</scope>

            <exclusions>

                <exclusion>

                    <groupId>org.junit.vintage</groupId>

                    <artifactId>junit-vintage-engine</artifactId>

                </exclusion>

            </exclusions>

        </dependency>

        <!-- MySQL 依赖-->

        <dependency>

            <groupId>mysql</groupId>

            <artifactId>mysql-connector-java</artifactId>

            <!--            <scope>runtime</scope>-->

            <version>5.1.30</version>

        </dependency>

        <!--MySQL 数据源 依赖包-->

        <dependency>

            <groupId>com.alibaba</groupId>

            <artifactId>druid-spring-boot-starter</artifactId>

            <version>1.1.10</version>

        </dependency>

        <!--        mybatis依赖-->

        <dependency>

            <groupId>org.mybatis.spring.boot</groupId>

            <artifactId>mybatis-spring-boot-starter</artifactId>

            <version>2.1.2</version>

        </dependency>

        <!-- mybatis的逆向工程依赖包-->

        <dependency>

            <groupId>org.mybatis.generator</groupId>

            <artifactId>mybatis-generator-core</artifactId>

            <version>1.3.2</version>

        </dependency>

    </dependencies>

    <build>

        <!--        -->

        <!--编译时 将 src/main/java 里面的xml文件 打包到src/main/resources-->

        <resources>

            <resource>

                <directory>src/main/java</directory>

                <includes>

                    <include>**/*.xml</include>

                </includes>

            </resource>

            <resource>

                <directory>src/main/resources</directory>

            </resource>

        </resources>

        <!--        -->

        <plugins>

            <plugin>

                <groupId>org.springframework.boot</groupId>

                <artifactId>spring-boot-maven-plugin</artifactId>

            </plugin>

        </plugins>

    </build>

</project>
(3)application.properties
spring.application.name=provider-mybatis-8002

server.port=8002

#mybatis设置

#mybatis配置文件所在路径

mybatis.config-location=classpath:mybatis/mybatisConfig.xml

#所有Entity别名类所在包

mybatis.type-aliases-package=com.example.providermybatis8002.entities.tables

#mapper映射文件[也可以放在 resources 里面]

#不论放在哪里,都必须使用classpath: 否则找不到 ,报错 org.apache.ibatis.binding.BindingException: Invalid bound statement (not found):

mybatis.mapper-locations= classpath:com/example/providermybatis8002/mapper/**/*.xml

#mysql配置

# 当前数据源操作类型

spring.datasource.type=com.alibaba.druid.pool.DruidDataSource

# mysql驱动包

spring.datasource.driver-class-name=org.gjt.mm.mysql.Driver

# 数据库名称

spring.datasource.url=jdbc:mysql://localhost:3306/clinic?characterEncoding=utf-8

# 数据库账户名

spring.datasource.username=root

# 数据库密码

spring.datasource.password=root

#

#

# 数据库连接池的最小维持连接数

spring.datasource.dbcp2.min-idle=5

# 初始化连接数

spring.datasource.dbcp2.initial-size=5

# 最大连接数

spring.datasource.dbcp2.max-total=5

# 等待连接获取的最大超时时间

spring.datasource.dbcp2.max-wait-millis=200

#

#

#

#

# 指明是否在从池中取出连接前进行检验,如果检验失败, 则从池中去除连接并尝试取出另一个,

#注意: 设置为true后如果要生效,validationQuery参数必须设置为非空字符串

spring.datasource.druid.test-on-borrow=false

#

# 指明连接是否被空闲连接回收器(如果有)进行检验.如果检测失败,则连接将被从池中去除.

#注意: 设置为true后如果要生效,validationQuery参数必须设置为非空字符串

spring.datasource.druid.test-while-idle=true

#

# 指明是否在归还到池中前进行检验,注意: 设置为true后如果要生效,

#validationQuery参数必须设置为非空字符串

spring.datasource.druid.test-on-return=false

#

# SQL查询,用来验证从连接池取出的连接,在将连接返回给调用者之前.

#如果指定,则查询必须是一个SQL SELECT并且必须返回至少一行记录

spring.datasource.druid.validation-query=select 1
(3)mybaitsConfig.xml
<?xml version="1.0" encoding="UTF-8" ?>

<!DOCTYPE configuration

        PUBLIC "-//mybatis.org//DTD Config 3.0//EN"

        "http://mybatis.org/dtd/mybatis-3-config.dtd">

<configuration>

    <settings>

        <!-- 开启log4j日志,打印到控制台,关闭则注释掉该语句即可-->

        <!--        <setting name="logImpl" value="STDOUT_LOGGING"/>-->

        <!-- 开启驼峰命名转换:Table{create_time} -> Entity{createTime} -->

        <setting name="mapUnderscoreToCamelCase" value="true"/>

        <!-- 使用列别名替换列名 默认:true -->

        <setting name="useColumnLabel" value="true"/>

        <!-- 使用jdbc的getGeneratedKeys获取数据库自增主键值 -->

        <setting name="useGeneratedKeys" value="true"/>

        <!-- 二级缓存开启 -->

        <setting name="cacheEnabled" value="true" />

    </settings>

</configuration>
(4)mybatis逆向工程配置文件 mybatis-generator.xml
<?xml version="1.0" encoding="UTF-8"?>

<!DOCTYPE generatorConfiguration

        PUBLIC "-//mybatis.org//DTD MyBatis Generator Configuration 1.0//EN"

        "http://mybatis.org/dtd/mybatis-generator-config_1_0.dtd">

<generatorConfiguration>

    <context id="testTables" targetRuntime="MyBatis3">

        <commentGenerator>

            <!-- 是否去除自动生成的注释 true:是 : false:否 -->

            <property name="suppressAllComments" value="true"/>

        </commentGenerator>

        <!--数据库连接的信息:驱动类、连接地址、用户名、密码 -->

        <jdbcConnection driverClass="com.mysql.jdbc.Driver"

                        connectionURL="jdbc:mysql://localhost:3306/clinic"

                        userId="root"

                        password="root">

        </jdbcConnection>

        <!--

            默认false,把JDBC DECIMAL 和 NUMERIC 类型解析为 Integer,

            为true时把JDBC DECIMAL和NUMERIC类型解析为java.math.BigDecimal

        -->

        <javaTypeResolver>

            <property name="forceBigDecimals" value="false"/>

        </javaTypeResolver>

        <!-- targetProject:生成PO类的位置,重要!! -->

        <javaModelGenerator targetPackage="com.example.providermybatis8002.entities.tables"

                            targetProject="src/main/java">

            <!-- enableSubPackages:是否让schema作为包的后缀 -->

            <property name="enableSubPackages" value="false"/>

            <!-- 从数据库返回的值被清理前后的空格 -->

            <property name="trimStrings" value="true"/>

        </javaModelGenerator>

        <!-- targetProject:mapper映射文件生成的位置,重要!! -->

        <sqlMapGenerator targetPackage="com.example.providermybatis8002.mapper.mapperXML"

                         targetProject="src/main/java">

            <property name="enableSubPackages" value="false"/>

        </sqlMapGenerator>

        <!-- targetPackage:mapper接口生成的位置,重要!! -->

        <javaClientGenerator type="XMLMAPPER"

                             targetPackage="com.example.providermybatis8002.mapper"

                             targetProject="src/main/java">

            <!-- 是否让schema作为包的后缀 -->

            <property name="enableSubPackages" value="fasle"/>

        </javaClientGenerator>

        <!-- 指定数据库表,要生成哪些表,就写哪些表,要和数据库中对应,不能写错! -->

        <table tableName="t_province" enableCountByExample="false" enableUpdateByExample="false"

               enableSelectByExample="false" enableDeleteByExample="false"

               selectByExampleQueryId="false"/>

    </context>

</generatorConfiguration>
(5)mybatis逆向工程启动测试类
package com.example.providermybatis8002;

import org.junit.Test;

import org.mybatis.generator.api.MyBatisGenerator;

import org.mybatis.generator.config.Configuration;

import org.mybatis.generator.config.xml.ConfigurationParser;

import org.mybatis.generator.internal.DefaultShellCallback;

import java.io.File;

import java.util.ArrayList;

import java.util.List;

/**

 * 逆向工程

 */

public class Generator {

    /**

     * 注意,警惕,mmp,逆向工程不可重复运行第二次,如果要运行第二次,必须删除原来由逆向工程生成的所有文件,

     * 否则sql语句的id和方法会重复,重复,重复,但是文件个数不会变化,,,,

     * 运行不会报错,什么都没有,但是会找不到对应的mapper文件。

     */

    @Test

    public void run() {

        try {

            this.generator();

            System.out.println("成功");

        } catch (Exception e) {

            e.printStackTrace();

        }

    }

    private void generator() throws Exception {

        List<String> warnings = new ArrayList<String>();

        boolean overwrite = true;

        //加载配置文件

        File configFile = new File("src/main/resources/mybatis/mybatis-generator.xml");

        ConfigurationParser cp = new ConfigurationParser(warnings);

        Configuration config = cp.parseConfiguration(configFile);

        DefaultShellCallback callback = new DefaultShellCallback(overwrite);

        MyBatisGenerator myBatisGenerator = new MyBatisGenerator(config, callback, warnings);

        myBatisGenerator.generate(null);

    }

}
(6)执行 mybatis逆向工程启动测试类 ,会自动生成entity实体类 、mapper接口 和 mapper.xml
【我的习惯是mapper接口 和 mapper.xml 放在Java包里的mapper包里,容易找,
但部分人喜欢将该mapper包命名为dao将mapper接口放在里面 ,然后再 在resources包里新建mapper包,将mapper.xml文件放在里面。
其实作用都一样,只是配置有一点区别而已
不论是哪种 ,application.properties文件 对mapper.xml的映射文件地址都需要使用 classpath的写法,否则会找不到
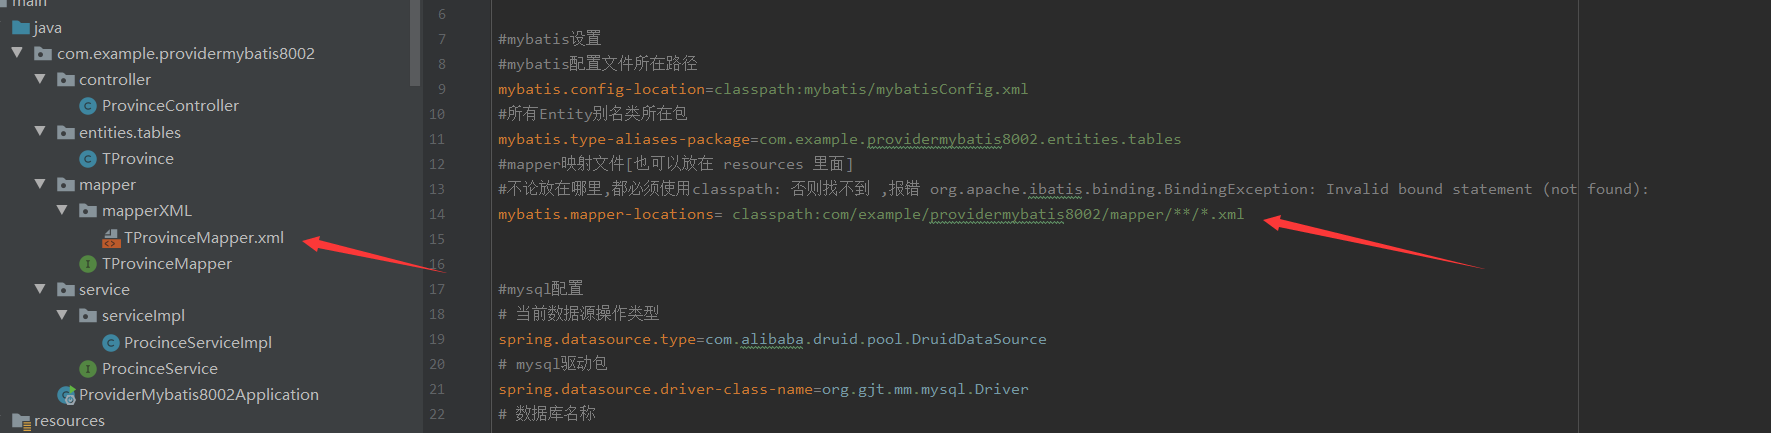
同时,如果将mapper.xml文件写在Java包里面,呢么需要在pom.xml文件里需要添加编译设置 ,否则工程发布后,Java里面的xml文件不编译,如果写在resources包里面则不需要写
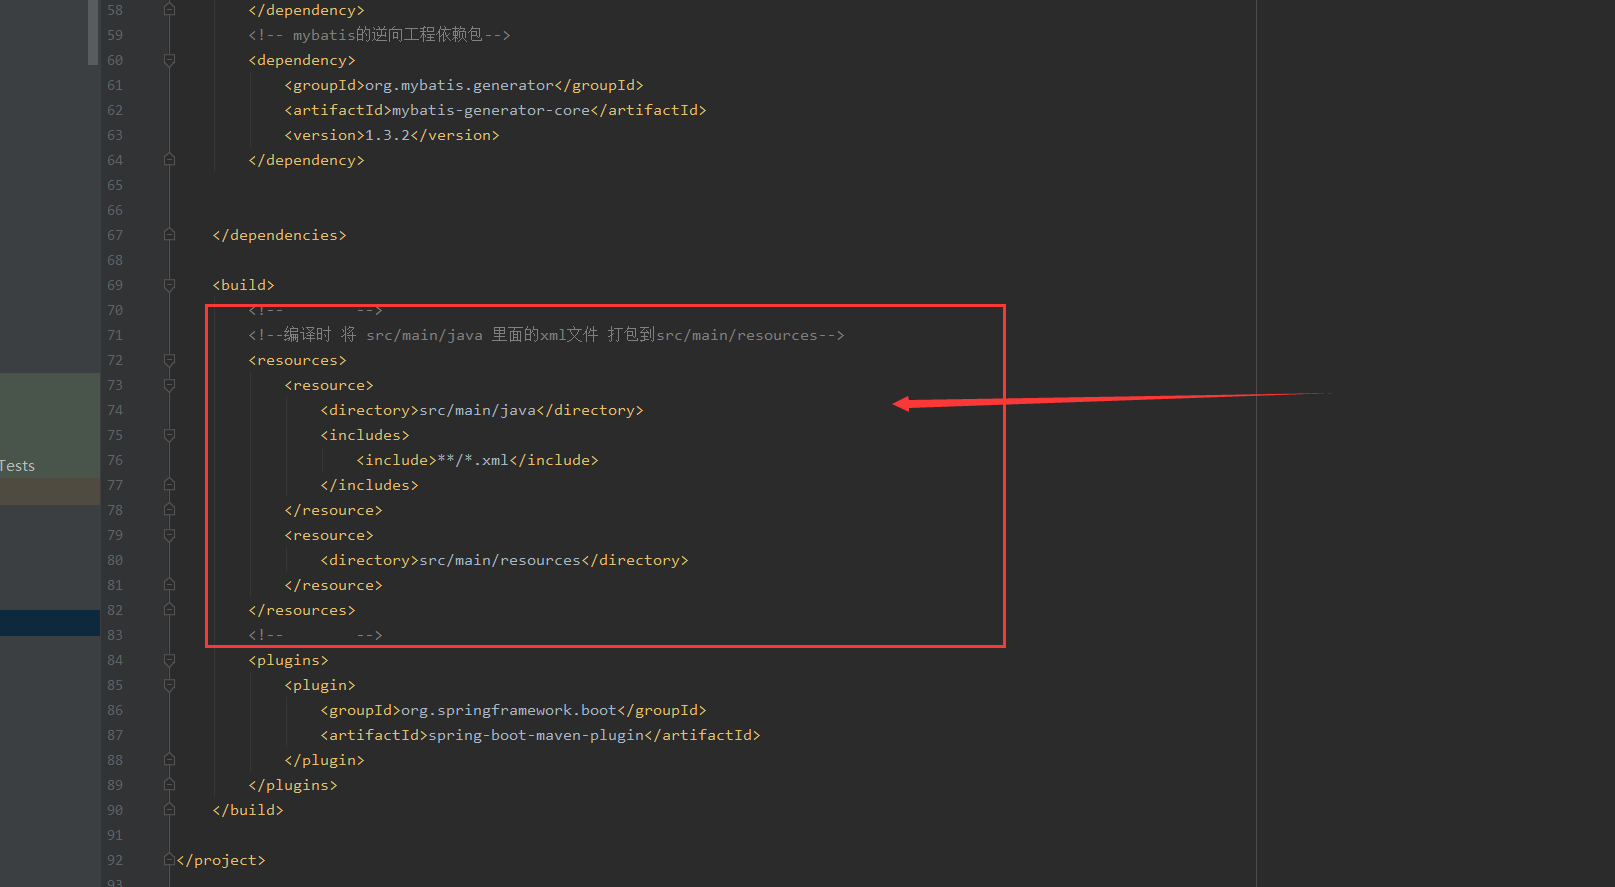
】
(7)实体类
package com.example.providermybatis8002.entities.tables;

public class TProvince {

    private Integer id;

    private String name;

    private Integer isuse;

    public Integer getId() {

        return id;

    }

    public void setId(Integer id) {

        this.id = id;

    }

    public String getName() {

        return name;

    }

    public void setName(String name) {

        this.name = name == null ? null : name.trim();

    }

    public Integer getIsuse() {

        return isuse;

    }

    public void setIsuse(Integer isuse) {

        this.isuse = isuse;

    }

    @Override

    public String toString() {

        return "TProvince{" +

                "id=" + id +

                ", name='" + name + '\'' +

                ", isuse=" + isuse +

                '}';

    }

}
(8)mapper接口
package com.example.providermybatis8002.mapper;

import com.example.providermybatis8002.entities.tables.TProvince;

import org.apache.ibatis.annotations.Mapper;

import org.springframework.stereotype.Component;

import java.util.List;

//如果不添加这个,会扫描不到 ;也可以不添加,但是必须去启动类使用 @MapperScan注解

//@Mapper

public interface TProvinceMapper {

    int deleteByPrimaryKey(Integer id);

    int insert(TProvince record);

    int insertSelective(TProvince record);

    TProvince selectByPrimaryKey(Integer id);

    int updateByPrimaryKeySelective(TProvince record);

    int updateByPrimaryKey(TProvince record);

    //查询所有

    List<TProvince> selectAll();

}

这个是我自定义的,不是自动生成的
(9)mapper.xml
<?xml version="1.0" encoding="UTF-8" ?>

<!DOCTYPE mapper PUBLIC "-//mybatis.org//DTD Mapper 3.0//EN" "http://mybatis.org/dtd/mybatis-3-mapper.dtd" >

<mapper namespace="com.example.providermybatis8002.mapper.TProvinceMapper">

    <resultMap id="BaseResultMap" type="com.example.providermybatis8002.entities.tables.TProvince">

        <id column="id" property="id" jdbcType="INTEGER"/>

        <result column="name" property="name" jdbcType="VARCHAR"/>

        <result column="isuse" property="isuse" jdbcType="INTEGER"/>

    </resultMap>

    <sql id="Base_Column_List">

    id, name, isuse

  </sql>

    <select id="selectByPrimaryKey" resultMap="BaseResultMap" parameterType="java.lang.Integer">

        select

        <include refid="Base_Column_List"/>

        from t_province

        where id = #{id,jdbcType=INTEGER}

    </select>

    <delete id="deleteByPrimaryKey" parameterType="java.lang.Integer">

    delete from t_province

    where id = #{id,jdbcType=INTEGER}

  </delete>

    <insert id="insert" parameterType="com.example.providermybatis8002.entities.tables.TProvince">

    insert into t_province (id, name, isuse

      )

    values (#{id,jdbcType=INTEGER}, #{name,jdbcType=VARCHAR}, #{isuse,jdbcType=INTEGER}

      )

  </insert>

    <insert id="insertSelective" parameterType="com.example.providermybatis8002.entities.tables.TProvince">

        insert into t_province

        <trim prefix="(" suffix=")" suffixOverrides=",">

            <if test="id != null">

                id,

            </if>

            <if test="name != null">

                name,

            </if>

            <if test="isuse != null">

                isuse,

            </if>

        </trim>

        <trim prefix="values (" suffix=")" suffixOverrides=",">

            <if test="id != null">

                #{id,jdbcType=INTEGER},

            </if>

            <if test="name != null">

                #{name,jdbcType=VARCHAR},

            </if>

            <if test="isuse != null">

                #{isuse,jdbcType=INTEGER},

            </if>

        </trim>

    </insert>

    <update id="updateByPrimaryKeySelective" parameterType="com.example.providermybatis8002.entities.tables.TProvince">

        update t_province

        <set>

            <if test="name != null">

                name = #{name,jdbcType=VARCHAR},

            </if>

            <if test="isuse != null">

                isuse = #{isuse,jdbcType=INTEGER},

            </if>

        </set>

        where id = #{id,jdbcType=INTEGER}

    </update>

    <update id="updateByPrimaryKey" parameterType="com.example.providermybatis8002.entities.tables.TProvince">

    update t_province

    set name = #{name,jdbcType=VARCHAR},

      isuse = #{isuse,jdbcType=INTEGER}

    where id = #{id,jdbcType=INTEGER}

  </update>

    <!--  //查询所有-->

    <select id="selectAll" resultType="tProvince">

    select * from t_province

  </select>

</mapper>
注意了需要在mapper接口 加入 @Mapper注解 ,否则spring无法扫描到 ,
那么问题来了,每一个mapper接口都写@Mapper注解 ,是不是很烦?
解决的办法也很简单,去要去启动类添加@MapperScan注解 ,参数是装有需要扫描的mapper接口的包位置 ,这样mapper接口 加不加 @Mapper注解都无所谓
(10)启动类
package com.example.providermybatis8002;

import org.mybatis.spring.annotation.MapperScan;

import org.springframework.boot.SpringApplication;

import org.springframework.boot.autoconfigure.SpringBootApplication;

@SpringBootApplication

//

//如果不添加这个注解 ,则必须去每一个mapper接口添加@Mapper注解

@MapperScan(basePackages = "com.example.providermybatis8002.mapper")

public class ProviderMybatis8002Application {

    public static void main(String[] args) {

        SpringApplication.run(ProviderMybatis8002Application.class, args);

    }

}
那么,现在该怎么调用呢? 其实跟 springMVC 的调用基本不差别 ,唯一不同的就是 以前实例 mapper接口 是使用 @Autowired ,但是在spring boot里
需要使用 @Resource ,否则会报错,接口名下面出现红色波浪线 ,虽然并不影响使用 ,但是对强迫症很不友好
(11)service服务层接口
package com.example.providermybatis8002.service;

import com.example.providermybatis8002.entities.tables.TProvince;

import java.util.List;

import java.util.Map;

public interface ProcinceService {

    public Map<String, Object> getAll();

}
(12)service服务层接口的实现类
package com.example.providermybatis8002.service.serviceImpl;

import com.example.providermybatis8002.entities.tables.TProvince;

import com.example.providermybatis8002.mapper.TProvinceMapper;

import com.example.providermybatis8002.service.ProcinceService;

import org.springframework.beans.factory.annotation.Autowired;

import org.springframework.stereotype.Service;

import javax.annotation.Resource;

import java.util.HashMap;

import java.util.List;

import java.util.Map;

@Service

public class ProcinceServiceImpl implements ProcinceService {

    //@Autowired是默认按照类型装配的 @Resource默认是按照名称装配的 ,都是注册bean的

//    @Autowired

    @Resource

    private TProvinceMapper tProvinceMapper;

    @Override

    public Map<String, Object> getAll() {

        Map<String, Object> map = new HashMap<>();

        List<TProvince> list = tProvinceMapper.selectAll();

//        System.out.println(list);

        map.put("data", list);

//        TProvince tProvince = tProvinceMapper.selectByPrimaryKey(100000);

//        System.out.println(tProvince);

//        if(tProvince == null){

//            System.out.println("44444");

//        }

        return map;

    }

}
(13)controller层
package com.example.providermybatis8002.controller;

import com.example.providermybatis8002.service.ProcinceService;

import org.springframework.beans.factory.annotation.Autowired;

import org.springframework.web.bind.annotation.RequestMapping;

import org.springframework.web.bind.annotation.RestController;

import java.util.Map;

@RestController

public class ProvinceController {

    @Autowired

    private ProcinceService procinceService;

    @RequestMapping("/getall")

    public Map<String, Object> getAll(){

        return procinceService.getAll();

    }

}
4.测试
启动工程 ,访问端口 8002 , http://localhost:8002/getall
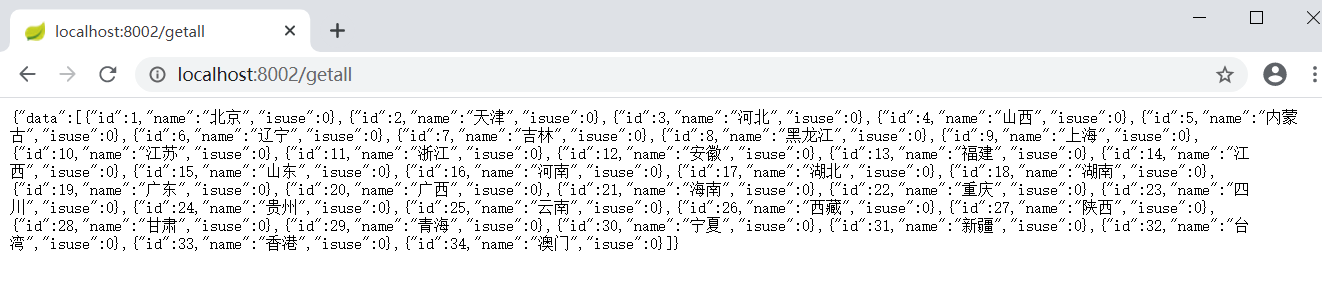
成功 ,撒花!!!
-----------------------
参考博文原址:
https://blog.csdn.net/u012702547/article/details/88643598
spring boot + mybatis + mybatis逆向工程 --- 心得的更多相关文章
- spring boot配置mybatis和事务管理
spring boot配置mybatis和事务管理 一.spring boot与mybatis的配置 1.首先,spring boot 配置mybatis需要的全部依赖如下: <!-- Spri ...
- spring boot集成mybatis只剩两个sql 并提示 Cannot obtain primary key information from the database, generated objects may be incomplete
前言 spring boot集成mybatis时只生成两个sql, 搞了一个早上,终于找到原因了 找了很多办法都没有解决, 最后注意到生成sql的时候打印了一句话: Cannot obtain pri ...
- Spring Boot 整合 Mybatis 实现 Druid 多数据源详解
摘要: 原创出处:www.bysocket.com 泥瓦匠BYSocket 希望转载,保留摘要,谢谢! “清醒时做事,糊涂时跑步,大怒时睡觉,独处时思考” 本文提纲一.多数据源的应用场景二.运行 sp ...
- 使用intelliJ创建 spring boot + gradle + mybatis站点
Spring boot作为快速入门是不错的选择,现在似乎没有看到大家写过spring boot + gradle + mybatis在intellij下的入门文章,碰巧.Net同事问到,我想我也可以写 ...
- Spring Boot整合Mybatis并完成CRUD操作
MyBatis 是一款优秀的持久层框架,被各大互联网公司使用,本文使用Spring Boot整合Mybatis,并完成CRUD操作. 为什么要使用Mybatis?我们需要掌握Mybatis吗? 说的官 ...
- Spring boot整合Mybatis
时隔两个月的再来写博客的感觉怎么样呢,只能用“棒”来形容了.闲话少说,直接入正题,之前的博客中有说过,将spring与mybatis整个后开发会更爽,基于现在springboot已经成为整个业界开发主 ...
- Spring boot教程mybatis访问MySQL的尝试
Windows 10家庭中文版,Eclipse,Java 1.8,spring boot 2.1.0,mybatis-spring-boot-starter 1.3.2,com.github.page ...
- spring boot 实现mybatis拦截器
spring boot 实现mybatis拦截器 项目是个报表系统,服务端是简单的Java web架构,直接在请求参数里面加了个query id参数,就是mybatis mapper的query id ...
- spring boot 整合 mybatis 以及原理
同上一篇文章一样,spring boot 整合 mybatis过程中没有看见SqlSessionFactory,sqlsession(sqlsessionTemplate),就连在spring框架整合 ...
- Spring Boot集成MyBatis开发Web项目
1.Maven构建Spring Boot 创建Maven Web工程,引入spring-boot-starter-parent依赖 <project xmlns="http://mav ...
随机推荐
- C# 使用modbus 读取PLC 寄存器地址
使用的组件Nmodbus 定义参数,全局变量: //创建modbus实体对象 private static ModbusFactory modbusFactory; private static IM ...
- ES6解构赋值的简单使用
相较于常规的赋值方式,解构赋值最主要的是'解构'两个字,在赋值的过程中要清晰的知道等号右边的结构. 先简单地看一下原来的赋值方式. var a=[1,2] 分析一下这句代码的几个点: (1)变量申明和 ...
- 安装火狐浏览器报错找不到VCRUNTIME140_1.DLL
产生原因参考及下载地址:https://cn.dll-files.com/vcruntime140_1.dll.html vcruntime140_1.dll 相关的错误可能源于多种不同原因.比如,错 ...
- 转:KVC 与 KVO 理解
KVC 与 KVO 理解 On 2012 年 6 月 7 日, in iPhone, by donly KVC 与 KVO 是 Objective C 的关键概念,个人认为必须理解的东西,下面是实例讲 ...
- Decorator 模式转载
原创作品,允许转载,转载时请务必以超链接形式标明文章 原始出处 .作者信息和本声明.否则将追究法律责任.http://tianli.blog.51cto.com/190322/35287 摘要:本文深 ...
- logcplus(2)
(一)log4cplus是C++编写的开源的日志系统,功能非常全面,用到自己开发的工程中会比较专业的,:),本文介绍了log4cplus基本概念,以及如何安装,配置. ### 简介 ### log4 ...
- xml数据结构处理
<data> <country name="Liechtenstein"> <rank updated="yes">2< ...
- Photoshop学习笔记(一)
1.Alt+delete,用前景色填充选区 2.按住shift键可以新加选区 3.按住alt键可以减去选区 4.第一次选择选区时按住shift键制作出正方形或者圆形 5.第一次选择选区时按住alt键将 ...
- SpringBoot 设置服务一启动就执行、初始化数据
定义一个类实现ApplicationRunner接口,然后Override这个ApplicationRunner接口的run方法 @Component public class TaskRunner ...
- git提交忽略文件.gitignore内容
###################################################################### # Build Tools .gradle /build/ ...