
No input file specified.问题的解决
问题描述:apache配置网站出现问题“No input file specified.”
解决1:
打开.htaccess 在RewriteRule 后面的index.php教程后面添加一个“?”
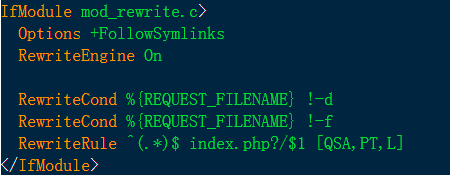
如果还是不行,尝试以下方法:
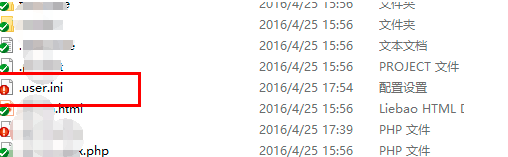
解决2:
以下文件内容清空或者全部注释
原文链接:https://jingyan.baidu.com/article/f7ff0bfccce11c2e26bb1381.html(感谢分享)
tp5.1 错误 No input file specified.
一、方法
与php版本有关 PHP版本5.6以上都会出现这个问题 把php版本改为5.5就OK
二、方法
.htaccess文件中的
RewriteRule ^(.*)$ index.php/$1 [QSA,PT,L]
在默认情况下会导致No input file specified.
修改成
RewriteRule ^(.*)$ index.php [L,E=PATH_INFO:$1]
问题解决。
没有配置路径
路径 :\public\.htaccess.php中配置
<IfModule mod_rewrite.c>
Options +FollowSymlinks -Multiviews
RewriteEngine On
RewriteCond %{REQUEST_FILENAME} !-d
RewriteCond %{REQUEST_FILENAME} !-f
RewriteRule ^(.*)$ index.php [L,E=PATH_INFO:$1]
</IfModule>
官方下面写法不行
URL重写
可以通过URL重写隐藏应用的入口文件index.php(也可以是其它的入口文件,但URL重写通常只能设置一个入口文件),下面是相关服务器的配置参考:
[ Apache ]
httpd.conf配置文件中加载了mod_rewrite.so模块
AllowOverride None 将None改为 All
把下面的内容保存为.htaccess文件放到应用入口文件的同级目录下
<IfModule mod_rewrite.c>
Options +FollowSymlinks -Multiviews
RewriteEngine On
RewriteCond %{REQUEST_FILENAME} !-d
RewriteCond %{REQUEST_FILENAME} !-f
RewriteRule ^(.*)$ index.php/$1 [QSA,PT,L]
</IfModule>
<IfModule mod_rewrite.c>
Options +FollowSymlinks -Multiviews
RewriteEngine On
RewriteCond %{REQUEST_FILENAME} !-d
RewriteCond %{REQUEST_FILENAME} !-f
RewriteRule ^(.*)$ index.php [L,E=PATH_INFO:$1]
</IfModule>
原文链接:https://blog.csdn.net/XinShun/article/details/90241842(感谢分享)
No input file specified.问题的解决的更多相关文章
- PHP no input file specified 三种解决方法
一.IIS Noinput file specified (IIS上报的错误) 方法一:改PHP.ini中的doc_root行,打开ini文件注释掉此行,然后重启IIS 方法二: 请修改php.i ...
- 【LNMP】提示Nginx PHP “No input file specified”错误的解决办法
原理: 任何对.php文件的请求,都简单地交给php-cgi去处理,但没有验证该php文件是否存在. PHP文件不存在,没办法返回普通的404错误,它返回 一个404,并带上一句”No input f ...
- Nginx+PHP “No input file specified”错误的解决办法
配置官网商城php网站时候,界面报错“No input file specified” 原理: 任何对.php文件的请求,都简单地交给php-cgi去处理,但没有验证该php文件是否存在. PHP文件 ...
- no input file specified 三种解决方法
一.IIS Noinput file specified 方法一:改PHP.ini中的doc_root行,打开ini文件注释掉此行,然后重启IIS 方法二: 请修改php.ini 找到 ; cgi.f ...
- nginx下No input file specified错误的解决
在web服务的根目录下创建 .htaccess文件,设置一下内容: RewriteEngine on RewriteCond %{REQUEST_FILENAME} !-d RewriteCond % ...
- thinkphp使用模块/控制器/操作访问时出现No input file specified.解决方式
thinkphp使用 http://serverName/index.php/模块/控制器/操作 访问时,出现了 No input file specified. 的错误 解决办法: 一: 开启cgi ...
- 安装coreseek cannot find input file: src/Makefile.in 错误解决方法
安装coreseek 出现了cannot find input file: src/Makefile.in 解决方法如下 >autoheader >automake --add-missi ...
- input:file样式怎样修改
问题描述: 我需要点击input:file来修改img中的图片,但是input:file样式太丑 解决办法: 给file设置透明度为0,让用户看不见他 创建新的button按钮 修改button按钮样 ...
- 完美解决 nginx No input file specified.
一次开发中遇到了这个问题:No input file specified nginx版本1.8 找遍网络都是说 fastcgi_param SCRIPT_FILENAME $document_root ...
随机推荐
- uniCloud的简单使用 增删改查
新建一个uni-app 项目 启动云开发 选择想要的云服务 在次之前先完成uniCloud 的实名认证 https://unicloud.dcloud.net.cn 有在Web控制台创建过云服务空间就 ...
- pyspider的环境安装
第一:确认自己的Python版本3.6.x(因该版本与pyspider较为适应,其他版本易出错) 如果不是3.6版本的,且想将版本替换成3.6版本的有以下处理方法: 1.再装一个3.6版本python ...
- Masterwoker模式
1 public class Task { 2 3 private int id; 4 private int price ; 5 public int getId() { 6 return id; ...
- 吃透 MQ
本文主要讲解 MQ 的通用知识,让大家先弄明白:如果让你来设计一个 MQ,该如何下手?需要考虑哪些问题?又有哪些技术挑战? 有了这个基础后,我相信后面几篇文章再讲 Kafka 和 RocketMQ 这 ...
- IDA 创建本地类型
在IDA中我们常常使用 shift+F9打开结构体视图,ins 创建结构体,但操作有些繁琐. 我们可以在View-->Open Subviews-->Local Types(视图--> ...
- 【框架】SPI四种模式+通用设备驱动实现-源码
目录 前言 bsp_spi.c bsp_spi.h bsp_flash.c bsp_flash.h 前言 SPI 介绍为搜集百度资料+个人理解 其余为原创(有误请指正) 集四种模式于一身 demo 采 ...
- Android Studio 之 BaseAdapter 学习笔记
•前行必备--ListView的显示与缓存机制 我们知道 ListView.GridView 等控件可以展示大量的数据信息. 假如下图中的 ListView 可以展示 100 条信息,但是屏幕的尺寸是 ...
- 学习Typora来写博客
Typora学习 标题分级 知识详解 标题分级可使用快捷键Ctry+数字键(1.2.3.4.5.6.0) 例如Ctry+1为一级标题,Ctry+2为二级标题,以此类推,总共可分为六个级别的标题,Ctr ...
- 面试官:聊一聊SpringBoot服务监控机制
目录 前言 SpringBoot 监控 HTTP Endpoints 监控 内置端点 health 端点 loggers 端点 metrics 端点 自定义监控端点 自定义监控端点常用注解 来,一起写 ...
- jd的艺术
我看最近的狗东的ldz很火哈.所以我也来凑个热闹发个教程. 准备工作 1.一台openwrt系统设备 2.一个脑子 3.一双手 话不多说,开始吧! 步骤 一.链接N1(你的设备) 这里需要一款ssh工 ...