linux 启动过程以及如何将进程加入开机自启
linux 启动流程
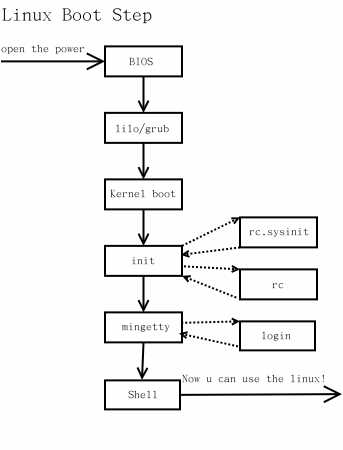
系统启动主要顺序就是:
1. 加载内核
2. 启动初始化进程
3. 确定运行级别
4. 加载开机启动程序
5. 用户登录
启动流程的具体细节可以看看Linux 的启动流程
第4步加载启动程序其实是两步:
- init进程逐一加载开机启动程序,其实就是运行指定目录里的启动脚本。
- 在运行完指定目录里面的程序后init进程还会去执行/etc/rc.local 这个脚本。
ps:“指定目录”是指在第3步中设置的运行级别对应的目录。
要完成我们的需求,我们使用第4步中的任意一种方式都可以。
方式一,chkconfig
以supervisord服务脚本为例:


#!/bin/sh

##

## /etc/rc.d/init.d/supervisord

##

#supervisor is a client/server system that

# allows its users to monitor and control a

# number of processes on UNIX-like operating

# systems.

#

# chkconfig: - 64 36

# description: Supervisor Server

# processname: supervisord

# Source init functions

. /etc/rc.d/init.d/functions

prog="supervisord"

prefix="/usr/"

exec_prefix="${prefix}"

PIDFILE="/var/run/supervisord.pid"

CONFIG="/etc/supervisord.conf"

prog_bin="${exec_prefix}bin/supervisord -c $CONFIG "

function log_success_msg() {

        echo "$@" "[ OK ]"

}

function log_failure_msg() {

        echo "$@" "[ OK ]"

}

start()

{

       #echo -n $"Starting $prog: "

       #daemon $prog_bin --pidfile $PIDFILE

       #[ -f $PIDFILE ] && success $"$prog startup" || failure $"$prog failed"

       #echo

        if [ ! -r $CONFIG ]; then

                log_failure_msg "config file doesn't exist (or you don't have permission to view)"

                exit 4

        fi

        if [ -e $PIDFILE ]; then

                PID="$(pgrep -f $PIDFILE)"

                if test -n "$PID" && kill -0 "$PID" &>/dev/null; then

                        # If the status is SUCCESS then don't need to start again.

                        log_failure_msg "$NAME process is running"

                        exit 0

                fi

        fi

        log_success_msg "Starting the process" "$prog"

        daemon $prog_bin --pidfile $PIDFILE

        log_success_msg "$prog process was started"

}

stop()

{

       echo -n $"Shutting down $prog: "

       [ -f $PIDFILE ] && killproc $prog || success $"$prog shutdown"

       echo

}

case "$1" in

 start)

   start

 ;;

 stop)

   stop

 ;;

 status)

       status $prog

 ;;

 restart)

   stop

   start

 ;;

 *)

   echo "Usage: $0 {start|stop|restart|status}"

 ;;

esac
第1步:把上面的脚本放在/etc/init.d/文件夹下。
第2步:将启动脚本权限改为可执行。
chmod a+x /etc/init.d/supervisord第3步:添加启动项。
chkconfig --add supervisordchkconfig supervisord on第4步:检查是否设置成功。
chkconfig --list | grep supervisord

supervisord     0:关闭    1:关闭    2:启用    3:启用    4:启用    5:启用    6:关闭
方式二,修改/etc/rc.local脚本
 1 #!/bin/sh

 2 #

 3 # This script will be executed *after* all the other init scripts.

 4 # You can put your own initialization stuff in here if you don't

 5 # want to do the full Sys V style init stuff.

 6

 7 #touch /var/lock/subsys/local

 8 echo "hello linux" >> /tmp/hello2.log

 9

10 influxd > /tmp/influxd.log 2>&1 &

11

12 echo "hello linux" >> /tmp/hello3.log
转自:https://www.cnblogs.com/ouruola863/p/8573374.html
linux 启动过程以及如何将进程加入开机自启的更多相关文章
- Linux启动过程详解(inittab、rc.sysinit、rcX.d、rc.local)
启动第一步--加载BIOS 当你打开计算机电源,计算机会首先加载BIOS信息,BIOS信息是如此的重要,以至于计算机必须在最开始就找到它.这是因为BIOS中包含了CPU的相关信息.设备启动顺序信息.硬 ...
- Linux启动过程详解
Linux启动过程详解 附上两张图,加深记忆 图1: 图2: 第一张图比较简洁明了,下面对第一张图的步骤进行详解: 加载BIOS 当你打开计算机电源,计算机会首先加载BIOS信息,BIOS信息是如此的 ...
- Linux启动过程详述
http://www.ibm.com/developerworks/cn/linux/kernel/startup/index.html Linux启动第1步:引导内核 Linux启动第2步:内核部分 ...
- Linux启动过程简述
Linux启动过程: 图片来自:https://www.cnblogs.com/codecc/p/boot.html 简单来讲: 加载BIOS–>读取MBR–>Boot Loader–&g ...
- Linux 启动过程详解
目录 1. Linux启动过程 2. 启动过程概述 3. 引导加载阶段 4. 内核阶段 4.1 内核加载阶段 4.2 内核启动阶段 5. 早期的用户空间 6. 初始化过程 6.1 SysV init ...
- 转-Linux启动过程详解(inittab、rc.sysinit、rcX.d、rc.local)
http://blog.chinaunix.net/space.php?uid=10167808&do=blog&id=26042 1)BIOS自检2)启动Grub/Lilo3)加 ...
- Linux启动过程笔记
Linux启动过程 1.启动流程(BIOS->MBR:Boot Code->引导GRUB->载入内核->运行init->runlevel) 2./boot/grub/下有 ...
- 深入理解Linux启动过程
深入理解Linux启动过程 本文详细分析了Linux桌面操作系统的启动过程,涉及到BIOS系统.LILO 和GRUB引导装载程序,以及bootsect.setup.vmlinux等映像文件 ...
- 嵌入式Linux启动过程中的问题积累
嵌入式Linux启动过程中的问题积累 Dongas 07-12-19 1.Bad Magic Number ## Booting image at 33000000 ... Bad Magic Num ...
随机推荐
- 对Java的annotation(注解)的认识
什么是java的annotation(注解) ? 注解的定义(annootation): public @interface TestAnnotation { } 上面的这种形式,便定义了注解是如何定 ...
- Java基础系列(13)- 包机制
包机制 为了更好的组织类,Java提供了包机制,用于区别类名的命名空间 包语句的语法格式为: package pkg1[. pkg2[. pkg3...]]; 一般利用公司域名倒置作为报名 为了能够使 ...
- Linux系列(11) - PATH环境变量
前言 在Liunx当中要想执行"执行脚本"."执行文件"或者"执行命令",需要用绝对路径:因此环境变量就出来了,将路径放到环境变量中,环境变 ...
- Kafka与RocketMq文件存储机制对比
一个商业化消息队列的性能好坏,其文件存储机制设计是衡量一个消息队列服务技术水平和最关键指标之一. 开头问题 kafka文件结构和rocketMQ文件结构是什么样子?特点是什么? 一.目录结构 Kafk ...
- Expression Tree 遍历集合
场景 从接口返回的数据是集合,却是 object 类型的.这个时候需要遍历这个集合.现提供两种方法. 方法一: 因为集合是可枚举的,所以可以尝试转为 IEnumerable 类型,然后遍历即可. st ...
- Ybt#452-序列合并【期望dp】
正题 题目链接:https://www.ybtoj.com.cn/contest/113/problem/2 题目大意 一个空序列,每次往末尾加入一个\([1,m]\)中的随机一个数.如果末尾两个数相 ...
- 深度学习--GAN学习笔记
生成模型 WGAN Blog GAN 推荐学习网站 生成模型 什么是生成模型? GMM: 用来做聚类,(非监督学习) NB(朴素贝叶斯):(监督学习,可以用来做垃圾邮件分类) Logistics 回归 ...
- Skywalking-12:Skywalking SPI机制
SPI机制 基本概述 SPI 全称 Service Provider Interface ,是一种服务发现机制.通过提供接口.预定义的加载器( Loader )以及约定俗称的配置(一般在 META-I ...
- iOS实现XMPP通讯(二)XMPP编程
项目概述 这是一个可以登录jabber账号,获取好友列表,并且能与好友进行聊天的项目. 使用的是第三方库XMPPFramework框架来实现XMPP通讯. 项目地址:XMPP-Project 项目准备 ...
- 使用固件库点亮led灯
1. 项目 使用STM32F103VE的固件库实现流水灯设计. 2. 代码 由于这是基于野火的视频进行学习的,项目代码在上节基础上进行编写的. 点亮绿灯: main.c #include " ...