
Django——实现最基础的评论功能(只有一级评论)
我对评论功能的理解:
————————(1)数据库建一个评论的表
————————(2)前端建一个提交评论的form表单
————————(3)表单提交评论内容后写入到数据库评论表中
————————(4)将评论表的数据取出来展示到前端评论列表中
1、项目目录结构
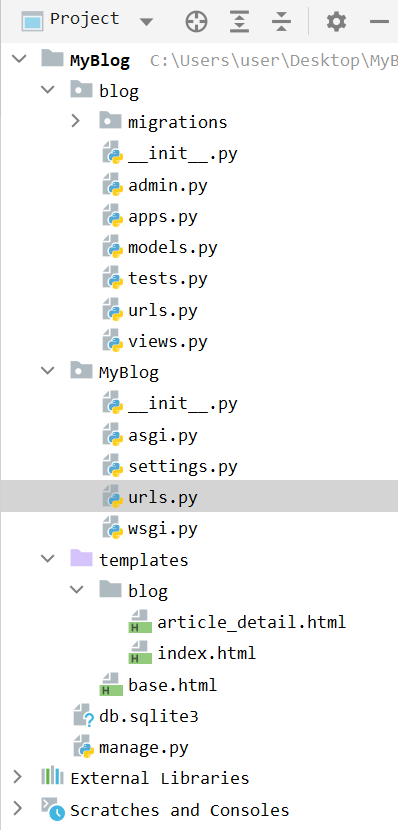
2、路由
(1)总路由:
from django.contrib import admin

from django.urls import path,include

urlpatterns = [

    path('admin/', admin.site.urls),

    path('blog/',include('blog.urls'))

]
(2)app路由:
from django.urls import path,re_path

from blog import views

urlpatterns = [

    path('',views.index),

    re_path('article_detail/(\d+)',views.article_detail)   # 传入文章ID参数

]
3、模型
from django.db import models

from django.contrib.auth.models import User

class Article(models.Model):

    title = models.CharField(max_length=70,verbose_name='文章标题')

    content = models.TextField(verbose_name='正文')

    author = models.ForeignKey(to=User,on_delete=models.DO_NOTHING,verbose_name='作者')

    created_time = models.DateTimeField(auto_now_add=True,verbose_name='发布时间')

    class Meta:

        db_table = 'article'

        verbose_name = '文章'

        verbose_name_plural = verbose_name

class Comment(models.Model):

    article = models.ForeignKey(to=Article,on_delete=models.DO_NOTHING,verbose_name='文章')

    content = models.TextField(verbose_name='评论内容')

    author = models.ForeignKey(User,on_delete=models.DO_NOTHING,verbose_name='评论者')

    post_time = models.DateTimeField(auto_now_add=True,verbose_name='评论时间')

    class Meta:

        db_table = 'comment'

        verbose_name = '评论'

        verbose_name_plural = verbose_name
4、视图函数
from django.shortcuts import render,HttpResponse,redirect

from django.core.paginator import Paginator

from blog.models import Article

from blog.models import Comment

def index(request):

    all_article_list = Article.objects.all()

    paginator = Paginator(all_article_list,10) #实例化分页器对象

    page = int(request.GET.get('page',1)) #获取页码数

    article_list_obj = paginator.page(page)  #获取当前页的分页对象

    article_list = article_list_obj.object_list #获取当前页的数据列表

    context = {

        'article_list': article_list,

        'paginator': paginator,

        'article_list_obj': article_list_obj

    }

    return render(request,'blog/index.html',context=context)

def article_detail(request,article_id):

    if request.method == 'GET':

        article = Article.objects.get(id=article_id)

        comment_list = Comment.objects.filter(article_id=article.id)

        context = {

            'article': article,

            'request': request,

            'comment_list': comment_list

        }

        return render(request,'blog/article_detail.html',context=context)

    else:

        c_id = article_id

        c_author = request.user.id

        c_content = request.POST.get('content')

        Comment.objects.create(content=c_content,article_id=c_id,author_id=c_author)

        return redirect('/blog/article_detail/{}/'.format(c_id))
5、模板HTML
(1)base.html
<!doctype html>

<html lang="zh-CN">

  <head>

    <meta charset="utf-8">

    <meta http-equiv="X-UA-Compatible" content="IE=edge">

    <meta name="viewport" content="width=device-width, initial-scale=1">

    <!-- The above 3 meta tags *must* come first in the head; any other head content must come *after* these tags -->

    <meta name="description" content="">

    <meta name="author" content="">

    <link rel="icon" href="https://cdn.jsdelivr.net/npm/@bootcss/v3.bootcss.com@1.0.14/favicon.ico">

    <link rel="canonical" href="https://getbootstrap.com/docs/3.4/examples/jumbotron/">

    <title>{% block title %}{% endblock %}</title>

    <!-- Bootstrap core CSS -->

    <link href="https://cdn.jsdelivr.net/npm/@bootcss/v3.bootcss.com@1.0.14/dist/css/bootstrap.min.css" rel="stylesheet">

    <!-- IE10 viewport hack for Surface/desktop Windows 8 bug -->

    <link href="https://cdn.jsdelivr.net/npm/@bootcss/v3.bootcss.com@1.0.14/assets/css/ie10-viewport-bug-workaround.css" rel="stylesheet">

    <!-- Custom styles for this template -->

    <link href="https://cdn.jsdelivr.net/npm/@bootcss/v3.bootcss.com@1.0.14/examples/jumbotron/jumbotron.css" rel="stylesheet">

    <!-- Just for debugging purposes. Don't actually copy these 2 lines! -->

    <!--[if lt IE 9]><script src="https://cdn.jsdelivr.net/npm/@bootcss/v3.bootcss.com@1.0.14/assets/js/ie8-responsive-file-warning.js"></script><![endif]-->

    <script src="https://cdn.jsdelivr.net/npm/@bootcss/v3.bootcss.com@1.0.14/assets/js/ie-emulation-modes-warning.js"></script>

    <!-- HTML5 shim and Respond.js for IE8 support of HTML5 elements and media queries -->

    <!--[if lt IE 9]>

      <script src="https://oss.maxcdn.com/html5shiv/3.7.3/html5shiv.min.js"></script>

      <script src="https://oss.maxcdn.com/respond/1.4.2/respond.min.js"></script>

    <![endif]-->

  </head>

  <body>

    <nav class="navbar navbar-inverse navbar-fixed-top">

      <div class="container">

        <div class="navbar-header">

          <a class="navbar-brand" href="/blog/">博客首页</a>

        </div>

        <div id="navbar" class="navbar-collapse collapse">

          <form class="navbar-form navbar-right">

            <div class="form-group">

              <input type="text" placeholder="Email" class="form-control">

            </div>

            <div class="form-group">

              <input type="password" placeholder="Password" class="form-control">

            </div>

            <button type="submit" class="btn btn-success">登录</button>

          </form>

        </div><!--/.navbar-collapse -->

      </div>

    </nav>

    <br>

    {% block content %}

    {% endblock %}

  </body>

</html>
(2)首页index.html
{% extends 'base.html' %}

{% block title %}

    博客首页

{% endblock %}

{% block content %}

        <div class="container">

        <div class="row">

          <div class="el-col-md-12">

              <table class="table">   {# 文章列表 #}

                  <tr class="info">

                      <th>ID</th>

                      <th>标题</th>

                      <th>正文</th>

                      <th>正文</th>

                      <th>时间</th>

                  </tr>

                  {% for article in article_list %}

                      <tr class="active">

                          <td>{{ article.id }}</td>

                          <td><a href="/blog/article_detail/{{ article.id }}/">{{ article.title}}</a></td>

                          <td>{{ article.content|truncatechars:100}}</td>

                          <td>{{ article.created_time}}</td>

                          <td>{{ article.author.username}}</td>

                      </tr>

                  {% endfor %}

              </table>              {# 文章列表结束 #}

              <div>                 {# 分页块 #}

                <nav aria-label="Page navigation">

                  <ul class="pagination">

                      {% if article_list_obj.has_previous %}

                        <li>

                           <a href="/blog/?page={{ article_list_obj.previous_page_number }}" aria-label="Previous">

                             <span aria-hidden="true">«</span>

                           </a>

                        </li>

                      {% endif %}

                      {% for number in paginator.page_range %}

                        <li><a href="/blog/?page={{ number }}">{{ number }}</a></li>

                      {% endfor %}

                      {% if article_list_obj.has_next %}

                          <li>

                           <a href="/blog/?page={{ article_list_obj.next_page_number }}" aria-label="Next">

                             <span aria-hidden="true">»</span>

                           </a>

                        </li>

                      {% endif %}

                  </ul>

                </nav>

              </div>   {# 分页块结束 #}

          </div>

        </div>

    </div>

{% endblock %}
(3)文章详情article_detail.html
{% extends 'base.html' %}

{% block title %}

    文章详情

{% endblock %}

{% block content %}

<div class="container">

    <div class="row">

        <div class="col-md-12">

            <div class="panel panel-primary">   {# 文章详情区域 #}

               <div class="panel-body">

                 {{ article.title }}

               </div>

                <div class="panel-body">

                 {{ article.content }}

               </div>

               <div class="panel-footer">{{ article.author }} {{ article.created_time }}</div>

            </div>   {# 文章详情区域结束 #}

            <div>

                <hr>

                <h4><b>评论</b></h4>

                <form action="" method="post">

                    <textarea class="form-control" rows="3" name="content"></textarea>

                    <br>

                    <button type="submit" class="btn btn-primary">提交</button>

                </form>

                <hr>

                <div class="panel panel-danger">

                    <div class="panel-body">评论列表</div>

                    <div>

                        {% for comment in comment_list %}

                            <div> {{ comment.content }}</div>

                            <div> {{ comment.post_time }} & {{ comment.author.username }}</div>

                            <hr>

                        {% endfor %}

                    </div>

                </div>

            </div>

        </div>

    </div>

</div>

{% endblock %}
6、效果
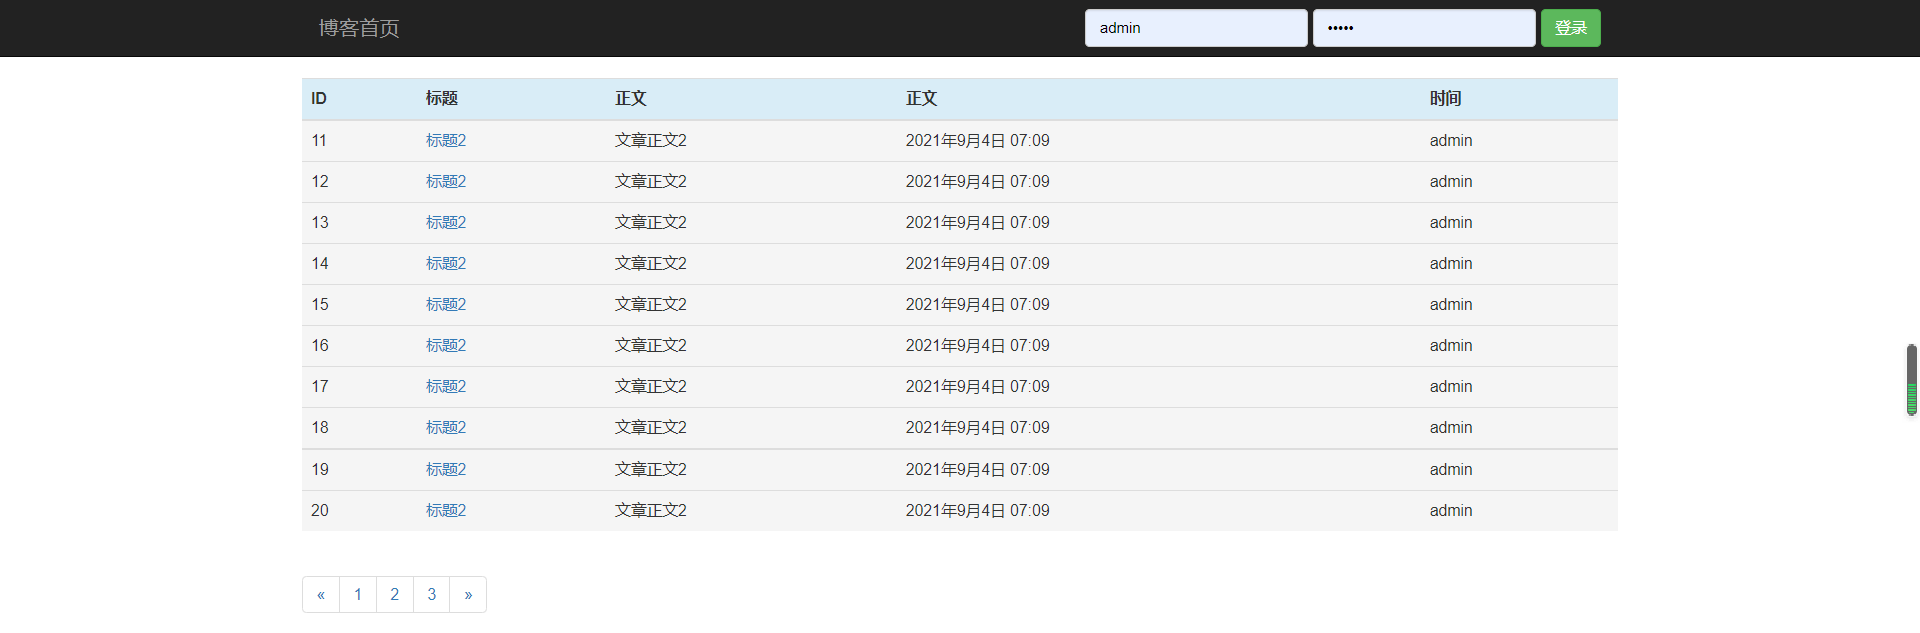
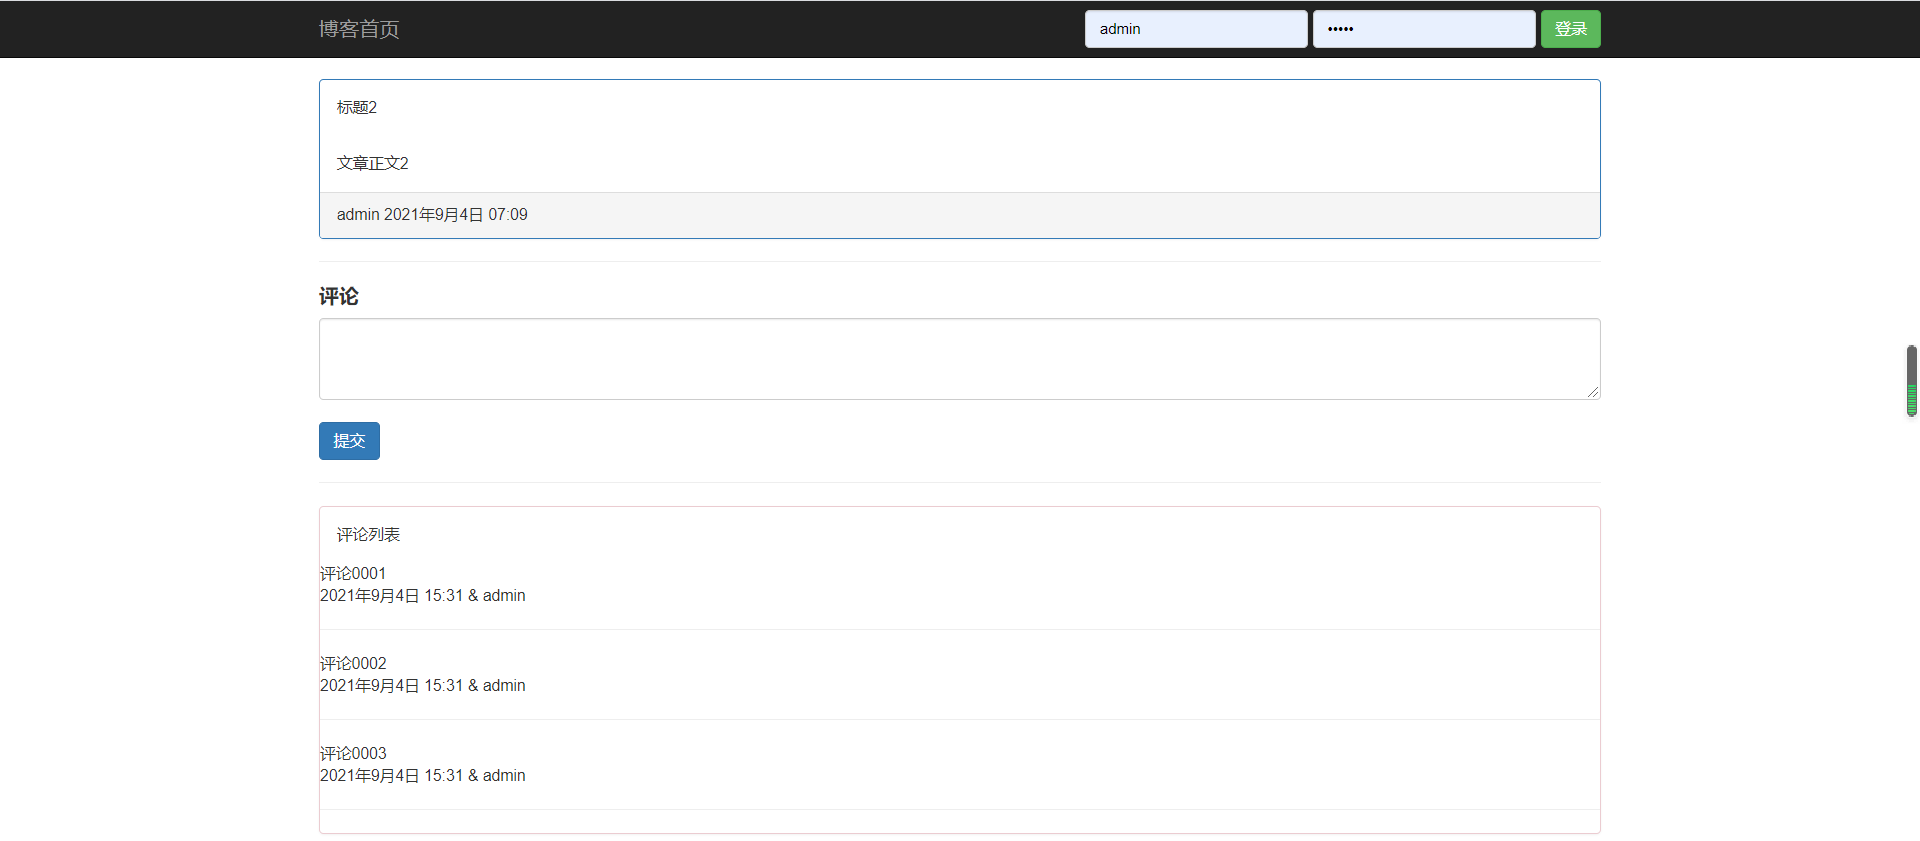
Django——实现最基础的评论功能(只有一级评论)的更多相关文章
- Django——实现评论功能(包括评论回复)
提示:(1)功能不全面,仅仅实现评论(2)样式简单 1.项目目录结构 2.模型 from django.db import models from django.contrib.auth.models ...
- Django使用forms来实现评论功能
貌似Django从版本1.6开始就放弃了对自带的comments的使用,具体原因未查,但是现在使用Django的内部的模块也可以实现评论功能,那就是借助于forms模块,下面是我的一个小例子. 环境准 ...
- [个人网站搭建]·Django增加评论功能(Python3)
[个人网站搭建]·Django增加评论功能 个人主页--> https://xiaosongshine.github.io/ 个人网站搭建github地址:https://github.com/ ...
- Django自带评论功能的基本使用
1. 模块安装 pip install django-contrib-comments 2. 注册APP INSTALLED_APP=( #..., 'django_comments', 'djang ...
- Django博客功能实现—文章评论的显示
功能:在打开文章之后,能在文章下面是显示文章的评论,有父级评论.思路:在文章详情的视图里面,获取这个文章的全部评论,得到显示列表,然后用模板显示出来.步骤:一,在views.py的文章详情中获取评论: ...
- 一步步搭建自己的博客 .NET版(2、评论功能)
前言 这次开发的博客主要功能或特点: 第一:可以兼容各终端,特别是手机端. 第二:到时会用到大量html5,炫啊. 第三:导入博客园的精华文章,并做分类.(不要封我) 第四:做 ...
- 《玩转Django2.0》读书笔记-Django建站基础
<玩转Django2.0>读书笔记-Django建站基础 作者:尹正杰 版权声明:原创作品,谢绝转载!否则将追究法律责任. 一.网站的定义及组成 网站(Website)是指在因特网上根据一 ...
- Django实现文章按年月归档、点赞和评论、发送邮件
文章归档的实现 我们在创建文章时,会在数据库中存储文章创建的时间这样的字段,一般用的都是datetime类型,记录文章创建的年月日和时分秒,所以我们直接使用文章的创建时间分类是无法实现文章的按年月归档 ...
- React.js 小书 Lesson25 - 实战分析:评论功能(四)
作者:胡子大哈 原文链接:http://huziketang.com/books/react/lesson25 转载请注明出处,保留原文链接和作者信息. (本文未审核) 目前为止,第二阶段知识已经基本 ...
随机推荐
- SpringBoot自动装配-源码分析
1. 简介 通过源码探究SpringBoot的自动装配功能. 2. 核心代码 2.1 启动类 我们都知道SpringBoot项目创建好后,会自动生成一个当前模块的启动类.如下: import org. ...
- dhanush
一.信息收集 ip.端口.指纹 目录扫描 查看frp文件 密码破解 失败换一个 https://github.com/truongkma/ctf-tools/blob/master/John/run/ ...
- K-Fold 交叉验证
转载--原文地址 www.likecs.com 1.K-Fold 交叉验证概念 在机器学习建模过程中,通行的做法通常是将数据分为训练集和测试集.测试集是与训练独立的数据,完全不参与训练,用于最终模型的 ...
- Vue学习笔记(一)简单使用和插值操作
目录 一.Vue是什么 二.Vue简单体验 1. 声明式渲染 2. vue列表展示 3. 处理用户输入(事件监听) 三.插值操作 1. Mustache语法 2. 常用v-指令 v-once v-ht ...
- RHCE_DAY02
常用数值运算方式 $[] #四则运算(+ - * / % 取余数) $(()) #数值运算工具 expr #数值运算工具 let #数值运算工具 [root@localhost ~]# echo $[ ...
- C# 为什么你应该更喜欢 is 关键字而不是 == 运算符
前言 在C# 进行开发中,检查参数值是否为null大家都用什么?本文介绍除了传统的方式==运算符,还有一种可以商用is关键字. C# 7.0 中 is 关键字的使用 传统的方式是使用==运算符: if ...
- 阿里三面Android开发岗都过了,但是无理由挂了,竟是HR骚操作?
进入互联网大厂一般都是"过五关斩六将",难度堪比西天取经,但当你真正面对这些大厂的面试时,有时候又会被其中的神操作弄的很是蒙圈. 近日,某位程序员发帖称,自己去阿里面试Androi ...
- Git8.3k星,十万字Android主流开源框架源码解析,必须盘
为什么读源码 很多人一定和我一样的感受:源码在工作中有用吗?用处大吗?很长一段时间内我也有这样的疑问,认为哪些有事没事扯源码的人就是在装,只是为了提高他们的逼格而已. 那为什么我还要读源码呢?一刚开始 ...
- 【LeetCode】39. 组合总和
39. 组合总和 知识点:递归:回溯:组合:剪枝 题目描述 给定一个无重复元素的正整数数组 candidates 和一个正整数 target ,找出 candidates 中所有可以使数字和为目标数 ...
- Git(7)-- 查看提交历史(git log 命令详解)
@ 目录 1.git clone 2.git log 3.git log -p 4.git log --stat 5.git log --pretty=oneline 6.git log --pret ...