OpenCv dnn模块扩展研究(1)--style transfer
一、opencv的示例模型文件
// This script is used to run style transfer models from '
// https://github.com/jcjohnson/fast-neural-style using OpenCV
#include <opencv2/dnn.hpp>
#include <opencv2/imgproc.hpp>
#include <opencv2/highgui.hpp>
#include <iostream>
using namespace cv;
using namespace cv::dnn;
using namespace std;
int main(int argc, char **argv)
{
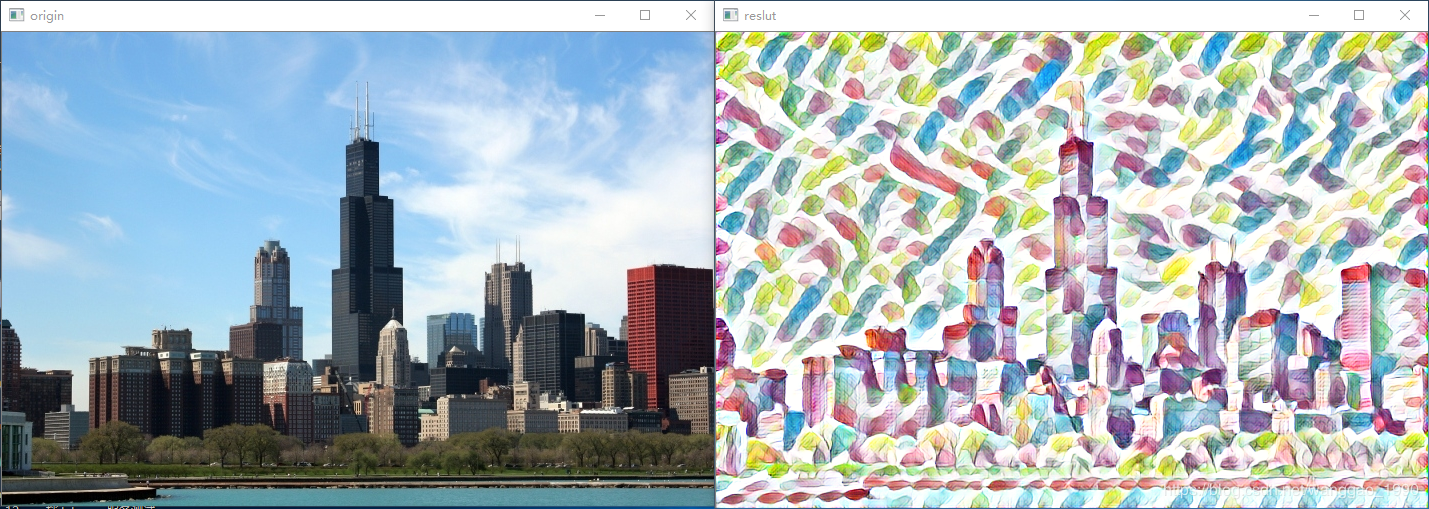
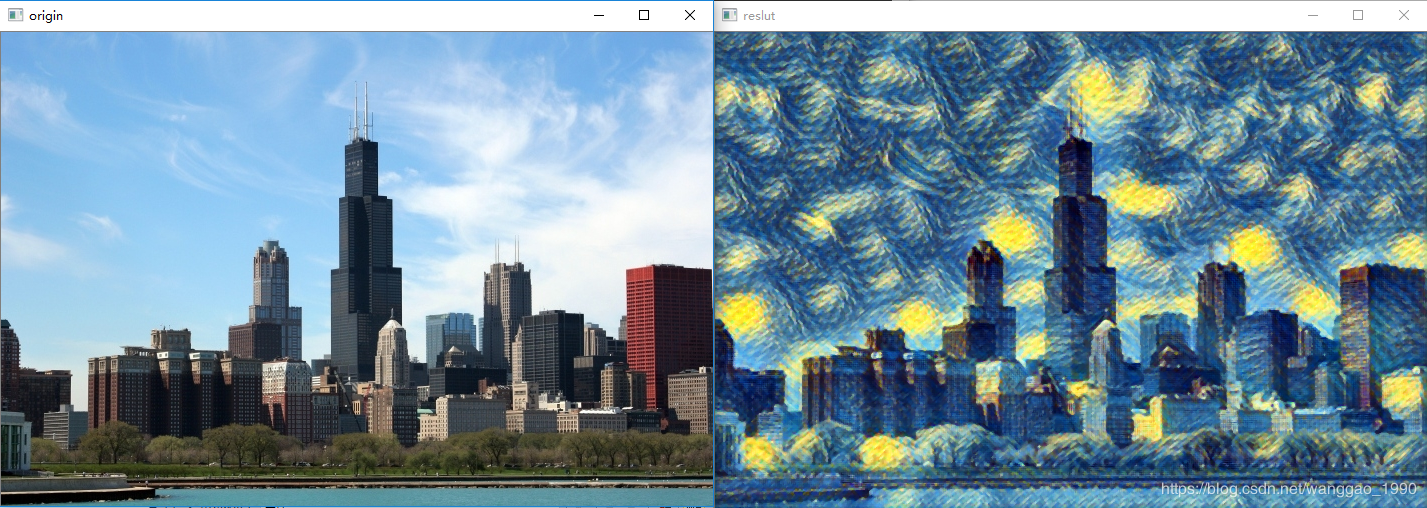
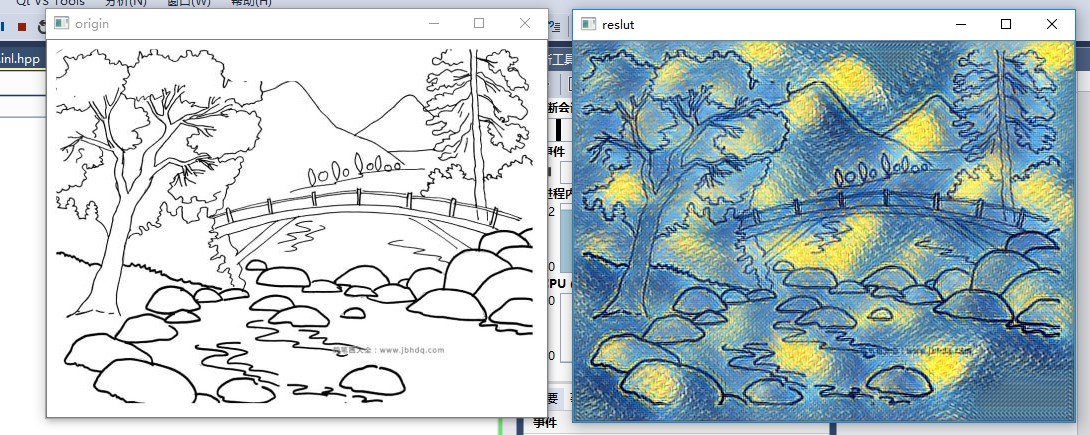
string modelBin = "../../data/testdata/dnn/fast_neural_style_instance_norm_feathers.t7";
string imageFile = "../../data/image/chicago.jpg";
float scale = 1.0;
cv::Scalar mean { 103.939, 116.779, 123.68 };
bool swapRB = false;
bool crop = false;
bool useOpenCL = false;
Mat img = imread(imageFile);
if (img.empty()) {
cout << "Can't read image from file: " << imageFile << endl;
return 2;
}
// Load model
Net net = dnn::readNetFromTorch(modelBin);
if (useOpenCL)
net.setPreferableTarget(DNN_TARGET_OPENCL);
// Create a 4D blob from a frame.
Mat inputBlob = blobFromImage(img,scale, img.size(),mean,swapRB,crop);
// forward netword
net.setInput(inputBlob);
Mat output = net.forward();
// process output
Mat(output.size[2], output.size[3], CV_32F, output.ptr<float>(0, 0)) += 103.939;
Mat(output.size[2], output.size[3], CV_32F, output.ptr<float>(0, 1)) += 116.779;
Mat(output.size[2], output.size[3], CV_32F, output.ptr<float>(0, 2)) += 123.68;
std::vector<cv::Mat> ress;
imagesFromBlob(output, ress);
// show res
Mat res;
ress[0].convertTo(res, CV_8UC3);
imshow("reslut", res);
imshow("origin", img);
waitKey();
return 0;
}


Training new models
To train new style transfer models, first use the scriptscripts/make_style_dataset.py to create an HDF5 file from folders of images.You will then use the script train.lua to actually train models.
Step 1: Prepare a dataset
You first need to install the header files for Python 2.7 and HDF5. On Ubuntuyou should be able to do the following:
You can then install Python dependencies into a virtual environment:
# Install Python dependencies# Work for a while ...
# Exit the virtual environment
With the virtual environment activated, you can use the scriptscripts/make_style_dataset.py to create an HDF5 file from a directory oftraining images and a directory of validation images:
All models in thisrepository were trained using the images from theCOCO dataset.
The preprocessing script has the following flags:
--train_dir: Path to a directory of training images.--val_dir: Path to a directory of validation images.--output_file: HDF5 file where output will be written.--height,--width: All images will be resized to this size.--max_images: The maximum number of images to use for trainingand validation; -1 means use all images in the directories.--num_workers: The number of threads to use.
Step 2: Train a model
After creating an HDF5 dataset file, you can use the script train.lua totrain feedforward style transfer models. First you need to download aTorch version of theVGG-16 modelby running the script
This will download the file vgg16.t7 (528 MB) to the models directory.
You will also need to installdeepmind/torch-hdf5which gives HDF5 bindings for Torch:
luarocks install https://raw.githubusercontent.com/deepmind/torch-hdf5/master/hdf5-0-0.rockspecYou can then train a model with the script train.lua. For basic usage thecommand will look something like this:
The full set of options for this script are described here.
OpenCv dnn模块扩展研究(1)--style transfer的更多相关文章
- 如何使用 Opencv dnn 模块调用 Caffe 预训练模型?
QString modelPrototxt = "D:\\Qt\\qmake\\CaffeModelTest\\caffe\\lenet.prototxt"; QString mo ...
- 手把手教你使用LabVIEW OpenCV DNN实现手写数字识别(含源码)
@ 目录 前言 一.OpenCV DNN模块 1.OpenCV DNN简介 2.LabVIEW中DNN模块函数 二.TensorFlow pb文件的生成和调用 1.TensorFlow2 Keras模 ...
- OpenCV自带dnn的Example研究(4)— openpose
这个博客系列,简单来说,今天我们就是要研究 https://docs.opencv.org/master/examples.html下的 6个文件,看看在最新的OpenCV中,它们是如何发挥作用的. ...
- OpenCV自带dnn的Example研究(3)— object_detection
这个博客系列,简单来说,今天我们就是要研究 https://docs.opencv.org/master/examples.html下的 6个文件,看看在最新的OpenCV中,它们是如何发挥作用的. ...
- [C4W4] Convolutional Neural Networks - Special applications: Face recognition & Neural style transfer
第四周:Special applications: Face recognition & Neural style transfer 什么是人脸识别?(What is face recogni ...
- fast neural style transfer图像风格迁移基于tensorflow实现
引自:深度学习实践:使用Tensorflow实现快速风格迁移 一.风格迁移简介 风格迁移(Style Transfer)是深度学习众多应用中非常有趣的一种,如图,我们可以使用这种方法把一张图片的风格“ ...
- (E2E_L2)GOMfcTemplate在vs2017上的运行并融合Dnn模块
GOMfcTemplate一直运行在VS2012上运行的,并且开发出来了多个产品.在技术不断发展的过程中,出现了一些新的矛盾:1.由于需要使用DNN模块,而这个模块到了4.0以上的OpenCV才支持的 ...
- 神经风格转换Neural Style Transfer a review
原文:http://mp.weixin.qq.com/s/t_jknoYuyAM9fu6CI8OdNw 作者:Yongcheng Jing 等 机器之心编译 风格迁移是近来人工智能领域内的一个热门研究 ...
- 课程四(Convolutional Neural Networks),第四 周(Special applications: Face recognition & Neural style transfer) —— 2.Programming assignments:Art generation with Neural Style Transfer
Deep Learning & Art: Neural Style Transfer Welcome to the second assignment of this week. In thi ...
随机推荐
- AQS的子类在各个同步工具类中的使用情况
AQS AQS(AbstractQueuedSynchronizer)是 java.util.concurrent的基础.J.U.C中宣传的封装良好的同步工具类Semaphore.CountDownL ...
- postgresql —— 数组类型
创建数组 CREATE TABLE sal_emp ( name text, pay_by_quarter integer[] --还可以定义为integer[4]或integer ARRAY[4] ...
- Python3.X下安装Scrapy
Python3.X下安装Scrapy (转载) 2017年08月09日 15:19:30 jingzhilie7908 阅读数:519 标签: python 相信很多同学对于爬虫需要安装Scrap ...
- learning java StringBuilder 类
StringBuilder s1 = new StringBuilder(); s1.append("panzidong"); s1.insert(,"hong,&quo ...
- RookeyFrame 添加 导入功能
我遇到的情况: 我在‘模块管理’里面, 把模块‘客户联系人’的‘允许导入’勾上,保存后,在‘客户联系人’页面没有导入按钮, 模块‘客户主数据’却可以, 这是为什么额?两个模块都是线下创建的,是哪儿不一 ...
- 看加载的php.ini 和 phpinfo 配置路径
php -i | grep "phar.readonly"看当前值php -i | grep "php.ini" 看加载的php.ini是哪个
- ORA-01033:ORACLE initialization or shutdown
ora-01033 错误处理:DOS下依次执行以下命令sqlplus/nologconnect sys/密码@orcl as sysdbashutdown normalstartup mountSQL ...
- nvarchar(MAX) 、ntext的差别
今天在做一个项目时,程序成功向数据库插入一条数据, 插入的是一篇比较大的文章,而且还有很多样式. Id是int型,Content用的是 ntext类型的 但是当我在手动改数据库Id时出现错误: 错误源 ...
- SpringBoot获取Freemarker模板引擎,生成HTML代码
今天用Ajax异步添加评论,加载Freemarker模板引擎,生成模板模块 1.新建Freemarker模板 <li id="${comment.oId}"> < ...
- 线程池(3)-参数-实现ThreadFactory
1.介绍 ThreadFactory用来创建线程,需要实现newThread方法. 2.常用场景 线程重命名 设置守护进程 设置优先级 3.示例(线程重命名) public class ThreadF ...