AspNetCore网关集成Swagger访问使用IdentityServer保护的webapi项目
创建webapi项目
创建四个webapi项目,两个处理业务,一个网关,一个验证中心。四个项目对应的端口如下,
ApiGateway:1999
IdentityServer:16690
Services.Api1:2108
Services.Api2:2343

添加Swagger支持
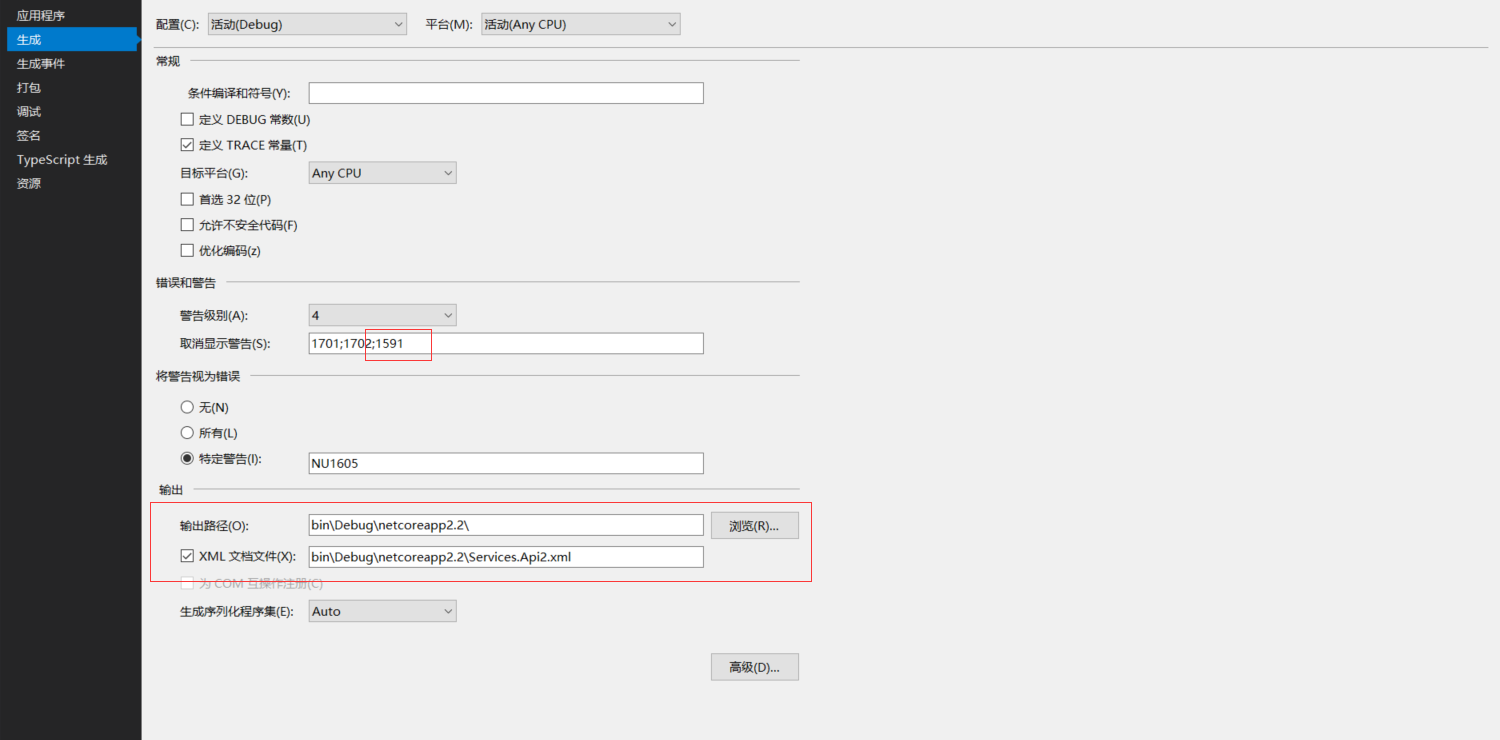
在两个业务项目中分别引用Swashbuckle.AspNetCore,目前是最新版本是4.0.1。在项目属性面板,设置输出xml文档,swagger可以读取xml注释生成json文件,在swagger ui页面中显示。但是选择输出xml文档后,对于没有xml注释的类和方法会显示警告,可以在项目属性面板中【错误和警告】选项,取消显示警告中添加1591,这样就可以不显示缺少xml注释的警告了。对于强迫症的你暂时可以平复一下了,当然,真的强迫症的话,肯定会全部加上xml注释的。(¬_¬)瞄
Startup.ConfigureServices
public void ConfigureServices(IServiceCollection services)

        {

           services.AddMvc().SetCompatibilityVersion(CompatibilityVersion.Version_2_2);

            services.AddSwaggerGen(options =>

            {

                //SwaggerDoc的第一个参数要与Configure中SwaggerEndPoint中的版本名称一致

                //既可以使用版本号,也可以使用自定义名称

                options.SwaggerDoc("ServiceApiTwo", new Info

                {

                    Title = "Services.Api #two",

                    Version = "v1",

                    Description = "服务api #two",

                    License = new License

                    {

                        Name = "APL2.0",

                        Url = "https://opensource.org/licenses/Apache-2.0"

                    },

                    Contact = new Contact

                    {

                        Name = "原来是李",

                        Url = "https://www.cnblogs.com/falltakeman"

                    }

                });

                var xmlFile = $"{Assembly.GetExecutingAssembly().GetName().Name}.xml";

                var xmlPath = Path.Combine(AppDomain.CurrentDomain.BaseDirectory, xmlFile);

                options.IncludeXmlComments(xmlPath);

            });

        }
Startup.Configure
public void Configure(IApplicationBuilder app, IHostingEnvironment env)

        {

            if (env.IsDevelopment())

            {

                app.UseDeveloperExceptionPage();

                app.UseSwagger(c=>

                {

                    c.RouteTemplate = "{documentName}/swagger.json";

                });

                app.UseSwaggerUI(u =>

                {

                    u.SwaggerEndpoint("/ServiceApiTwo/swagger.json", "ServiceApiTwo");

                    u.DocumentTitle = "Service Api #2 文档";

                });

            }

            app.UseMvc();

        }
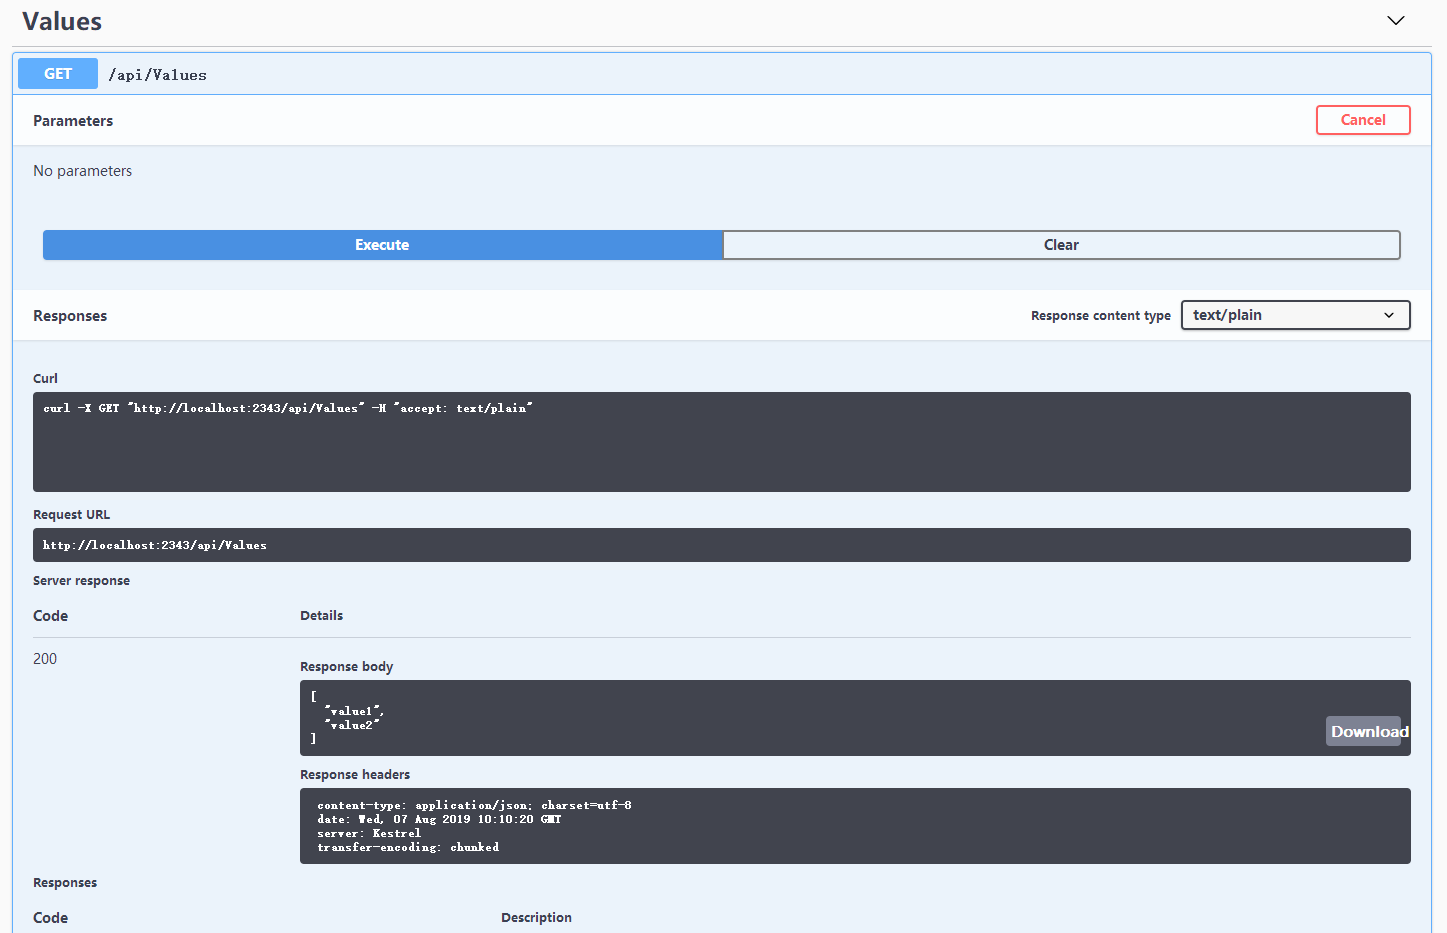
配置好启动项目看看。

通过swagger发起请求,响应正常。
配置网关项目
使用目前比较流行的开源网关服务Ocelot,APIGateway项目添加引用Ocelot、Ocelot.Provider.Consul、Ocelot.Provider.Polly、Ocelot.Cache.CacheManager,目前用到的版本是13.5.2。要在网关中统一查看各个服务的swagger文档,还需引用Swash.AspNetCore。Consul的配置先不说了。
在项目根路径下添加OcelotConfig.json配置文件。处理正常的路由转发外,要在网关swagger页面访问业务api,还需要配置swagger路由转发。
{

  "GlobalConfiguration": {

    //外部访问路径

    "BaseUrl": "http://localhost:1999",

    //限速配置

    "RateLimitOptions": {

      //白名单

      "ClientWhitelist": [],

      "EnableRateLimiting": true,

      //限制时间段,例如1s,5m,1h,1d

      "Period": "1s",

      //等待重试等待的时间间隔(秒)

      "PeriodTimespan": ,

      //限制

      "Limit": ,

      //自定义消息

      "QuotaExceededMessage": "单位时间内请求次数超过限制。",

      "HttpStatusCode":

    },

    //服务发现配置

    "ServiceDiscoveryProvider": {

      "Host": "localhost",

      "Port": ,

      "Type": "PollConsul",

      "PollingInterval":

    },

    //熔断配置

    "QoSOptions": {

      "ExceptionsAllowedBeforeBreaking": ,

      "DurationOfBreak": ,

      //超时值(毫秒)

      "TimeoutValue":

    }

  },

  "ReRoutes": [

    // Api#one项目配置

    {

      "UpstreamPathTemplate": "/gateway/one/{url}", //上游路径模板

      "UpstreamHttpMethod": [ "Get", "Post", "Put", "Delete" ], //上游HTTP请求方法

      "DownstreamPathTemplate": "/api/{url}", //下游路径模板

      "DownstreamScheme": "http", //下游协议 https/http

      "ServiceName": "ServiceApiOne", //服务名称(结合服务发现使用)

      "UseServiceDiscovery": true, //启用服务发现

      "LoadBalancer": "RoundRobin", //负载均衡算法:RoundRobin-轮询;LeastConnection-最少连接数(最空闲的服务器);NoLoadBalancer-总是发送往第一个请求或者服务发现

      //下游主机与端口,允许配置多个

      "DownstreamHostAndPorts": [

        //{

        //  "Host": "ip",

        //  "Port": 80

        //},

        {

          "Host": "localhost",

          "Port":

        }

      ],

      //熔断配置,在请求下游服务时使用断路

      "QoSOptions": {

        "ExceptionsAllowedBeforeBreaking": ,

        "DurationOfBreak": ,

        "TimeoutValue":

      },

      //权限配置

      //"AuthenticationOptions": {

      //  "AuthenticationProviderKey": "Bearer",

      //  "AllowedScopes": []

      //}

    },

    // Api#two项目配置

    {

      "UpstreamPathTemplate": "/gateway/two/{url}",

      "UpstreamHttpMethod": [ "Get", "Post", "Put", "Delete" ],

      "DownstreamPathTemplate": "/api/{url}",

      "DownstreamScheme": "http",

      "ServiceName": "ServiceApiTwo",

      "UseServiceDiscovery": true,

      "LoadBalancer": "RoundRobin",

      "DownstreamHostAndPorts": [

        //{

        //  "Host": "ip",

        //  "Port": 80

        //},

        {

          "Host": "localhost",

          "Port":

        }

      ],

      "QoSOptions": {

        "ExceptionsAllowedBeforeBreaking": ,

        "DurationOfBreak": ,

        "TimeoutValue":

      },

      //"AuthenticationOptions": {

      //  "AuthenticationProviderKey": "Bearer",

      //  "AllowedScopes": []

      //}

    },

    //swagger api2配置

    {

      "UpstreamPathTemplate": "/ServiceApiTwo/swagger.json",

      "UpstreamHttpMethod": [ "Get", "Post", "Put", "Delete" ],

      "DownstreamPathTemplate": "/ServiceApiTwo/swagger.json",

      "DownstreamScheme": "http",

      "DownstreamHostAndPorts": [

        {

          "Host": "localhost",

          "Port":

        }

      ]

    },

    //swagger api1多版本配置v1.0

    {

      "UpstreamPathTemplate": "/ServiceApiOne/1.0/swagger.json",

      "UpstreamHttpMethod": [ "Get", "Post", "Put", "Delete" ],

      "DownstreamPathTemplate": "/ServiceApiOne/1.0/swagger.json",

      "DownstreamScheme": "http",

      "DownstreamHostAndPorts": [

        {

          "Host": "localhost",

          "Port":

        }

      ]

    },

    //swagger api1多版本配置v2.0

    {

      "UpstreamPathTemplate": "/ServiceApiOne/2.0/swagger.json",

      "UpstreamHttpMethod": [ "Get", "Post", "Put", "Delete" ],

      "DownstreamPathTemplate": "/ServiceApiOne/2.0/swagger.json",

      "DownstreamScheme": "http",

      "DownstreamHostAndPorts": [

        {

          "Host": "localhost",

          "Port":

        }

      ]

    }

  ]

}
Startup.ConfigureServices注册swagger和Ocelot网关服务,ConfigureServices中的swagger配置和业务api中一样,
services.AddOcelot(Configuration)

                .AddConsul()

                .AddCacheManager(c => c.WithDictionaryHandle())

                .AddPolly();

services.AddSwaggerGen(options =>

            {

                options.SwaggerDoc(Configuration["Swagger:Name"], new Info

                {

                    Title = Configuration["Swagger:Title"],

                    Version = Configuration["Swagger:Version"],

                    Description = Configuration["Swagger:Description"],

                    License = new License

                    {

                        Name = Configuration["Swagger:License:Name"],

                        Url = Configuration["Swagger:License:Url"]

                    },

                    Contact = new Contact

                    {

                        Name = Configuration["Swagger:Contact:Name"],

                        Email = Configuration["Swagger:Contact:Email"],

                        Url = Configuration["Swagger:Contact:Url"]

                    }

                });

            });
Startup.Configure中,我是使用了配置文件,将业务api的swagger节点写在了配置文件中。
public void Configure(IApplicationBuilder app, IHostingEnvironment env)

        {

            if (env.IsDevelopment())

            {

                app.UseDeveloperExceptionPage();

                // 配置文件中的SwaggerName为业务api中是SwaggerEndPoint名称,有版本号的带上版本号

                var apis = Configuration["SwaggerApis:SwaggerName"].Split(';').ToList();

                app.UseSwagger();

                app.UseSwaggerUI(options=>

                {

                    //显示注册到网关的api接口

                    apis.ForEach(key =>

                    {

                        options.SwaggerEndpoint($"/{key}/swagger.json", key);

                    });

                    options.DocumentTitle = "api网关";

                });

            }

            else

            {

                app.UseExceptionHandler("/Home/Error");

            }

            app.UseStaticFiles();

            app.UseCookiePolicy();

            app.UseMvc(routes =>

            {

                routes.MapRoute(

                    name: "default",

                    template: "{controller=Home}/{action=Index}/{id?}");

            });

            app.UseOcelot().Wait(); // 使用Ocelot网关中间件

        }
修改ApiGateway项目Program.cs将配置文件添加进来。
public static IWebHostBuilder CreateWebHostBuilder(string[] args) =>

            WebHost.CreateDefaultBuilder(args)

            .ConfigureAppConfiguration((hostingContext,config)=>

            {

                var env = hostingContext.HostingEnvironment;

                //根据环境变量加载不同的json配置

                config.AddJsonFile($"appsettings.{env.EnvironmentName}.json", optional: true, reloadOnChange: true)

                .AddJsonFile("OcelotConfig.json")//网关配置

                .AddEnvironmentVariables();//环境变量

            })

            .ConfigureLogging((hostingContext,logging)=>

            {

                logging.AddConfiguration(hostingContext.Configuration.GetSection("Logging"));

                logging.AddConsole();

                //添加调试日志

                logging.AddDebug();

            })

            .UseStartup<Startup>();
网关配置了,swagger也配置了,启动业务api和网关服务看看效果。

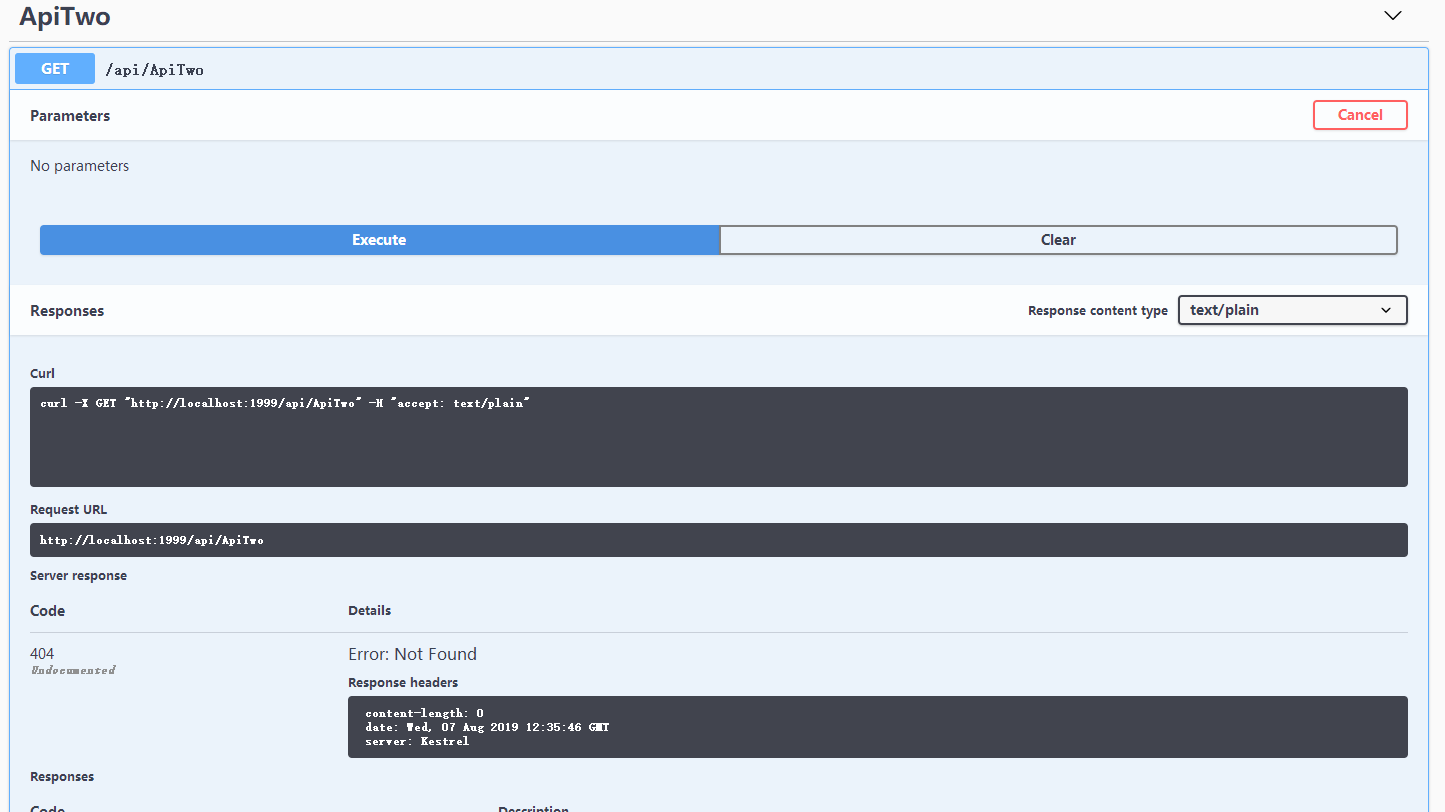
两个业务api的swagger文档都可以正常查看。发请求看一下,结果响应404,仔细看一下,请求的服务地址是网关服务的地址,而不是业务api的地址,难道是Ocelot网关路由配置错了?使用Postman发一个GET请求看看,localhost:1999/gateway/two/values,网关转发到localhost:2343/api/values,响应正常。
看swashbuckle文档这一段,将业务api中Configure加上这一段后再次通过网关发起请求,结果出现TypeError。既然出错了,打开浏览器调试工具看一下就明白了,Failed to load http://localhost:2343/api/ApiTwo: No 'Access-Control-Allow-Origin' header is present on the requested resource. Origin 'http://localhost:1999' is therefore not allowed access.
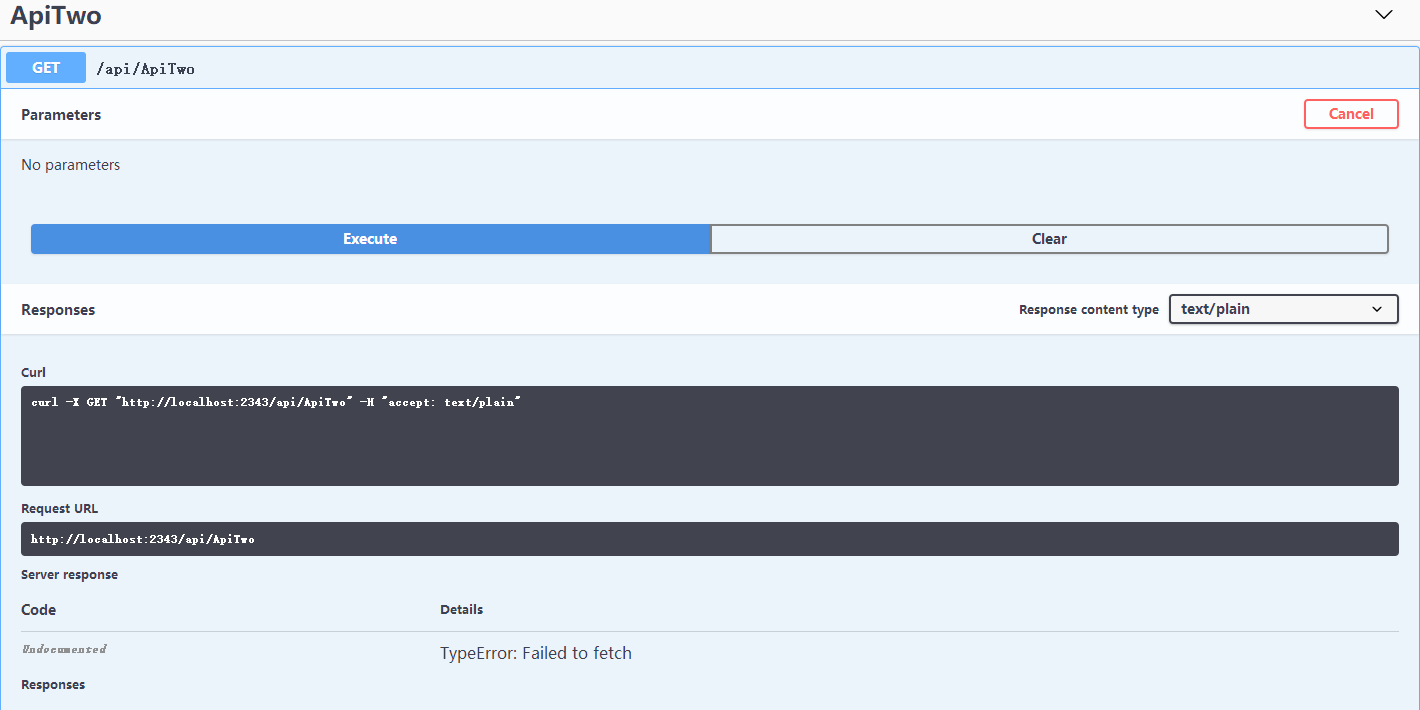
网关请求业务api跨域了,要让业务api允许来自网关的请求,需要设置业务api跨域请求政策。加上下面的配置后,网关请求正常了。
修改Startup.Configure
public void Configure(IApplicationBuilder app, IHostingEnvironment env)

        {

            if (env.IsDevelopment())

            {

                app.UseDeveloperExceptionPage();

                app.UseSwagger(c=>

                {

                    //处理网关通过swagger访问

                    c.PreSerializeFilters.Add((swaggerDoc, httpReq) => swaggerDoc.Host = httpReq.Host.Value);

                    c.RouteTemplate = "{documentName}/swagger.json";

                });

                app.UseSwaggerUI(u =>

                {

                    u.SwaggerEndpoint("/ServiceApiTwo/swagger.json", "ServiceApiTwo");

                    u.DocumentTitle = "Service Api #2 文档";

                });

            }

            // 允许网关访问

            app.UseCors(options =>

            {

                options.WithOrigins("http://localhost:1999")

                .AllowAnyHeader()

                .AllowAnyMethod();

            });

            app.UseMvc();

        }
使用IdentityServer4保护webapi
先前已经创建IdentityServer项目,添加引用IdentityServer4.AspNetIdentity(2.5.0)、IdentityServer4.EntityFramework(2.5.0)。新建一个类IdentityServerConfig,里面定义四个方法GetApiResources、GetIdentityResources、GetClients、GetTestUsers,具体代码就不贴了,看一下Startup。生产环境的话,当然要用数据库,这里不讨论IdentityServer4的使用。
public void ConfigureServices(IServiceCollection services)

        {

            services.AddMvc().SetCompatibilityVersion(CompatibilityVersion.Version_2_2);

            services.AddIdentityServer()

                .AddDeveloperSigningCredential()

                .AddInMemoryPersistedGrants()

                .AddTestUsers(IdentityServerConfig.GetTestUsers())

                .AddInMemoryIdentityResources(IdentityServerConfig.GetIdentityResources())

                .AddInMemoryApiResources(IdentityServerConfig.GetApiResources())

                .AddInMemoryClients(IdentityServerConfig.GetClients(Configuration));

        }

        // This method gets called by the runtime. Use this method to configure the HTTP request pipeline.

        public void Configure(IApplicationBuilder app, IHostingEnvironment env)

        {

            if (env.IsDevelopment())

            {

                app.UseDeveloperExceptionPage();

            }

            app.UseIdentityServer();

            app.UseMvc();

        }
将网关和两个api项目对应的ApiResources和Clients分别为api-gateway、service-api-one、service-api-two,两个api客户端AllowedScope为自己,网关的AllowedScope为自己和两个api客户端。在需要保护的三个项目中添加引用IdentityServer4.AccessTokenValidation(2.7.0),修改Startup的ConfigureServices,添加如下代码。
//使用IdentityServer4

            services.AddAuthentication(IdentityServerAuthenticationDefaults.AuthenticationScheme)

                .AddIdentityServerAuthentication(options =>

                {

                    options.ApiName = "service-api-two";

                    options.Authority = "http://localhost:16690"; // IdentityServer验证服务

                    options.RequireHttpsMetadata = false;

                    options.EnableCaching = true;

                });
Startup.Configure中添加app.UseAuthentication();
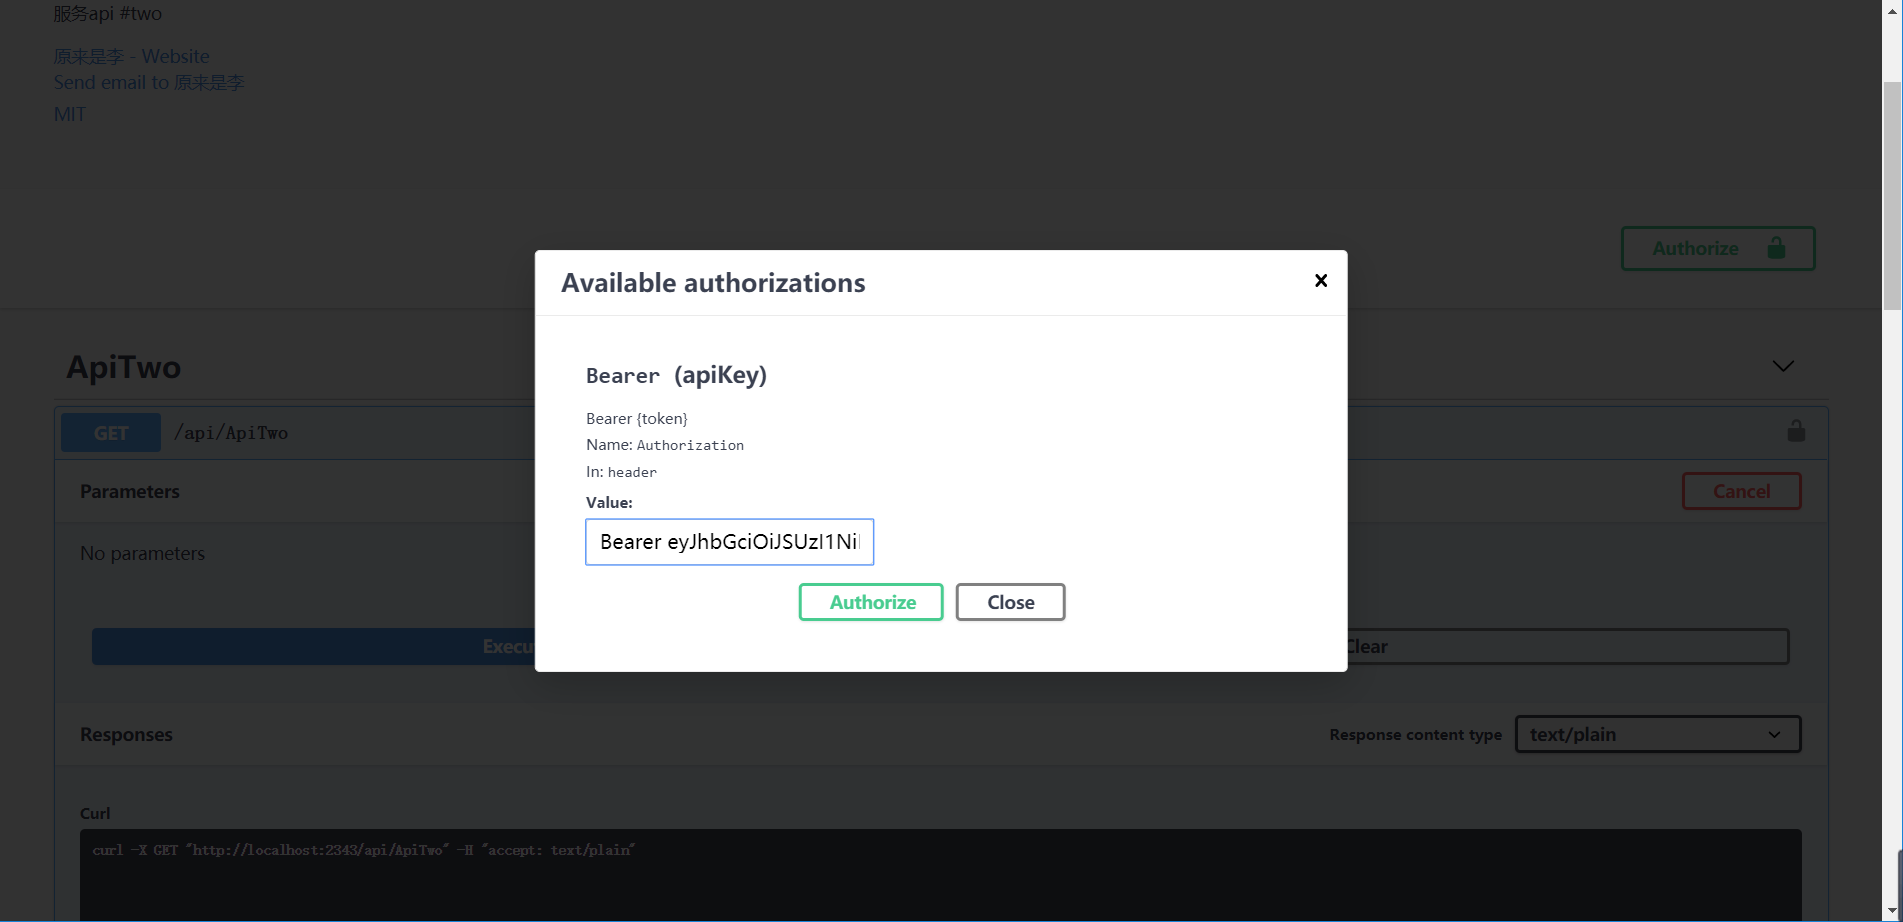
要在swagger中访问需要验证的api,需要在swagger配置中添加安全验证。
services.AddSwaggerGen(options =>

            {

                //SwaggerDoc的第一个参数要与Configure中SwaggerEndPoint中的版本名称一致

                //既可以使用版本号,也可以使用自定义名称

                options.SwaggerDoc("ServiceApiTwo", new Info

                {

                    Title = "Services.Api #two",

                    Version = "v1",

                    Description = "服务api #two",

                    License = new License

                    {

                        Name = "MIT",

                        Url = "https://mit-license.org/"

                    },

                    Contact = new Contact

                    {

                        Name = "原来是李",

                        Url = "http://www.cnblogs.com/falltakeman"

                    }

                });

                var xmlFile = $"{Assembly.GetExecutingAssembly().GetName().Name}.xml";

                var xmlPath = Path.Combine(AppDomain.CurrentDomain.BaseDirectory, xmlFile);

                options.IncludeXmlComments(xmlPath);

                // swagger访问需要验证的api

                options.AddSecurityDefinition("Bearer", new ApiKeyScheme

                {

                    In = "header",

                    Name = "Authorization",

                    Type = "apiKey",

                    Description = "Bearer {token}"

                });

                options.AddSecurityRequirement(new Dictionary<string, IEnumerable<string>>

                {

                    {

                        "Bearer",

                        Enumerable.Empty<string>()

                    }

                });

            });
在api控制器中,在需要保护的api上添加[Authorize]特性,没有授权的情况下访问受限api会报401错误。
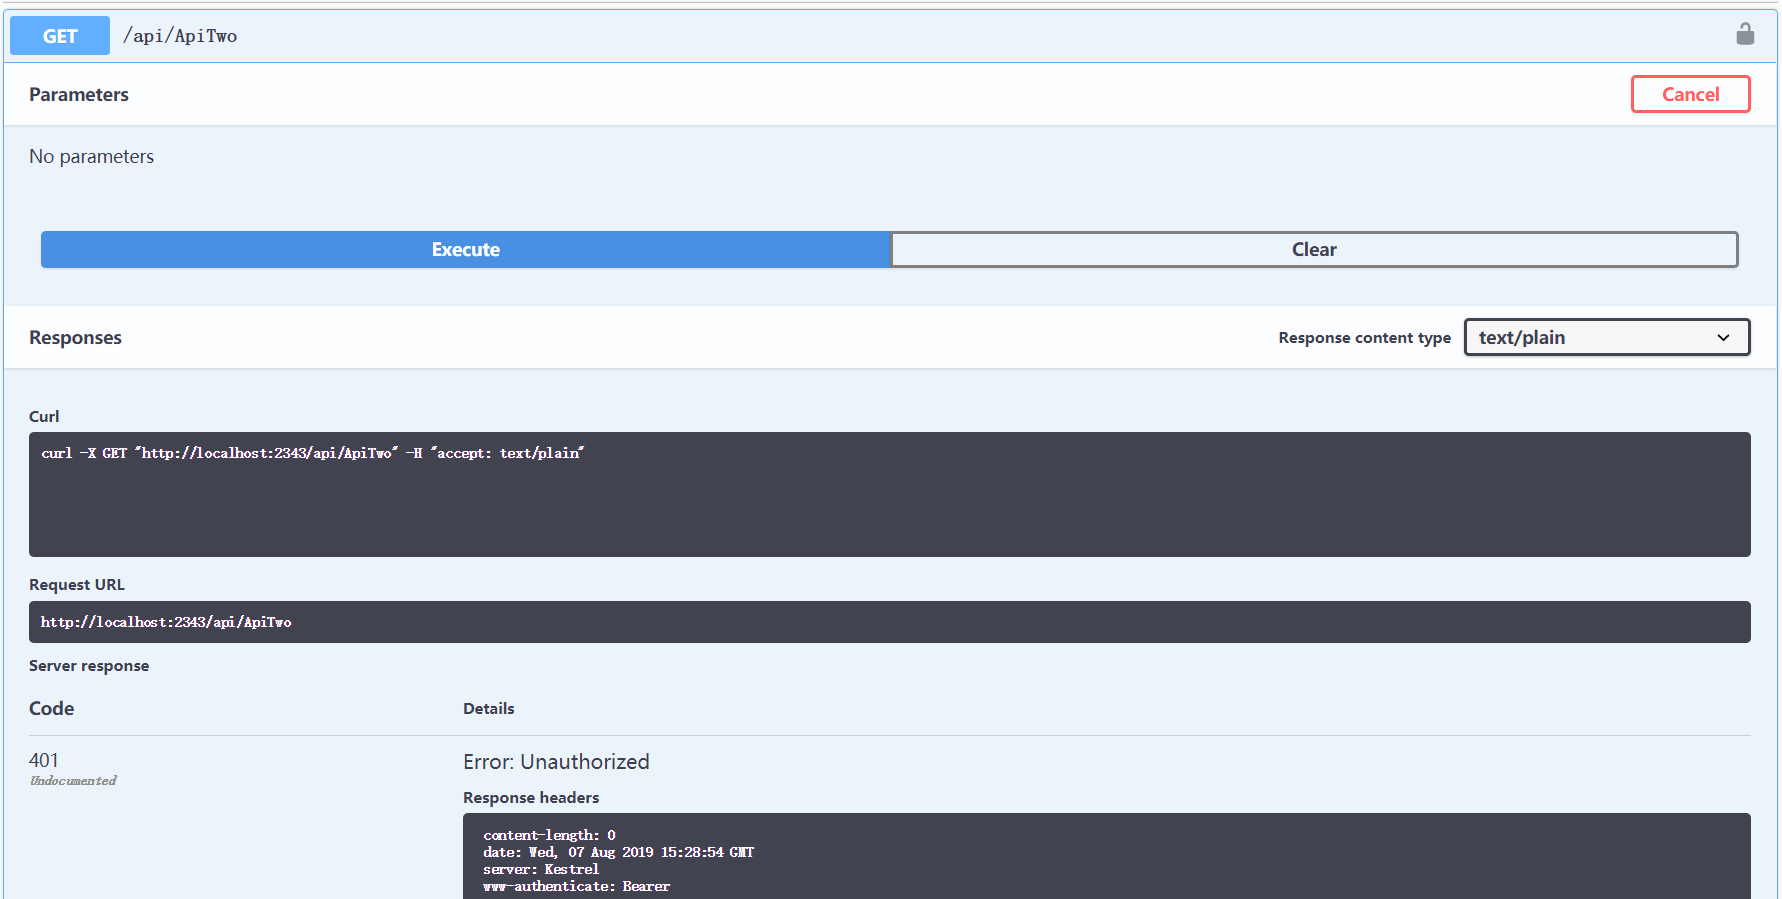
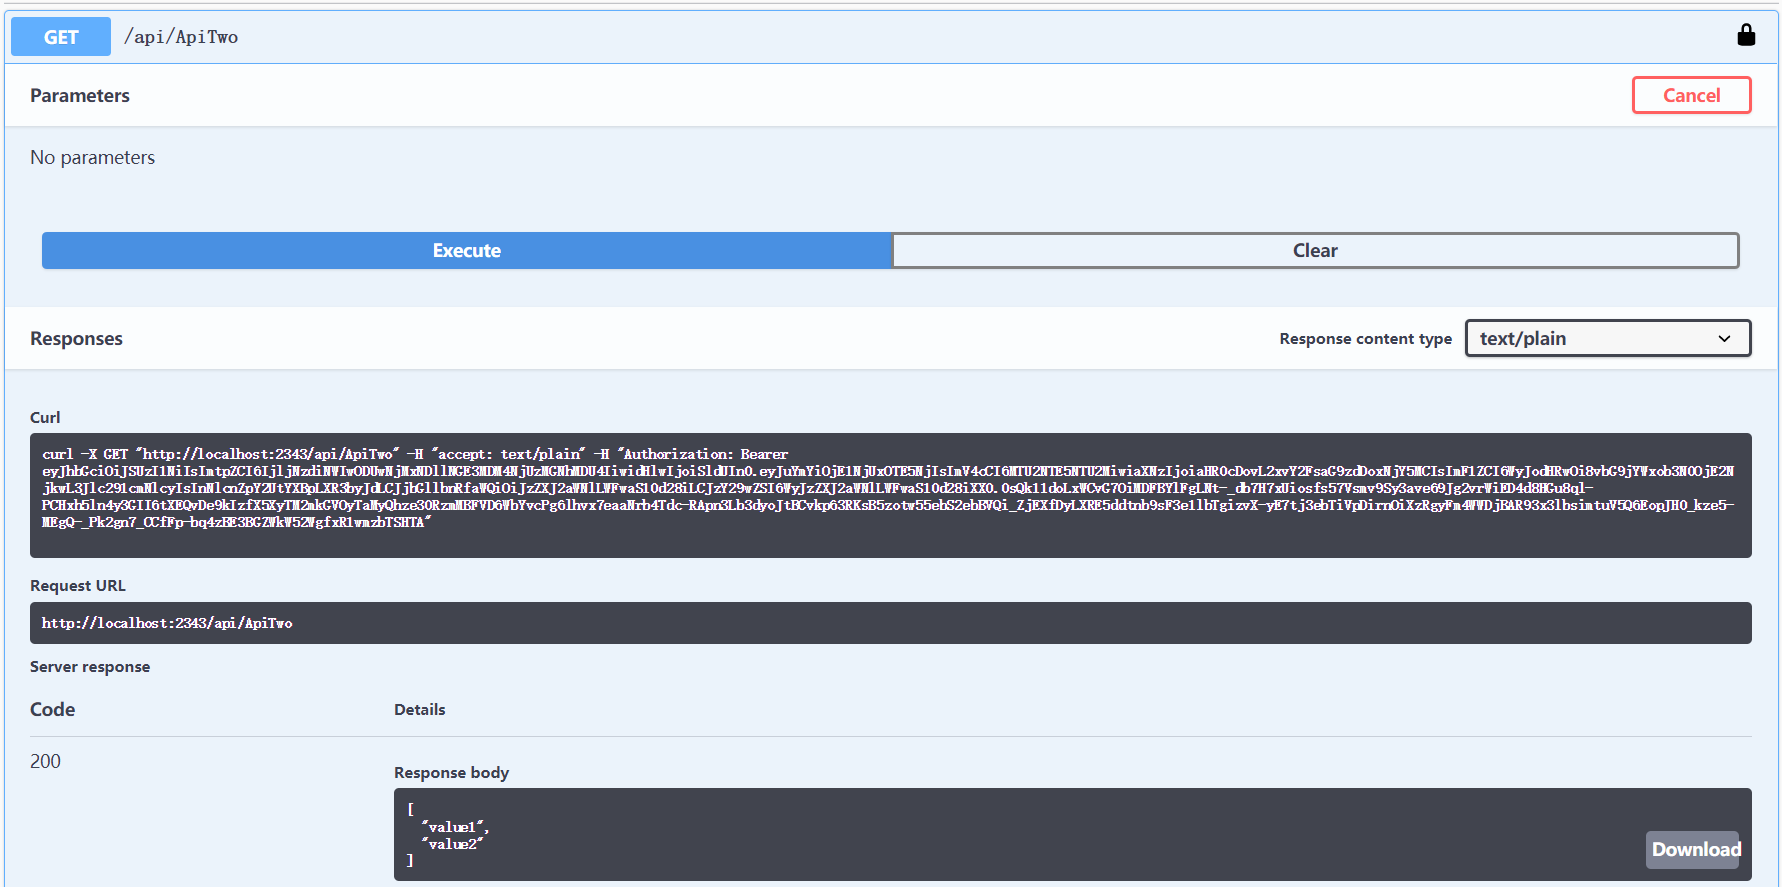
使用postman获取token,在swagger中填写token,再次发起请求,响应正常。

在ApiGateway的Startup.ConfigureServices添加Authentication,在Services.AddSwaggerGen添加相应代码,启动项目在app.UseOcelot().Wait()抛出异常:Scheme already exists: BearerIdentityServerAuthenticationJwt. 最终使用了下面的方式。在ApiGateway项目中通过swagger也可以访问业务api了。
Action<IdentityServerAuthenticationOptions> isaOpt = option =>

            {

                option.Authority = Configuration["IdentityService:Uri"];

                option.RequireHttpsMetadata = Convert.ToBoolean(Configuration["IdentityService:UseHttps"]);

                option.ApiName = Configuration["IdentityService:ApiName"];

                option.ApiSecret = Configuration["IdentityService:ApiSecret"];

                option.SupportedTokens = SupportedTokens.Both;

            };

            services.AddAuthentication().AddIdentityServerAuthentication(Configuration["IdentityService:DefaultScheme"], isaOpt);
但是配置中的IdentityService:DefaultScheme不可以是"Bearer",试验配置的是"IdentityBearer",不知为何不可以是"Bearer",不知道有没有懂这个的可以指点一二。
the end...
AspNetCore网关集成Swagger访问使用IdentityServer保护的webapi项目的更多相关文章
- 网关集成Swagger出现404错误
原因是忘了在需要生成api的类上加入注解 @EnableSwagger2Doc
- .netcore简单集成swagger
为什么要集成Swagger 在前后端分离比较普遍的当下,当后端开发完接口后,还需把接口的信息.参数说明.返回参数等信息编写好提供给调用者.对于对外开放接口需提供说明文档是必不可少的.但是对于内部开发, ...
- 【大道至简】NetCore3.1快速开发框架一:集成Swagger
在上一章节中,我们创建了基本的框架结构:https://www.cnblogs.com/fuyu-blog/p/12217647.html 下面我们测试接口和集成Swagger接口文档 一.接口测试 ...
- 微服务之十四如何在 Ocelot 网关中配置多实例 Swagger 访问
一.介绍 当我们开发基于微服务的应用程序的时候,有一个环节总是跳不过去的,那就是要创建 WebApi,然后,我们的应用程序基于 WebApi 接口去访问.在没有 Swagger 以前,我们开发好了 W ...
- 【从零开始搭建自己的.NET Core Api框架】(一)创建项目并集成swagger:1.1 创建
系列目录 一. 创建项目并集成swagger 1.1 创建 1.2 完善 二. 搭建项目整体架构 三. 集成轻量级ORM框架——SqlSugar 3.1 搭建环境 3.2 实战篇:利用SqlSuga ...
- Asp.Net Core集成Swagger
工作中一个公司会有很多个项目,项目之间的交互经常需要编写 API 来实现,但是编写文档是一件繁琐耗时的工作,并且随着 API 的迭代,每次都需要去更新维护接口文档,很多时候由于忘记或者人员交替的愿意造 ...
- ASP.NET Core3.1使用IdentityServer4中间件系列随笔(二):创建API项目,配置IdentityServer保护API资源
配套源码:https://gitee.com/jardeng/IdentitySolution 接上一篇<ASP.NET Core3.1使用IdentityServer4中间件系列随笔(一):搭 ...
- asp.net core 集成swagger ui
什么是Swagger? 说swagger 之前,我们先说一下OpenApi 规范. OpenApi 是一种和语言无关的用于描述RESTAPIs 接口功能的一种规范,对RESTAPIs 接口的描述包括: ...
- EF 数据库连接字符串-集成安全性访问 SQL Server
使用 Windows 集成安全性访问 SQL Server 如果您的应用程序运行在基于 Windows 的 Intranet 上,则也许可以将 Windows 集成身份验证用于数据库访问.集成安全性使 ...
随机推荐
- Java使用Jsoup之爬取博客数据应用实例
导入Maven依赖 <!-- https://mvnrepository.com/artifact/org.jsoup/jsoup --> <dependency> <g ...
- vscode插件开发之如何玩转vscode命令
这里以插件开发为例,VsCode之所以那么强大是因为它背后有千千万万的开发者们为其开发大量功能插件,WordPress同理. 那么如何玩转VsCode命令呢(以插件开发为例)? 官方文档必不可少 ht ...
- 【大数据】安装关系型数据库MySQL安装大数据处理框架Hadoop
作业来源于:https://edu.cnblogs.com/campus/gzcc/GZCC-16SE2/homework/3161 1. 简述Hadoop平台的起源.发展历史与应用现状. 列举发展过 ...
- 第10组 Alpha冲刺(6/6)
链接部分 队名:女生都队 组长博客: 博客链接 作业博客:博客链接 小组内容 恩泽(组长) 过去两天完成了哪些任务 描述 tomcat的学习与实现 服务器后端部署,API接口的beta版实现 后端代码 ...
- Netty 读写检测机制(心跳)
一.创建服务端 1.MyServer 类 public class MyServer { public static void main(String[] args) throws Exception ...
- Facets:一款Google开源机器学习数据集可视化工具
Homepage/演示网站:https://pair-code.github.io/facets/ Pypi:https://pypi.org/project/facets-overview/ Git ...
- android -------- GifImageView 之gif图片加载
目前支持Gif播放的开源库还是有的,试了一下还是这种好用点,所以来分享下android-gif-drawable是通过JNI来渲染帧的,这种方式比使用WebView或者Movie效率要高 要求Andr ...
- docker中mysql pxc集群
PXC集群 https://hub.docker.com/r/percona/percona-xtradb-cluster 安装PXC镜像 下载镜像或者导入本地镜像 docker pull perco ...
- 手工下载php的composer软件包,如何让项目自动加载包里的类
有的时候需要手工下载php的composer包 1.将下载好的包放到项目的vendor目录下,比如包名:pinguo/php-aop 2.然后查看软件包目录(vendor/pinguo/php-aop ...
- Kubernetes 基于 RBAC 的授权(十六)
目录 一.RBAC介绍 1.1.角色和集群角色 1.2.RoleBinding 和 ClusterRoleBinding 1.3.资源 1.4.主体 二.命令行工具 2.1.kubectl creat ...