NAVagationController
UINavigationController为导航控制器,在iOS里经常用到。
1.UINavigationController的结构组成
UINavigationController有Navigation bar ,Navigation View ,Navigation toolbar等组成。
将RootViewController添加到window上,在AppDelegate.m 文件的didFinishLaunchingWithOptions方法中创建添加navController,RootViewController视图。
- (BOOL)application:(UIApplication *)application didFinishLaunchingWithOptions:(NSDictionary *)launchOptions
{
self.window = [[UIWindow alloc] initWithFrame:[[UIScreen mainScreen] bounds]];
// Override point for customization after application launch.
RootViewController *rootViewController = [[RootViewController alloc] init];
rootViewController.title = @"rootView";
UINavigationController *nav = [[UINavigationController alloc] initWithRootViewController:rootViewController];
self.window.rootViewController = nav;
rootViewController = nil;
nav = nil;
self.window.backgroundColor = [UIColor whiteColor];
[self.window makeKeyAndVisible];
return YES;
}
控制视图推进推出的主要方法如下:
pushViewController:viewController animated:BOOL
(加载视图控制器)
– 添加指定的视图控制器并予以显示
popViewControllerAnimated:BOOL
(推出当前视图控制器)
– 弹出并向左显示前一个视图
popToViewController:viewController animated:BOOL
(推到指定视图控制器)
– 回到指定视图控制器, 也就是不只弹出一个
popToRootViewControllerAnimated:BOOL
退到根视图控制器
setNavigationBarHidden:BOOL animated:BOOL
设置导航栏是否显示
关于pushViewController:animated:的动画效果一般情况我们使用默认的动画就行,但我们也可以自定动画内容,我们可以使用CATransition来实现转换动画效果,代码如下:
- (void)tableView:(UITableView *)tableView didSelectRowAtIndexPath:(NSIndexPath *)indexPath{
if (indexPath.row == 0) {
OneViewController *oneViewController = [[OneViewController alloc] init];
CATransition *animation = [CATransition animation];
[animation setDuration:0.5];
[animation setType: kCATransitionMoveIn];
[animation setSubtype: kCATransitionFromTop];
[animation setTimingFunction:[CAMediaTimingFunction functionWithName:kCAMediaTimingFunctionDefault]];
[self.navigationController pushViewController:oneViewController animated:NO];
oneViewController = nil;
[self.navigationController.view.layer addAnimation:animation forKey:nil];
}
}
2.navigationItem
我们都知道navigationItem是UIViewController的一个属性,这个属性是为UINavigationController服务的。文档中是这么解释的“The navigation item used to represent the view controller in a parent’s navigation bar. (read-only)”,即navigation item在navigation Bar代表一个viewController,具体一点儿来说就是每一个加到navigationController的viewController都会有一个对应的navigationItem,该对象由viewController以懒加载的方式创建,稍后我们可以在对象中堆navigationItem进行配置,可以设置leftBarButtonItem, rightBarButtonItem, backBarButtonItem, title以及prompt等属性。前三个每一个都是一个UIBarButtonItem对象,最后两个属性是一个NSString类型描述,注意添加该描述以后NavigationBar的高度会增加30,总的高度会变成74(不管当前方向是Portrait还是Landscape,此模式下navigationbar都使用高度44加上prompt30的方式进行显示)。当然如果觉得只是设置文字的title不够爽,你还可以通过titleview属性指定一个定制的titleview,这样你就可以随心所欲了,当然注意指定的titleview的frame大小,不要显示出界。
a、添加UIBarButtonItem,
初始化UIBarButtonItem的方法有以下几种方法:
- (id)initWithImage:(UIImage *)image style:(UIBarButtonItemStyle)style target:(id)target action:(SEL)action;
- (id)initWithTitle:(NSString *)title style:(UIBarButtonItemStyle)style target:(id)target action:(SEL)action;
- (id)initWithBarButtonSystemItem:(UIBarButtonSystemItem)systemItem target:(id)target action:(SEL)action;
- (id)initWithCustomView:(UIView *)customView; //这个方法可以用来自定UIBarButtonItem
这里重点介绍下
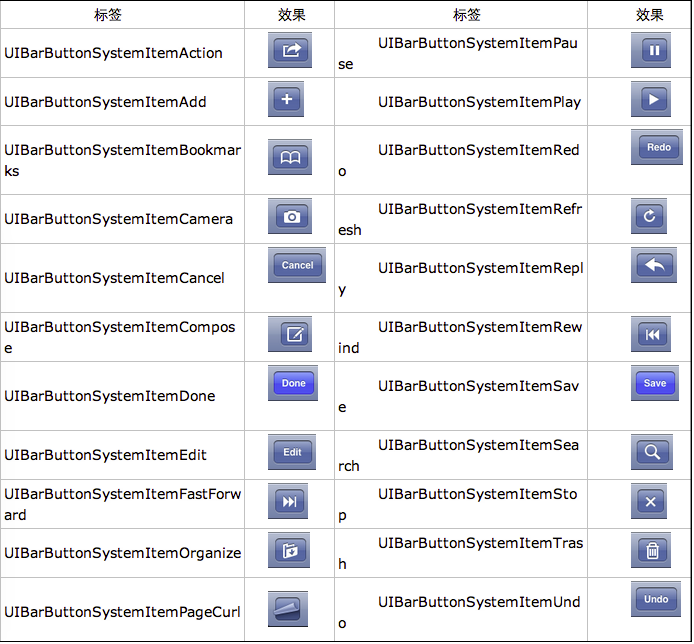
- (id)initWithBarButtonSystemItem:(UIBarButtonSystemItem)systemItem target:(id)target action:(SEL)action;
UIBarButtonSystemItem的风格,这是系统自带的按钮风格,看下图,你不用一个个试验,你也知道想用那个item,如下图:
给navigationItem 添加 UIBarButtonItem的方法有:
@property(nonatomic,retain) UIBarButtonItem *leftBarButtonItem;
@property(nonatomic,retain) UIBarButtonItem *rightBarButtonItem;
- (void)setLeftBarButtonItem:(UIBarButtonItem *)item animated:(BOOL)animated;
- (void)setRightBarButtonItem:(UIBarButtonItem *)item animated:(BOOL)animated;
@property(nonatomic,copy) NSArray *leftBarButtonItems NS_AVAILABLE_IOS(5_0);
@property(nonatomic,copy) NSArray *rightBarButtonItems NS_AVAILABLE_IOS(5_0);
- (void)setLeftBarButtonItems:(NSArray *)items animated:(BOOL)animated NS_AVAILABLE_IOS(5_0);
- (void)setRightBarButtonItems:(NSArray *)items animated:(BOOL)animated NS_AVAILABLE_IOS(5_0);
下面举例说明:
- (void)viewDidLoad
{
[super viewDidLoad];
self.view.backgroundColor = [UIColor scrollViewTexturedBackgroundColor];
UIBarButtonItem *buttonItem1 = [[UIBarButtonItem alloc] initWithTitle:@"登录"
style:UIBarButtonItemStyleBordered
target:self
action:@selector(barButtonItemClick:)];
UIBarButtonItem *buttonItem2 = [[UIBarButtonItem alloc] initWithImage:[UIImage imageNamed:@"setUp.png"]
style:UIBarButtonItemStyleBordered
target:self
action:@selector(barButtonItemClick:)];
UIBarButtonItem *buttonItem3 = [[UIBarButtonItem alloc] initWithBarButtonSystemItem:UIBarButtonSystemItemAdd
target:self
action:@selector(barButtonItemClick:)];
UIButton *button = [[UIButton alloc] initWithFrame:CGRectMake(0, 7, 50, 30)];
button.backgroundColor = [UIColor blueColor];
[button setTitle:@"按扭" forState:UIControlStateNormal];
UIBarButtonItem *buttonItem4 = [[UIBarButtonItem alloc] initWithCustomView:button];
self.navigationItem.leftBarButtonItem = buttonItem1;
self.navigationItem.rightBarButtonItems = @[buttonItem2, buttonItem3, buttonItem4];
}
//UIBarButtonItem击事件
- (void)barButtonItemClick:(UIBarButtonItem *)barButton{
//添加你要响应的代码
b、自定义backBarButtonItem
在项目中使用UINavigationController导航,当第一级页面的title较长,在进入第二级页面后返回按钮backBarButtonItem的title就会变得很长,于是使用代码对leftButtonItem的title文本进行修改,无论是设置self.navigationItem.leftBarButtonItem.title = @"返回";还是self.navigationItem.backBarButtonItem.title = @"返回";都没有效果,title始终不会发生变化,要怎第才能修改返回按扭的title呢?
原来使用pushViewController切换到下一个视图时,navigationController按照以下3条顺序更改导航栏的左侧按钮。
1)、如果B视图有一个自定义的左侧按钮(leftBarButtonItem),则会显示这个自定义按钮;
2)、如果B没有自定义按钮,但是A视图的backBarButtonItem属性有自定义项,则显示这个自定义项;
3)、如果前2条都没有,则默认显示一个后退按钮,后退按钮的标题是A视图的标题。
按照这个解释,我把UIBarButtonItem *backItem……这段代码放在A视图的pushViewController语句之前。
- (void)tableView:(UITableView *)tableView didSelectRowAtIndexPath:(NSIndexPath *)indexPath{
if (indexPath.row == 0) {
ItemOneViewController *itemOne = [[ItemOneViewController alloc] init];
itemOne.title = @"addItem";
[self.navigationController pushViewController:itemOne animated:YES];
itemOne = nil;
}
else{
ItemTwoViewController *itemTwo = [[ItemTwoViewController alloc] init];
itemTwo.title = @"setBackItemTitle";
UIBarButtonItem *back = [[UIBarButtonItem alloc] initWithTitle:@"返回"
style:UIBarButtonItemStyleBordered
target:nil
action:nil];
self.navigationItem.backBarButtonItem = back;
back = nil;
[self.navigationController pushViewController:itemTwo animated:YES];
itemTwo = nil;
}
}
OK问题解决了,B视图的后退按钮的标题变成“返回“了,也可以使用自定义的返回按扭。
c、自定义titleView,
UINavigationController的title可以用别的view替代,比如用UIview、 UIButton、 segmentedController、UILabel等,在下面的代码我用UIButton来演示.代码如下
- (void)viewDidLoad
{
[super viewDidLoad];
UIButton *button = [[UIButton alloc] initWithFrame:CGRectMake(0, 0, 90, 35)];
button.backgroundColor = [UIColor blueColor];
[button setTitle:@"自定义titleView" forState:UIControlStateNormal];
self.navigationItem.titleView = button;
}
注意:view的大小不要大小导航栏的大小,要不在就会显示不下。
3、Toolbar
在前面我们讲了UINavigationController有Navigation bar ,Navigation View ,Navigation toolbar等组成,下面就讲解一下toolbar的使用,
toolbar在UINavigationController默认是隐藏的,可通过下面的代码显示出来。
self.navigationController.toolbarHidden = NO;
或
[self.navigationController setToolbarHidden:NO animated:YES];
在ToolBar上添加UIBarButtonItem,新建几个UIBarButtonItem,然后以数组的形式添加到Toolbar中
{
[super viewDidLoad];
self.navigationController.toolbarHidden = NO;
UIBarButtonItem*one=[[UIBarButtonItem alloc]initWithBarButtonSystemItem:UIBarButtonSystemItemAdd
target:nil
action:nil];
UIBarButtonItem*two=[[UIBarButtonItem alloc]initWithBarButtonSystemItem:UIBarButtonSystemItemBookmarks
target:nil
action:nil];
UIBarButtonItem*three=[[UIBarButtonItem alloc]initWithBarButtonSystemItem:UIBarButtonSystemItemAction
target:nil
action:nil];
UIBarButtonItem*four=[[UIBarButtonItem alloc]initWithBarButtonSystemItem:UIBarButtonSystemItemEdit
target:nil
action:nil];
UIBarButtonItem*flexItem=[[UIBarButtonItem alloc]initWithBarButtonSystemItem:UIBarButtonSystemItemFlexibleSpace
target:nil
action:nil];
[self setToolbarItems:@[flexItem,one,flexItem,two,flexItem,three,flexItem,four,flexItem]];
}
注意:用[self.navigationController.toolbar setItems:(NSArray *) animated:(BOOL)]这个方法添加item是不起效果的。
但调用这个方法后所有UINavigationController中的viewController都会显示出toolbar.
所以为了不出现这种情况可以不用UINavigationController中的toolbar、需重写toolbar来实现。这样在返回上级视图时就不会出现本来隐藏着的toolbar,代码如下:
- (void)viewDidLoad
{
[super viewDidLoad];
UIBarButtonItem*one=[[UIBarButtonItem alloc]initWithBarButtonSystemItem:UIBarButtonSystemItemAdd
target:nil
action:nil];
UIBarButtonItem*two=[[UIBarButtonItem alloc]initWithBarButtonSystemItem:UIBarButtonSystemItemBookmarks
target:nil
action:nil];
UIBarButtonItem*three=[[UIBarButtonItem alloc]initWithBarButtonSystemItem:UIBarButtonSystemItemAction
target:nil
action:nil];
UIBarButtonItem*four=[[UIBarButtonItem alloc]initWithBarButtonSystemItem:UIBarButtonSystemItemEdit
target:nil
action:nil];
UIBarButtonItem*flexItem=[[UIBarButtonItem alloc]initWithBarButtonSystemItem:UIBarButtonSystemItemFlexibleSpace
target:nil
action:nil];
UIToolbar *toolBar = [[UIToolbar alloc] initWithFrame:CGRectMake(0, self.view.frame.size.height - 44, self.view.frame.size.width, 44)];
[toolBar setBarStyle:UIBarStyleBlack];
toolBar.autoresizingMask = UIViewAutoresizingFlexibleTopMargin;
[toolBar setItems:@[flexItem,one,flexItem,two,flexItem,three,flexItem,four,flexItem] animated:YES];
[self.view addSubview:toolBar];
}
设置导航栏的一些属性
设置导航栏中title的字体效果
NSDictionary *dict = @{UITextAttributeTextColor: [UIColor colorWithRed:27.0/255 green:125.0/255 blue:197.0/255 alpha:1],
UITextAttributeTextShadowColor: [UIColor whiteColor]};
self.navigationController.navigationBar.titleTextAttributes = dict;
设置导航栏的背影色
self.navigationController.navigationBar.barTintColor = [UIColor blueColor];
用图片设置导航栏的背影
[self.navigationController.navigationBar setBackgroundImage:[UIImage imageNamed:@"nav_bg.png"] forBarMetrics:UIBarMetricsDefault];
将导航栏设置为半透明,
self.navigationController.navigationBar.translucent = YES; //设置这个属性后视图的坐标会上移到导航栏的上面
将导航栏设置为透明的效果
先做一张全透明的图片1*1的像素就行,作为UINavigationBar的背景色,然后将barStyle设置成通道就可以了。
[self.navigationController.navigationBar setBackgroundImage:[UIImage imageNamed:@"clear.png"] forBarMetrics:UIBarMetricsDefault];
self.navigationController.navigationBar.barStyle = UIBarStyleBlackTranslucent
总结下上面讲到的属性使用方法
//设置导航栏title字体的样式
NSDictionary *dict = @{UITextAttributeTextColor: [UIColor colorWithRed:27.0/255 green:125.0/255 blue:197.0/255 alpha:1],
UITextAttributeTextShadowColor: [UIColor whiteColor]};
self.navigationController.navigationBar.titleTextAttributes = dict;
//设置导航栏的背影图片,可以设置成透明效果。
[self.navigationController.navigationBar setBackgroundImage:[UIImage imageNamed:@"nav_bg.png"] forBarMetrics:UIBarMetricsDefault];
//设置导航栏的样式
self.navigationController.navigationBar.barStyle = UIBarStyleBlackTranslucent;
//门置导航栏为半透明效果,同时视图坐标上移。
self.navigationController.navigationBar.translucent = YES;
注意,上面设置和修改的属性都是全局的,设置后在当前这个UINavigationController中的导航栏都将改变。
NAVagationController的更多相关文章
- navagationController 的子控制器如何取消右滑返回
1.首先在navagationController的某个控制器中 遵守:UIGestureRecognizerDelegate 2.在viewDidload中设置: self.navigationCo ...
- iOS-scrollview及其子类适配iOS7
问题描述: 在iOS7之后如果在导航控制器中所属的字控制器中嵌入scrollview及其子类的视图,当scrollview的尺寸太小的话不会调用返回cell的方法.控制器的嵌套层级结构如下图所示,着重 ...
- 06-UIKit(tableView数据模型)
目录: 一.UIPageControl 二.table view数据模型 三.反向传值给TableView并更新 回到顶部 一.UIPageControl在页面下显示点 1 重要属性 .numberO ...
- [课堂实践与项目]NavigationController与TabBarController的综合使用及易错点分析(包含消息提醒,app更新)
陈述:我们在使用tabbarController的时候,我们总会和NavagationController联合起来.但是不联合的时候又是什么样的一种pool的情况呢?我们就单单的 TabBarCont ...
- 在iOS 7中使用storyboard(part 1)
原文:Storyboards Tutorial in iOS 7: Part 1 感谢翻译小组成员heartasice热心翻译.如果您有不错的原创或译文,欢迎提交给我们,更欢迎其他朋友加 ...
随机推荐
- C# 调用win api获取chrome浏览器中地址
//FindWindow 查找窗口 //FindWindowEx查找子窗口 //EnumWindows列举屏幕上的所有顶层窗口,如果回调函数成功则返回非零,失败则返回零 //GetWindowText ...
- Linux Shell编程第2章——Linux文件系统
目录 用户和用户组管理 用户管理常用命令 用户组管理常用命令 文件和目录操作 文件操作常用命令 目录操作常用命令 文件和目录权限管理 文件查找--find 用户和用户组管理 用户管理常用命令 用户的角 ...
- SpringMVC学习大纲
PartA: 1.SpringMVC介绍 2.入门程序 3.SpringMVC架构讲解 a) 框架结构 b) 组件说明 4.SpringMVC整合MyBatis 5.参数绑定 a) SpringMVC ...
- 3. Longest Substring Without Repeating Characters(最长子串,双指针+hash)
Given a string, find the length of the longest substring without repeating characters. Examples: Giv ...
- 『NiFi 学习之路』入门 —— 下载、安装与简单使用
一.概述 "光说不练假把式." 官网上的介绍多少让人迷迷糊糊的,各种高大上的词语仿佛让 NiFi 离我们越来越远. 实践是最好的老师.那就让我们试用一下 NiFi 吧! 二.安装 ...
- HDOJ 1423 Greatest Common Increasing Subsequence 【DP】【最长公共上升子序列】
HDOJ 1423 Greatest Common Increasing Subsequence [DP][最长公共上升子序列] Time Limit: 2000/1000 MS (Java/Othe ...
- $python打包工具pyinstaller的用法
pyinstaller是一个很好用的python打包工具,在Windows环境下可以将python脚本打包成一个exe可执行文件,并且脚本中所依赖的各种第三方库在打包时候都会被统一处理到一起,这样打包 ...
- BeatSaber节奏光剑插件开发官方教程1-创建一个插件模板
原文:https://wiki.assistant.moe/modding/intro 一.简介 Beat Saber 开发环境:unity2018.C#..NET framework 4.6. 此教 ...
- Android Studio Gradle Could not reserve enough space for object heap
Studio 创建第一个工程报错 Error:Unable to start the daemon process.This problem might be caused by incorrect ...
- Linux常用监控命令
A goal is a dream with a deadline. Much effort, much prosperity. 1.IOSTAT命令 此命令安装包为sysstat 可用yu ...