ANN神经网络——Sigmoid 激活函数编程练习 (Python实现)
# ----------
#
# There are two functions to finish:
# First, in activate(), write the sigmoid activation function.
# Second, in update(), write the gradient descent update rule. Updates should be
# performed online, revising the weights after each data point.
#
# ----------
import numpy as np
class Sigmoid:
"""
This class models an artificial neuron with sigmoid activation function.
"""
def __init__(self, weights = np.array([1])):
"""
Initialize weights based on input arguments. Note that no type-checking
is being performed here for simplicity of code.
"""
self.weights = weights
# NOTE: You do not need to worry about these two attribues for this
# programming quiz, but these will be useful for if you want to create
# a network out of these sigmoid units!
self.last_input = 0 # strength of last input
self.delta = 0 # error signal
def activate(self, values):
"""
Takes in @param values, a list of numbers equal to length of weights.
@return the output of a sigmoid unit with given inputs based on unit
weights.
"""
# YOUR CODE HERE
# First calculate the strength of the input signal.
strength = np.dot(values, self.weights)
self.last_input = strength
# TODO: Modify strength using the sigmoid activation function and
# return as output signal.
# HINT: You may want to create a helper function to compute the
# logistic function since you will need it for the update function.
result = self.logistic(strength)
return result
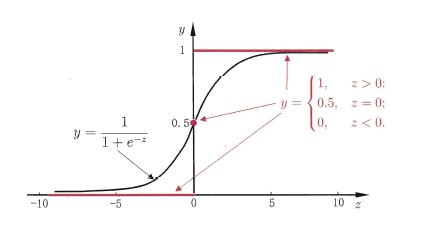
def logistic(self,strength):
return 1/(1+np.exp(-strength))
def update(self, values, train, eta=.1):
"""
Takes in a 2D array @param values consisting of a LIST of inputs and a
1D array @param train, consisting of a corresponding list of expected
outputs. Updates internal weights according to gradient descent using
these values and an optional learning rate, @param eta.
"""
# TODO: for each data point...
for X, y_true in zip(values, train):
# obtain the output signal for that point
y_pred = self.activate(X)
# YOUR CODE HERE
# TODO: compute derivative of logistic function at input strength
# Recall: d/dx logistic(x) = logistic(x)*(1-logistic(x))
dx = self.logistic(self.last_input)*(1 - self.logistic(self.last_input) )
print ("dx{}:".format(dx))
print ('\n')
# TODO: update self.weights based on learning rate, signal accuracy,
# function slope (derivative) and input value
delta_w = eta * (y_true - y_pred) * dx * X
print ("delta_w:{} weight before {}".format(delta_w, self.weights))
self.weights += delta_w
print ("delta_w:{} weight after {}".format(delta_w, self.weights))
print ('\n')
def test():
"""
A few tests to make sure that the perceptron class performs as expected.
Nothing should show up in the output if all the assertions pass.
"""
def sum_almost_equal(array1, array2, tol = 1e-5):
return sum(abs(array1 - array2)) < tol
u1 = Sigmoid(weights=[3,-2,1])
assert abs(u1.activate(np.array([1,2,3])) - 0.880797) < 1e-5
u1.update(np.array([[1,2,3]]),np.array([0]))
assert sum_almost_equal(u1.weights, np.array([2.990752, -2.018496, 0.972257]))
u2 = Sigmoid(weights=[0,3,-1])
u2.update(np.array([[-3,-1,2],[2,1,2]]),np.array([1,0]))
assert sum_almost_equal(u2.weights, np.array([-0.030739, 2.984961, -1.027437]))
if __name__ == "__main__":
test()
OUTPUT
Running test()...

dx0.104993585404:

delta_w:[-0.0092478  -0.01849561 -0.02774341] weight before [3, -2, 1]

delta_w:[-0.0092478  -0.01849561 -0.02774341] weight after [ 2.9907522  -2.01849561  0.97225659]

dx0.00664805667079:

delta_w:[-0.00198107 -0.00066036  0.00132071] weight before [0, 3, -1]

delta_w:[-0.00198107 -0.00066036  0.00132071] weight after [ -1.98106867e-03   2.99933964e+00  -9.98679288e-01]

dx0.196791859198:

delta_w:[-0.02875794 -0.01437897 -0.02875794] weight before [ -1.98106867e-03   2.99933964e+00  -9.98679288e-01]

delta_w:[-0.02875794 -0.01437897 -0.02875794] weight after [-0.03073901  2.98496067 -1.02743723]

All done!
ANN神经网络——Sigmoid 激活函数编程练习 (Python实现)的更多相关文章
- ANN神经网络——实现异或XOR (Python实现)
一.Introduction Perceptron can represent AND,OR,NOT 用初中的线性规划问题理解 异或的里程碑意义 想学的通透,先学历史! 据说在人工神经网络(artif ...
- 目前所有的ANN神经网络算法大全
http://blog.sina.com.cn/s/blog_98238f850102w7ik.html 目前所有的ANN神经网络算法大全 (2016-01-20 10:34:17) 转载▼ 标签: ...
- 【python实现卷积神经网络】激活层实现
代码来源:https://github.com/eriklindernoren/ML-From-Scratch 卷积神经网络中卷积层Conv2D(带stride.padding)的具体实现:https ...
- BP神经网络求解异或问题(Python实现)
反向传播算法(Back Propagation)分二步进行,即正向传播和反向传播.这两个过程简述如下: 1.正向传播 输入的样本从输入层经过隐单元一层一层进行处理,传向输出层:在逐层处理的过程中.在输 ...
- OpenCV——ANN神经网络
ANN-- Artificial Neural Networks 人工神经网络 //定义人工神经网络 CvANN_MLP bp; // Set up BPNetwork's parameters Cv ...
- 神经网络BP算法C和python代码
上面只显示代码. 详BP原理和神经网络的相关知识,请参阅:神经网络和反向传播算法推导 首先是前向传播的计算: 输入: 首先为正整数 n.m.p.t,分别代表特征个数.训练样本个数.隐藏层神经元个数.输 ...
- 神经网络的训练和测试 python
承接上一节,神经网络需要训练,那么训练集来自哪?测试的数据又来自哪? <python神经网络编程>一书给出了训练集,识别图片中的数字.测试集的链接如下: https://raw.githu ...
- 吴裕雄--天生自然神经网络与深度学习实战Python+Keras+TensorFlow:TensorFlow与神经网络的实现
import tensorflow as tf import numpy as np ''' 初始化运算图,它包含了上节提到的各个运算单元,它将为W,x,b,h构造运算部件,并将它们连接 起来 ''' ...
- 吴裕雄--天生自然神经网络与深度学习实战Python+Keras+TensorFlow:使用TensorFlow和Keras开发高级自然语言处理系统——LSTM网络原理以及使用LSTM实现人机问答系统
!mkdir '/content/gdrive/My Drive/conversation' ''' 将文本句子分解成单词,并构建词库 ''' path = '/content/gdrive/My D ...
随机推荐
- windows使用putty向远程服务器传送文件
一.问题产生 对于远程服务器,我习惯把文件写好后直接上传到服务器,也有很多方法可以做到,我现在比较习惯使用putty自带的pscp直接去传. 二.解决办法 1.首先在本地下载的putty文件下看是否有 ...
- Effective C++ 改善55个方法
美·Scott Meyers 候捷 电子工业 2011 刚才看到个会议时间有点晚,3.25论文都提交了 谷歌去广告的插件, 最后投了这个会议,刚刚好正合适.我说金钱与时间 ACCUSTOMING YO ...
- 【Python】端口扫描脚本
0x00 使用模块简介 1.optparse模块 选项分析器,可用来生成脚本使用说明文档,基本使用如下: import optparse #程序使用说明 usage="%prog -H ...
- 剑指offer——面试题20:表示数值的字符串
#include"iostream" using namespace std; bool IsInt(const char **str); bool IsUnsignInt(con ...
- MVC返回数据流,ajax接受并保存文件
js代码 <!DOCTYPE html> <html> <head> <meta charset="utf-8" /> <ti ...
- ifconfig无输出的原因及解决办法
问题 执行 ifconfig 命令无任何报错,也无任何输出信息 [root@linuxprobe ~]# ifconfig[root@linuxprobe ~]# 排错 1. 检查PATH变量 [r ...
- springMVC的一些入门配置
1.springMVC的描述 1.1.SpringMVC是Spring框架内置的MVC的实现.SpringMVC就是一个Spring内置的MVC子框架. 1.2.SpringMVC的作用是实现页面和后 ...
- es6-函数的扩展
/* * 1:函数参数的默认值 * */ !(() => { function f(x, y = 1, z = 1, g = 1) { console.log(x, y, z, g);//1,1 ...
- 3dsmax2014卸载/安装失败/如何彻底卸载清除干净3dsmax2014注册表和文件的方法
3dsmax2014提示安装未完成,某些产品无法安装该怎样解决呢?一些朋友在win7或者win10系统下安装3dsmax2014失败提示3dsmax2014安装未完成,某些产品无法安装,也有时候想重新 ...
- md5码加密(Python)
import hashlib import hmac m = input('输入要加密内容:') md = hashlib.md5()#生成md5 hash对象 md.update(m.encode( ...