NioEventLoop启动流程源码解析
NioEventLoop的启动时机是在服务端的NioServerSocketChannel中的ServerSocketChannel初始化完成,且注册在NioEventLoop后执行的, 下一步就是去绑定端口,但是在绑定端口前,需要完成NioEventLoop的启动工作, 因为程序运行到这个阶段为止,依然只有MainThread一条线程,下面就开始阅读源码看NioEventLoop如何开启新的线程自立家门的
总想说 NioEventLoop的整体结构,像极了这个图
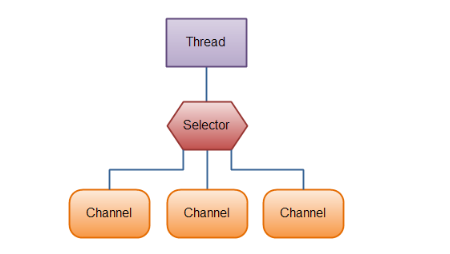
该图为,是我画的NioEventLoop启动的流程草图,很糙,但是不画它,总觉的少了点啥...
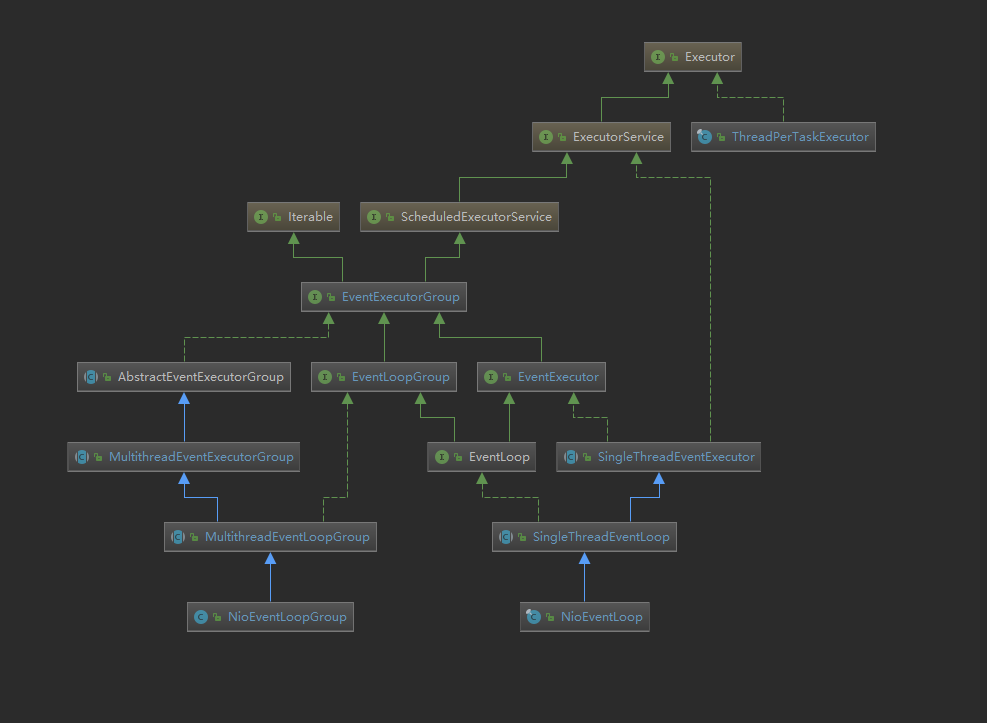
NioEventLoop的继承体系图
NioEventLoop的线程开启之路
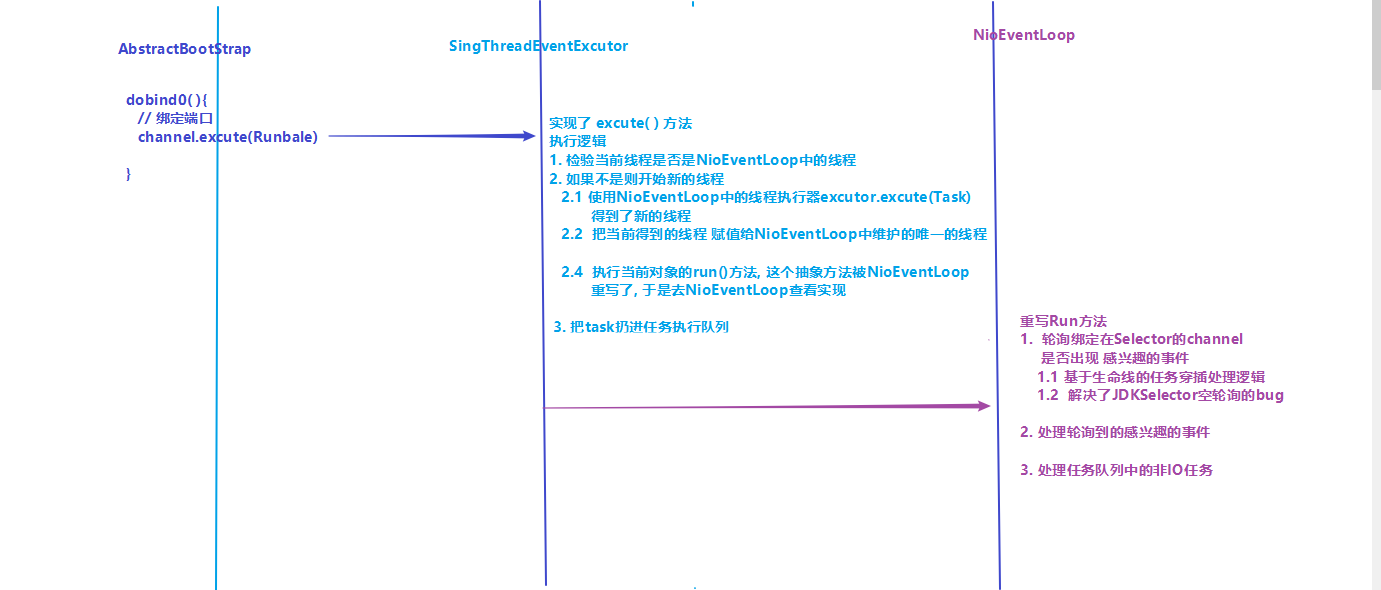
程序的入口是AbstractBootStrap, 这个抽象的启动辅助类, 找到它准备绑定端口的doBind0()方法,下面是源码:
private static void doBind0(

        final ChannelFuture regFuture, final Channel channel,

        final SocketAddress localAddress, final ChannelPromise promise) {

    // This method is invoked before channelRegistered() is triggered.  Give user handlers a chance to set up

    // the pipeline in its channelRegistered() implementation.

    // todo  此方法在触发  channelRegistered() 之前调用, 给用户一个机会,在  channelRegistered()  中设置pipeline

    // todo 这是 eventLoop启动的逻辑 ,  下面的Runable就是一个 task任务, 什么任务的呢? 绑定端口

    // todo 进入exeute()

    System.out.println("00000");

    channel.eventLoop().execute(new Runnable() {

        @Override

        public void run() {

            if (regFuture.isSuccess()) {

                // todo channel绑定端口并且添加了一个listenner

                channel.bind(localAddress, promise).addListener(ChannelFutureListener.CLOSE_ON_FAILURE);

            } else {

                promise.setFailure(regFuture.cause());

            }

        }

    });

}
我们关注上面的channel.execute(Runable)方法, 如果我们直接使用鼠标点击进去,会进入java.util.concurrent包下的Executor接口, 原因是因为,它是NioEventLoop继承体系的超顶级接口,见上图, 我们进入它的实现类,SingleThreadEventExcutor, 也就是NioEventLoop的间接父类, 源码如下:
 // todo eventLoop事件循环里面的task,会在本类SingleThreadEventExecutor里面: execute() 执行

    @Override

public void execute(Runnable task) {

    if (task == null) {

        throw new NullPointerException("task");

    }

    // todo 同样判断当前线程是不是 eventLoop里面的那条唯一的线程, 如果是的话, 就把当前任务放到任务队列里面等着当前的线程执行

    // todo ,不是的话就开启新的线程去执行这个新的任务

    // todo , eventLoop一生只会绑定一个线程,服务器启动时只有一条主线程,一直都是在做初始化的工作,并没有任何一次start()

    // todo 所以走的是else, 在else中首先开启新的线程,而后把任务添加进去

    boolean inEventLoop = inEventLoop();

    if (inEventLoop) {

        addTask(task);

    } else {

        // todo 开启线程 , 进入查看

        startThread();

        // todo 把任务丢进队列

        addTask(task);

        if (isShutdown() && removeTask(task)) {

            reject();

        }

    }

    if (!addTaskWakesUp && wakesUpForTask(task)) {

        wakeup(inEventLoop);

    }

}
现在执行这些代码的线程依然是主线程,主线程手上有绑定端口任务,但是它想把这个任务提交给NioEventLoop去执行,于是它就做出下面的判断
boolean inEventLoop = inEventLoop();

// 方法实现

@Override

public boolean inEventLoop(Thread thread) {

    return thread == this.thread;

}
但是发现,主线程并不是NioEventLoop唯一绑定的那个线程, 于是他就准备下面两件事:
- 开启激活当前NioEventLoop中的线程
- 把绑定端口的任务添加到任务队列
开启新线程的逻辑在下面,我删除了一些收尾,以及判断的代码,保留了主要的逻辑
   private void doStartThread() {

    assert thread == null;

    // todo 断言线程为空, 然后才创建新的线程

    executor.execute(new Runnable() { // todo 每次Execute 都是在使用 默认的线程工厂,创建一个线程并执行 Runable里面的任务

    @Override

    public void run() {

    // todo 获取刚才创建出来的线程,保存在NioEventLoop中的 thread 变量里面, 这里其实就是在进行那个唯一的绑定

    thread = Thread.currentThread();

    updateLastExecutionTime();

    try {

        // todo 实际启动线程, 到这里  NioEventLoop 就启动完成了

        SingleThreadEventExecutor.this.run();

    }

}
主要做了两件事第一波高潮来了 1. 调用了NioEventLoop的线程执行器的execute,这个方法的源码在下面,可以看到,excute,其实就是在创建线程, 线程创建完成后,立即把新创建出来的线程当作是NioEventLoop相伴终生的线程;
public final class ThreadPerTaskExecutor implements Executor {

    private final ThreadFactory threadFactory;

    public ThreadPerTaskExecutor(ThreadFactory threadFactory) {

        if (threadFactory == null) {

            throw new NullPointerException("threadFactory");

        }

        this.threadFactory = threadFactory;

    }

    // todo  必须实现 Executor 里面唯一的抽象方法, execute , 执行性 任务

    @Override

    public void execute(Runnable command) {

        threadFactory.newThread(command).start();

    }

}
创建/绑定完成了新的线程后,第二波高潮来了, SingleThreadEventExecutor.this.run(); 这行代码的意思是,调用本类的Run()方法,这个Run()方法就是真正在干活的事件循环,但是呢, 在本类中,Run()是一个抽象方法,因此我们要去找他的子类,那么是谁重写的这个Run()呢? 就是NioEventLoop, 它根据自己需求,重写了这个方法
小结: 到现在,NioEventLoop的线程已经开启了,下面的重头戏就是看他是如何进行事件循环的
NioEventLoop的事件循环run()
我们来到了NioEventLoop的run(), 他是个无限for循环, 主要完成了下面三件事
- 轮询IO事件
- 处理IO事件
- 处理非IO任务
这是NioEventLoop的run()的源码,删除了部分注解和收尾工作,
/**

 * todo select()  检查是否有IO事件

 * todo ProcessorSelectedKeys()    处理IO事件

 * todo RunAllTask()    处理异步任务队列

 */

@Override

protected void run() {

    for (; ; ) {

        try {

            switch (selectStrategy.calculateStrategy(selectNowSupplier, hasTasks())) {

                case SelectStrategy.CONTINUE:

                    continue;

                case SelectStrategy.SELECT:

                    // todo 轮询IO事件, 等待事件的发生, 本方法下面的代码是处理接受到的感性趣的事件, 进入查看本方法

                    select(wakenUp.getAndSet(false));

                    if (wakenUp.get()) {

                        selector.wakeup();

                    }

                default:

            }

            cancelledKeys = 0;

            needsToSelectAgain = false;

            final int ioRatio = this.ioRatio;  // todo 默认50

            // todo  如果ioRatio==100 就调用第一个     processSelectedKeys();  否则就调用第二个

            if (ioRatio == 100) {

                try {

                    // todo 处理 处理发生的感性趣的事件

                    processSelectedKeys();

                } finally {

                    // Ensure we always run tasks.

                    // todo 用于处理 本 eventLoop外的线程 扔到taskQueue中的任务

                    runAllTasks();

                }

            } else {// todo 因为ioRatio默认是50 , 所以来else

                // todo 记录下开始的时间

                final long ioStartTime = System.nanoTime();

                try {

                    // todo 处理IO事件

                    processSelectedKeys();

                } finally {

                    // Ensure we always run tasks.

                    // todo  根据处理IO事件耗时 ,控制 下面的runAllTasks执行任务不能超过 ioTime 时间

                    final long ioTime = System.nanoTime() - ioStartTime;

                    // todo 这里面有聚合任务的逻辑

                    runAllTasks(ioTime * (100 - ioRatio) / ioRatio);

                }

            }

        } catch (Throwable t) {

            handleLoopException(t);

        }

    }

}
下面进入它的select(),我们把select()称作: 基于deadline的任务穿插处理逻辑
下面直接贴出它的源码:下面的代码中我写了一些注解了, 主要是分如下几步走
- 根据当前时间计算出本次for()的最迟截止时间, 也就是他的deadline
- 判断1 如果超过了 截止时间,
selector.selectNow();直接退出 - 判断2 如果任务队列中出现了新的任务
selector.selectNow();直接退出 - 经过了上面12两次判断后, netty 进行阻塞式
select(time),默认是1秒这时可会会出现空轮询的Bug - 判断3 如果经过阻塞式的轮询之后,出现的感兴趣的事件,或者任务队列又有新任务了,或者定时任务中有新任务了,或者被外部线程唤醒了 都直接退出循环
- 如果前面都没出问题,最后检验是否出现了JDK空轮询的BUG
// todo 循环接受IO事件

// todo 每次进行 select()  操作时, oldWakenUp被标记为false

private void select(boolean oldWakenUp) throws IOException {

Selector selector = this.selector;

try {

    ///todo ----------------------------------------- 如下部分代码, 是 select()的deadLine及任务穿插处理逻辑-----------------------------------------------------

   // todo selectCnt这个变量记录了 循环 select的次数

    int selectCnt = 0;

    // todo 记录当前时间

    long currentTimeNanos = System.nanoTime();

    // todo 计算出估算的截止时间,  意思是, select()操作不能超过selectDeadLineNanos这个时间, 不让它一直耗着,外面也可能有任务等着当前线程处理

    long selectDeadLineNanos = currentTimeNanos + delayNanos(currentTimeNanos);

        // -------for 循环开始  -------

    for (; ; ) {

        // todo 计算超时时间

        long timeoutMillis = (selectDeadLineNanos - currentTimeNanos + 500000L) / 1000000L;

        if (timeoutMillis <= 0) {// todo 如果超时了 , 并且selectCnt==0 , 就进行非阻塞的 select() , break, 跳出for循环

            if (selectCnt == 0) {

                selector.selectNow();

                selectCnt = 1;

            }

            break;

        }

        // todo  判断任务队列中时候还有别的任务, 如果有任务的话, 进入代码块, 非阻塞的select() 并且 break; 跳出循环

        //todo  通过cas 把线程安全的把 wakenU设置成true表示退出select()方法, 已进入时,我们设置oldWakenUp是false

        if (hasTasks() && wakenUp.compareAndSet(false, true)) {

            selector.selectNow();

            selectCnt = 1;

            break;

        }

        ///todo ----------------------------------------- 如上部分代码, 是 select()的deadLine及任务穿插处理逻辑-----------------------------------------------------

        ///todo ----------------------------------------- 如下, 是 阻塞式的select() -----------------------------------------------------

        // todo  上面设置的超时时间没到,而且任务为空,进行阻塞式的 select() , timeoutMillis 默认1

        // todo netty任务,现在可以放心大胆的 阻塞1秒去轮询 channel连接上是否发生的 selector感性的事件

        int selectedKeys = selector.select(timeoutMillis);

        // todo 表示当前已经轮询了SelectCnt次了

        selectCnt++;

        // todo 阻塞完成轮询后,马上进一步判断 只要满足下面的任意一条. 也将退出无限for循环, select()

        // todo  selectedKeys != 0      表示轮询到了事件

        // todo  oldWakenUp              当前的操作是否需要唤醒

        // todo  wakenUp.get()          可能被外部线程唤醒

        // todo  hasTasks()             任务队列中又有新任务了

        // todo   hasScheduledTasks()   当时定时任务队列里面也有任务

        if (selectedKeys != 0 || oldWakenUp || wakenUp.get() || hasTasks() || hasScheduledTasks()) {

            break;

        }

        ///todo ----------------------------------------- 如上, 是 阻塞式的select() -----------------------------------------------------

        if (Thread.interrupted()) {

            if (logger.isDebugEnabled()) {

                logger.debug("Selector.select() returned prematurely because " +

                        "Thread.currentThread().interrupt() was called. Use " +

                        "NioEventLoop.shutdownGracefully() to shutdown the NioEventLoop.");

            }

            selectCnt = 1;

            break;

        }

        // todo 每次执行到这里就说明,已经进行了一次阻塞式操作 ,并且还没有监听到任何感兴趣的事件,也没有新的任务添加到队列,  记录当前的时间

        long time = System.nanoTime();

        // todo 如果  当前的时间 - 超时时间 >= 开始时间   把 selectCnt设置为1 , 表明已经进行了一次阻塞式操作

        // todo  每次for循环都会判断, 当前时间 currentTimeNanos 不能超过预订的超时时间 timeoutMillis

        // todo 但是,现在的情况是, 虽然已经进行了一次 时长为timeoutMillis时间的阻塞式select了,

        // todo  然而, 我执行到当前代码的 时间 - 开始的时间 >= 超时的时间

        // todo 但是   如果 当前时间- 超时时间< 开始时间, 也就是说,并没有阻塞select, 而是立即返回了, 就表明这是一次空轮询

        // todo 而每次轮询   selectCnt ++;  于是有了下面的判断,

        if (time - TimeUnit.MILLISECONDS.toNanos(timeoutMillis) >= currentTimeNanos) {

            // timeoutMillis elapsed without anything selected.

            selectCnt = 1;

        } else if (SELECTOR_AUTO_REBUILD_THRESHOLD > 0 &&

                // todo  selectCnt如果大于 512 表示cpu确实在空轮询, 于是rebuild Selector

                selectCnt >= SELECTOR_AUTO_REBUILD_THRESHOLD) {

            // The selector returned prematurely many times in a row.

            // Rebuild the selector to work around the problem.

            logger.warn(

                    "Selector.select() returned prematurely {} times in a row; rebuilding Selector {}.",

                    selectCnt, selector);

            // todo 它的逻辑创建一个新的selectKey , 把老的Selector上面的key注册进这个新的selector上面 , 进入查看

            rebuildSelector();

            selector = this.selector;

            // Select again to populate selectedKeys.

            // todo 解决了Select空轮询的bug

            selector.selectNow();

            selectCnt = 1;

            break;

        }

        currentTimeNanos = time;

    }

    ////   -----------for 循环结束 --------------

    if (selectCnt > MIN_PREMATURE_SELECTOR_RETURNS) {

        if (logger.isDebugEnabled()) {

            logger.debug("Selector.select() returned prematurely {} times in a row for Selector {}.",

                    selectCnt - 1, selector);

        }

    }

} catch (CancelledKeyException e) {

    if (logger.isDebugEnabled()) {

        logger.debug(CancelledKeyException.class.getSimpleName() + " raised by a Selector {} - JDK bug?",

                selector, e);

    }

    // Harmless exception - log anyway

}

}
什么是Jdk的Selector空轮询
我们可以看到,上面的run()方法,经过两次判断后进入了指定时长的阻塞式轮询,而我们常说的空轮询bug,指的就是本来该阻塞住轮询,但是却直接返回了, 在这个死循环中,它的畅通执行很可能使得CPU的使用率飙升, 于是把这种情况说是jdk的selector的空轮询的bug
Netty 如何解决了Jdk的Selector空轮询bug?
一个分支语句 if(){}else{} , 首先他记录下,现在执行判断时的时间, 然后用下面的公式判断
当前的时间t1 - 预订的deadLine截止时间t2 >= 开始进入for循环的时间t3
我们想, 如果说,上面的阻塞式select(t2)没出现任何问题,那么 我现在来检验是否出现了空轮询是时间t1 = t2+执行其他代码的时间, 如果是这样, 上面的等式肯定是成立的, 等式成立说没bug, 顺道把selectCnt = 1;
但是如果出现了空轮询,select(t2) 并没有阻塞,而是之间返回了, 那么现在的时间 t1 = 0+执行其他代码的时间, 这时的t1相对于上一个没有bug的大小,明显少了一个t2, 这时再用t1-t2 都可能是一个负数, 等式不成立,就进入了else的代码块, netty接着判断,是否是真的在空轮询, 如果说循环的次数达到了512次, netty就确定真的出现了空轮询, 于是nettyrebuild()Selector ,从新开启一个Selector, 循环老的Selector上面的上面的注册的时间,重新注册进新的 Selector上,用这个中替换Selector的方法,解决了空轮询的bug
感性趣的事件,是何时添加到selectedkeys中的?
ok, run()的三部曲第一步轮询已经完成了, 下一步就是处理轮询出来的感兴趣的IO事件,processSelectedKeys() ,下面我们进入这个方法, 如果这个selectedKeys不为空,就进去 processSelectedKeysOptimized();继续处理IO事件,
比较有趣的是,这个selectedKeys是谁? ,别忘了我们是在NioEventLoop中,是它开启了Selector,也是他使用反射的手段将Selector,存放感兴趣事件的HashSet集合替换成了SelectedSelectionKeySet这个名叫set,实为数组的数据结构, 当时的情况如下:
- 创建出
SelectedSelectionKeySet的实例selectedKeySet - 使用反射,将
unwrappedSelector中的selectedKeysField字段,替换成selectedKeySet - 最后一步, 也很重要
selectedKeys = selectedKeySet;
看到第三步没? 也就是说,我们现在再想获取装有感兴趣Key的 HashSet集合,已经不可能了,取而代之的是更优秀的selectedKeySet,也就是下面我们使用的selectedKeys ,于是我们想处理感性趣的事件,直接从selectedKeys中取, Selector轮询到感兴趣的事件,也会直接往selectedKeys中放
private void processSelectedKeys() {

    // todo  selectedKeys 就是经过优化后的keys(底层是数组)

    if (selectedKeys != null) {

        processSelectedKeysOptimized();

    } else {

        processSelectedKeysPlain(selector.selectedKeys());

    }

}
下面接着跟进processSelectedKeysOptimized();,关于这个方法的有趣的地方,我写在这段代码的下面
private void processSelectedKeysOptimized() {

for (int i = 0; i < selectedKeys.size; ++i) {

    final SelectionKey k = selectedKeys.keys[i];

    // null out entry in the array to allow to have it GC'ed once the Channel close

    // todo 数组输出空项, 从而允许在channel 关闭时对其进行垃圾回收

    // See https://github.com/netty/netty/issues/2363

    // todo 数组中当前循环对应的keys质空, 这种感兴趣的事件只处理一次就行

    selectedKeys.keys[i] = null;

    // todo 获取出 attachment,默认情况下就是注册进Selector时,传入的第三个参数  this===>   NioServerSocketChannel

    // todo 一个Selector中可能被绑定上了成千上万个Channel,  通过K+attachment 的手段, 精确的取出发生指定事件的channel, 进而获取channel中的unsafe类进行下一步处理

    final Object a = k.attachment();

    // todo

    if (a instanceof AbstractNioChannel) {

        // todo 进入这个方法, 传进入 感兴趣的key + NioSocketChannel

        processSelectedKey(k, (AbstractNioChannel) a);

    } else {

        @SuppressWarnings("unchecked")

        NioTask<SelectableChannel> task = (NioTask<SelectableChannel>) a;

        processSelectedKey(k, task);

    }

    if (needsToSelectAgain) {

        // null out entries in the array to allow to have it GC'ed once the Channel close

        // See https://github.com/netty/netty/issues/2363

        selectedKeys.reset(i + 1);

        selectAgain();

        i = -1;

    }

}

}
NioEventLoop是如何在千百条channel中,精确获取出现指定感兴趣事件的channel的?
上面这个方法,就是在真真正正的处理IO事件, 看看这段代码, 我们发现了这样一行代码
final Object a = k.attachment();
并且,判断出Key的类型后,执行处理逻辑的代码中的入参都是一样的processSelectedKey(a,k) , 这是在干什么呢?
其实,我们知道,每个NioEventLoop开始干活后,会有很多客户端的连接channel前来和它建立连接,一个事件循环同时为多条channel服务,而且一条channel的整个生命周期都只和一个NioEventLoop关联
现在好了,事件循环的选择器轮询出了诸多的channel中有channel出现了感兴趣的事件,下一步处理这个事件的前提得知道,究竟是哪个channel?
使用的attachment特性,早在Channel注册进Selector时,进存放进去了,下面是Netty中,Channel注册进Selector的源码
  @Override

    protected void doRegister() throws Exception {

boolean selected = false;

for (;;) {

    try {

        // todo  javaChannel() -- 返回SelectableChanel 可选择的Channel,换句话说,可以和Selector搭配使用,他是channel体系的顶级抽象类, 实际的类型是 ServerSocketChannel

        // todo  eventLoop().unwrappedSelector(), -- >  获取选择器, 现在在AbstractNioChannel中 获取到的eventLoop是BossGroup里面的

        // todo  到目前看, 他是把ServerSocketChannel(系统创建的) 注册进了 EventLoop的选择器

        // todo 到目前为止, 虽然注册上了,但是它不关心任何事件

        selectionKey = javaChannel().register(eventLoop().unwrappedSelector(), 0, this);

        return;

    } catch (CancelledKeyException e) {
这里的 最后一个参数是 this是当前的channel , 意思是把当前的Channel当成是一个 attachment(附件) 绑定到selector上 作用如下:
- 当channel在这里注册进 selector中返回一个selectionKey, 这个key告诉selector 这个channel是自己的
- 当selector轮询到 有channel出现了自己的感兴趣的事件时, 需要从成百上千的channel精确的匹配出 出现Io事件的channel,于是seleor就在这里提前把channel存放入 attachment中, 后来使用
- 最后一个 this 参数, 如果是服务启动时, 他就是NioServerSocketChannel 如果是客户端他就是 NioSocketChannel
ok, 现在就捋清楚了,挖坑,填坑的过程; 下面进入processSelectedKey(SelectionKey k, AbstractNioChannel ch)执行IO任务, 源码如下: 我们可以看到,具体的处理IO的任务都是用Channel的内部类unSafe()完成的, 到这里就不往下跟进了, 后续写新博客连载
private void processSelectedKey(SelectionKey k, AbstractNioChannel ch) {

        // todo 这个unsafe 也是可channel 也是和Channel进行唯一绑定的对象

        final AbstractNioChannel.NioUnsafe unsafe = ch.unsafe();

        if (!k.isValid()) {   // todo 确保Key的合法

            final EventLoop eventLoop;

            try {

                eventLoop = ch.eventLoop();

            } catch (Throwable ignored) {

                // If the channel implementation throws an exception because there is no event loop, we ignore this

                // because we are only trying to determine if ch is registered to this event loop and thus has authority

                // to close ch.

                return;

            }

            // Only close ch if ch is still registered to this EventLoop. ch could have deregistered from the event loop

            // and thus the SelectionKey could be cancelled as part of the deregistration process, but the channel is

            // still healthy and should not be closed.

            // See https://github.com/netty/netty/issues/5125

            if (eventLoop != this || eventLoop == null) { // todo 确保多线程下的安全性

                return;

            }

            // close the channel if the key is not valid anymore

            unsafe.close(unsafe.voidPromise());

            return;

        }

        // todo NioServerSocketChannel和selectKey都合法的话, 就进入下面的 处理阶段

        try {

            // todo 获取SelectedKey 的 关心的选项

            int readyOps = k.readyOps();

            // We first need to call finishConnect() before try to trigger a read(...) or write(...) as otherwise

            // the NIO JDK channel implementation may throw a NotYetConnectedException.

            // todo 在read()   write()之前我们需要调用 finishConnect()  方法, 否则  NIO JDK抛出异常

            if ((readyOps & SelectionKey.OP_CONNECT) != 0) {

                // remove OP_CONNECT as otherwise Selector.select(..) will always return without blocking

                // See https://github.com/netty/netty/issues/924

                int ops = k.interestOps();

                ops &= ~SelectionKey.OP_CONNECT;

                k.interestOps( );

                unsafe.finishConnect();

            }

            // Process OP_WRITE first as we may be able to write some queued buffers and so free memory.

            if ((readyOps & SelectionKey.OP_WRITE) != 0) {

                // Call forceFlush which will also take care of clear the OP_WRITE once there is nothing left to  write

                ch.unsafe().forceFlush();

            }

            // Also check for readOps of 0 to workaround possible JDK bug which may otherwise lead

            // to a spin loop

            // todo 同样是检查 readOps是否为零, 来检查是否出现了  jdk  空轮询的bug

            if ((readyOps & (SelectionKey.OP_READ | SelectionKey.OP_ACCEPT)) != 0 || readyOps == 0) {

                unsafe.read();

            }

        } catch (CancelledKeyException ignored) {

            unsafe.close(unsafe.voidPromise());

        }

    }
处理非IO任务
上面的处理IO事件结束后,第三波高潮就来了,处理任务队列中的任务, runAllTask(timeOutMinils), 他也是有生命时长限制的 deadline, 它主要完成了如下的几步:
- 聚合任务, 把到期的定时任务转移到普通任务队列
- 循环从普通队列获取任务
- 执行任务
- 每执行完64个任务,判断是否到期了
- 收尾工作
源码如下:
protected boolean runAllTasks(long timeoutNanos) {

    // todo 聚合任务, 会把定时任务放入普通的任务队列中 进入查看

    fetchFromScheduledTaskQueue();

    // todo 从普通的队列中拿出一个任务

    Runnable task = pollTask();

    if (task == null) {

        afterRunningAllTasks();

        return false;

    }

    // todo 计算截止时间, 表示任务的执行,最好别超过这个时间

    final long deadline = ScheduledFutureTask.nanoTime() + timeoutNanos;

    long runTasks = 0;

    long lastExecutionTime;

    // todo for循环执行任务

    for (;;) {

        // todo 执行任务, 方法里调用 task.run();

        safeExecute(task);

        runTasks ++;

        // Check timeout every 64 tasks because nanoTime() is relatively expensive.

        // XXX: Hard-coded value - will make it configurable if it is really a problem.

        // todo 因为 nanoTime();的执行也是个相对耗时的操作,因此没执行完64个任务后,检查有没有超时

        if ((runTasks & 0x3F) == 0) {

            lastExecutionTime = ScheduledFutureTask.nanoTime();

            if (lastExecutionTime >= deadline) {

                break;

            }

        }

        // todo 拿新的任务

        task = pollTask();

        if (task == null) {

            lastExecutionTime = ScheduledFutureTask.nanoTime();

            break;

        }

    }

    // todo 每个任务执行结束都有个收尾的构造

    afterRunningAllTasks();

    this.lastExecutionTime = lastExecutionTime;

    return true;

}
NioEventLoop如何聚合任务?
聚合任务就是把已经到执行时间的任务从定时任务队列中全部取出 ,放入普通任务队列然后执行, 我们进入上的第一个方法fetchFromScheduledTaskQueue,源码如下,
private boolean fetchFromScheduledTaskQueue() {

    // todo 拉取第一个聚合任务

    long nanoTime = AbstractScheduledEventExecutor.nanoTime();

    // todo 从任务丢列中取出 截止时间是 nanoTime的定时任务 ,

    // todo 往定时队列中添加 ScheduledFutureTask任务, 排序的基准是 ScheduledFutureTask 的compare方法,按照时间,从小到大

    // todo 于是当我们发现队列中的第一个任务,也就是截止时间最近的任务的截止时间比我们的

    Runnable scheduledTask  = pollScheduledTask(nanoTime);

    while (scheduledTask != null) {

        // todo scheduledTask != null表示定时任务该被执行了, 于是将定时任务添加到 普通任务队列

        if (!taskQueue.offer(scheduledTask)) {

            // No space left in the task queue add it back to the scheduledTaskQueue so we pick it up again.

            // todo 如果添加失败了, 把这个任务从新放入到定时任务队列中, 再尝试添加

            scheduledTaskQueue().add((ScheduledFutureTask<?>) scheduledTask);

            return false;

        }

        // todo 循环,尝试拉取定时任务 , 循环结束后,所有的任务全部会被添加到 task里面

        scheduledTask  = pollScheduledTask(nanoTime);

    }

    return true;

}
根据指定的截止时间,从定时任务队列中取出任务,定时任务队列中任务按照时间排序,时间越短的,排在前面, 时间相同,按照添加的顺序排序, 现在的任务就是检查定时任务队列中任务,尝试把里面的任务挨个取出来,于是netty使用这个方法 Runnable scheduledTask = pollScheduledTask(nanoTime); 然后马上在while(){}循环中判断是否存在, 这个方法实现源码如下, 不难看出,他是在根据时间判断
  /**

 * Return the {@link Runnable} which is ready to be executed with the given {@code nanoTime}.

 * You should use {@link #nanoTime()} to retrieve the the correct {@code nanoTime}.

 *  todo  根据给定的纳秒值,返回 Runable定时任务 , 并且,每次使用都要冲洗使用是nanoTime() 来矫正时间

 */

protected final Runnable pollScheduledTask(long nanoTime) {

    assert inEventLoop();

    Queue<ScheduledFutureTask<?>> scheduledTaskQueue = this.scheduledTaskQueue;

    ScheduledFutureTask<?> scheduledTask = scheduledTaskQueue == null ? null : scheduledTaskQueue.peek();

    if (scheduledTask == null) {

        return null;

    }

    // todo 如果定时任务的截止时间<= 我们穿进来的时间, 就把他返回

    if (scheduledTask.deadlineNanos() <= nanoTime) {

        scheduledTaskQueue.remove();

        return scheduledTask;

    }

    // todo 否则返回kong,表示当前所有的定时任务都没到期, 没有可以执行的

    return null;

}
经过循环之后,到期的任务,全被添加到 taskQueue里面了,下面就是执行TaskQueue里面的任务
任务队列中的任务是怎么执行的?
safeExecute(task); 方法,执行任务队列中的任务
源码如下: 实际上就行执行了 task这个Runable的Run方法
/**

 * Try to execute the given {@link Runnable} and just log if it throws a {@link Throwable}.

 */

protected static void safeExecute(Runnable task) {

    try {

        task.run();

    } catch (Throwable t) {

        logger.warn("A task raised an exception. Task: {}", task, t);

    }

}
总结一下: 到现在为止,EventLoop已经启动了, 一说到NioEventLoop总是想起上图, 现在他可以接受新的连接接入,轮询,处理任务...
NioEventLoop启动流程源码解析的更多相关文章
- Spring IOC容器启动流程源码解析(四)——初始化单实例bean阶段
目录 1. 引言 2. 初始化bean的入口 3 尝试从当前容器及其父容器的缓存中获取bean 3.1 获取真正的beanName 3.2 尝试从当前容器的缓存中获取bean 3.3 从父容器中查找b ...
- Spring IOC容器启动流程源码解析(一)——容器概念详解及源码初探
目录 1. 前言 1.1 IOC容器到底是什么 1.2 BeanFactory和ApplicationContext的联系以及区别 1.3 解读IOC容器启动流程的意义 1.4 如何有效的阅读源码 2 ...
- Android Activity启动流程源码全解析(1)
前言 Activity是Android四大组件的老大,我们对它的生命周期方法调用顺序都烂熟于心了,可是这些生命周期方法到底是怎么调用的呢?在启动它的时候会用到startActivty这个方法,但是这个 ...
- Android Activity启动流程源码全解析(2)
接上之前的分析 ++Android Activity启动流程源码全解析(1)++ 1.正在运行的Activity调用startPausingLocked 一个一个分析,先来看看startPausing ...
- Spark(五十一):Spark On YARN(Yarn-Cluster模式)启动流程源码分析(二)
上篇<Spark(四十九):Spark On YARN启动流程源码分析(一)>我们讲到启动SparkContext初始化,ApplicationMaster启动资源中,讲解的内容明显不完整 ...
- Spark(四十九):Spark On YARN启动流程源码分析(一)
引导: 该篇章主要讲解执行spark-submit.sh提交到将任务提交给Yarn阶段代码分析. spark-submit的入口函数 一般提交一个spark作业的方式采用spark-submit来提交 ...
- Spring IOC 容器预启动流程源码探析
Spring IOC 容器预启动流程源码探析 在应用程序中,一般是通过创建ClassPathXmlApplicationContext或AnnotationConfigApplicationConte ...
- 【图解源码】Zookeeper3.7源码分析,包含服务启动流程源码、网络通信源码、RequestProcessor处理请求源码
Zookeeper3.7源码剖析 能力目标 能基于Maven导入最新版Zookeeper源码 能说出Zookeeper单机启动流程 理解Zookeeper默认通信中4个线程的作用 掌握Zookeepe ...
- Spring Boot的自动配置原理及启动流程源码分析
概述 Spring Boot 应用目前应该是 Java 中用得最多的框架了吧.其中 Spring Boot 最具特点之一就是自动配置,基于Spring Boot 的自动配置,我们可以很快集成某个模块, ...
随机推荐
- 查看window端口占用并结束相关进程
启动cmd命令行 运行netstat –ano,可列出所有端口情况 根据被占用的端口号,比如8081,运行netstat -aon|findstr "8081",找到它对应的PID ...
- workerman源码分析之启动过程
PHP一直以来以草根示人,它简单,易学,被大量应用于web开发,非常可惜的是大部分开发都在简单的增删改查,或者加上pdo,redis等客户端甚至分布式,以及规避语言本身的缺陷.然而这实在太委屈PHP了 ...
- 图像滤镜艺术---Wave滤镜
原文:图像滤镜艺术---Wave滤镜 Wave Filter水波滤镜 水波滤镜是通过坐标变换来模拟水波效果,使图像呈现出水波的特效.这个滤镜有一个可调参数:水波的扭曲程度. 代码如下; // ...
- mfc动态显示图片
参考:https://blog.csdn.net/pudongdong/article/details/69396600 之前写过win32动态显示图片的博客,这次用到了mfc.原理是一样的. OnI ...
- MySQL创建数据库并插入数据
启动MySql 启动服务:sudo service mysql start 登陆:mysql -u root 新建数据库 CREATE DATABASE <数据库名>; 在大多数SQL系统 ...
- Qt https 用户认证authenticationRequired()
用QNetworkAccessManager以POST方式访问https需要用户认证,所以用SIGNAL(authenticationRequired(QNetworkReply *, QAuthen ...
- c# winform快捷键实现
我们在软件中经常用到快捷键,这里整理备份一下. 首先我们要定义可以作为快捷键的按键,以下是整理的 一些,自己可以根据情况来修改 public static Dictionary<int, str ...
- 逆向工程mybatis-geneator.xml
<?xml version="1.0" encoding="UTF-8"?><!DOCTYPE generatorConfiguration ...
- Qt之OpenSSL(有pro文件的路径格式,以及对libeay32和ssleay32的引用)
简述 OpenSSL是一个强大的安全套接字层密码库,囊括主要的密码算法.常用的密钥和证书封装管理功能及SSL协议,并提供丰富的应用程序供测试或其它目的使用. 简述 下载安装 使用 更多参考 下载安装 ...
- NSmutableArray 的实现原理机制
古老的C数组: 优点:查询速度很快,直接通过下表找到对应的值 缺点:修改.删除数据很慢,需要移动基于所有的其他的元素 插入和删除一个元素,需要移动后面所有的元素 改进的目标:实现快速增加,删除 N ...