
Spring Boot缓存Ehcache
<!-- Spring Boot 缓存支持启动器 -->

        <dependency>

            <groupId>org.springframework.boot</groupId>

            <artifactId>spring-boot-starter-cache</artifactId>

        </dependency>

        <!-- Ehcache 坐标 -->

        <dependency>

            <groupId>net.sf.ehcache</groupId>

            <artifactId>ehcache</artifactId>

</dependency><ehcache xmlns:xsi="http://www.w3.org/2001/XMLSchema-instance" xsi:noNamespaceSchemaLocation="../config/ehcache.xsd">
<diskStore path="java.io.tmpdir"/> <!--defaultCache:echcache 的默认缓存策略 -->
<defaultCache maxElementsInMemory="10000"
eternal="false"
timeToIdleSeconds="120"
timeToLiveSeconds="120"
maxElementsOnDisk="10000000"
diskExpiryThreadIntervalSeconds="120"
memoryStoreEvictionPolicy="LRU">
<persistence strategy="localTempSwap"/>
</defaultCache> <!-- 自定义缓存策略 -->
<cache name="users"
maxElementsInMemory="10000"
eternal="false"
timeToIdleSeconds="120"
timeToLiveSeconds="120"
maxElementsOnDisk="10000000"
diskExpiryThreadIntervalSeconds="120"
memoryStoreEvictionPolicy="LRU">
<persistence strategy="localTempSwap"/>
</cache>
</ehcache>#项目端口配置
server.port=8080
server.address=0.0.0.0
spring.datasource.driver-class-name=com.mysql.cj.jdbc.Driver
spring.datasource.url=jdbc:mysql://localhost:3306/ssm?characterEncoding=UTF8&useSSL=false&serverTimezone=UTC
spring.datasource.username=root
spring.datasource.password=root
spring.datasouce.type=com.alibaba.druid.pool.DruidDataSource
spring.jpa.hibernate.ddl-auto=update
spring.jpa.show-sql=true
spring.devtools.restart.enabled=true
spring.cache.ehcache.config=classpath:ehcache.xml
package com.bjsxt;

import org.springframework.boot.SpringApplication;

import org.springframework.boot.autoconfigure.SpringBootApplication;

import org.springframework.cache.annotation.EnableCaching;

@SpringBootApplication

@EnableCaching//启用缓存机制

public class BootDataApplication {

    public static void main(String[] args) {

        SpringApplication.run(BootDataApplication.class, args);

    }

}
package com.bjsxt.service.impl;

import com.bjsxt.dao.UserDao;

import com.bjsxt.pojo.Users;

import com.bjsxt.service.UserService;

import org.springframework.beans.factory.annotation.Autowired;

import org.springframework.cache.annotation.CacheEvict;

import org.springframework.cache.annotation.Cacheable;

import org.springframework.data.domain.Page;

import org.springframework.data.domain.Pageable;

import org.springframework.stereotype.Service;

import java.util.List;

@Service

public class UserServiceImpl implements UserService {

    @Autowired

    UserDao ud;

    @Override

    @CacheEvict(value = "users",allEntries = true)//清空缓存

    public void addUser(Users users) {

        ud.save(users);

    }

    @Override

    @Cacheable(value = "users")//配置缓存,查找缓存文件

    public List<Users> findall() {

        List<Users> usersList = ud.findAll();

        return usersList;

    }

    @Override

    @Cacheable(value = "users",key = "#pageable.pageSize")//配置缓存,配置缓存的key

    public Page<Users> findUserByPage(Pageable pageable) {

        Page<Users> usersPage = ud.findAll(pageable);

        return usersPage;

    }

}
package com.bjsxt.pojo;

import lombok.Data;

import javax.persistence.*;

import java.io.Serializable;

@Entity

@Table(name = "users")

@Data

public class Users implements Serializable {

    @Id

    @GeneratedValue(strategy = GenerationType.IDENTITY)

    @Column(name = "userid")

    private int userid;

    @Column(name = "username")

    private String username;

    @Column(name = "userage")

    private int userage;

    public Users(){}

    public Users(String username, int userage) {

        this.username = username;

        this.userage = userage;

    }

}
package com.bjsxt.test;

import com.bjsxt.BootDataApplication;

import com.bjsxt.dao.UserDao;

import com.bjsxt.pojo.Users;

import com.bjsxt.service.UserService;

import org.junit.Test;

import org.junit.runner.RunWith;

import org.springframework.beans.factory.annotation.Autowired;

import org.springframework.boot.test.context.SpringBootTest;

import org.springframework.data.domain.Page;

import org.springframework.data.domain.PageRequest;

import org.springframework.data.domain.Pageable;

import org.springframework.data.jpa.domain.Specification;

import org.springframework.test.context.junit4.SpringJUnit4ClassRunner;

import javax.persistence.criteria.CriteriaBuilder;

import javax.persistence.criteria.CriteriaQuery;

import javax.persistence.criteria.Predicate;

import javax.persistence.criteria.Root;

import java.util.ArrayList;

import java.util.List;

@RunWith(SpringJUnit4ClassRunner.class)

@SpringBootTest(classes = BootDataApplication.class)

public class UserTest {

    @Autowired

    UserService us;

    @Autowired

    UserDao ud;

    /**

     * 添加用户

     */

    @Test

    public void TestAddUser(){

        Users users=new Users();

        users.setUsername("杨彪");

        users.setUserage(27);

        us.addUser(users);

    }

    @Test

    public void findByNameAndAge(){

        Specification<Users> spec=new Specification<Users>() {

            @Override

            public Predicate toPredicate(Root<Users> root, CriteriaQuery<?> criteriaQuery, CriteriaBuilder criteriaBuilder) {

                /*List<Predicate> predicates=new ArrayList<>();

                predicates.add(criteriaBuilder.equal(root.get("username"),"asd"));

                predicates.add(criteriaBuilder.equal(root.get("userage"),"123"));

                Predicate[] arr=new Predicate[predicates.size()];

                return criteriaBuilder.and(predicates.toArray(arr));*/

               return criteriaBuilder.or(criteriaBuilder.equal(root.get("username"),"asd"),criteriaBuilder.equal(root.get("userage"),"22"));

            }

        };

        List<Users> users = ud.findAll(spec);

        for (Users user : users) {

            System.out.println(user);

        }

    }

    /**

     * 测试使用缓存查询所有,第二次不会打印sql语句

     */

    @Test

    public void TestFindAll(){

        System.out.println("第一次查询:");

        List<Users> users = us.findall();

        for (Users user : users) {

            System.out.println("First:"+user);

        }

        Users use=new Users();

        use.setUsername("杨彪3");

        use.setUserage(22);

        us.addUser(use);

        System.out.println("\n第二次查询:");

        List<Users> u = us.findall();

        for (Users user : u) {

            System.out.println("Second:"+user);

        }

    }

    @Test

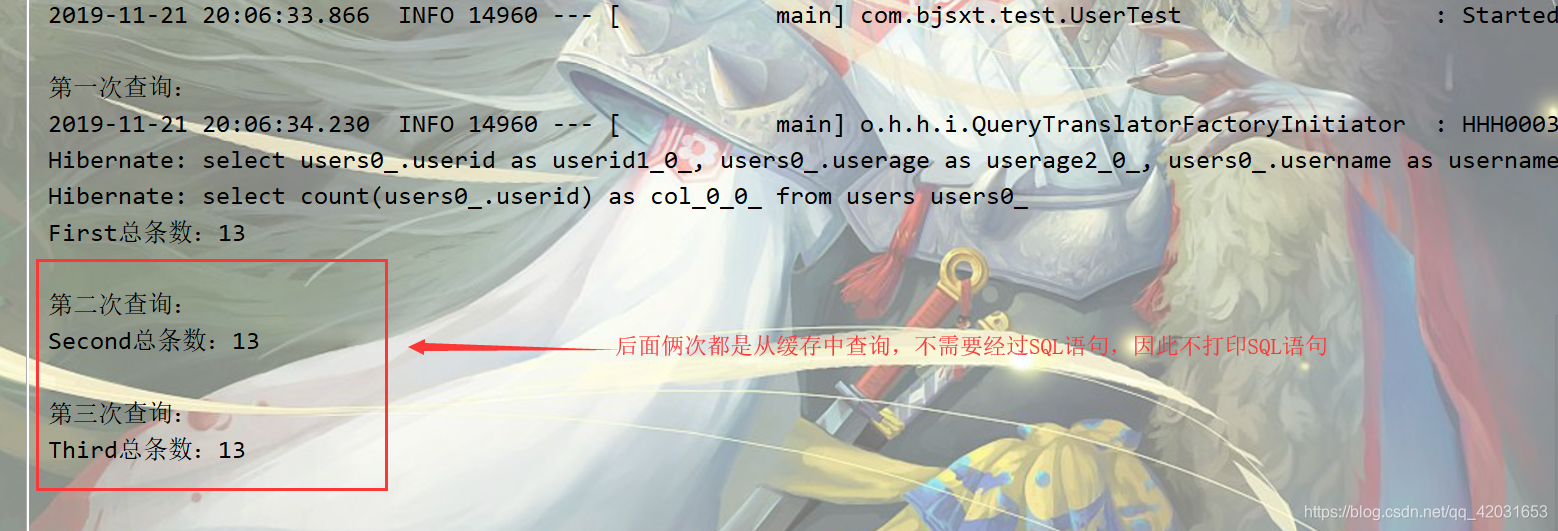
    public void findUserByPage(){

        Pageable pageable=new PageRequest(0,2);

        System.out.println("第一次查询:");

        Page<Users> userByPage = us.findUserByPage(pageable);

        long totalElements = userByPage.getTotalElements();

        System.out.println("First总条数:"+totalElements);

        System.out.println("\n第二次查询:");

        Page<Users> userByPage2 = us.findUserByPage(pageable);

        long totalElements2 = userByPage2.getTotalElements();

        System.out.println("Second总条数:"+totalElements2);

        System.out.println("\n第三次查询:");

        pageable=new PageRequest(1,2);

        Page<Users> userByPage3 = us.findUserByPage(pageable);

        long totalElements3 = userByPage3.getTotalElements();

        System.out.println("Third总条数:"+totalElements3);

    }

}
Spring Boot缓存Ehcache的更多相关文章
- (37)Spring Boot集成EHCache实现缓存机制【从零开始学Spring Boot】
[本文章是否对你有用以及是否有好的建议,请留言] 写后感:博主写这么一系列文章也不容易啊,请评论支持下. 如果看过我之前(35)的文章这一篇的文章就会很简单,没有什么挑战性了. 那么我们先说说这一篇文 ...
- Spring Boot集成EHCache实现缓存机制
SpringBoot 缓存(EhCache 2.x 篇) SpringBoot 缓存 在 Spring Boot中,通过@EnableCaching注解自动化配置合适的缓存管理器(CacheManag ...
- 另一种缓存,Spring Boot 整合 Ehcache
用惯了 Redis ,很多人已经忘记了还有另一个缓存方案 Ehcache ,是的,在 Redis 一统江湖的时代,Ehcache 渐渐有点没落了,不过,我们还是有必要了解下 Ehcache ,在有的场 ...
- Spring Boot 集成 Ehcache 缓存,三步搞定!
作者:谭朝红 www.ramostear.com/articles/spring_boot_ehcache.html 本次内容主要介绍基于Ehcache 3.0来快速实现Spring Boot应用程序 ...
- spring boot 使用Ehcache
1-引入maven依赖: 2-增加ehcache.xml 3-bootstrap.yml配置ehcache.xml的路径 4-启动类加注解@EnableCaching 5-使用处加注解@Cacheab ...
- Spring Boot2 系列教程(三十)Spring Boot 整合 Ehcache
用惯了 Redis ,很多人已经忘记了还有另一个缓存方案 Ehcache ,是的,在 Redis 一统江湖的时代,Ehcache 渐渐有点没落了,不过,我们还是有必要了解下 Ehcache ,在有的场 ...
- 3步轻松搞定Spring Boot缓存
作者:谭朝红 前言 本次内容主要介绍基于Ehcache 3.0来快速实现Spring Boot应用程序的数据缓存功能.在Spring Boot应用程序中,我们可以通过Spring Caching来快速 ...
- Spring Boot整合EhCache
本文讲解Spring Boot与EhCache的整合. 1 EhCache简介 EhCache 是一个纯Java的进程内缓存框架,具有快速.精干等特点,是Hibernate中默认CacheProvid ...
- Spring boot缓存初体验
spring boot缓存初体验 1.项目搭建 使用MySQL作为数据库,spring boot集成mybatis来操作数据库,所以在使用springboot的cache组件时,需要先搭建一个简单的s ...
随机推荐
- getchar()用法 【转】
1.从缓冲区读走一个字符,相当于清除缓冲区 2.前面的scanf()在读取输入时会在缓冲区中留下一个字符'\n'(输入完s[i]的值后按回车键所致),所以如果不在此加一个getchar()把这个回车符 ...
- 使用 vue-element-admin 动态路由渲染
附上:vue-element-admin 官方文档 vue-element-admin https://panjiachen.github.io/vue-element-admin-site/zh/g ...
- windows中修改IP映射的位置
windows中修改IP映射的位置 置顶 2018年08月05日 14:42:44 wangxiaolong0 阅读数:1473 在安装linux之后,发现windows不能通过映射来访问linu ...
- 小白学 Python(24):Excel 基础操作(下)
人生苦短,我选Python 前文传送门 小白学 Python(1):开篇 小白学 Python(2):基础数据类型(上) 小白学 Python(3):基础数据类型(下) 小白学 Python(4):变 ...
- 解决WordPress不能发邮件,WordPress 无法发送邮件
解决WordPress不能发邮件,WordPress 无法发送邮件,不得不说WordPress这个问题真的很烦人,研究了一下午发现不能发邮件的问题无非以下几种! 1.系统本身问题,这个直接装个插件即可 ...
- 花了几个小时总结了一些容易出错的 Java 知识点!
本文已经收录自 JavaGuide (61k+Star![Java学习+面试指南] 一份涵盖大部分Java程序员所需要掌握的核心知识.欢迎 Star!欢迎骚扰!) 原文地址:https://javag ...
- windows 激活工具链接
链接:https://pan.baidu.com/s/1FphGFZhhLp01akGTDWjW2A 密码:f9t7
- win10 visual studio 2017环境中安装CUDA8
从https://developer.nvidia.com/cuda-toolkit-archive下载CUDA 8 安装 从https://developer.nvidia.com/gamework ...
- spark集群搭建(三台虚拟机)——zookeeper集群搭建(3)
!!!该系列使用三台虚拟机搭建一个完整的spark集群,集群环境如下: virtualBox5.2.Ubuntu14.04.securecrt7.3.6_x64英文版(连接虚拟机) jdk1.7.0. ...
- # & 等特殊字符会导致传参失败
# & 等特殊字符会导致 post 传参失败 处理方法使用 encodeURIComponent 将字符串转化一下 实例 // toUpperCase() 转化为大写字母 var cateco ...