学习Android有一段时间了,虽然前段时间对软件测试有了一些了解,不过接触android的单元测试却是头一次。这几天在物流大赛上也用了不少时间,所以对于android的单元测试没有太深入的研究,所以先写个基本入门吧!
首先,我们来了解一下android的测试类的层次结构: 
可以看出android中的测试方法主要有AndroidTextCase和InstrumentationTextCase。在这篇文章中,我将介绍Instrumentation这种测试方法,那么什么是Instrumentation?
Instrumentation和Activity有点类似,只不过Activity是需要一个界面的,而Instrumentation并不是这样的,我们可以将它理解为一种没有图形界面的,具有启动能力的,用于监控其他类(用Target Package声明)的工具类。
下面通过一个简单的例子来讲解Instrumentation的基本测试方法。
1.首先建立一个Android project,类名为Sample,代码如下:
01 |
package com.hustophone.sample; |
03 |
import android.app.Activity; |
04 |
import android.os.Bundle; |
05 |
import android.view.View; |
06 |
import android.view.View.OnClickListener; |
07 |
import android.widget.Button; |
08 |
import android.widget.TextView; |
10 |
public class Sample extends Activity { |
11 |
private TextView myText = null; |
12 |
private Button button = null; |
15 |
public void onCreate(Bundle savedInstanceState) { |
16 |
super.onCreate(savedInstanceState); |
17 |
setContentView(R.layout.main); |
18 |
myText = (TextView) findViewById(R.id.text1); |
19 |
button = (Button) findViewById(R.id.button1); |
20 |
button.setOnClickListener(new OnClickListener() { |
22 |
public void onClick(View arg0) { |
23 |
myText.setText("Hello Android"); |
28 |
public int add(int i, int j) { |
这个程序的功能比较简单,点击按钮之后,TextView的内容由Hello变为Hello Android.同时,在这个类中,我还写了一个简单的add方法,没有被调用,仅供测试而已。
2. 在src文件夹中添加一个测试包,在测试包中添加一个测试类SampleTest 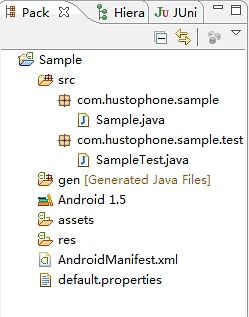
测试类的代码如下:
01 |
package com.hustophone.sample.test; |
03 |
import com.hustophone.sample.R; |
04 |
import com.hustophone.sample.Sample; |
05 |
import android.content.Intent; |
06 |
import android.os.SystemClock; |
07 |
import android.test.InstrumentationTestCase; |
08 |
import android.util.Log; |
09 |
import android.widget.Button; |
10 |
import android.widget.TextView; |
12 |
public class SampleTest extends InstrumentationTestCase { |
13 |
private Sample sample = null; |
14 |
private Button button = null; |
15 |
private TextView text = null; |
19 |
* @see junit.framework.TestCase#setUp() |
22 |
protected void setUp() { |
25 |
} catch (Exception e) { |
28 |
Intent intent = new Intent(); |
29 |
intent.setClassName("com.hustophone.sample", Sample.class.getName()); |
30 |
intent.setFlags(Intent.FLAG_ACTIVITY_NEW_TASK); |
31 |
sample = (Sample) getInstrumentation().startActivitySync(intent); |
32 |
text = (TextView) sample.findViewById(R.id.text1); |
33 |
button = (Button) sample.findViewById(R.id.button1); |
38 |
* @see android.test.InstrumentationTestCase#tearDown() |
41 |
protected void tearDown() { |
45 |
} catch (Exception e) { |
53 |
public void testActivity() throws Exception { |
54 |
Log.v("testActivity", "test the Activity"); |
55 |
SystemClock.sleep(1500); |
56 |
getInstrumentation().runOnMainSync(new PerformClick(button)); |
57 |
SystemClock.sleep(3000); |
58 |
assertEquals("Hello Android", text.getText().toString()); |
64 |
private class PerformClick implements Runnable { |
66 |
public PerformClick(Button button) { |
78 |
public void testAdd() throws Exception{ |
79 |
String tag = "testAdd"; |
80 |
Log.v(tag, "test the method"); |
81 |
int test = sample.add(1, 1); |
82 |
assertEquals(2, test); |
下面来简单讲解一下代码: setUp()和tearDown()都是受保护的方法,通过继承可以覆写这些方法。
在android Developer中有如下的解释 protected void setUp () Since: API Level 3 Sets up the fixture, for example, open a network connection. This method is called before a test is executed.
protected void tearDown () Since: API Level 3 Make sure all resources are cleaned up and garbage collected before moving on to the next test. Subclasses that override this method should make sure they call super.tearDown() at the end of the overriding method.
setUp ()用来初始设置,如启动一个Activity,初始化资源等。 tearDown ()则用来垃圾清理与资源回收。
在testActivity()这个测试方法中,我模拟了一个按钮点击事件,然后来判断程序是否按照预期的执行。在这里PerformClick这个方法继承了Runnable接口,通过新的线程来执行模拟事件,之所以这么做,是因为如果直接在UI线程中运行可能会阻滞UI线程。
2.要想正确地执行测试,还需要修改AndroidManifest.xml这个文件.
01 |
<?xml version="1.0" encoding="utf-8"?> |
02 |
<manifest xmlns:android="http://schemas.android.com/apk/res/android" |
03 |
package="com.hustophone.sample" android:versionCode="1" |
04 |
android:versionName="1.0"> |
05 |
<application android:icon="@drawable/icon" android:label="@string/app_name"> |
07 |
<uses-library android:name="android.test.runner" /> |
08 |
<activity android:name=".Sample" android:label="@string/app_name"> |
10 |
<action android:name="android.intent.action.MAIN" /> |
11 |
<category android:name="android.intent.category.LAUNCHER" /> |
16 |
<uses-sdk android:minSdkVersion="3" /> |
17 |
<!--表示被测试的目标包与instrumentation的名称。--> |
18 |
<instrumentation android:targetPackage="com.hustophone.sample" android:name="android.test.InstrumentationTestRunner" /> |
经过以上步骤,下面可以开始测试了。测试方法也有以下几种,下面介绍两个常用的方法:
(1) 用Eclipse集成的JUnit工具 在Eclipse中选择工程Sample,单击右键,在Run as子菜单选项中选择Android JUnit Test 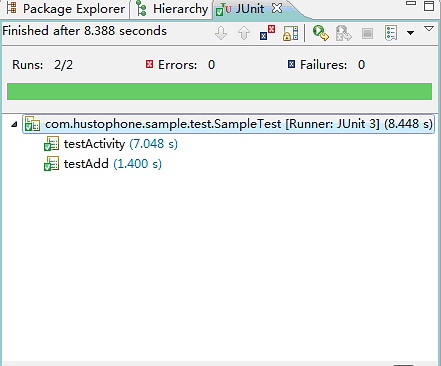
同时可以通过LogCat工具查看信息 
(2) 通过模拟器运行单元测试
点击模拟器界面的Dev Tools菜单 
再点击Instrumentation选项,进入Instrumentation菜单 
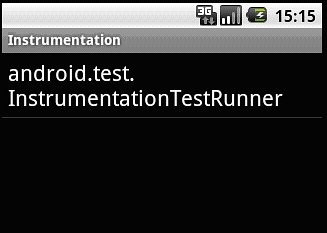
这里有一个InstrumentationTestRunner,它是测试的入口,点击这个选项,就可以自动运行我们的测试代码。以下为运行结果:
按钮点击前 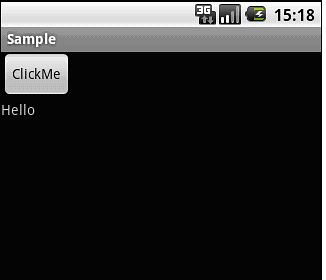
按钮点击后 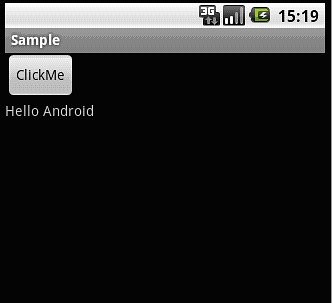
至此,一个简单的测试过程结束了。当然,android的测试内容还有很多,也有比较复杂的,我会在以后的学习过程中继续分享我的体会。好了,今天就到这里吧!
- 深入浅出Android makefile(1)--初探(转载)
转载:http://nfer-zhuang.iteye.com/blog/1752368 一.说明 android build system是一个非常庞大的系统,要编译Android工程.修改或新增A ...
- Android随笔之——Android单元测试
在实际开发中,开发android软件的过程需要不断地进行测试.所以掌握Android的单元测试是极其重要的.您应该把单元测试作为Android应用开发周期的一部分,精心编写的测试可以在开发早起帮你发现 ...
- Android——单元测试
在实际开发中,开发android软件的过程需要不断地进行测试.而使用Junit测试框架,侧是正规的Android开发的必用技术,在Junit中可以得到组件,可以模拟发送事件和检测程序处理的正确性. 第 ...
- Android单元测试实践
为什么要写单元测试 首先要介绍为什么蘑菇街支付金融这边会采用单元测试的实践.说起来比较巧,刚开始的时候,只是我一个人会写单元测试.后来老板们知道了,觉得这是件 很有价值的事情,于是就叫我负责我们组的单 ...
- Android单元测试之四:仪器化测试
Android单元测试之四:仪器化测试 仪器化测试 在某些情况下,虽然可以通过模拟的手段来隔离 Android 依赖,但代价很大,这种情况下可以考虑仪器化的单元测试,有助于减少编写和维护模拟代码所需的 ...
- android单元测试 activity跳转 以及 input 输入后 测试
Android junit实现多个Activity跳转测试 分类: Android Junit测试2011-11-14 16:49 1601人阅读 评论(2) 收藏 举报 androidjunitla ...
- Android 性能测试初探(六)
书接前文 Android 性能测试初探之功耗(五) 本节聊聊性能测试的最后一项- 流量,当然我所指的性能测试是针对大部分应用而言的,可能还有部分应用会关注网速.弱网之类的测试,但本系列文章都不去一一探 ...
- Android 性能测试初探(五)
书接上文 Android 性能测试初探之 GPU(四) 前文说了的一些性能测试项大家可能都听说,接下来我们聊聊大家不常关注的测试项- 功耗 . 功耗测试主要从以下几个方面入手进行测试 测试手机安装目标 ...
- Android 性能测试初探(三)
书接上文 Android 性能测试初探(二) 本文接着往下聊,今天主聊 CPU 及 内存 看到这两个名词,做过PC性能测试的就比较熟悉了,同样的性能测试关注点 :) 首先说说内存,移动端关注的是内存消 ...
随机推荐
- Linux安装sonarQube
安装sonarQube之前,需要先安装JDK和mysql 服务器/home/azrlnx04/下创建三个文件夹,/java ./mysql. /sonar 一:安装JDK (1)打开http://ww ...
- winform Execl数据 导入到数据库(SQL) 分类: WinForm C# 2014-05-09 20:52 191人阅读 评论(0) 收藏
首先,看一下我的窗体设计: 要插入的Excel表: 编码 名称 联系人 电话 省市 备注 100 100线 张三 12345678910 北京 测试 101 101线 张三 12345678910 上 ...
- android_小总结_方法过时的兼容处理
随着android系统的升级,有些过时的方法已经不再使用,但是又要兼容老的版本,所以这个时候可以使用反射来处理下 举个列子pull_to_refresh 中有个方法找不到==initializeScr ...
- python 分支 循环
一 python 知识点 1.变量(标签): a(变量名) = '字符串'or 数字 (整形和浮点型) a相当于变量名的标签 如: a = ...
- SDUT2608(Alice and Bob)
题目描述 Alice and Bob like playing games very much.Today, they introduce a new game. There is a polynom ...
- Android 颜色渲染(三) Shader颜色渲染
版权声明:本文为博主原创文章,未经博主允许不得转载. 相信看过在上一篇中提到的三篇文章后,大家已经对颜色处理方面有更深的体会. 之前讲到颜色渐变的效果, 具体怎么做呢,这就需要应用颜色渲染. 首先要介 ...
- Android中关于在onDrow或者onMeasure中创建对象提示Avoid object allocations during draw/layout operations (preallocate and reuse instead) 问题
在实际开发中Android中自带的控件有时无法满足我们的需求,这时就需要我们重写控件来实现我们想要的功能. 还有个关于UI体验的问题,就是在onDraw()函数中最好不要去创建对象,否则就提示下面的警 ...
- Emoji表情处理
//php对于 Emoji表情的处理 //当接收内容需要转换时: //preg_replace_callback('/[\xf0-\xf7].{3}/','cal_fun', $str) functi ...
- 【Android】数据的应用-使用sharedpreferences存储数据
Android应用开发SharedPreferences存储数据的使用方法 SharedPreferences是Android中最容易理解的数据存储技术,实际上SharedPreferences处理的 ...
- SQL Server中的20个系统变量
1.@@CONNECTIONS返回自上次启动 Microsoft SQL Server以来连接或试图连接的次数.示例:下面的示例显示了到当前日期和时间为止试图登录的次数.SELECT GETDATE( ...