
vue中使用Element主题自定义肤色
一、搭建好项目的环境。
二、根据ElementUI官网的自定义主题(http://element.eleme.io/#/zh-CN/component/custom-theme)来安装【主题生成工具】。
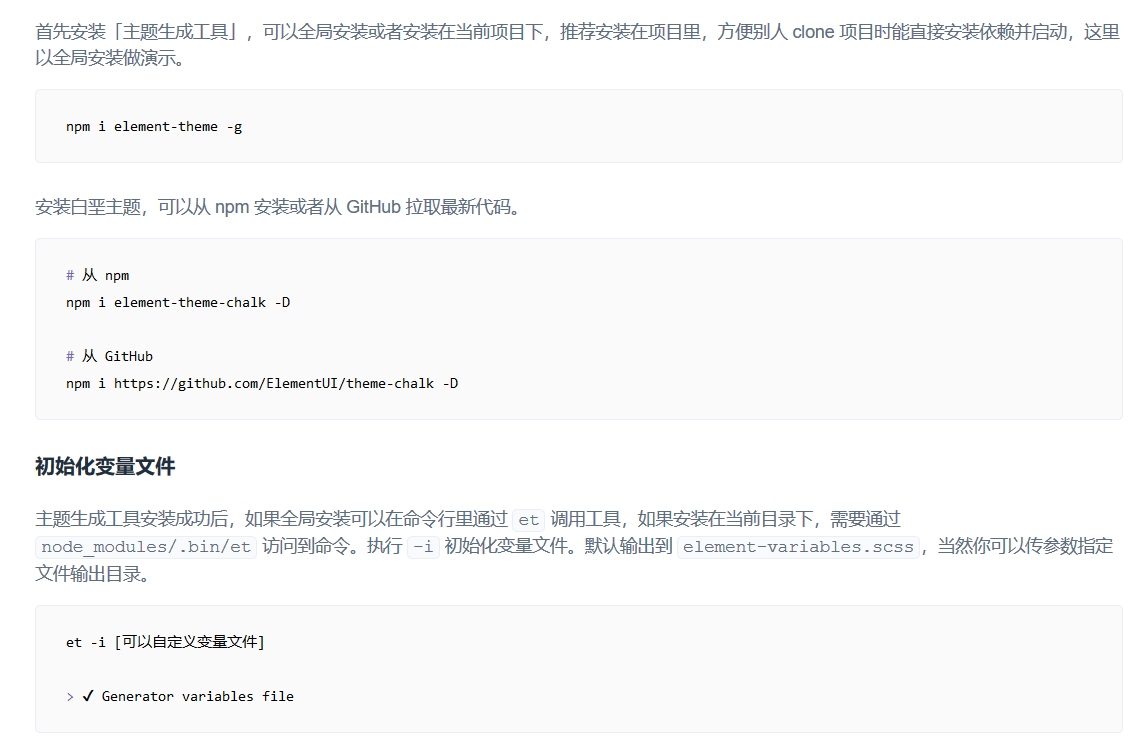
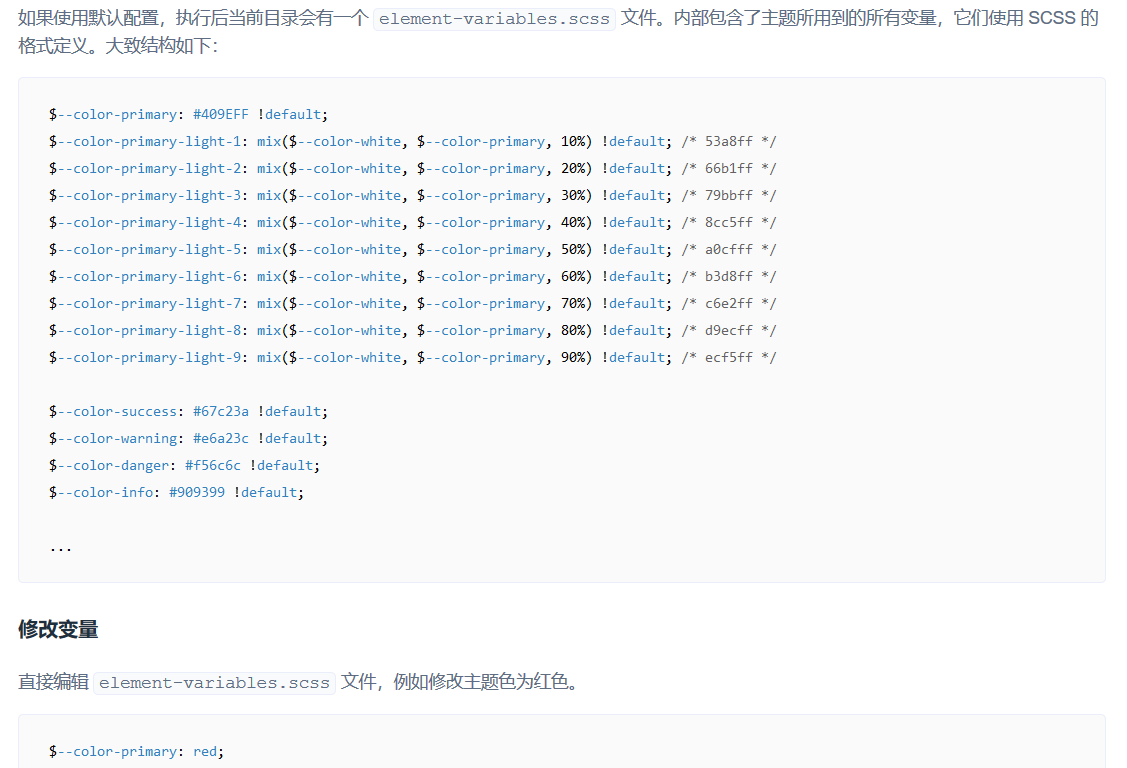

三、在 element-variables.scss 文件里修改 $–color-primary:#409EFF,即你想要的主题颜色。然后,执行主题编译命令生成主题(et),根目录会生成一个theme文件夹。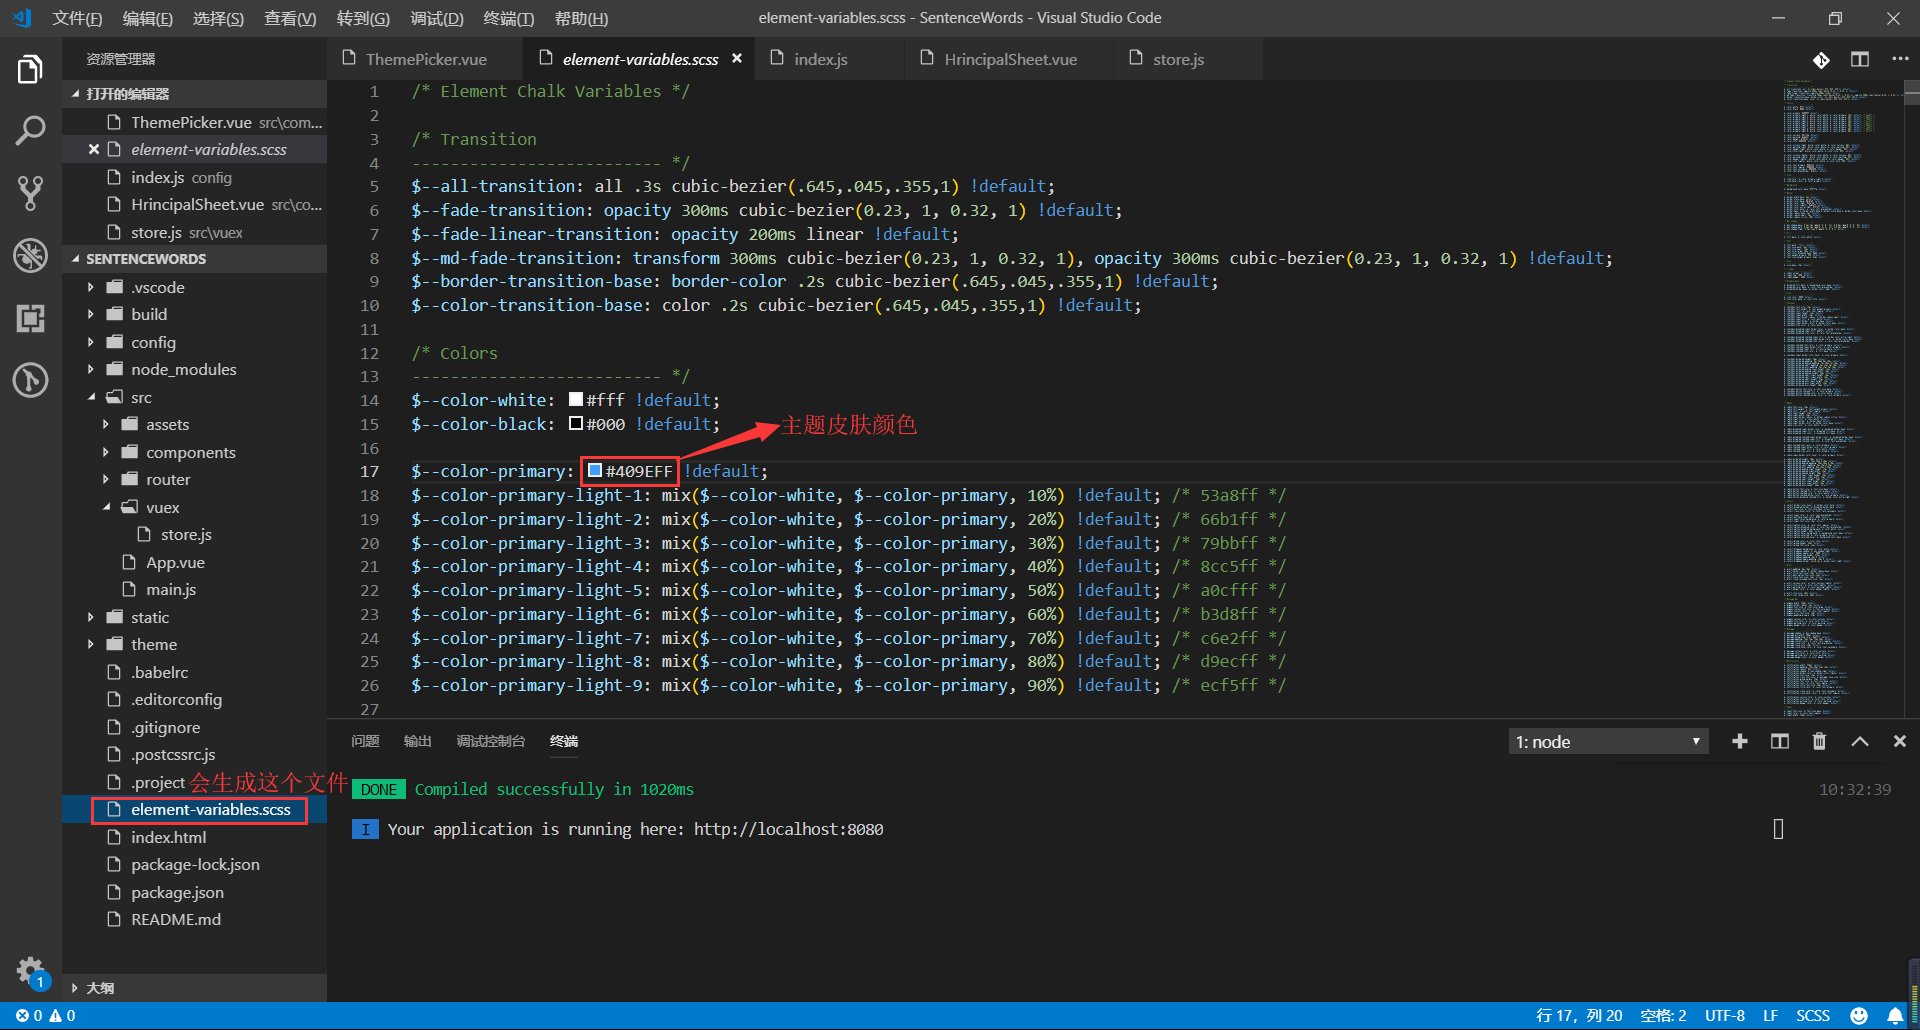
四、封装动态换肤色ThemePicker.vue组件。
<template>

  <el-color-picker

    class="theme-picker"

    popper-class="theme-picker-dropdown"

    v-model="theme"

    :size="size">

  </el-color-picker>

</template>

<script>

const version = require('element-ui/package.json').version // element-ui version from node_modules

const ORIGINAL_THEME = '#409EFF' // default color

export default {

  name: 'ThemePicker',

  props: {

    default: { // 初始化主题,可由外部传入

      type: String,

      //default: '#EB815B'

      default: ""+localStorage.getItem("tremePackers")+""

    },

    size: { // 初始化主题,可由外部传入

      type: String,

      default: 'small'

    }

  },

  data() {

    return {

      chalk: '', // content of theme-chalk css

      theme: ORIGINAL_THEME,

      showSuccess: true, // 是否弹出换肤成功消息

    }

  },

  mounted() {

    if(this.default != null) {

      this.theme = this.default

      this.$emit('onThemeChange', this.theme)

      this.showSuccess = false

    }

  },

  watch: {

    theme(val, oldVal) {

      if (typeof val !== 'string') return

      const themeCluster = this.getThemeCluster(val.replace('#', ''))

      const originalCluster = this.getThemeCluster(oldVal.replace('#', ''))

      const getHandler = (variable, id) => {

        return () => {

          const originalCluster = this.getThemeCluster(ORIGINAL_THEME.replace('#', ''))

          const newStyle = this.updateStyle(this[variable], originalCluster, themeCluster)

          let styleTag = document.getElementById(id)

          if (!styleTag) {

            styleTag = document.createElement('style')

            styleTag.setAttribute('id', id)

            document.head.appendChild(styleTag)

          }

          styleTag.innerText = newStyle

        }

      }

      const chalkHandler = getHandler('chalk', 'chalk-style')

      if (!this.chalk) {

        const url = `https://unpkg.com/element-ui@${version}/lib/theme-chalk/index.css`

        this.getCSSString(url, chalkHandler, 'chalk')

      } else {

        chalkHandler()

      }

      const styles = [].slice.call(document.querySelectorAll('style'))

        .filter(style => {

          const text = style.innerText

          return new RegExp(oldVal, 'i').test(text) && !/Chalk Variables/.test(text)

        })

      styles.forEach(style => {

        const { innerText } = style

        if (typeof innerText !== 'string') return

        style.innerText = this.updateStyle(innerText, originalCluster, themeCluster)

      })

      // 响应外部操作

      this.$emit('onThemeChange', val)

      //存入localStorage

      localStorage.setItem('tremePackers',val);

      if(this.showSuccess) {

        this.$message({

          message: '换肤成功',

          type: 'success'

        })

      } else {

        this.showSuccess = true

      }

    }

  },

  methods: {

    updateStyle(style, oldCluster, newCluster) {

      let newStyle = style

      oldCluster.forEach((color, index) => {

        newStyle = newStyle.replace(new RegExp(color, 'ig'), newCluster[index])

      })

      return newStyle

    },

    getCSSString(url, callback, variable) {

      const xhr = new XMLHttpRequest()

      xhr.onreadystatechange = () => {

        if (xhr.readyState === 4 && xhr.status === 200) {

          this[variable] = xhr.responseText.replace(/@font-face{[^}]+}/, '')

          callback()

        }

      }

      xhr.open('GET', url)

      xhr.send()

    },

    getThemeCluster(theme) {

      const tintColor = (color, tint) => {

        let red = parseInt(color.slice(0, 2), 16)

        let green = parseInt(color.slice(2, 4), 16)

        let blue = parseInt(color.slice(4, 6), 16)

        if (tint === 0) { // when primary color is in its rgb space

          return [red, green, blue].join(',')

        } else {

          red += Math.round(tint * (255 - red))

          green += Math.round(tint * (255 - green))

          blue += Math.round(tint * (255 - blue))

          red = red.toString(16)

          green = green.toString(16)

          blue = blue.toString(16)

          return `#${red}${green}${blue}`

        }

      }

      const shadeColor = (color, shade) => {

        let red = parseInt(color.slice(0, 2), 16)

        let green = parseInt(color.slice(2, 4), 16)

        let blue = parseInt(color.slice(4, 6), 16)

        red = Math.round((1 - shade) * red)

        green = Math.round((1 - shade) * green)

        blue = Math.round((1 - shade) * blue)

        red = red.toString(16)

        green = green.toString(16)

        blue = blue.toString(16)

        return `#${red}${green}${blue}`

      }

      const clusters = [theme]

      for (let i = 0; i <= 9; i++) {

        clusters.push(tintColor(theme, Number((i / 10).toFixed(2))))

      }

      clusters.push(shadeColor(theme, 0.1))

      return clusters

    }

  }

}

</script>

<style>

.theme-picker .el-color-picker__trigger {

  vertical-align: middle;

}

.theme-picker-dropdown .el-color-dropdown__link-btn {

  display: none;

}

</style>
五、直接在组件中引用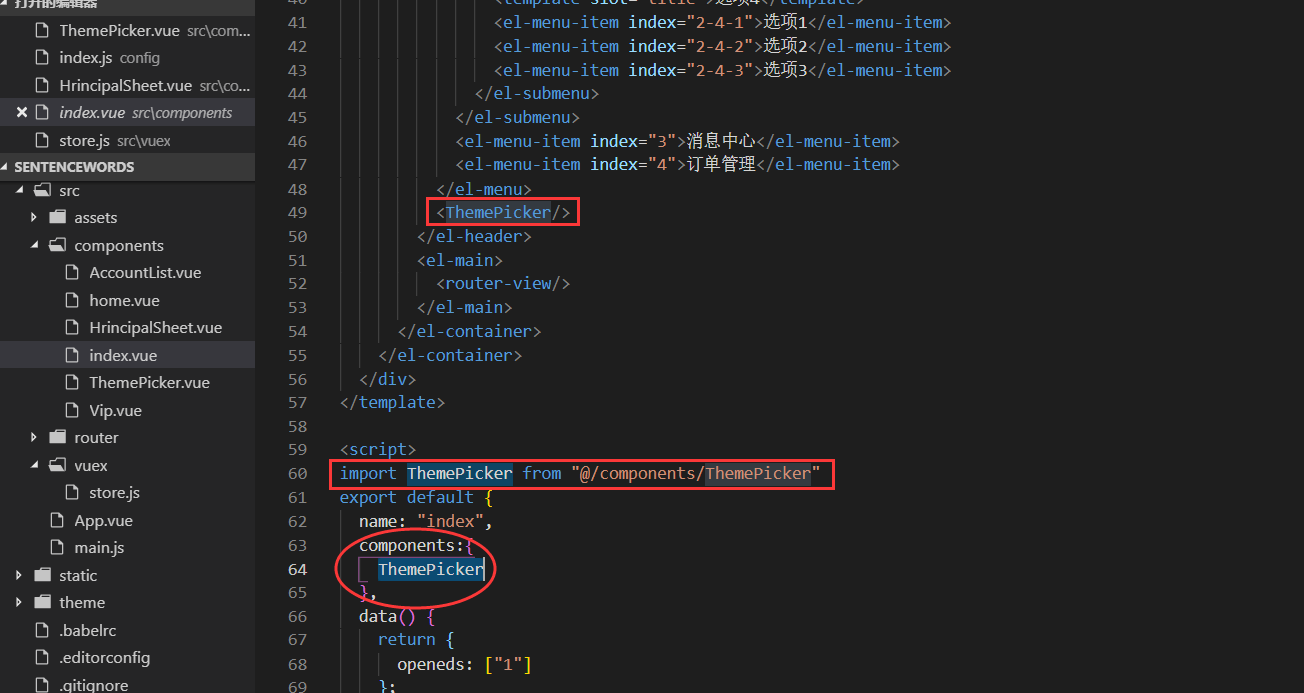
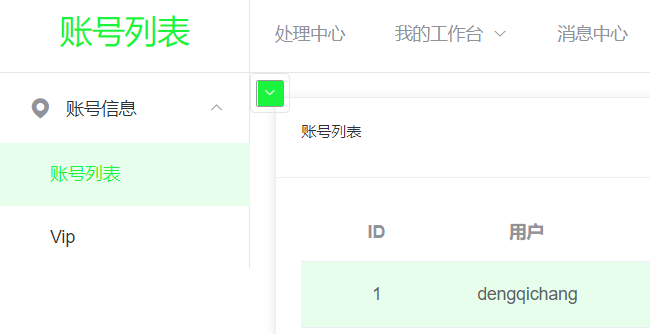
六、换肤效果测试。(关闭浏览器再次打开依旧是你所选中的主题肤色)


vue中使用Element主题自定义肤色的更多相关文章
- 在vue中使用Element的message组件
在vue中使用Element的message组件 在vue文件中使用 this.$message({ message: "提示信息", type: "success&qu ...
- 在vue中关于element UI 中表格实现下载功能,表头添加按钮,和点击事件失效的解决办法。
因为在element 中表格是使用el-table的形式通过数据来支撑结构,所以,表格的样式没有自己写的灵活,所以有了没法添加按钮的烦恼.下面是解决的方法. 准备工作: 一.下载npm安装包两个 1. ...
- vue中使用element组件时事件想要传递其他参数的问题
在使用element的上传组件时在一下几个钩子中传递其他参数 图中是文件上传时的几个钩子,参数为文件或文件列表或者其他参数,但是现在我想在原有参数上传递其他参数.比如我想在on-success的钩子中 ...
- vue中修改Element ui样式不起作用
公司做的一个后台系统,由于Elemen ui是响应式的,在小屏笔记本中,一行两列的表单会自动变成一行一列,这样就很不美观了,由于是后台系统,当时也没考虑适配问题. 老总 地表最强的电脑 运行了一下,当 ...
- vue中使用swiper并自定义分页器样式
一,安装swiper 执行命令 npm install vue-awesome-swiper --save 二,引入swiper import {Swiper} from "vue-awes ...
- vue中使用element写点击input内部标签(使用模态框传值)
首先附上源码地址 https://files.cnblogs.com/files/maruihua/vue-tagsinput-master.zip 这个是我修改后的代码.取消了部分功能,添加的一些功 ...
- Vue 中的组件
VUE中的组件 一个自定义的标签,vue就会把他看成一个组件,vue可以给这些标签赋予一定意义:一个页面就是一个组件 好处: 1.提高开发效率 2.方便重复使用 3.便于协同开发 4.更容易被管理和维 ...
- vue中对element-ui框架中el-table的列的每一项数据进行操作
vue中使用element table,表格参数格式化formatter 后台返回对应的数字, 那肯定不能直接显示数字,这时候就要对 表格进行数据操作 如图: 代码: methods: { //状态改 ...
- vue中使用element-ui自定义主题后,vue-cli跑不起来了
环境:vue-cli 2.x版本 自己在官网配置了主题并放到了项目中https://element.eleme.cn/#/zh-CN/theme 然后,我的脚手架在我的电脑中休息了几天,就跑不通了呢! ...
随机推荐
- 操作系统中 heap 和 stack 的区别
操作系统中 heap 和 stack 的区别heap 和 stack是什么堆栈是两种数据结构.堆栈都是一种数据项按序排列的数据结构,只能在一端(称为栈顶(top))对数据项进行插入和删除.==在单片机 ...
- #Java学习之路——基础阶段(第五篇)
我的学习阶段是跟着CZBK黑马的双源课程,学习目标以及博客是为了审查自己的学习情况,毕竟看一遍,敲一遍,和自己归纳总结一遍有着很大的区别,在此期间我会参杂Java疯狂讲义(第四版)里面的内容. 前言: ...
- Kali学习笔记44:SQLMAP
SQLMAP漏洞检测技术: 1.基于布尔的盲注检测:' and 1=1 'and 1=2等 2.基于时间的盲注检测:' and (select * from (select(sleep(20))) ...
- 交叉编译 tcpdump
目录 1. 下载 tcpdump 2. 交叉编译 3. 相关说明 1. 下载 tcpdump 官网:http://www.tcpdump.org/ 2. 交叉编译 交叉编译libpcap: $ wge ...
- Java中 Linux下安装Redis
1.连接上虚拟机之后,选择/usr/local目录,将redis-4.0.6.tar.gz放入/usr/local目录. 1.1:使用Xftp将redis-4.0.6.tar.gz放入/usr/loc ...
- Visual Studio 2010软件安装教程
链接:https://pan.baidu.com/s/10FeLlKpzFcb9yUjm3ZECsg 提取码:pup1 复制这段内容后打开百度网盘手机App,操作更方便哦 1.右击软件压缩包,选择解压 ...
- ubuntu18下安装docker
1.通过指令检查linux内核 uname -a 可以看到大于3.10版本 2.检查是否存在对应目录 ls -l /sys/class/misc/device-mapper 3. apt-get指令 ...
- Python内置函数(30)——hex
英文文档: hex(x) Convert an integer number to a lowercase hexadecimal string prefixed with “0x”, for exa ...
- AspNetCore 文件上传(模型绑定、Ajax) 两种方式 get到了吗?
就目前来说,ASP.NET Core2.1了,已经相当成熟了,希望下个项目争取使用吧!! 上传文件的三种方式("我会的,说不定还有其他方式") 模型绑定 Ajax WebUploa ...
- 使用ML.NET + ASP.NET Core + Docker + Azure Container Instances部署.NET机器学习模型
本文将使用ML.NET创建机器学习分类模型,通过ASP.NET Core Web API公开它,将其打包到Docker容器中,并通过Azure Container Instances将其部署到云中. ...