【Unity】微软的一款依赖注入组件
前言
前面学习了autofac这个依赖注入组件,本来是打算写在一起的,因为这个组件没打算像autofac一样详细的写,只是写下以前自己鼓捣玩搭建框架然后使用的一个依赖注入组件,并且也是进行了封装使用。不打算作为学习知识,仅作为使用封装记录的。
没想autofac写着写着篇幅有点长,就单独当作一个封装类记录一下吧。技术就和东西差不多长时间不使用就容易忘记。
上一篇autofac地址:【AutoFac】依赖注入和控制反转的使用
Unity
引用dll
别的不说引用还是要简单说一下的,在使用前要引用dll:

类文件结构
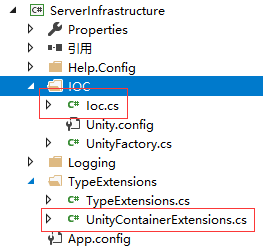
我这里是把Unity组件和项目业务进行了分层所有我这个组件相当于在一个独立的项目中,单独的封装到了IOC文件夹下创建,这里不介绍整个解决方案了只对这个介绍下,大致的结构如下:
IOC封装类
这个是主要类,容器的注入和获取容器里面的类相当于Unity的入口调用和请求都通过他,这个封装有一个好处就是统一调用(废话)。
 /// <summary>

    /// 依赖注入之区域注入方式

    /// 没有写入到配置文件可传参注入

    /// </summary>

    public class Ioc

    {

        private static readonly UnityContainer _container;

        static Ioc()

        {

            _container = new UnityContainer();

        }

        public static void RegisterInheritedTypes(Assembly assembly, Type baseType)

        {

            _container.RegisterInheritedTypes(assembly, baseType);

        }

        public static void Register<TInterface, TImplementation>() where TImplementation : TInterface

        {

            _container.RegisterType<TInterface, TImplementation>();

        }

        public static T Get<T>()

        {

            return _container.Resolve<T>();

        }

    }
Unity扩展注册
然后有一个Unity扩展注册方法:
 public static class UnityContainerExtensions

    {

        /// <summary>

        /// Unity扩展注册方法

        /// </summary>

        /// <param name="container"></param>

        /// <param name="assembly"></param>

        /// <param name="baseType"></param>

        public static void RegisterInheritedTypes(this IUnityContainer container, Assembly assembly, Type baseType)

        {

            var allTypes = assembly.GetTypes();

            var baseInterfaces = baseType.GetInterfaces();

            foreach (var type in allTypes)

            {

                if (type.BaseType != null && type.BaseType.GenericEq(baseType))

                {

                    var typeInterface = type.GetInterfaces().FirstOrDefault(x => !baseInterfaces.Any(bi => bi.GenericEq(x)));

                    if (typeInterface == null)

                    {

                        continue;

                    }

                    container.RegisterType(typeInterface, type);

                }

            }

        }

    }
这个很关键哦,这里再说下我这里其实不是每个类都要写一遍注册,而是所有业务类继承于一个底层抽象类ServiceBase。然后传入程序集和类型,就会把当前程序集下的所有这个类型注册进去。
例如我有UserServer和UserServerTwo两个业务类,我让他都继承ServiceBase抽象类,当然他们仍然要实现自己的服务接口的就拿UserServer举例吧:
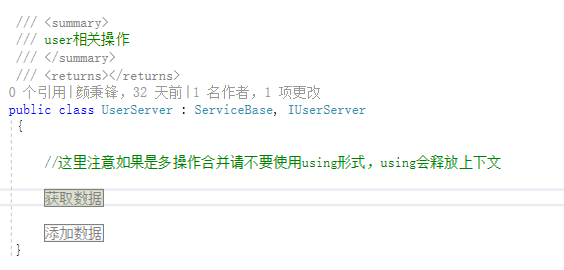
这样我到时候使用只需要注册一遍就把这两个服务同时注入了。什么好处在哪里,第一注册代码写少了,第二实现区域化分类。
注册使用
使用根据mvc的控制器区域进行单独注册即可:
 public override void RegisterArea(AreaRegistrationContext context)

        {

            //注册使用代码,先注册后使用

            Ioc.RegisterInheritedTypes(typeof(Server_Areas.Admin.IUserServer).Assembly, typeof(ServiceBase));

            context.MapRoute(

                "AdminAreas_default",

                "AdminAreas/{controller}/{action}/{id}",

                new { action = "Index", id = UrlParameter.Optional },

                   new string[] { "LayerFrame.Areas." + this.AreaName + ".Controllers" }

            );

        }
然后在该区域控制器使用:
        public ActionResult Index()

        {

            //测试日志

            LogHelp.WriteFile("deBug", "这是日志输出哦");

            //数据操作

            var service = Ioc.Get<Server_Areas.Admin.IUserServer>();

            //添加数据

            UserInfor user = new UserInfor();

            user.userAccount = "test001";

            user.userPwd = "123456";

            user.userPhone = "0530123456";

            user.userRealName = "真实姓名";

            user.userSex = 0;

            user.userPhone = "0530123456";

            user.userRemark = "备注内容";

            user.addTime = DateTime.Now;

            int count = service.UserAdd(user);

            var data= service.GetData();

            ViewBag.data = service.GetData();

            return View();

        }
Unity配置文件注入:
每次注入服务类是很麻烦的,比如修改了增加了,总不能一直去修改代码吧,总是不好的,所以我们也可以写到配置文件统一管理,比较方便(其实我上面封装的也很方便了)。这个比上面好的是在于不用进行区域注册了。全部统一注册了。
UnityFactory类:
这里我又一个地方是使用了以前的一篇【Config】类库读取自己的配置文件,配置文件的扩展,所以我是单独在IOC文件夹下创建了对应的web.config文件,如果写在项目跟web.config文件把注释那句话取消即可。
 public class UnityFactory

    {

        private static IUnityContainer _iUnityContainer = null;

        private UnityFactory()

        {

        }

        static UnityFactory()

        {

            ExeConfigurationFileMap fileMap = new ExeConfigurationFileMap();

           string basePath = Path.Combine(AppDomain.CurrentDomain.BaseDirectory + "IOC\\Unity.Config");

            Configuration configuration = LibConfig.InitConfig("IOC\\Unity");

             UnityConfigurationSection section = (UnityConfigurationSection)configuration.GetSection(UnityConfigurationSection.SectionName);

           // UnityConfigurationSection section = (UnityConfigurationSection)ConfigurationManager.GetSection(UnityConfigurationSection.SectionName);

            _iUnityContainer = new UnityContainer();

            try

            {

                section.Configure(_iUnityContainer, "MyContainer");

            }

            catch (Exception e)

            {

                throw;

            }

        }

        public static IUnityContainer GetContainerInstance()

        {

            return _iUnityContainer;

        }

        public static T GetServer<T>()

        {

            try

            {

                return _iUnityContainer.Resolve<T>();

            }

            catch (Exception e)

            {

                throw;

            }

        }

    }
使用就特别简单啦:
        public ActionResult Test() {

            try

            {

                var service = UnityFactory.GetServer<Server_Areas.Admin.UserServer>();

                var data = service.GetData();

            }

            catch (Exception e)

            {

            }

            return View();

        }
【Unity】微软的一款依赖注入组件的更多相关文章
- .NET 中依赖注入组件 Autofac 的性能漫聊
Autofac 是一款超赞的 .NET IoC 容器 ,在众多性能测评中,它也是表现最优秀的一个.它管理类之间的依赖关系, 从而使 应用在规模及复杂性增长的情况下依然可以轻易地修改.它的实现方式是将常 ...
- [IoC容器Unity]第三回:依赖注入
1.引言 上节介绍了,Unity的Lifetime Managers生命周期,Unity具体实现依赖注入包含构造函数注入.属性注入.方法注入,所谓注入相当赋值,下面一个一个来介绍. 2.构造函数注入 ...
- 基于ABP模块组件与依赖注入组件的项目插件开发
注意,阅读本文,需要先阅读以下两篇文章,并且对依赖注入有一定的基础. 模块系统:http://www.cnblogs.com/mienreal/p/4537522.html 依赖注入:http://w ...
- 3、手写Unity容器--第N层依赖注入
这个场景跟<手写Unity容器--第一层依赖注入>又不同,这里构造AndroidPhone的时候,AndroidPhone依赖于1个IPad,且依赖于1个IHeadPhone,而HeadP ...
- 关于微软企业库中依赖注入容器Unity两种生成对象的实现u
http://www.byywee.com/page/M0/S261/261037.html
- 依赖注入组件 Autofac 的小记
1. 批量给 Service 层自动注入.(支持 ASP.NET Core) builder.RegisterAssemblyTypes(typeof(IProductService).Assemb ...
- 【AutoFac】依赖注入和控制反转的使用
在开始之前首先解释一下我认为的依赖注入和控制反转的意思.(新手理解,哪里说得不正确还请指正和见谅) 控制反转:我们向IOC容器发出获取一个对象实例的一个请求,IOC容器便把这个对象实例“注入”到我们的 ...
- 【ASP.Net MVC3 】使用Unity 实现依赖注入
转载于:http://www.cnblogs.com/techborther/archive/2012/01/06/2313498.html 家人身体不太好,好几天没在园子里发帖了. 新项目还是要用M ...
- 【依赖注入】Unity和Autofac
全面理解ASP.NET Core依赖注入:https://www.cnblogs.com/jesse2013/p/di-in-aspnetcore.html MSDN:https://docs.mic ...
随机推荐
- Logstash导入数据到ElasticSearch
一:在Windows环境 1 下载解压Logstash的压缩包 2 在Logstash的压缩包中安装Logstash-jdbc-input插件: 在Bin命令行下运行命令: .\logstash-pl ...
- Springboot中关于跨域问题的一种解决方法
前后端分离开发中,跨域问题是很常见的一种问题.本文主要是解决 springboot 项目跨域访问的一种方法,其他 javaweb 项目也可参考. 1.首先要了解什么是跨域 由于前后端分离开发中前端页面 ...
- nodejs内存溢出
npm-v 报错,错误信息如下: FATAL ERROR: Ineffective mark-compacts near heap limit Allocation failed - JavaScri ...
- mantisbt的配置与安装
下载并安装wampserver; 安装时,提示SMTP服务器时,应正确填写邮箱的SMTP的服务器地址: 安装完成后,登录phpMyAdmin; 给原有的root用户创建密码,所有root用户: 创建一 ...
- SUSE12Sp3-Nginx安装
1.安装pcre(nginx 依赖) 把安装包pcre-8.12.tar.gz复制到服务器指定目录 tar -zxvf pcre-8.12.tar.gz # 解压 cd pcre-8.12 #进入目录 ...
- [Swift]LeetCode204. 计数质数 | Count Primes
Count the number of prime numbers less than a non-negative number, n. Example: Input: 10 Output: 4 E ...
- [Swift]LeetCode556. 下一个更大元素 III | Next Greater Element III
Given a positive 32-bit integer n, you need to find the smallest 32-bit integer which has exactly th ...
- [Swift]LeetCode704. 二分查找 | Binary Search
Given a sorted (in ascending order) integer array nums of nelements and a target value, write a func ...
- win10安装ubuntu16.04及后续配置
原文地址:https://www.jianshu.com/p/842e36a8255c UEFI 模式下win10安装ubuntu16.04双系统教程 - baobei0112的专栏 - CSDN博客 ...
- RSA算法原理——(1)目前常见加密算法简介
艾伦·麦席森·图灵在二战期间主要负责破译德国人的密码系统Enigma,破解密码需要大量的计算,图灵深知工欲善其事必先利其器的道理,于是一台叫作CO-LOSSUS的计算机在1943年被研制出来,后来 ...