Spring系列(六) Spring Web MVC 应用构建分析
DispatcherServlet
DispatcherServlet 是Spring MVC的前端控制器名称, 用户的请求到达这里进行集中处理, 在Spring MVC中, 它的作用是为不同请求匹配对应的处理器, 将结果传递给视图解析器最终呈现给客户端.
前端控制器模式(Front Controller Pattern)是用来提供一个集中的请求处理机制,所有的请求都将由一个单一的处理程序处理。该处理程序可以做认证/授权/记录日志,或者跟踪请求,然后把请求传给相应的处理程序。
Servlet WebApplicationContext 和 Root WebApplicationContext
Spring MVC 存在两个应用上下文, 分别为Servlet WebApplicationContext和Root WebApplicationContext. 他们分别初始化不同类型的bean.
下图来自Spring官方文档
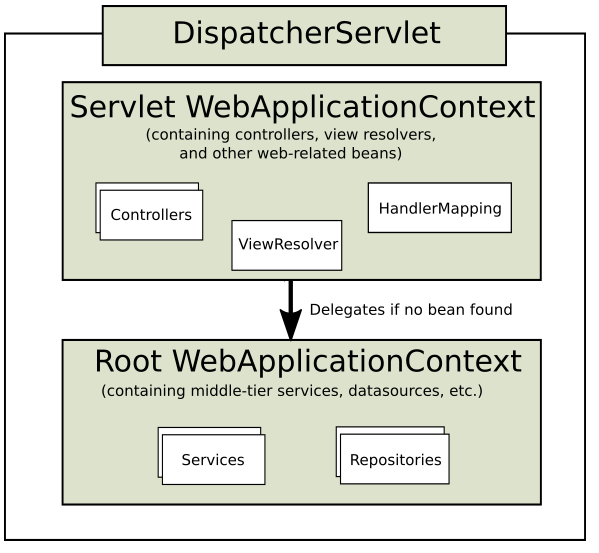
在DispatcherServlet启动的时候, 它会创建Spring上下文Servlet WebApplicationContext, 其中包含Web相关的Controller,ViewResolver,HandlerMapping等.
另外一个上下文Root WebApplicationContext是由ContextLoaderListener创建的, 包含除了Web组件外的其他bean, 比如包含业务逻辑的Service, 还有数据库相关的组件等.
代码(JavaConfig方式的配置代码)
下面是用JavaConfig方式实现的配置代码, 我们先搭建好一个Spring MVC 项目,然后结合源码分析Spring如何注册DispatcherServlet实例的.
// 继承AbstractAnnotationConfigDispatcherServletInitializer并重写其中的三个方法

public class MvcWebAppInitializer extends AbstractAnnotationConfigDispatcherServletInitializer {

    // 指定Root上下文的配置类

    @Override

    protected Class<?>[] getRootConfigClasses() {

        return new Class[]{ RootConfig.class };

    }

    // 指定Web上下文的配置类

    @Override

    protected Class<?>[] getServletConfigClasses() {

        return new Class[]{ WebConfig.class };

    }

    // url映射

    @Override

    protected String[] getServletMappings() {

        return new String[]{"/"};

    }

}
通过重写AbstractAnnotationConfigDispatcherServletInitializer的三个方法完成配置, WebConfig用来配置Web组件, RootConfig用来配置非Web组件.
@EnableWebMvc // 启用MVC

@ComponentScan(basePackages = {"com.xlx.mvc.web"}) // 启用组件扫描,只扫描web相关的组件

@Configuration

public class WebConfig implements WebMvcConfigurer {

    // 视图解析器,jsp

    @Bean

    public ViewResolver viewResolver(){

        InternalResourceViewResolver resolver = new InternalResourceViewResolver();

        resolver.setPrefix("/WEB-INF/views/");

        resolver.setSuffix(".jsp");

        resolver.setExposeContextBeansAsAttributes(true);

        return  resolver;

    }

    // 重写以启用默认的处理器, 用来处理静态资源

    @Override

    public void configureDefaultServletHandling(DefaultServletHandlerConfigurer configurer){

        configurer.enable();

    }

}

@Configuration

@ComponentScan(basePackages = {"com.xlx.mvc"},  excludeFilters = {

        @ComponentScan.Filter(type = FilterType.ANNOTATION,classes = EnableWebMvc.class)

}) // 扫描包, 但排除EnableWebMvc注解的类

public class RootConfig {

}
源码分析
Servlet 3.0 旨在支持基于代码的方式配置Servlet容器, 当3.0兼容的servlet容器启动的时候会在ClassPath查找并调用实现了接口ServletContainerInitializer的类的onStartup()方法, Spring中提供了这个接口的一个实现类SpringServletContainerInitializer. 其启动方法的代码如下:
@Override

public void onStartup(@Nullable Set<Class<?>> webAppInitializerClasses, ServletContext servletContext)

        throws ServletException {

    List<WebApplicationInitializer> initializers = new LinkedList<>();

    // 应用中WebApplicationInitializer的bean生成到一个列表中.

    if (webAppInitializerClasses != null) {

        for (Class<?> waiClass : webAppInitializerClasses) {

            if (!waiClass.isInterface() && !Modifier.isAbstract(waiClass.getModifiers()) &&

                    WebApplicationInitializer.class.isAssignableFrom(waiClass)) {

                try {

                    initializers.add((WebApplicationInitializer)

                            ReflectionUtils.accessibleConstructor(waiClass).newInstance());

                }

                catch (Throwable ex) {

                    throw new ServletException("Failed to instantiate WebApplicationInitializer class", ex);

                }

            }

        }

    }

    if (initializers.isEmpty()) {

        servletContext.log("No Spring WebApplicationInitializer types detected on classpath");

        return;

    }

    servletContext.log(initializers.size() + " Spring WebApplicationInitializers detected on classpath");

    AnnotationAwareOrderComparator.sort(initializers);

    // 遍历所有WebApplicationInitializer, 并调用其onStartup方法

    for (WebApplicationInitializer initializer : initializers) {

        initializer.onStartup(servletContext);

    }

}
在上面方法的最后, 可以看到其将控制权交给WebApplicationInitializer的实例并遍历调用了onStartup()方法, 而我们定义的类MvcWebAppInitializer 就是它的子类. 完整的继承关系为
WebApplicationInitializer <--
AbstractContextLoaderInitializer <--
AbstractDispatcherServletInitializer <--
AbstractAnnotationConfigDispatcherServletInitializer <--
MvcWebAppInitializer
在类 AbstractDispatcherServletInitializer 中实现了onStartup()方法, 最终调用registerDispatcherServlet()方法完成注册, 两个方法的代码如下:
@Override

public void onStartup(ServletContext servletContext) throws ServletException {

    super.onStartup(servletContext);

    registerDispatcherServlet(servletContext);

}

protected void registerDispatcherServlet(ServletContext servletContext) {

    // 获取Sevlet名称, 这个方法返回了默认值"dispatcher"

    String servletName = getServletName();

    Assert.hasLength(servletName, "getServletName() must not return null or empty");

    // 此处调用的方法是抽象方法, 由子类AbstractAnnotationConfigDispatcherServletInitializer实现, 其最终调用了自定义类的getServletConfigClasses()方法获取配置信息(源码附在本段后面). 用来生成Servlet上下文.

    WebApplicationContext servletAppContext = createServletApplicationContext();

    Assert.notNull(servletAppContext, "createServletApplicationContext() must not return null");

    // 生成dispatcherServlet实例

    FrameworkServlet dispatcherServlet = createDispatcherServlet(servletAppContext);

    Assert.notNull(dispatcherServlet, "createDispatcherServlet(WebApplicationContext) must not return null");

    dispatcherServlet.setContextInitializers(getServletApplicationContextInitializers());

    // 注册DispatcherServlet

    ServletRegistration.Dynamic registration = servletContext.addServlet(servletName, dispatcherServlet);

    if (registration == null) {

        throw new IllegalStateException("Failed to register servlet with name '" + servletName + "'. " +

                "Check if there is another servlet registered under the same name.");

    }

    registration.setLoadOnStartup(1);

    registration.addMapping(getServletMappings());

    registration.setAsyncSupported(isAsyncSupported());

    Filter[] filters = getServletFilters();

    if (!ObjectUtils.isEmpty(filters)) {

        for (Filter filter : filters) {

            registerServletFilter(servletContext, filter);

        }

    }

    customizeRegistration(registration);

}
下面附读取Servlet配置类的代码: 类AbstractAnnotationConfigDispatcherServletInitializer实现了createServletApplicationContext(), 可以看到代码中调用了方法getServletConfigClasses(), 这是个抽象方法, 声明为protected abstract Class<?>[] getServletConfigClasses();. 最终的实现正是在我们自定义的子类MvcWebAppInitializer中.
@Override

protected WebApplicationContext createServletApplicationContext() {

    AnnotationConfigWebApplicationContext context = new AnnotationConfigWebApplicationContext();

    // 读取配置类

    Class<?>[] configClasses = getServletConfigClasses();

    if (!ObjectUtils.isEmpty(configClasses)) {

        context.register(configClasses);

    }

    return context;

}
上面完成了DispatcherServlet的注册和启动, 接下来可以定义Controller了.
请求映射
在此之前需要了解下关于URL映射的Servlet规范, 注意这是Servlet的规范, 当然也适用于DispatcherServlet, 代码中我们为DispatcherServlet映射为"/", 规范中"/"为使用"default"Servlet, 也就意味着所有的请求默认通过DispatcherServlet处理.
为了处理静态资源, 在WebConfig中覆盖了方法configureDefaultServletHandling()已启用静态资源处理器DefaultServletHttpRequestHandler, 它的优先级是最低, 这意味着在匹配不到其他handler的时候,servlet会将请求交给这个handler处理.
规则按顺序执行,匹配到就直接返回.
- 精确匹配, url完全与模式匹配
- 最长路径匹配, 查找模式中路径最长的匹配项, 例如/user/list/1匹配模式/user/list/, 而不是/user/
- 扩展名匹配
- 默认Servlet
代码
@Controller

@RequestMapping(value = "/home")

public class HomeController {

    @RequestMapping(value = "/default",method = RequestMethod.GET)

    public String home(){

        return "home";

    }

}
源码分析
我们的Controller以注解(@RequestMapping,@GetMapping等)方式定义, RequestMappingHandlerMapping用来生成请求url与处理方法的映射关系(mapping),这个mapping最终是由DispatcherServlet调用找到匹配到url对应的controller方法并调用.
通过查看Spring的bean依赖关系图(找到类WebConfig, Ctrl+Alt+U并选spring beans dependency)可以找到RequestMappingHandlerMapping生成的线索.
简化的关系图如下:
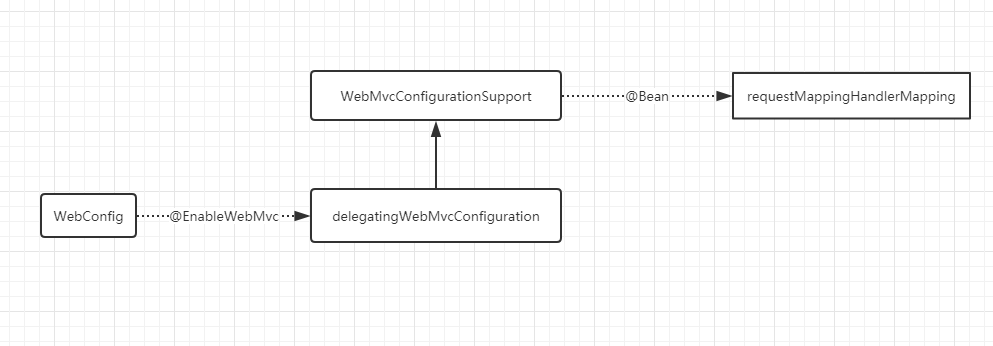
可以看到WebmvcConfigurationSupport中有个@Bean注解的方法生成RequestMappingHandlerMapping的实例, 而WebmvcConfigurationSupport继承了DelegatingWebMvcConfiguration, 后者是由@EnableWebMvc注解导入.
/**

    *

    * 返回排序为0的RequestMappingHandlerMapping实例bean, 用来处理注解方式的Controller请求.

    */

@Bean

public RequestMappingHandlerMapping requestMappingHandlerMapping() {

    RequestMappingHandlerMapping mapping = createRequestMappingHandlerMapping();

    // 顺序为0, 顺便提一句, 静态资源的处理器Handler的顺序为Integer.Max

    mapping.setOrder(0);

    mapping.setInterceptors(getInterceptors());

    mapping.setContentNegotiationManager(mvcContentNegotiationManager());

    mapping.setCorsConfigurations(getCorsConfigurations());

    PathMatchConfigurer configurer = getPathMatchConfigurer();

    Boolean useSuffixPatternMatch = configurer.isUseSuffixPatternMatch();

    if (useSuffixPatternMatch != null) {

        mapping.setUseSuffixPatternMatch(useSuffixPatternMatch);

    }

    Boolean useRegisteredSuffixPatternMatch = configurer.isUseRegisteredSuffixPatternMatch();

    if (useRegisteredSuffixPatternMatch != null) {

        mapping.setUseRegisteredSuffixPatternMatch(useRegisteredSuffixPatternMatch);

    }

    Boolean useTrailingSlashMatch = configurer.isUseTrailingSlashMatch();

    if (useTrailingSlashMatch != null) {

        mapping.setUseTrailingSlashMatch(useTrailingSlashMatch);

    }

    UrlPathHelper pathHelper = configurer.getUrlPathHelper();

    if (pathHelper != null) {

        mapping.setUrlPathHelper(pathHelper);

    }

    PathMatcher pathMatcher = configurer.getPathMatcher();

    if (pathMatcher != null) {

        mapping.setPathMatcher(pathMatcher);

    }

    Map<String, Predicate<Class<?>>> pathPrefixes = configurer.getPathPrefixes();

    if (pathPrefixes != null) {

        mapping.setPathPrefixes(pathPrefixes);

    }

    return mapping;

}
好了, 现在有了DispatcherServlet, 并且有了可以处理映射关系的RequestMappingHandlerMapping, 接下来再看下当请求到达时, DispatcherServlet 如何为Url找到对应的Handler方法.
DispatcherServlet中定义了处理请求的doService()方法, 最终这个方法委托doDispatch()处理请求, 特别注意中文注释的几个语句, 除此之外, 这个方法还提供了生命周期的一些处理工作.
protected void doDispatch(HttpServletRequest request, HttpServletResponse response) throws Exception {

    HttpServletRequest processedRequest = request;

    HandlerExecutionChain mappedHandler = null;

    boolean multipartRequestParsed = false;

    WebAsyncManager asyncManager = WebAsyncUtils.getAsyncManager(request);

    try {

        ModelAndView mv = null;

        Exception dispatchException = null;

        try {

            processedRequest = checkMultipart(request);

            multipartRequestParsed = (processedRequest != request);

            // 获取当前请求对应的handler

            mappedHandler = getHandler(processedRequest);

            if (mappedHandler == null) {

                noHandlerFound(processedRequest, response);

                return;

            }

            // 获取当前请求对应handler的适配器

            HandlerAdapter ha = getHandlerAdapter(mappedHandler.getHandler());

            // Process last-modified header, if supported by the handler.

            String method = request.getMethod();

            boolean isGet = "GET".equals(method);

            if (isGet || "HEAD".equals(method)) {

                long lastModified = ha.getLastModified(request, mappedHandler.getHandler());

                if (new ServletWebRequest(request, response).checkNotModified(lastModified) && isGet) {

                    return;

                }

            }

            if (!mappedHandler.applyPreHandle(processedRequest, response)) {

                return;

            }

            // 最终调用Handler的方法

            mv = ha.handle(processedRequest, response, mappedHandler.getHandler());

            if (asyncManager.isConcurrentHandlingStarted()) {

                return;

            }

            applyDefaultViewName(processedRequest, mv);

            mappedHandler.applyPostHandle(processedRequest, response, mv);

        }

        catch (Exception ex) {

            dispatchException = ex;

        }

        catch (Throwable err) {

            // As of 4.3, we're processing Errors thrown from handler methods as well,

            // making them available for @ExceptionHandler methods and other scenarios.

            dispatchException = new NestedServletException("Handler dispatch failed", err);

        }

        processDispatchResult(processedRequest, response, mappedHandler, mv, dispatchException);

    }

    catch (Exception ex) {

        triggerAfterCompletion(processedRequest, response, mappedHandler, ex);

    }

    catch (Throwable err) {

        triggerAfterCompletion(processedRequest, response, mappedHandler,

                new NestedServletException("Handler processing failed", err));

    }

    finally {

        if (asyncManager.isConcurrentHandlingStarted()) {

            // Instead of postHandle and afterCompletion

            if (mappedHandler != null) {

                mappedHandler.applyAfterConcurrentHandlingStarted(processedRequest, response);

            }

        }

        else {

            // Clean up any resources used by a multipart request.

            if (multipartRequestParsed) {

                cleanupMultipart(processedRequest);

            }

        }

    }

}
上面代码中, 重点关注getHandler方法.
protected HandlerExecutionChain getHandler(HttpServletRequest request) throws Exception {

    if (this.handlerMappings != null) {

        for (HandlerMapping mapping : this.handlerMappings) {

            HandlerExecutionChain handler = mapping.getHandler(request);

            if (handler != null) {

                return handler;

            }

        }

    }

    return null;

}
可以看到请求所需的handler是取自实例变量this.handlerMappings,接下来顺藤摸瓜, 看这个变量是何时初始化的.通过引用, 我们查找到了下面方法.
private void initHandlerMappings(ApplicationContext context) {

    this.handlerMappings = null;

    if (this.detectAllHandlerMappings) {

        // 找到上下文中的所有HandlerMapping, 包括祖先上下文

        Map<String, HandlerMapping> matchingBeans =

                BeanFactoryUtils.beansOfTypeIncludingAncestors(context, HandlerMapping.class, true, false);

        if (!matchingBeans.isEmpty()) {

            this.handlerMappings = new ArrayList<>(matchingBeans.values());

            // HandlerMapping排序

            AnnotationAwareOrderComparator.sort(this.handlerMappings);

        }

    }

    else {

        try {

            HandlerMapping hm = context.getBean(HANDLER_MAPPING_BEAN_NAME, HandlerMapping.class);

            this.handlerMappings = Collections.singletonList(hm);

        }

        catch (NoSuchBeanDefinitionException ex) {

            // Ignore, we'll add a default HandlerMapping later.

            // 这个注释...

        }

    }

    // 保证至少要有一个HandlerMapping.

    if (this.handlerMappings == null) {

        this.handlerMappings = getDefaultStrategies(context, HandlerMapping.class);

        if (logger.isTraceEnabled()) {

            logger.trace("No HandlerMappings declared for servlet '" + getServletName() +

                    "': using default strategies from DispatcherServlet.properties");

        }

    }

}
整理下调用关系: DispatcherServlet initHandlerMappings <-- initStrategies <-- onRefresh <--
FrameworkServlet initWebApplicationContext <-- initServletBean <--
HttpServletBean init <--
GenericServlet init(ServletConfig config)
最后的GenericServlet是servlet Api的.
Spring Boot 中的DispatcherServlet
Spring Boot微服务中的DispatcherServlet装配, 因为其一般使用内置的Servlet容器, 是通过DispatcherServletAutoConfiguration来完成的. 下面是生成DispatcherServlet bean的代码, 这个bean在内部静态类DispatcherServletConfiguration中.
@Bean(name = DEFAULT_DISPATCHER_SERVLET_BEAN_NAME)

public DispatcherServlet dispatcherServlet() {

    DispatcherServlet dispatcherServlet = new DispatcherServlet();

    dispatcherServlet.setDispatchOptionsRequest(

            this.webMvcProperties.isDispatchOptionsRequest());

    dispatcherServlet.setDispatchTraceRequest(

            this.webMvcProperties.isDispatchTraceRequest());

    dispatcherServlet.setThrowExceptionIfNoHandlerFound(

            this.webMvcProperties.isThrowExceptionIfNoHandlerFound());

    return dispatcherServlet;

}
上面我们通过注解方式构建了一个MVC应用程序, 并且通过源码分析其构建原理, 其中Spring使用的前端控制器实现类是DispatcherServlet, 其在Servlet容器启动的时候实例化, 并初始化容器中的Handler处理器. 当请求到达DispatcherServlet时会调用其doDispatcher()方法选择最合适的处理器. 最后我们扫了一眼Spring Boot的自动装配DispatcherServlet方式.
Spring系列(六) Spring Web MVC 应用构建分析的更多相关文章
- Spring系列(七) Spring MVC 异常处理
Servlet传统异常处理 Servlet规范规定了当web应用发生异常时必须能够指明, 并确定了该如何处理, 规定了错误信息应该包含的内容和展示页面的方式.(详细可以参考servlet规范文档) 处 ...
- Spring系列之Spring常用注解总结 转载
Spring系列之Spring常用注解总结 传统的Spring做法是使用.xml文件来对bean进行注入或者是配置aop.事物,这么做有两个缺点:1.如果所有的内容都配置在.xml文件中,那么.x ...
- 深入理解Spring系列之七:web应用自动装配Spring配置
转载 https://mp.weixin.qq.com/s/Lf4akWFmcyn9ZVGUYNi0Lw 在<深入理解Spring系列之一:开篇>的示例代码中使用如下方式去加载Spring ...
- Spring系列(零) Spring Framework 文档中文翻译
Spring 框架文档(核心篇1和2) Version 5.1.3.RELEASE 最新的, 更新的笔记, 支持的版本和其他主题,独立的发布版本等, 是在Github Wiki 项目维护的. 总览 历 ...
- Spring系列之Spring常用注解总结
传统的Spring做法是使用.xml文件来对bean进行注入或者是配置aop.事物,这么做有两个缺点:1.如果所有的内容都配置在.xml文件中,那么.xml文件将会十分庞大:如果按需求分开.xml文件 ...
- Spring学习(六)-----Spring使用@Autowired注解自动装配
Spring使用@Autowired注解自动装配 在上一篇 Spring学习(三)-----Spring自动装配Beans示例中,它会匹配当前Spring容器任何bean的属性自动装配.在大多数情况下 ...
- Spring学习(六)--渲染Web视图
一.将模型数据渲染为Html 在上一篇文章中,我们所编写的控制器方法都没有直接产生浏览器中渲染所需的HTML.这些方法只是将数据填充到模型中,然后将模型传递给一个用来渲染的视图.这些方法会返回一个St ...
- 【Spring系列】Spring mvc整合redis(非集群)
一.在pom.xml中增加redis需要的jar包 <!--spring redis相关jar包--> <dependency> <groupId>redis.cl ...
- spring入门(六) spring mvc+mybatis
1.引入依赖 <!-- https://mvnrepository.com/artifact/org.mybatis/mybatis --> <dependency> < ...
随机推荐
- 通过C#学Proto.Actor模型》之Remote
Proto.Actor中提供了基于tcp/ip的通迅来实现Remote,可以通过其Remot实现对Actor的调用. 先来看一个极简单片的远程调用. 码友看码: 引用NuGet包 Proto.Acto ...
- js 移除数组元素
//移除数组元素 Array.prototype.remove = function(val) { var index = this.indexOfArr(val); if (index > - ...
- 使用Github生成燃尽图
经过一晚上折腾,终于算是把linux上成功生成了我们团队项目的燃尽图,效果还是不错,在过程中又发现了另一种生成燃尽图的方式,也是基于一个开源项目. 1.准备: 首先你的项目一定要有milestone. ...
- centos7之添加开机启动服务/脚本
一.添加开机启动脚本 #!/bin/bash # THIS FILE IS ADDED FOR COMPATIBILITY PURPOSES # # It is highly advisable to ...
- pci设备驱动相关
pci 设备注册及查找: https://www.cnblogs.com/image-eye/archive/2012/02/15/2352912.html PFN https://nieyong.g ...
- UVA 10118 Free Candies
https://vjudge.net/problem/UVA-10118 题目 桌上有4堆糖果,每堆有$N$($N\leqslant 40$)颗.有个熊孩子拿了个可以装5颗糖的篮子,开始玩无聊的装糖游 ...
- ubuntu16.04下sublime text3安装和配置
ubuntu16.04下sublime text3安装和配置 2018年04月20日 10:31:08 zhengqijun_ 阅读数:1482 1.安装方法 1)使用ppa安装 sudo add-a ...
- 纯css实现checkbox开关切换按钮
我们都知道 checkbox 标签默认样式 实在是太low了,故对CheckBox美化很有必要. 现提供两种方式对其进行美化. 方法一 <div class="switch-wrap ...
- C# 数独算法——LINQ+委托
using System; using System.Collections.Generic; using System.Linq; using System.Text; namespace Sing ...
- Redis扩展机制
Redis扩展机制扫盲 作者:尹正杰 版权声明:原创作品,谢绝转载!否则将追究法律责任. 关于Redis的Avalibility解决方案有很多,比如Twemproxy,Codis, 一.Twempro ...