ssm框架结合axis2实例步骤
本文亲测;
1、从官网下载axis2相关api,地址是:http://axis.apache.org/axis2/java/core/download.html,我下载的是axis2-1.7.6-bin;
2、从axis2-1.7.6-bin里面找到webapp,WEB-INF,将conf,modules,service全部复制到项目下,如下图:
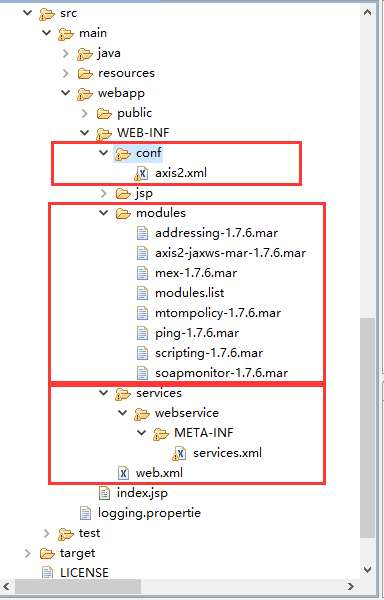
复制到WEB-INF下面(axis2-1.7.6-bin里面有);
3、在项目web.xml中加入axis2支持:
    <!-- 加入Axis2支持 -->

    <servlet>

        <servlet-name>AxisServlet</servlet-name>

        <servlet-class>org.apache.axis2.transport.http.AxisServlet</servlet-class>

        <load-on-startup>2</load-on-startup>

    </servlet>

    <servlet-mapping>

        <servlet-name>AxisServlet</servlet-name>

        <url-pattern>/services/*</url-pattern>

    </servlet-mapping>
4、接口发布java代码
package cn.yql8.sappi.service;

import java.io.Serializable;

import java.util.List;

/**

 * <!-- 公司代码主数据 -->

 * @author Administrator

 *

 */

public class Companycode {

    public String getCompanycode(List<Masterdatas> list)throws Exception{

        System.out.println("-----------------------------");

        return "1";

    }

    public static class Masterdatas implements Serializable{

        /**

         *

         */

        private static final long serialVersionUID = 1L;

        String MANDT;  //客户端           主键

        String BUKRS;  //公司代码        主键

        String BUTXT;  //公司名称     主键

        String LAND1;  //国家代码        主键

        String ORT01;  //城市

        String WAERS;  //货币码

        String SPRAS;  //语言代码

        String KTOPL;  //帐目表

        String ADRNR;  //地址

        public String getMANDT() {

            return MANDT;

        }

        public void setMANDT(String mANDT) {

            MANDT = mANDT;

        }

        public String getBUKRS() {

            return BUKRS;

        }

        public void setBUKRS(String bUKRS) {

            BUKRS = bUKRS;

        }

        public String getBUTXT() {

            return BUTXT;

        }

        public void setBUTXT(String bUTXT) {

            BUTXT = bUTXT;

        }

        public String getLAND1() {

            return LAND1;

        }

        public void setLAND1(String lAND1) {

            LAND1 = lAND1;

        }

        public String getORT01() {

            return ORT01;

        }

        public void setORT01(String oRT01) {

            ORT01 = oRT01;

        }

        public String getWAERS() {

            return WAERS;

        }

        public void setWAERS(String wAERS) {

            WAERS = wAERS;

        }

        public String getSPRAS() {

            return SPRAS;

        }

        public void setSPRAS(String sPRAS) {

            SPRAS = sPRAS;

        }

        public String getKTOPL() {

            return KTOPL;

        }

        public void setKTOPL(String kTOPL) {

            KTOPL = kTOPL;

        }

        public String getADRNR() {

            return ADRNR;

        }

        public void setADRNR(String aDRNR) {

            ADRNR = aDRNR;

        }

    }

}
5、springmvc.xml中注入AXIS2支持
<bean id="applicationContext" class="org.apache.axis2.extensions.spring.receivers.ApplicationContextHolder" />
6、pom.xml引入的对应的jar包
            <!-- axis2.jar -->

        <dependency>

            <groupId>org.apache.axis2</groupId>

            <artifactId>axis2-adb</artifactId>

            <version>${axis-version}</version>

        </dependency>

        <dependency>

            <groupId>org.apache.axis2</groupId>

            <artifactId>axis2-adb-codegen</artifactId>

            <version>${axis-version}</version>

        </dependency>

        <dependency>

            <groupId>org.apache.axis2</groupId>

            <artifactId>axis2-clustering</artifactId>

            <version>${axis-version}</version>

        </dependency>

        <dependency>

            <groupId>org.apache.axis2</groupId>

            <artifactId>axis2-codegen</artifactId>

            <version>${axis-version}</version>

        </dependency>

        <dependency>

            <groupId>org.apache.axis2</groupId>

            <artifactId>axis2-corba</artifactId>

            <version>${axis-version}</version>

        </dependency>

        <dependency>

            <groupId>org.apache.axis2</groupId>

            <artifactId>axis2-fastinfoset</artifactId>

            <version>${axis-version}</version>

        </dependency>

        <dependency>

            <groupId>org.apache.axis2</groupId>

            <artifactId>axis2-java2wsdl</artifactId>

            <version>${axis-version}</version>

        </dependency>

        <dependency>

            <groupId>org.apache.axis2</groupId>

            <artifactId>axis2-jaxbri</artifactId>

            <version>${axis-version}</version>

        </dependency>

        <dependency>

            <groupId>org.apache.axis2</groupId>

            <artifactId>axis2-jaxws</artifactId>

            <version>${axis-version}</version>

        </dependency>

        <dependency>

            <groupId>org.apache.axis2</groupId>

            <artifactId>axis2-jibx</artifactId>

            <version>${axis-version}</version>

        </dependency>

        <dependency>

            <groupId>org.apache.axis2</groupId>

            <artifactId>axis2-json</artifactId>

            <version>${axis-version}</version>

        </dependency>

        <dependency>

            <groupId>org.apache.axis2</groupId>

            <artifactId>axis2-kernel</artifactId>

            <version>${axis-version}</version>

        </dependency>

        <dependency>

            <groupId>org.apache.axis2</groupId>

            <artifactId>axis2-metadata</artifactId>

            <version>${axis-version}</version>

        </dependency>

        <dependency>

            <groupId>org.apache.axis2</groupId>

            <artifactId>axis2-mtompolicy</artifactId>

            <version>${axis-version}</version>

        </dependency>

        <dependency>

            <groupId>org.apache.axis2</groupId>

            <artifactId>axis2-saaj</artifactId>

            <version>${axis-version}</version>

        </dependency>

        <dependency>

            <groupId>org.apache.axis2</groupId>

            <artifactId>axis2-soapmonitor-servlet</artifactId>

            <version>${axis-version}</version>

        </dependency>

        <dependency>

            <groupId>org.apache.axis2</groupId>

            <artifactId>axis2-spring</artifactId>

            <version>${axis-version}</version>

        </dependency>

        <dependency>

            <groupId>org.apache.axis2</groupId>

            <artifactId>axis2-transport-http</artifactId>

            <version>${axis-version}</version>

        </dependency>

        <dependency>

            <groupId>org.apache.axis2</groupId>

            <artifactId>axis2-transport-local</artifactId>

            <version>${axis-version}</version>

        </dependency>

        <dependency>

            <groupId>org.apache.axis2</groupId>

            <artifactId>axis2-xmlbeans</artifactId>

            <version>${axis-version}</version>

        </dependency>
7、services.xml中发布接口
<serviceGroup>

<service name="companycodeService" >

    <description>

        Test Companycode Example

    </description>

    <!-- 公司代码主数据 -->

    <parameter name="ServiceClass">cn.yql8.sappi.service.Companycode</parameter>

<!--     <parameter name="SpringBeanName">emptyBoxService</parameter> -->

     <!-- 公司代码主数据 -->

     <operation name="getCompanycode">

        <messageReceiver class="org.apache.axis2.rpc.receivers.RPCMessageReceiver" />

    </operation>

   <messageReceivers>

        <messageReceiver mep="http://www.w3.org/2004/08/wsdl/in-only" class="org.apache.axis2.rpc.receivers.RPCInOnlyMessageReceiver"/>

        <messageReceiver mep="http://www.w3.org/2004/08/wsdl/in-out" class="org.apache.axis2.rpc.receivers.RPCMessageReceiver" />

    </messageReceivers>

</service>

</serviceGroup>
8、浏览器地址访问:
http://localhost:8080/cgxtpt/services/CompanycodeService?wsdl
9、可以用SOAPUI进行测试;
ssm框架结合axis2实例步骤的更多相关文章
- SSM 框架快速整合实例--学生查询
一.快速准备 SSM 框架即 Spring 框架.SpringMVC 框架.MyBatis 框架,关于这几个框架的基础和入门程序,我前面已经写过几篇文章作为基础和入门介绍了.对于这 3 个框架还不熟悉 ...
- SSM框架快速整合实例——学生查询
一.快速准备 SSM 框架即 Spring 框架.SpringMVC 框架.MyBatis 框架,关于这几个框架的基础和入门程序,我前面已经写过几篇文章作为基础和入门介绍了.这里再简单的介绍一下: 1 ...
- SpringMVC笔记——SSM框架搭建简单实例
落叶枫桥 博客园 首页 新随笔 联系 订阅 管理 SpringMVC笔记——SSM框架搭建简单实例 简介 Spring+SpringMVC+MyBatis框架(SSM)是比较热门的中小型企业级项目开发 ...
- SSM框架整合模板
SSM框架整合--MAVEN依赖 spring方面(包含了springmvc): spring-webmvc:spring与mvc的整合依赖,主要包括spring的核心包和springmvc需要的包 ...
- SSM(Spring+SpringMVC+Mybatis)框架环境搭建(整合步骤)(一)
1. 前言 最近在写毕设过程中,重新梳理了一遍SSM框架,特此记录一下. 附上源码:https://gitee.com/niceyoo/jeenotes-ssm 2. 概述 在写代码之前我们先了解一下 ...
- SSM框架之整合(Maven实例)
有不少朋友在maven中因为pom文件依赖的事导致报错 今天我这个快速搭建ssm框架,确保在jdk7或者jdk8的环境,tomcat没什么要求.但如果要用jdk8的话,最好用run as中的serve ...
- SSM框架搭建步骤
首先要导入相关的jar包(spring\spring-core\spring-jdbc\spring-aop\spring-context\spring-webmvc\junit\commons-la ...
- 吴裕雄--天生自然JAVA SPRING框架开发学习笔记:SSM(Spring+Spring MVC+MyBatis)框架整合搭建详细步骤
因为 Spring MVC 是 Spring 框架中的一个子模块,所以 Spring 与 SpringMVC 之间不存在整合的问题.实际上,SSM 框架的整合只涉及 Spring 与 MyBatis ...
- SSM框架开发web项目系列(二) MyBatis真正的力量
前言 上篇SSM框架环境搭建篇,演示了我们进行web开发必不可少的一些配置和准备工作,如果这方面还有疑问的地方,可以先参考上一篇“SSM框架开发web项目系列(一) 环境搭建篇”.本文主要介绍MyBa ...
随机推荐
- RVM Ruby 管理工具
1.RVM 简介 1.1 Ruby 简介 Ruby 是一种面向对象的脚本语言,简单易用,功能强大.能跨平台和可移植性好等等.其实就是种脚本语言. Ruby 的软件源使用的是亚马逊的云服务,国内网络环境 ...
- JavaWeb下载文件response
以下代码在 chrome.firefox,安卓自带手机浏览器上测试通过,但未经过完全测试,先记录下 public static void downLoadFile(HttpServletRequest ...
- [转]@Transactional spring 配置事务 注意事项
@Transactional spring 配置事务 注意事项 [@more@] @Transactional spring 配置事务 注意事项 1. 在需要事务管理的地方加@Transactiona ...
- Python 图像下载解决图像损坏
在下载图片的过程中,经常会发现图片损坏,下面提供了两种解决方法: 方法一: if response.status_code == 200: print '======================= ...
- Sql Server Compact 4.0数据库部署安装
Sql Server Compact 4.0相比3.5版本增强了很多,支持Entity Framework 4.1,对于轻量级应用来讲,使用Sql Server Compact 4.0是个很好的选择, ...
- [CTCI] 下一个较大元素
下一个较大元素 题目描述 现在我们有一个int数组,请你找出数组中每个元素的下一个比它大的元素. 给定一个int数组A及数组的大小n,请返回一个int数组,代表每个元素比他大的下一个元素,若不存在则为 ...
- iOS 再谈 代理传值,block反向传值
本贴的例子是:有A和B两个界面,要实现的效果就是先让A跳转到B,然后B中有个颜色的参数,当B跳转到A时,把这个颜色的参数传递给A,在A中利用这个颜色改变自己界面的颜色. 第1步:在发送者(界面B)中, ...
- 设计模式-装饰模式(Decorator Pattern)
装饰模式(Decorator Pattern):动态地给一个对象添加一些额外的职责,就增加功能来说,装饰模式比生成子类更为灵活
- lame,把ios录音转换为mp3格式
在ios设备中进行录音,录音文件的格式为caf.但这种格式在很多设备中没法播放.为了适应终端的播放功能,特将caf转换为mp3格式文件来使用. 在录制caf文件时,需要使用双通道,否则在转换为MP3格 ...
- 优化基于FPGA的深度卷积神经网络的加速器设计
英文论文链接:http://cadlab.cs.ucla.edu/~cong/slides/fpga2015_chen.pdf 翻译:卜居 转载请注明出处:http://blog.csdn.net/k ...