
Mac + PyCharm 安装 Opencv3 + python2.7
本文地址:http://www.cnblogs.com/QingHuan/p/7354074.html


转载请注明本文地址,方便读者查看本文更新,谢谢!
今天要在Mac上安装OpenCV,过程非常曲折,充分体会到了每个人的安装过程都是不同的
具体参考了以下几篇博客:
[1] http://www.jianshu.com/p/6e345b3aa988
[2] http://www.jianshu.com/p/b5424e9cb7ad
[3] http://blog.csdn.net/willduan1/article/details/53898440
[4] http://nooverfit.com/wp/手把手教你,在ubuntu上安装opencv-3-0-和-python-2-7/
在参考 [1] 的过程中,还下载了Anaconda,其实最后都没有用上
另外推荐一本学习Python的书:
https://www.gitbook.com/book/lenkimo/byte-of-python-chinese-edition/details
下面是正式安装过程,目的是使用PyCharm进行Python开发
// 更新:可以不安装虚拟环境,直接跳到第二节,选择系统默认的python2.7即可
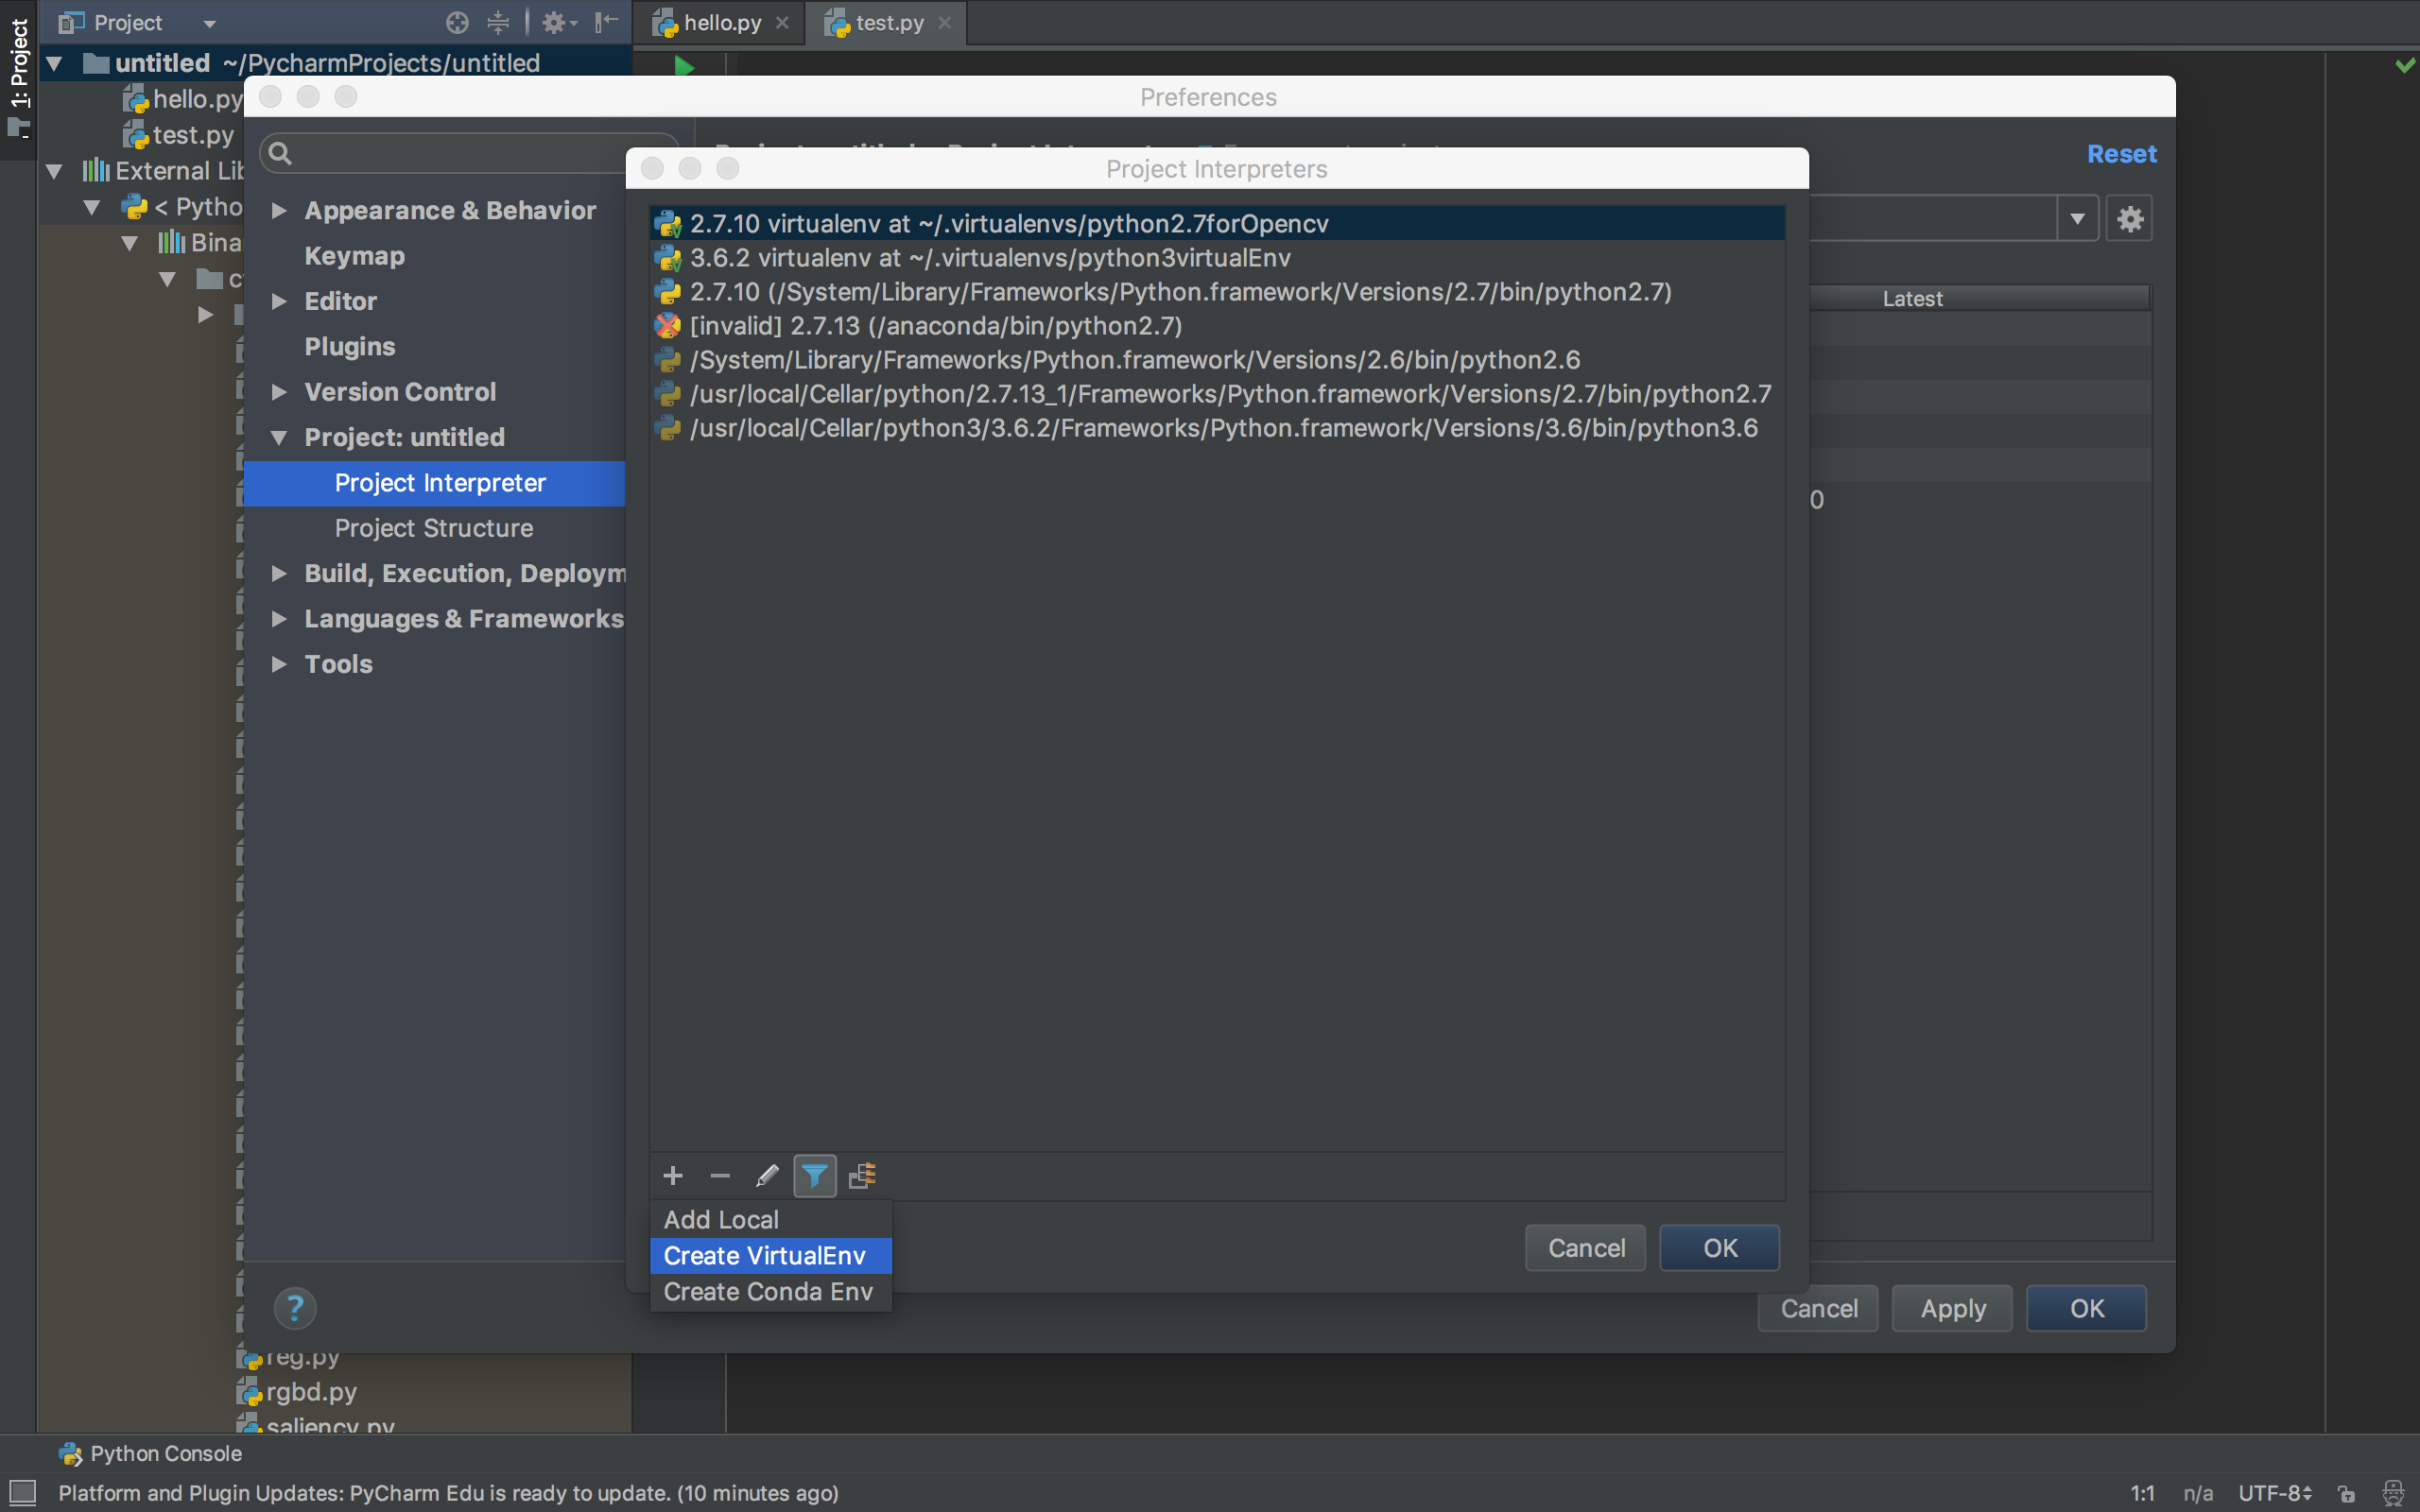
// 再更新,其实可以在Pycharm里配置安装虚拟环境(实在太赞了),如下图
第一节 安装虚拟环境
参考 [2] 和 [4] ,感谢原作者!
安装virtualenv和virtualenvwrapper. 用来分割python虚拟环境. 这不是必须的, 但是强烈推荐:
$ sudo pip install virtualenv virtualenvwrapper

$ sudo rm -rf ~/.cache/pip
如果报以下的错误:
Operation not permitted: '/tmp/pip-bxaFhj-uninstall/System/Library/Frameworks/Python.framework/Versions/2.7/Extras/lib/python/six-1.4.1-py2.7.egg-info'
参考[7] https://github.com/pypa/pip/issues/3165
输入
sudo pip install virtualenv virtualenvwrapper --upgrade --ignore-installed six
即可
原因是:
This is because OS X El Capitan ships with six 1.4.1 installed already and when it attempts to uninstall it (because awscli depends on botocore, botocore depends on python-dateutil, and python-dateutil depends on six >= 1.5) it doesn't have permission to do so because System Integrity Protection doesn't allow even root to modify those directories.
Ideally, pip should just skip uninstalling those items since they aren't installed to site-packages they are installed to a special Apple directory. However, even if pip skips uninstalling those items and installs six into site-packages we'll hit another bug where Apple puts their pre-installed stuff earlier in the
sys.paththan site-packages. I've talked to Apple about this and I'm not sure if they're going to do anything about it or not.
也就是six的版本问题
现在我们有了virtualenv和virtualenvwrapper, 我们要更新我们的~/.bashrc 文件:(Mac中为.bash_profile)(修改原因参考 [5] )
在Mac中:

vi ~/.bash_profile

如果提示Read-only file,不允许写入的话,执行:

chmod a+w ~/.bash_profile

如果在Linux系统中:

vi ~/.bashrc
然后将下面的几行复制到最末尾
# virtualenv and virtualenvwrapper

export WORKON_HOME=$HOME/.virtualenvs

source /usr/local/bin/virtualenvwrapper.sh
为了使~/.bashrc 文件生效 , 你可以用以下这些方法的其中之一(1) 注销后重新登录, (2)关闭终端开一个新终端, (3)直接使得~/.bashrc文件在当前生效,执行:
$ source ~/.bashrc
最后我们生成虚拟开发环境:
$ mkvirtualenv python2.7forOpencvExp
1.1 安装Python
安装python包管理器pip:
$ wget https://bootstrap.pypa.io/get-pip.py

$ sudo python get-pip.py
安装Python-2.7.13:
brew install python
安装好后的python路径为 /usr/local/Cellar/python/2.7.13_1
可执行文件的位置在 /usr/local/Cellar/python/2.7.13_1/Frameworks/Python.framework/Versions/2.7/bin/python2.7
可以参考 [6] 来修改虚拟环境使用的python版本,
你可以选择使用一个Python解释器(比如``python2.7``):
$ virtualenv -p /usr/bin/python2.7 my_project
如果想查看全局的python位置,输入
whereis python
第二节 在PYCHARM中进行配置:
1. 点击左上角的Pycharm Edu ==> Preferences ==> Project Interpreter,如图
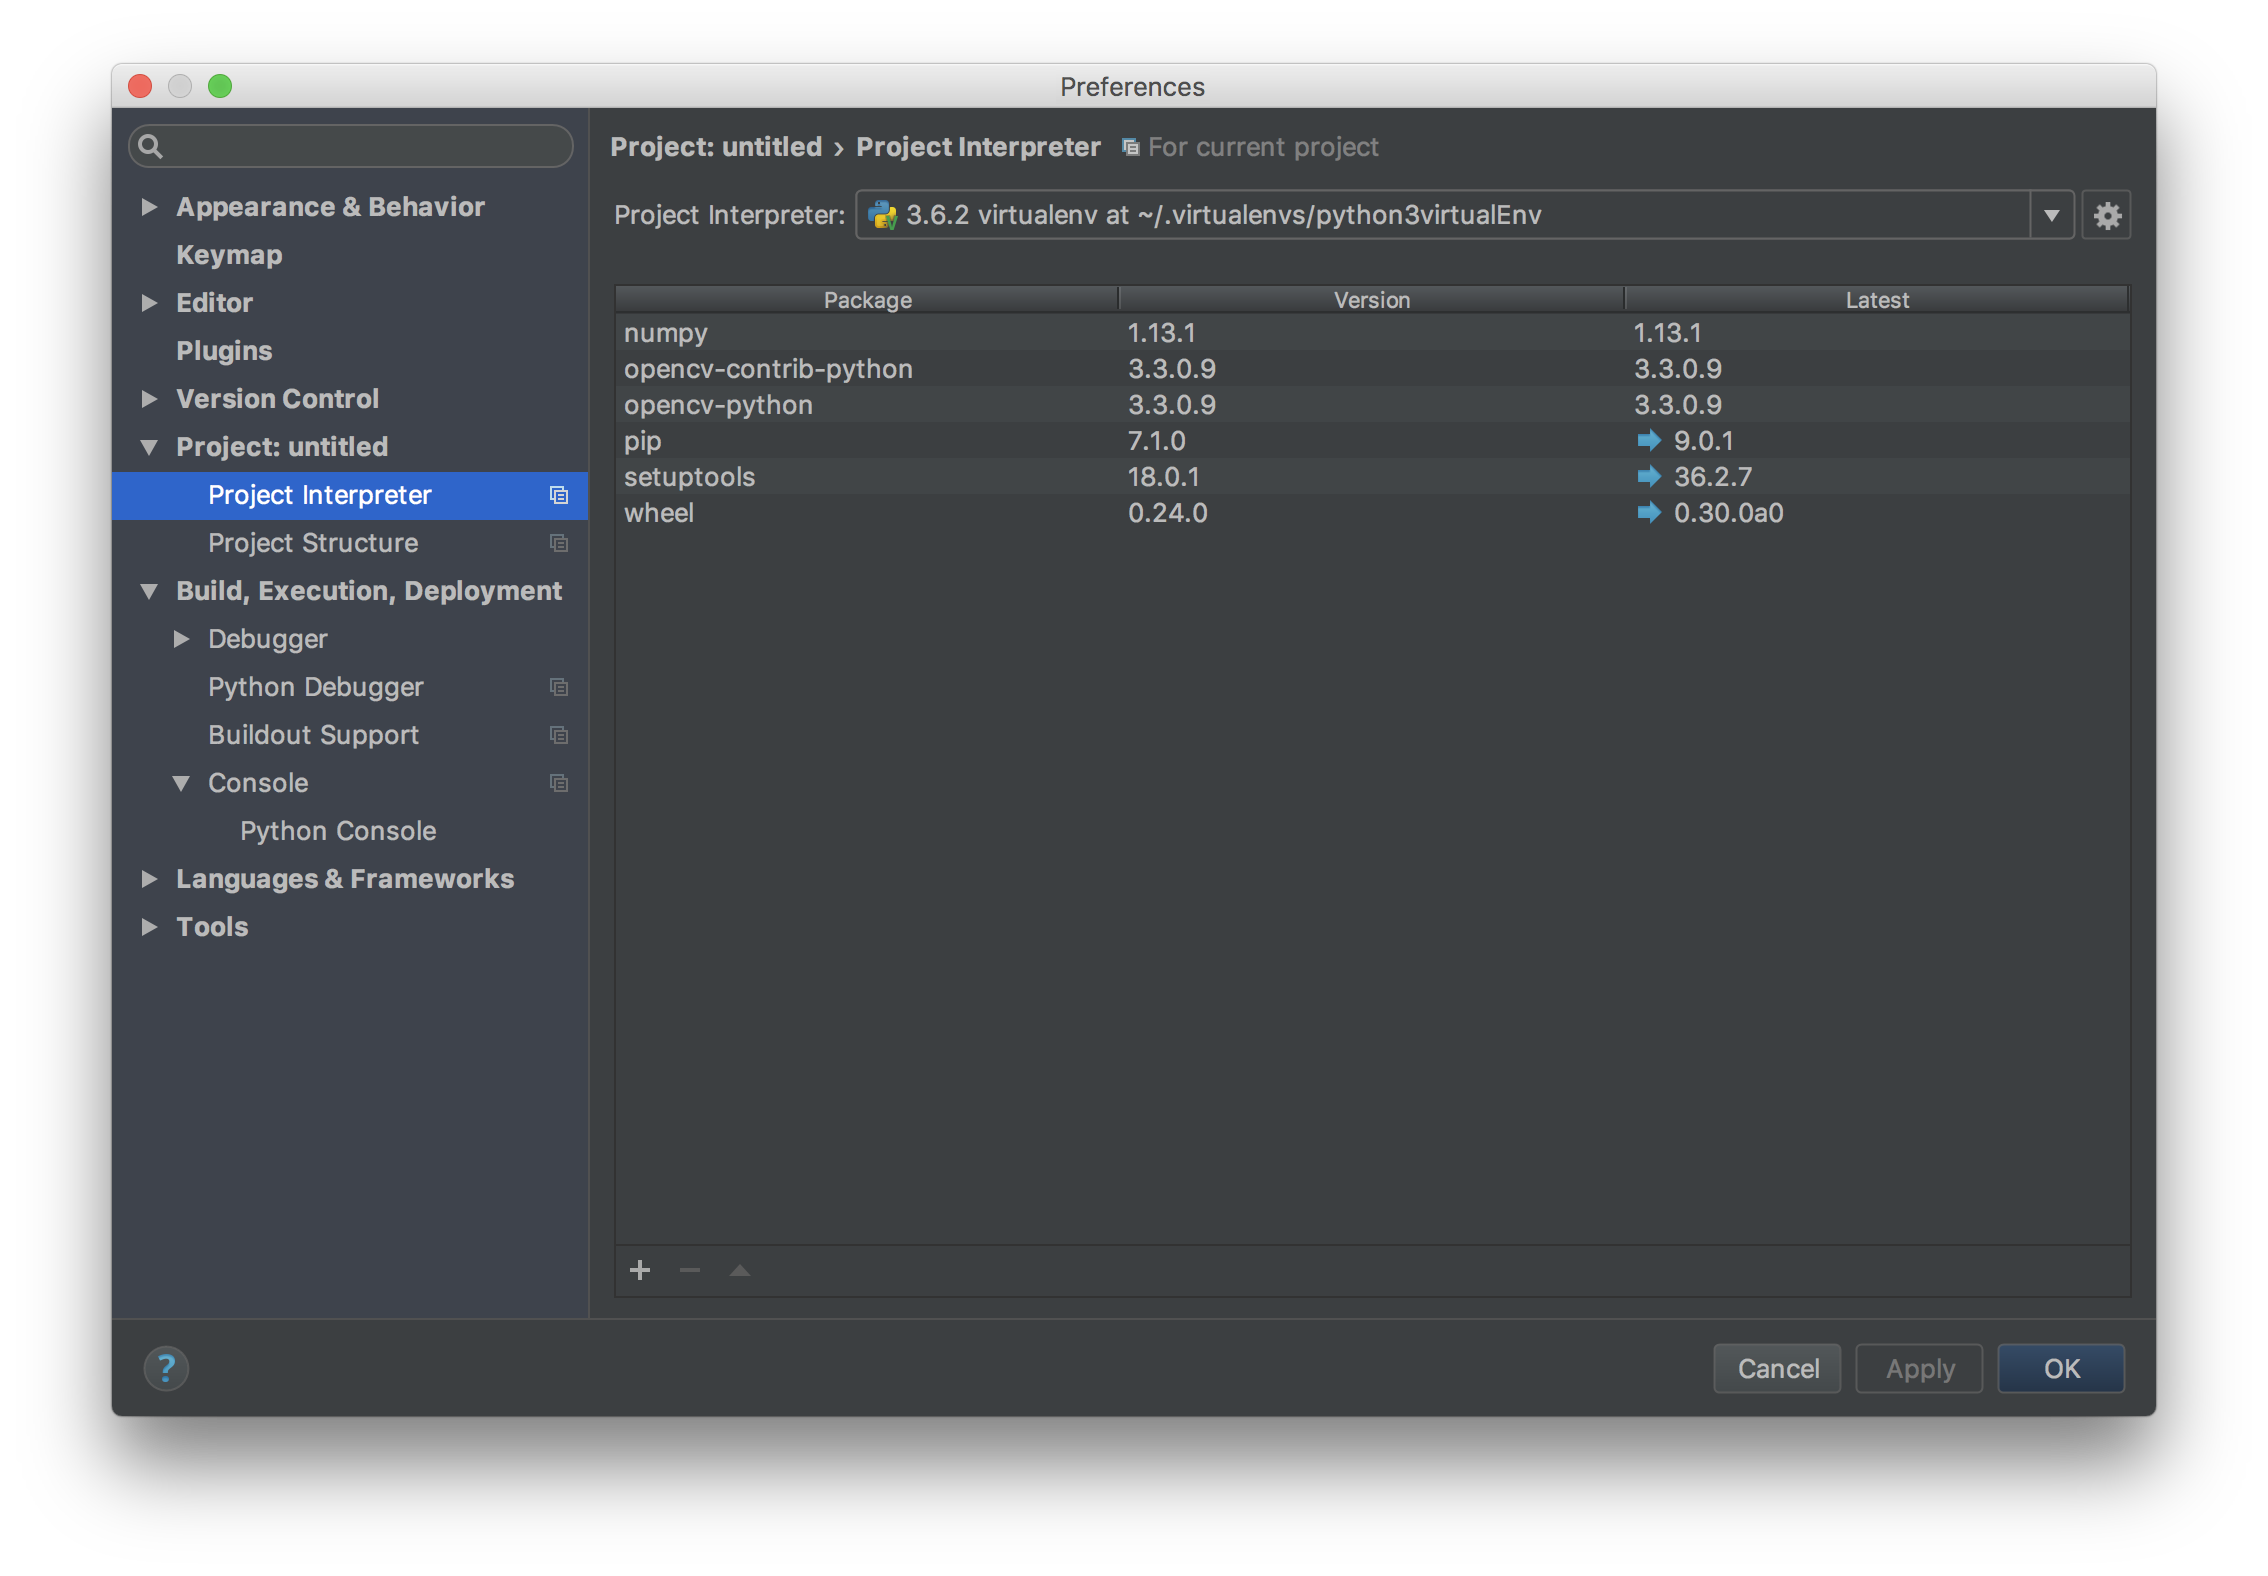
选择解释器为虚拟环境中安装的那个(图中没选对,下面也是,当时安装的是python3.6但是发现不好用)。
2. 点击左下角的“+”加号,进入PYTHON的包管理界面
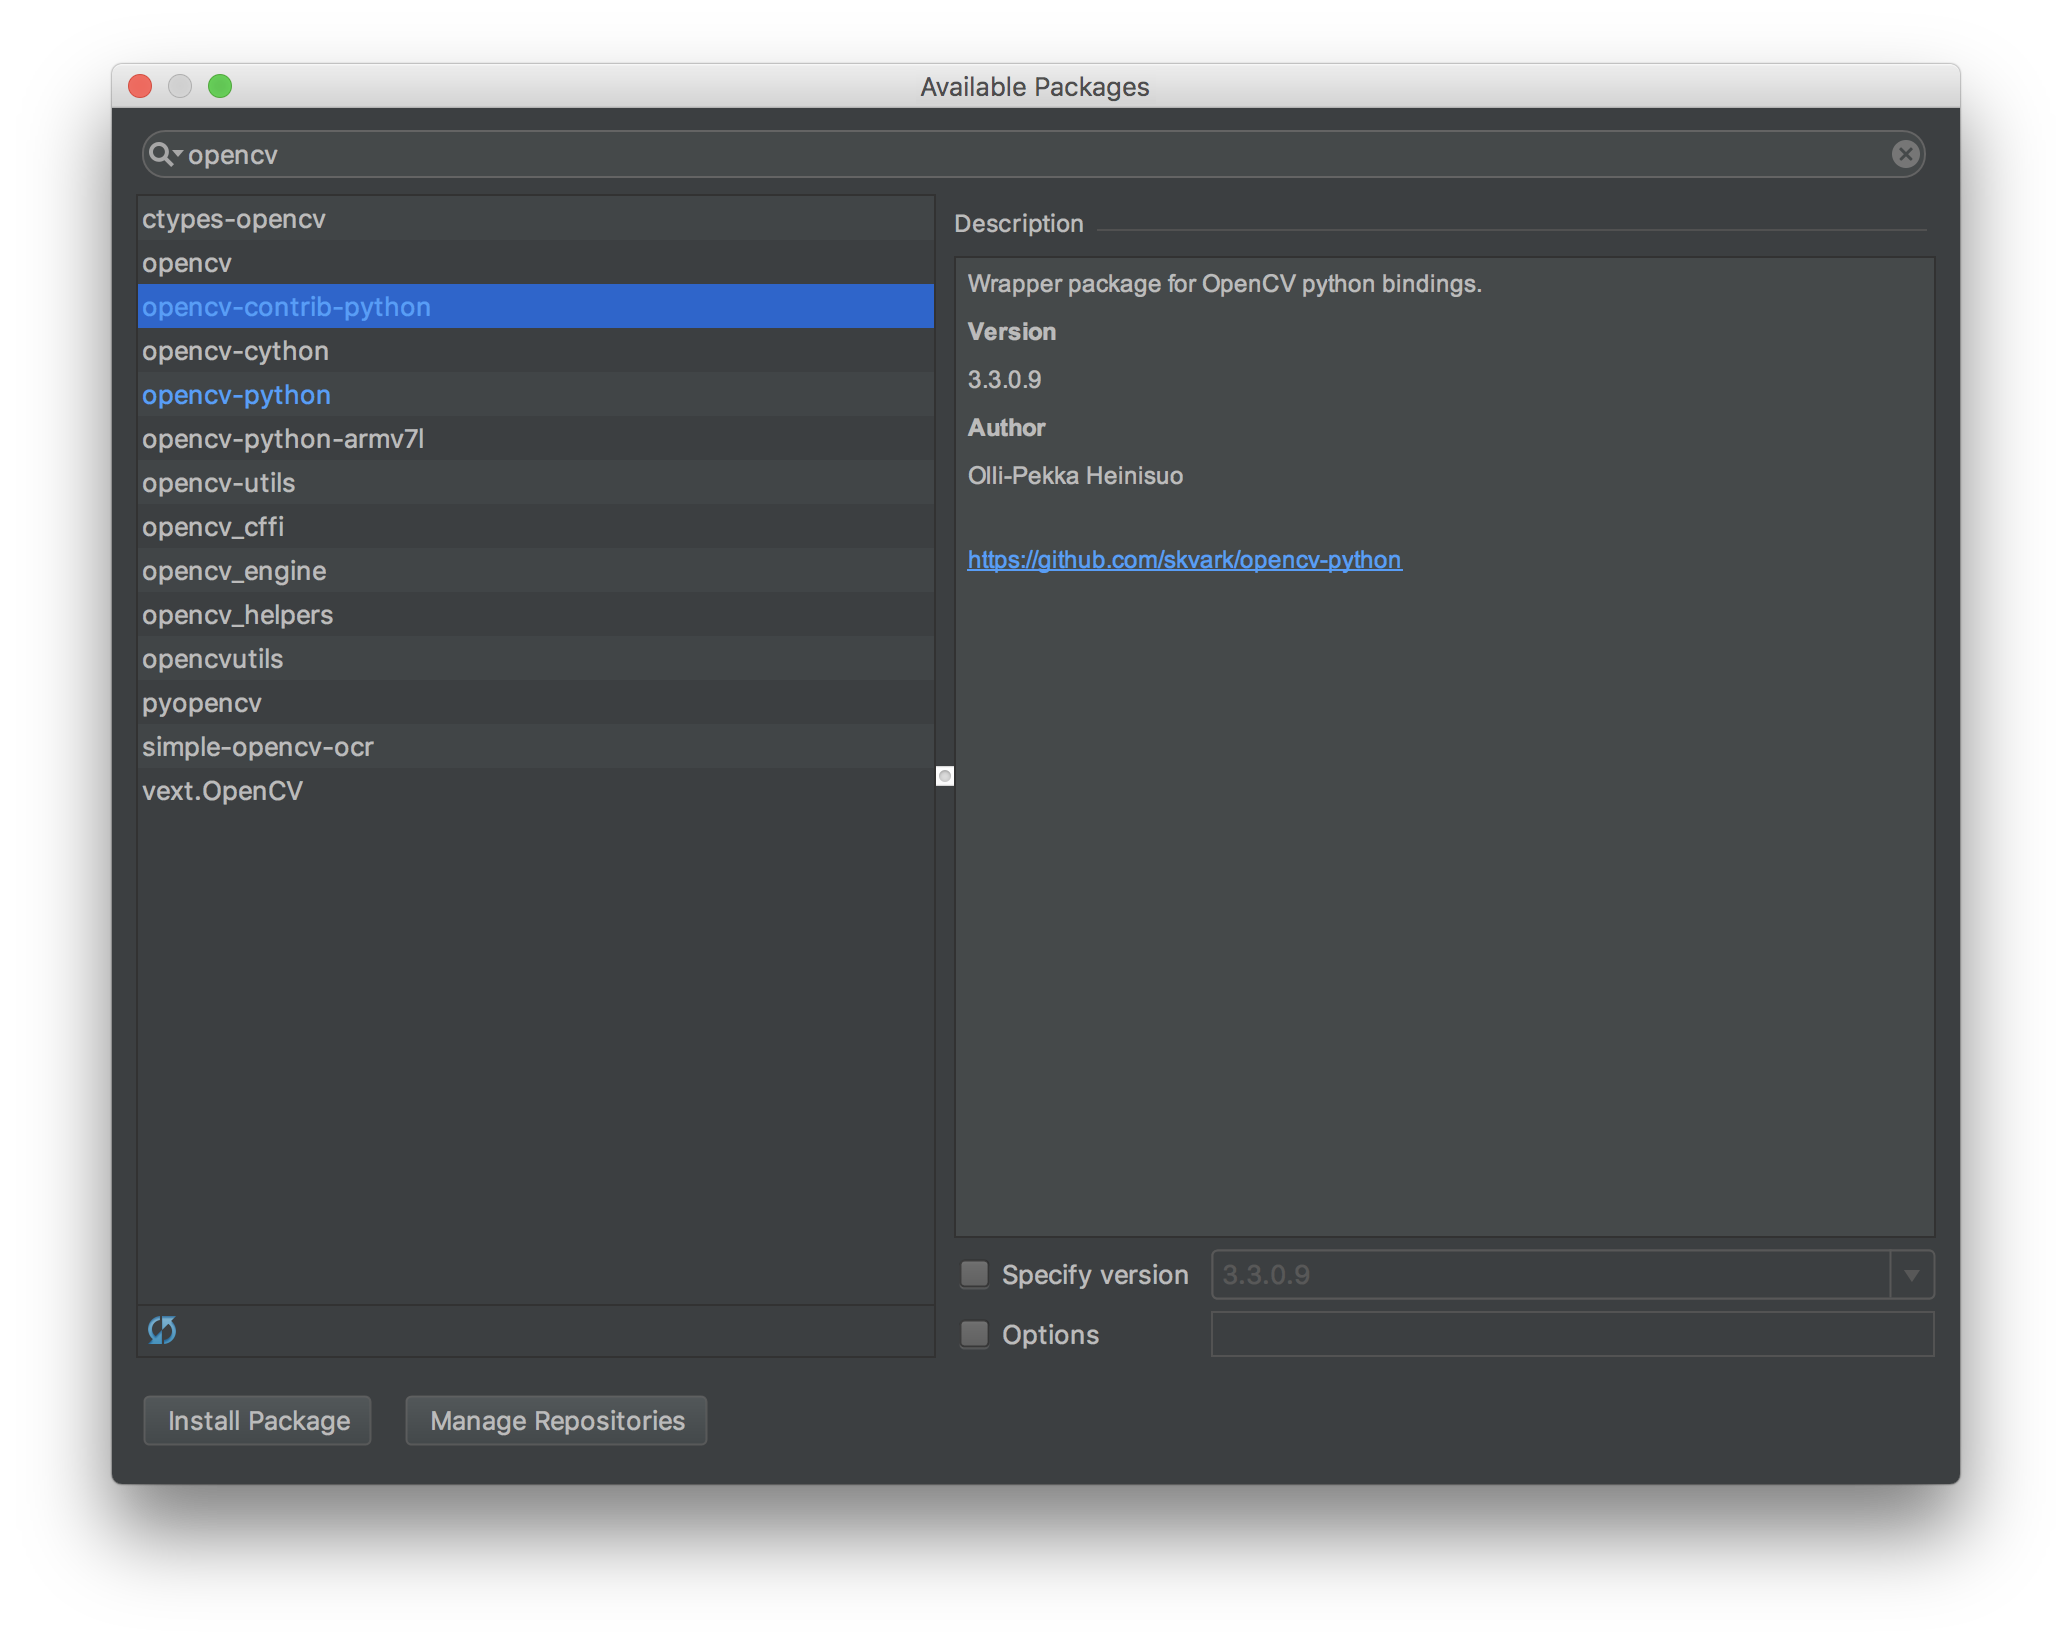
搜索Opencv,选中opencv-python,点击Install Package;同理再安装opencv-contrib
3. 完成最后的配置,还是在Preferences内,选择Build, Execution, Deployment ==> Console ==> Python Console,
选择Python Interpreter为虚拟环境中安装的那款,如图
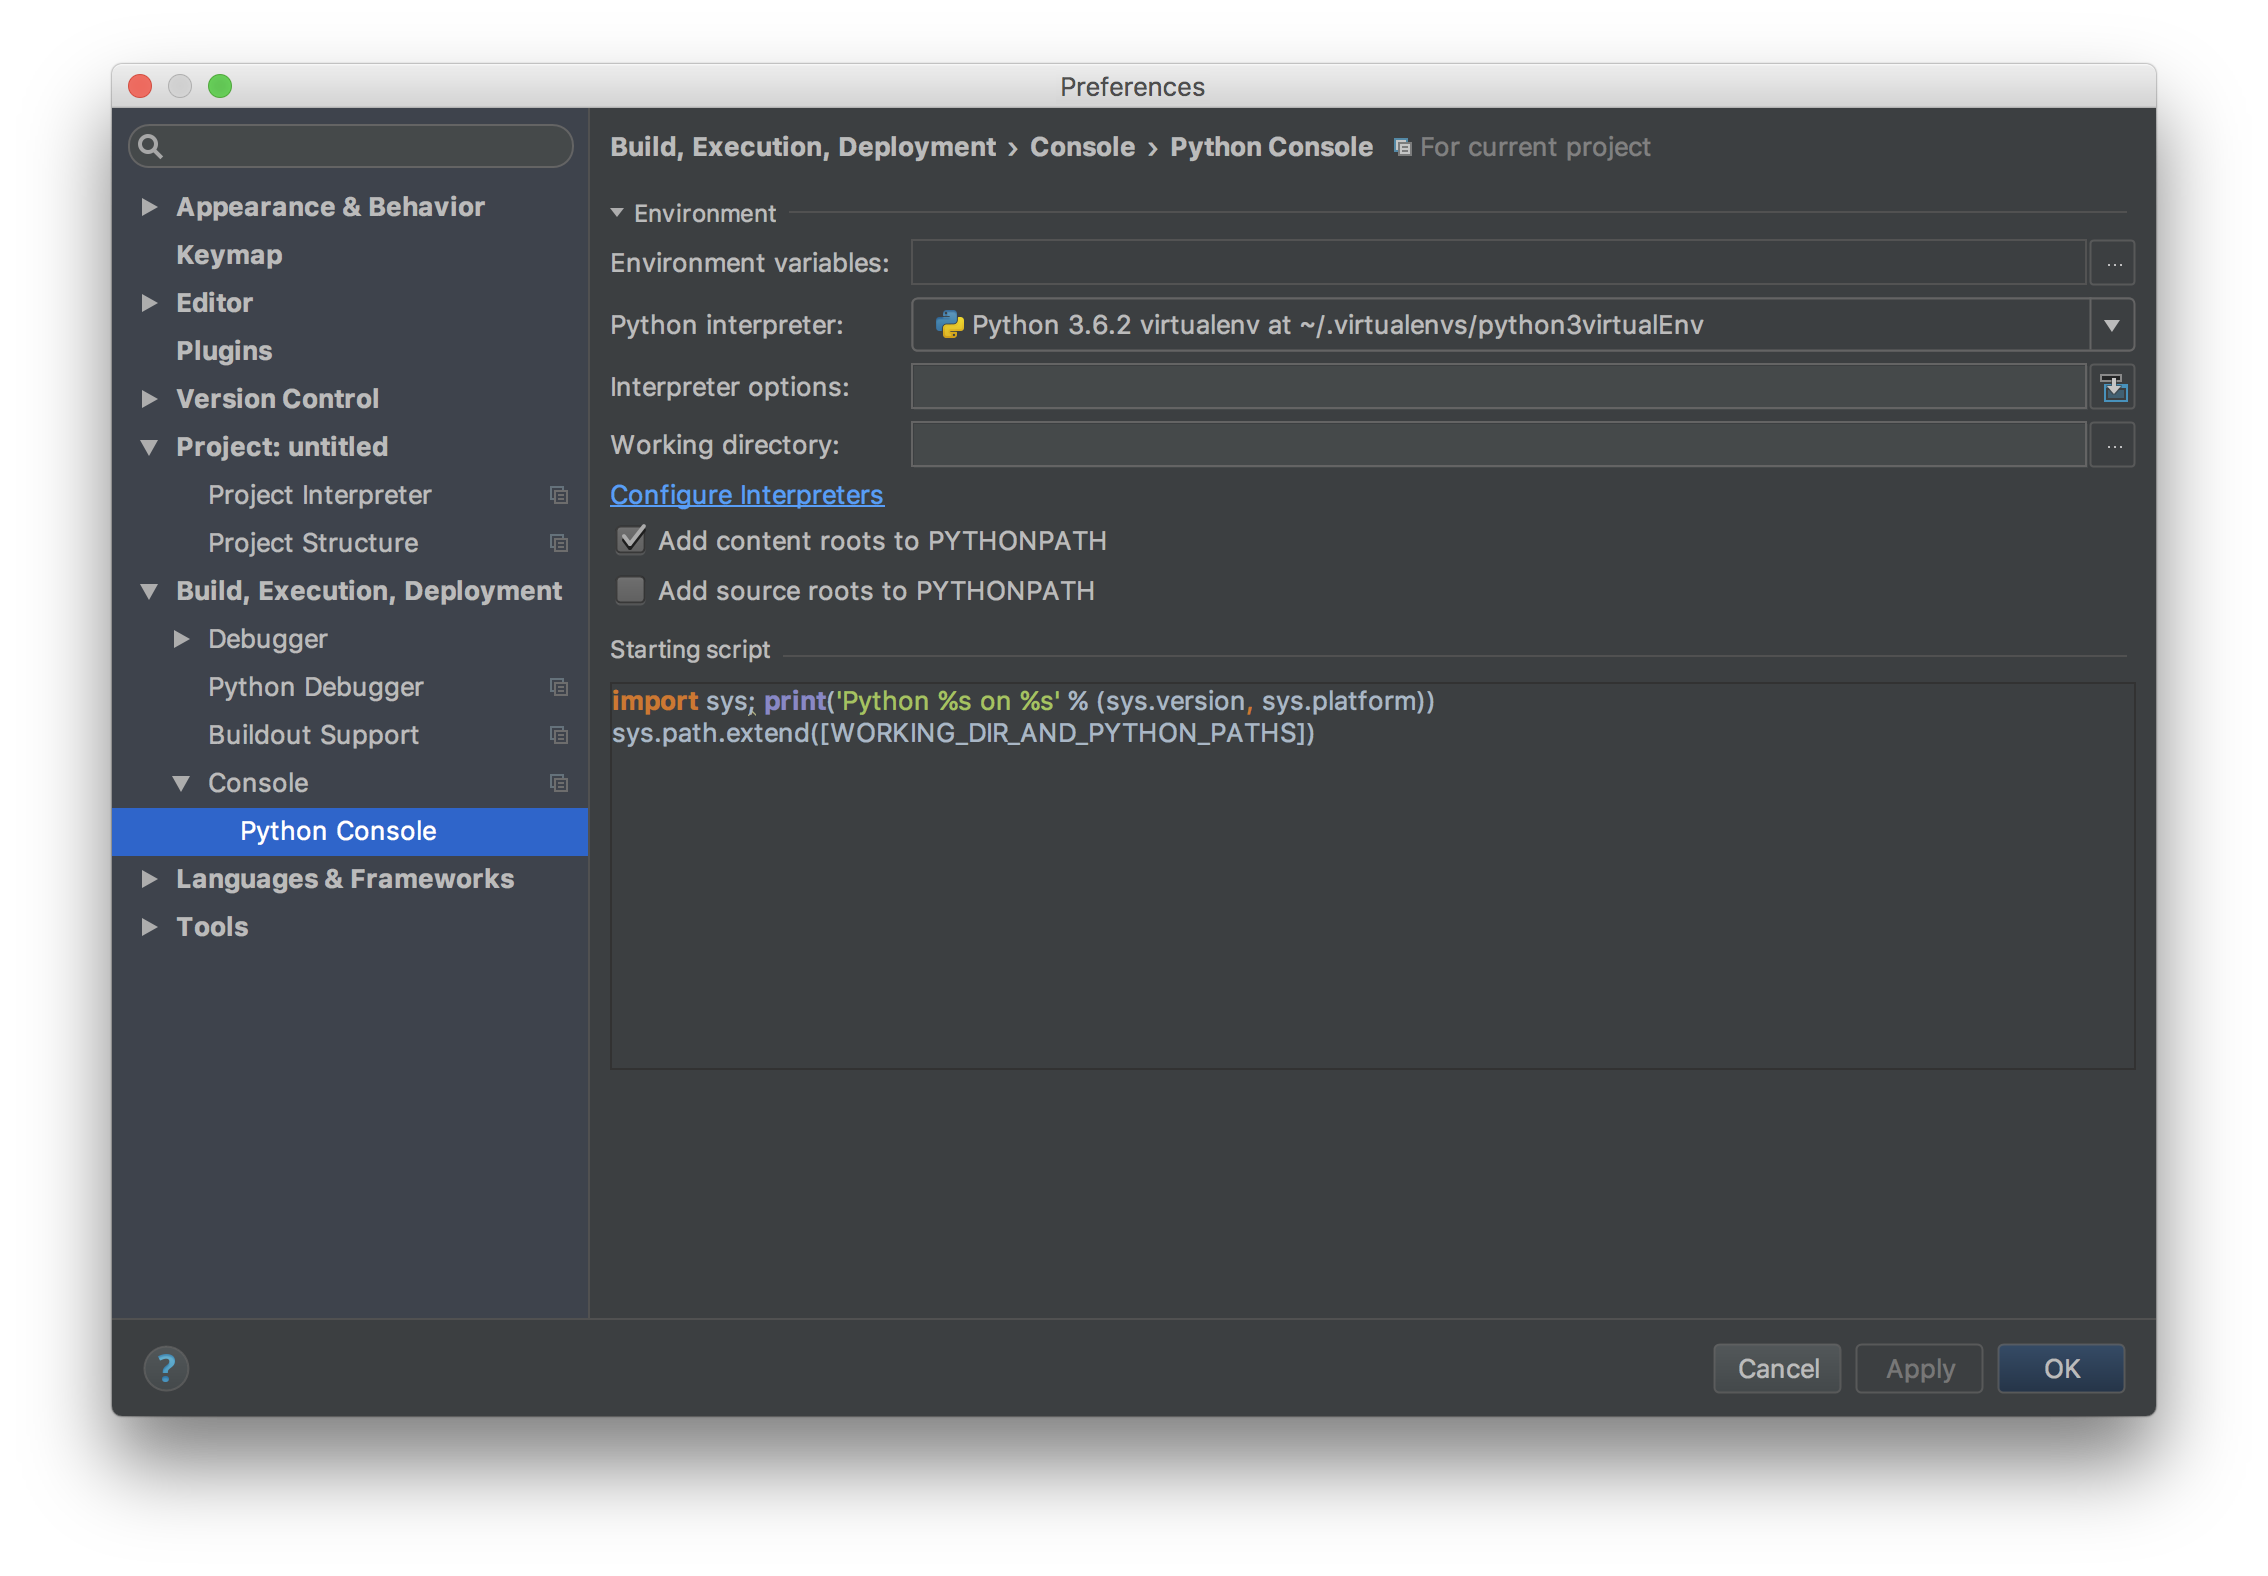
然后点击OK进行确定
4. 测试:在文本框内输入如下命令:
import cv2

print(cv2.__version__)
运行后得到当前Opencv版本为3.3.0,如图
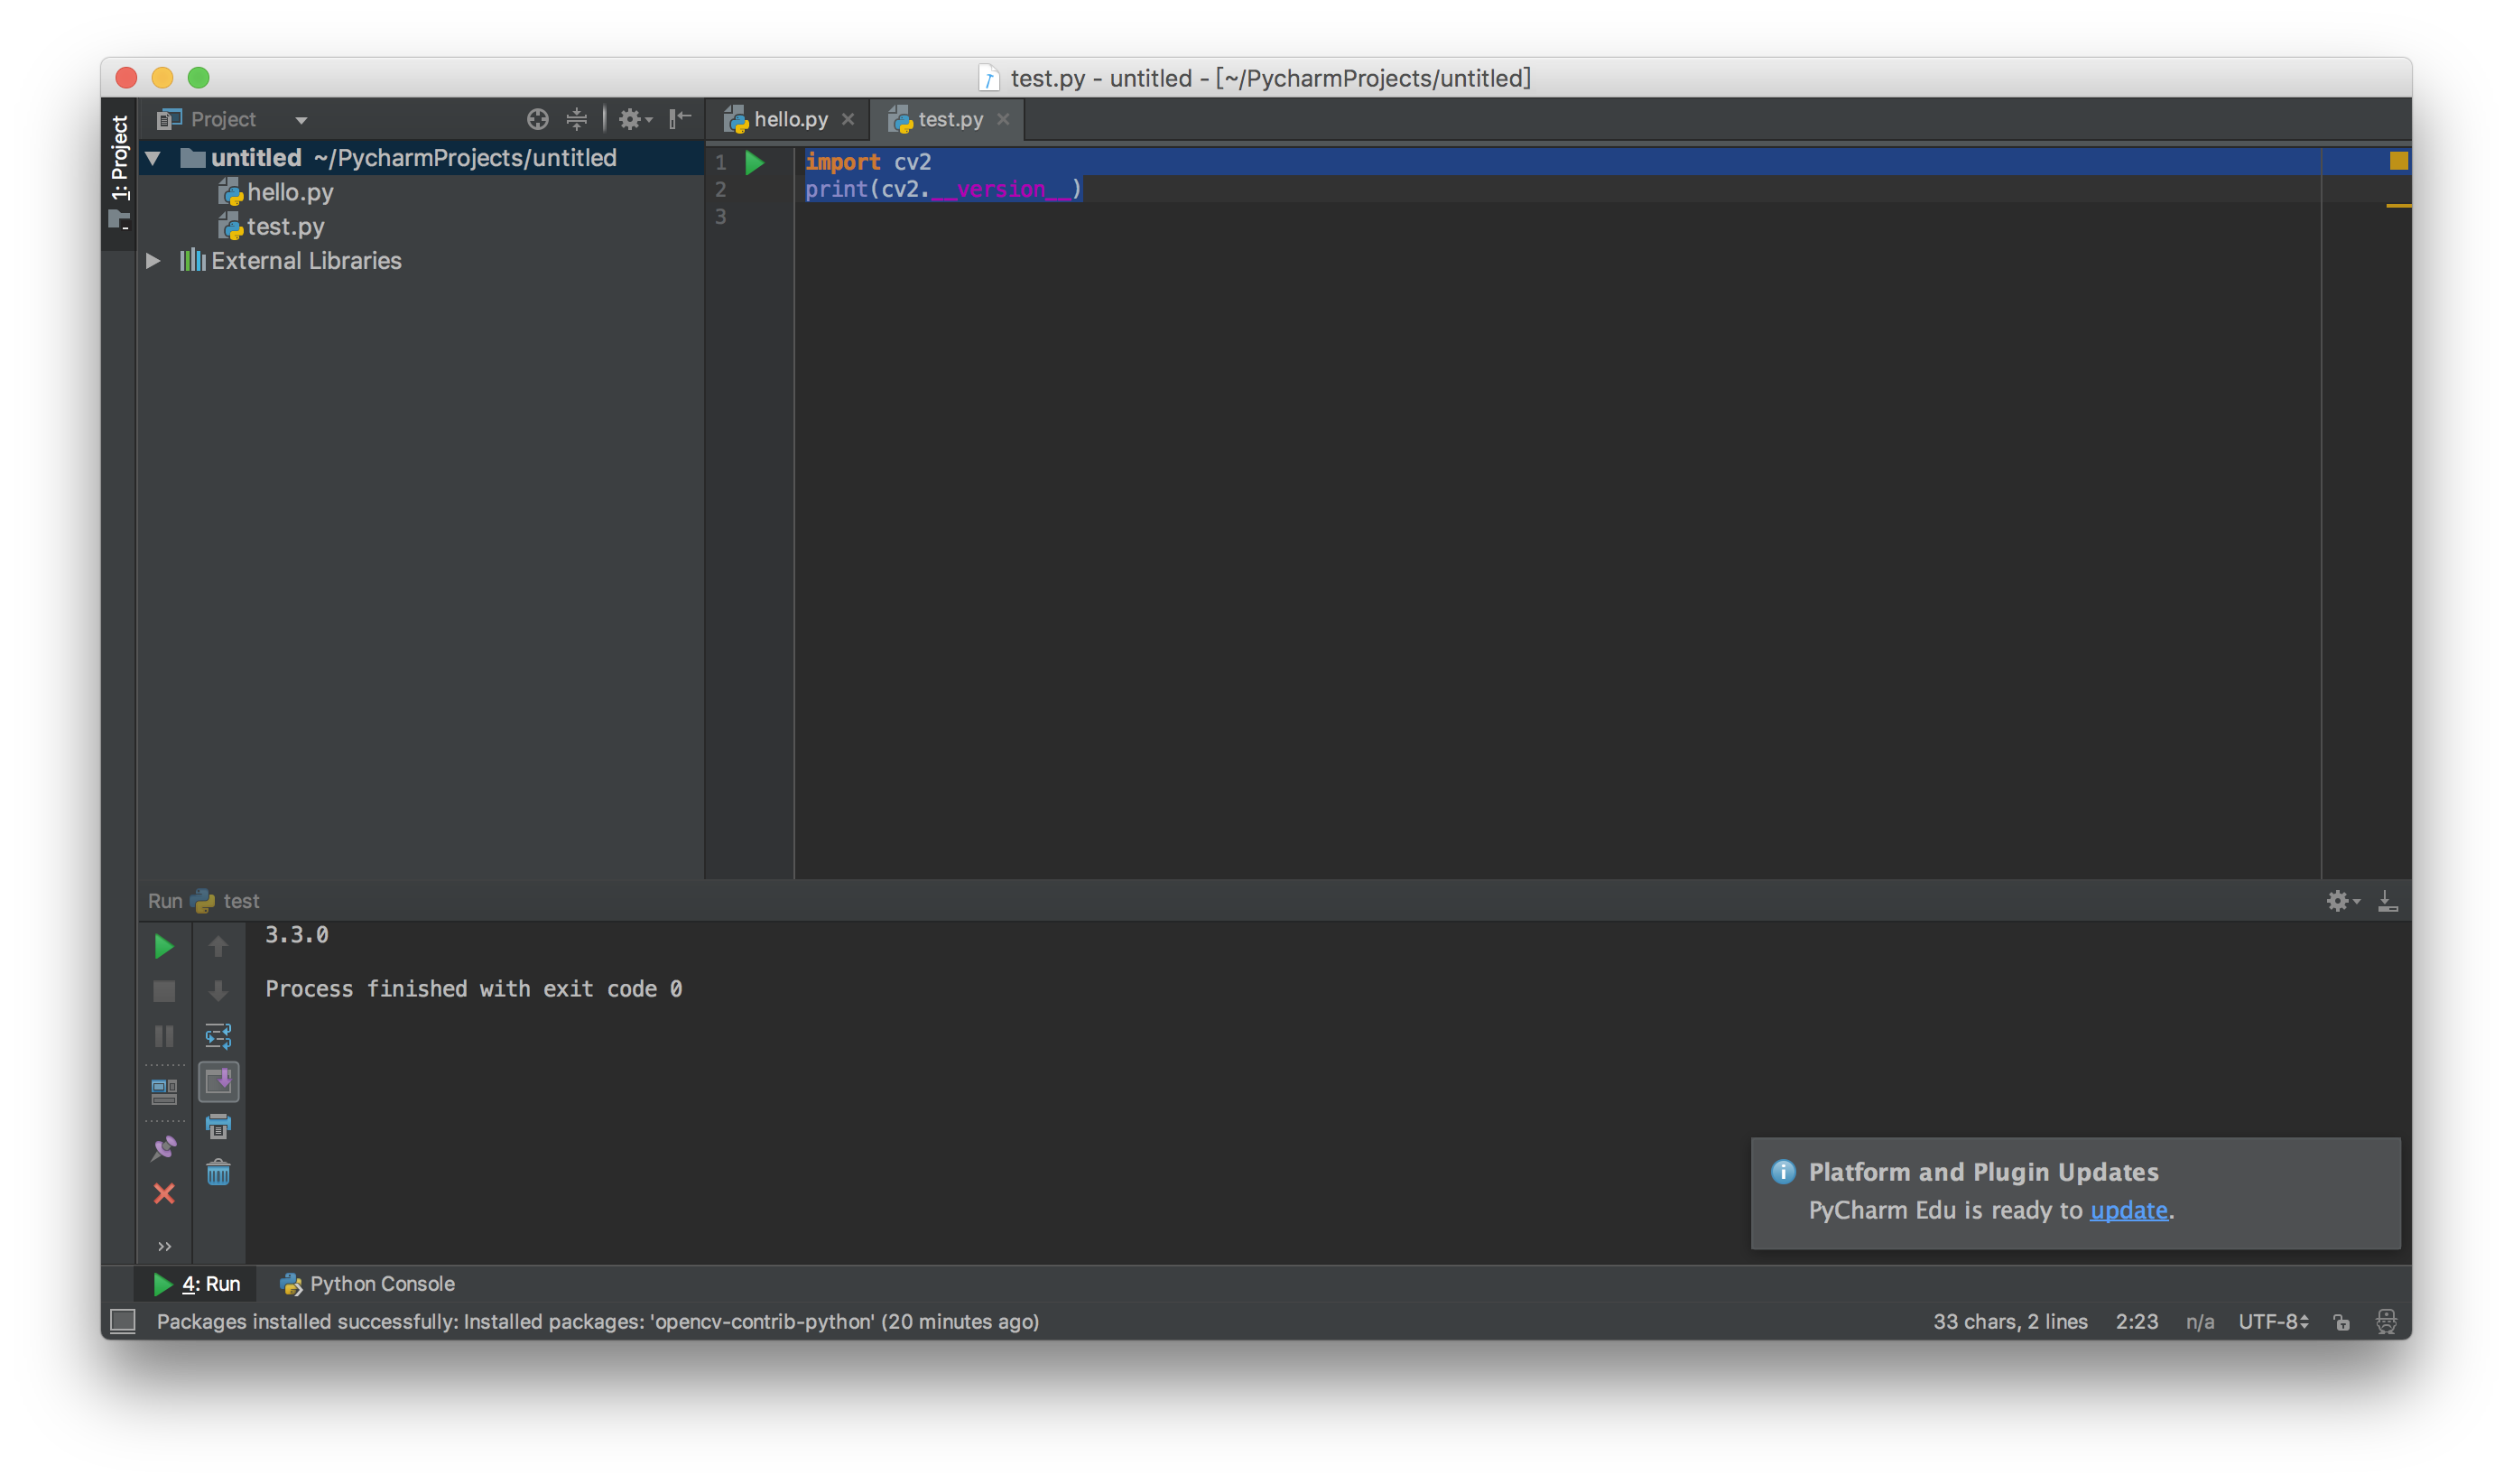
至此就安装好了!
--- THE END ---
参考文献:
[1] http://www.jianshu.com/p/6e345b3aa988
[2] http://www.jianshu.com/p/b5424e9cb7ad
[3] http://blog.csdn.net/willduan1/article/details/53898440
[4] http://nooverfit.com/wp/手把手教你,在ubuntu上安装opencv-3-0-和-python-2-7/
[5] http://elf8848.iteye.com/blog/1582137
[6] http://pythonguidecn.readthedocs.io/zh/latest/dev/virtualenvs.html
[7] https://github.com/pypa/pip/issues/3165
Mac + PyCharm 安装 Opencv3 + python2.7的更多相关文章
- Mac下安装OpenCV3.0和Anaconda和环境变量设置
入手Mac几天了,想在Mac OS下玩玩OpenCV和keras,间歇捣鼓了两天,终于搞定zsh.OpenCV3.0以及Anaconda.OpenCV3.0刚发布不久,这方面的资料也不是很多,能够查到 ...
- mac上安装opencv3
转载于:http://blog.csdn.net/sanwandoujiang/article/details/51159983 在macosx上安装opencv2 brew tap homebrew ...
- Mac下安装配置Python2和Python3并相互切换使用 转
版权声明:本文为博主原创文章,未经博主允许不得转载. https://blog.csdn.net/u014259820/article/details/81023224 安装Python2 Mac系统 ...
- Mac下安装配置Python2和Python3并相互切换使用
mac os 以前没有使用过,这次使用了一把,的确还是比较不顺手的,估计从今以后,就要把平台逐渐切换到mac了.今后好的文章,专门会开一个macos专栏,专门记录macos的使用过程中的心得,体会,以 ...
- mac10.12.6系统使用cmake安装opencv3.3.0+opencv_contrib-3.3.0
brew与cmake brew安装 /usr/bin/ruby -e "$(curl -fsSL https://raw.githubusercontent.com/Homebrew/ins ...
- Mac同时安装python2和python3
Mac同时安装python2和python3 Mac自带python2,但因为开发时所用但pythonkennel是3也可能是2,并且就算是python2,版本号也许和内置但python也有所不同.所 ...
- Mac OS X10.9安装的Python2.7升级Python3.4步骤详解
Mac OS X10.9安装的Python2.7升级Python3.4步骤详解 Mac OS X10.9默认带了Python2.7,不过现在Python3.4.0出来了,如果想使用最新版本,赶紧升级下 ...
- Python2和Python3的安装以及pycharm安装,path环境变量的配置
一:安装python2.7过程步骤 1.官网下载pythonan安装包: ·输入python搜索 ·找到python官网,点击进入 ·鼠标放在Downloads上,在新弹出的选项中选择Windows, ...
- mac os 安装PIP 及异常“”Can't install python module: PyCharm Error: “byte-compiling is disabled, skipping”“”的解决方案
For all who have the same problem, it took me a while to find the solution in a new installation of ...
随机推荐
- 剑指offer(7)斐波那契数列
题目描述 大家都知道斐波那契数列,现在要求输入一个整数n,请你输出斐波那契数列的第n项. n<=39 题目分析 我们都知道斐波那契可以用递归,但是递归重复计算的部分太多了(虽然可以通过),但是这 ...
- 剑指offer(40)数组中只出现一次的数字
题目描述 一个整型数组里除了两个数字之外,其他的数字都出现了两次.请写程序找出这两个只出现一次的数字. 题目分析 第一种方法:使用js中的indexOf()和lastIndexOf(),只要两个相等, ...
- 小技巧:windows软件窗口键盘移动
alt+tab alt+空格 m键,上下左右操作
- weblogic10补丁升级与卸载
1.首先将补丁包解压放在weblogic的utils/bsu/cache_dir文件夹下,如果没有该文件夹,则手动创建. 2.回到bsu目录,执行安装命令 C:\Oracle\Middleware\u ...
- react-router 4.0(三)根据当前url显示导航
import React, { PropTypes } from 'react' import ReactDOM from 'react-dom' import { HashRouter, Route ...
- linux基础之sed
sed: Stream EDitor,行编辑器 用法: sed [option]... 'script' inputfile... script: '地址命令' 常用选项: -n: 不输出模式中的内容 ...
- Linux配置中文输入法(搜狗输入法)
一.基础知识 在原生ubuntu14.04英文环境系统中只有IBus拼音,真的好难用.由于搜狗输入法确实比Linux系统下其它的中文输入法都要好用得多,所以我决定在我的Ubuntu 14.04系统中安 ...
- Linux文件结构
/: 根目录,所有的目录.文件.设备都在/之下,/就是Linux文件系统的组织者,也是最上级的领导者. /bin: bin 就是二进制(binary)英文缩写.在一般的系统当中,都可以在这个目录下找到 ...
- [codechef]SnackDown 2017 Online Elimination Round Prefix XOR
预处理后主席树维护 首先得出最后的答案为 \(\sum_{i=l}^{r}{min(right[i],r)-i+1}\) \(ri[i]\)表示i最远的上升序列(即代码中的f[i]) step1 那么 ...
- Redis 队列好处
Redis 队列好处 .降低流量高峰(并不是提升处理能力,系统的整体处理能力不变) .解除耦合(任务格式定好,各自演变,互不影响) .高可用(后台升级/崩溃完全不影响客户端的响应)