SpringBoot集成WebSocket【基于纯H5】进行点对点[一对一]和广播[一对多]实时推送
代码全部复制,仅供自己学习用
1.环境搭建
因为在上一篇基于STOMP协议实现的WebSocket里已经有大概介绍过Web的基本情况了,所以在这篇就不多说了,我们直接进入正题吧,在SpringBoot中,我们还是需要导入WebSocket的包。
在pox.xml加上对springBoot对WebSocket的支持:
<!-- webSocket -->

<dependency>

<groupId>org.springframework.boot</groupId>

<artifactId>spring-boot-starter-websocket</artifactId>

</dependency>
这里大概说一下自己的一点小见解:客户端与服务器建立WebSocket连接,实际上是创建了一个Socket,这个Socket是共享与客户端和服务器的。两者只要往对应的Socket里操作,就可以实现双方实时通讯了
2.编码实现
一、在SpringBoot中,添加WebSocket的配置
package com.cloud.sbjm.configure;

import org.springframework.context.annotation.Configuration;

import org.springframework.web.socket.config.annotation.EnableWebSocket;

import org.springframework.web.socket.config.annotation.WebSocketConfigurer;

import org.springframework.web.socket.config.annotation.WebSocketHandlerRegistry;

import com.cloud.sbjm.security.WebSocketInterceptor;

import com.cloud.sbjm.service.Imp.MyHandler;

//实现接口来配置Websocket请求的路径和拦截器。

@Configuration

@EnableWebSocket

public class WebSocketH5Config implements WebSocketConfigurer{

@Override

public void registerWebSocketHandlers(WebSocketHandlerRegistry registry) {

    //handler是webSocket的核心,配置入口

    registry.addHandler(new MyHandler(), "/myHandler/{ID}").setAllowedOrigins("*").addInterceptors(new WebSocketInterceptor());

}

}
1.@Configuration:注解标识该类为Spring的配置类
2.@EnableWebSocket:开启注解接收和发送消息
3.实现WebSocketConfigurer接口,重写registerWebSocketHandlers方法,这是一个核心实现方法,配置websocket入口,允许访问的域、注册Handler、定义拦截器。客户端通过“/myHandler/{ID}”直接访问Handler核心类,进行socket的连接、接收、发送等操作,这里由于还加了个拦截器,所以建立新的socket访问时,都先进来拦截器再进去Handler类,“new WebSocketInterceptor()”是我实现的拦截器,“new MyHandler()”是我实现的一个Handler类。
二、WebSocketInterceptor拦截器的实现:
package com.cloud.sbjm.security;

import java.util.Map;

import javax.servlet.http.HttpSession;

import org.springframework.http.server.ServerHttpRequest;

import org.springframework.http.server.ServerHttpResponse;

import org.springframework.http.server.ServletServerHttpRequest;

import org.springframework.web.socket.WebSocketHandler;

import org.springframework.web.socket.server.HandshakeInterceptor;

public class WebSocketInterceptor implements HandshakeInterceptor {

    //在握手之前执行该方法, 继续握手返回true, 中断握手返回false. 通过attributes参数设置WebSocketSession的属性

@Override

public boolean beforeHandshake(ServerHttpRequest request, ServerHttpResponse serverHttpResponse, WebSocketHandler webSocketHandler, Map<String, Object> attributes) throws Exception {

if (request instanceof ServletServerHttpRequest) {

    String ID = request.getURI().toString().split("ID=")[1];

    System.out.println("当前session的ID="+ID);

//ServletServerHttpRequest serverHttpRequest = (ServletServerHttpRequest) request;

//HttpSession session = serverHttpRequest.getServletRequest().getSession();

attributes.put("WEBSOCKET_USERID",ID);

}

return true;

}

//完成握手之后执行该方法

@Override

public void afterHandshake(ServerHttpRequest serverHttpRequest, ServerHttpResponse serverHttpResponse, WebSocketHandler webSocketHandler, Exception e) {

System.out.println("进来webSocket的afterHandshake拦截器!");

}

}
1.实现了HandshakeInterceptor 接口,并实现了beforeHandshake该方法,该方法是在进入Handler核心类之前进行拦截。
这里主要实现的逻辑是:
截取客户端建立webSocket连接时发送的URL地址字符串,并通过对该字符串进行特殊标识截取操作,获取客户端发送的唯一标识(由自己定义的,一般是系统用户ID唯一标识,用以标识该用户),并把它以键值对的形式放到Session里,这样后期可以通过该session获取它对应的用户ID了。【一个session对应着一个webSocketSession】
三、MyHandler核心类的实现
package com.cloud.sbjm.service.Imp;

import java.io.IOException;

import java.util.HashMap;

import java.util.Map;

import java.util.Set;

import net.sf.json.JSONObject;

import org.springframework.stereotype.Service;

import org.springframework.web.socket.CloseStatus;

import org.springframework.web.socket.TextMessage;

import org.springframework.web.socket.WebSocketHandler;

import org.springframework.web.socket.WebSocketMessage;

import org.springframework.web.socket.WebSocketSession;

@Service

public class MyHandler implements WebSocketHandler {

    //在线用户列表

private static final Map<String, WebSocketSession> users;

static {

users = new HashMap<>();

}

//新增socket

@Override

public void afterConnectionEstablished(WebSocketSession session) throws Exception {

System.out.println("成功建立连接");

String ID = session.getUri().toString().split("ID=")[1];

System.out.println(ID);

if (ID != null) {

users.put(ID, session);

session.sendMessage(new TextMessage("成功建立socket连接"));

System.out.println(ID);

System.out.println(session);

}

System.out.println("当前在线人数:"+users.size());

}

//接收socket信息

@Override

public void handleMessage(WebSocketSession webSocketSession, WebSocketMessage<?> webSocketMessage) throws Exception {

try{

JSONObject jsonobject = JSONObject.fromObject(webSocketMessage.getPayload());

System.out.println(jsonobject.get("id"));

System.out.println(jsonobject.get("message")+":来自"+(String)webSocketSession.getAttributes().get("WEBSOCKET_USERID")+"的消息");

sendMessageToUser(jsonobject.get("id")+"",new TextMessage("服务器收到了,hello!"));

}catch(Exception e){

e.printStackTrace();

}

}

/**

* 发送信息给指定用户

* @param clientId

* @param message

* @return

*/

public boolean sendMessageToUser(String clientId, TextMessage message) {

if (users.get(clientId) == null) return false;

WebSocketSession session = users.get(clientId);

System.out.println("sendMessage:" + session);

if (!session.isOpen()) return false;

try {

session.sendMessage(message);

} catch (IOException e) {

e.printStackTrace();

return false;

}

return true;

}

/**

* 广播信息

* @param message

* @return

*/

public boolean sendMessageToAllUsers(TextMessage message) {

boolean allSendSuccess = true;

Set<String> clientIds = users.keySet();

WebSocketSession session = null;

for (String clientId : clientIds) {

try {

session = users.get(clientId);

if (session.isOpen()) {

session.sendMessage(message);

}

} catch (IOException e) {

e.printStackTrace();

allSendSuccess = false;

}

}

return allSendSuccess;

}

@Override

public void handleTransportError(WebSocketSession session, Throwable exception) throws Exception {

if (session.isOpen()) {

session.close();

}

System.out.println("连接出错");

users.remove(getClientId(session));

}

@Override

public void afterConnectionClosed(WebSocketSession session, CloseStatus status) throws Exception {

System.out.println("连接已关闭:" + status);

users.remove(getClientId(session));

}

@Override

public boolean supportsPartialMessages() {

return false;

}

/**

* 获取用户标识

* @param session

* @return

*/

private Integer getClientId(WebSocketSession session) {

try {

Integer clientId = (Integer) session.getAttributes().get("WEBSOCKET_USERID");

return clientId;

} catch (Exception e) {

return null;

}

}

}
1.实现了WebSocketHandler接口,并实现了关键的几个方法。
① afterConnectionEstablished(接口提供的):建立新的socket连接后回调的方法。主要逻辑是:将成功建立连接的webSocketSssion放到定义好的常量[private static final Map<String, WebSocketSession> users;]中去。这里也截取客户端访问的URL的字符串,拿到标识,以键值对的形式讲每一个webSocketSession存到users里,以记录每个Socket。
② handleMessage(接口提供的):接收客户端发送的Socket。主要逻辑是:获取客户端发送的信息。这里之所以可以获取本次Socket的ID,是因为客户端在第一次进行连接时,拦截器进行拦截后,设置好ID,这样也说明,双方在相互通讯的时候,只是对第一次建立好的socket持续进行操作。
③ sendMessageToUser(自己定义的):发送给指定用户信息。主要逻辑是:根据用户ID从常量users(记录每一个Socket)中,获取Socket,往该Socket里发送消息,只要客户端还在线,就能收到该消息。
④sendMessageToAllUsers (自己定义的):这个广播消息,发送信息给所有socket。主要逻辑是:跟③类型,只不过是遍历整个users获取每一个socket,给每一个socket发送消息即可完广播发送
⑤handleTransportError(接口提供的):连接出错时,回调的方法。主要逻辑是:一旦有连接出错的Socket,就从users里进行移除,有提供该Socket的参数,可直接获取ID,进行移除。这个在客户端没有正常关闭连接时,会进来,所以在开发客户端时,记得关闭连接
⑥afterConnectionClosed(接口提供的):连接关闭时,回调的方法。主要逻辑:一旦客户端/服务器主动关闭连接时,将个socket从users里移除,有提供该Socket的参数,可直接获取ID,进行移除。
后台的开发就开发完了,大家有没有发现比基于STOMP协议实现要灵活得多?
四、客户端页面的实现【基于H5】
不需要加入任何的JS包
<!DOCTYPE html>
<html>
<head>
<title>socket.html</title> <meta name="keywords" content="keyword1,keyword2,keyword3">
<meta name="description" content="this is my page">
<meta name="content-type" content="text/html" charset="UTF-8">
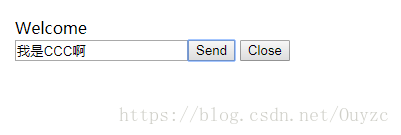
<!--<link rel="stylesheet" type="text/css" href="./styles.css">--> </head> <body> Welcome<br/>
<input id="text" type="text" /><button onclick="send()">Send</button> <button onclick="closeWebSocket()">Close</button>
<div id="message">
</div>
<!-- 公共JS -->
<script type="text/javascript" src="../webSocket/jquery.min.js"></script> <script type="text/javascript">
var userID="888";
var websocket=null;
$(function() { //创建WebSocket
connectWebSocket();
}) //强制关闭浏览器 调用websocket.close(),进行正常关闭
window.onunload = function() { //关闭连接
closeWebSocket();
} //建立WebSocket连接
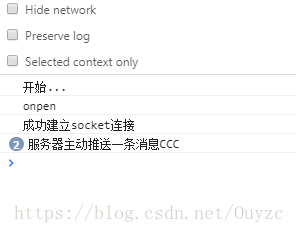
function connectWebSocket(){ console.log("开始..."); //建立webSocket连接
websocket = new WebSocket("ws://127.0.0.1:9091/cloud-sbjm/myHandler/ID="+userID); //打开webSokcet连接时,回调该函数
websocket.onopen = function () {
console.log("onpen");
} //关闭webSocket连接时,回调该函数
websocket.onclose = function () {
//关闭连接
console.log("onclose");
} //接收信息
websocket.onmessage = function (msg) {
console.log(msg.data);
}
} //发送消息
function send(){
var postValue={};
postValue.id=userID;
postValue.message=$("#text").val();
websocket.send(JSON.stringify(postValue));
}
//关闭连接
function closeWebSocket(){
if(websocket != null) {
websocket.close();
}
} </script>
</body>
</html>
页面比较简单,简单解释一下:
1.new WebSocket("ws://127.0.0.1:9091/cloud-sbjm/myHandler/ID="+userID),与服务器建立webSocket连接,后面的ID="+userID,是动态参数,跟服务器配置Handler的访问地址时对应"/myHandler/{ID}"。
2.H5也提供多个回调函数
onopen:打开webSokcet连接时,回调该函数
onclose:关闭webSocket连接时,回调该函数
onmessage:服务器给该socket发送消息时,回调该函数,获取消息
websocket.send(JSON.stringify(postValue));:给Socket发送消息,服务器获取
websocket.close();客户端主要关闭连接,会触发客户端的onclose方法和服务器的afterConnectionClosed方法
到此服务端的开发也完成了,下面执行一下程序效果图:
一、建立连接
客户端:
服务器:
二、发送消息
客户端:

服务器:

三、服务器主动推送消息
服务器代码:

到此已经完成了,各位可以根据自己需求进行修改,这会灵活多了!
如有错漏,请各位指导。
SpringBoot集成WebSocket【基于纯H5】进行点对点[一对一]和广播[一对多]实时推送的更多相关文章
- SpringBoot集成WebSocket【基于STOMP协议】进行点对点[一对一]和广播[一对多]实时推送
原文详细地址,有点对点,还有广播的推送:https://blog.csdn.net/ouyzc/article/details/79884688 下面是自己处理的一些小bug 参考原文demo,结合工 ...
- springboot集成websocket的两种实现方式
WebSocket跟常规的http协议的区别和优缺点这里大概描述一下 一.websocket与http http协议是用在应用层的协议,他是基于tcp协议的,http协议建立链接也必须要有三次握手才能 ...
- springboot集成websocket实现向前端浏览器发送一个对象,发送消息操作手动触发
工作中有这样一个需示,我们把项目中用到代码缓存到前端浏览器IndexedDB里面,当系统管理员在后台对代码进行变动操作时我们要更新前端缓存中的代码怎么做开始用想用版本方式来处理,但这样的话每次使用代码 ...
- springboot搭建一个简单的websocket的实时推送应用
说一下实用springboot搭建一个简单的websocket 的实时推送应用 websocket是什么 WebSocket是一种在单个TCP连接上进行全双工通信的协议 我们以前用的http协议只能单 ...
- HTML5 WebSocket 实时推送信息测试demo
测试一下HTML5的websocket功能,实现了客户端→服务器实时推送信息到客户端,包括推送图片: websocket实现MessageInbound类 onTextMessage()/onBina ...
- 基于Node.js的实时推送 juggernaut
基于Node.js的实时推送 juggernaut Juggernaut 基于 Node.js 构建.为浏览器和服务器端提供一个实时的连接,可在客户端和服务器端进行数据的实时推送,适合多角色游戏.聊天 ...
- 关于 实时推送技术--WebSocket的 知识分享
今天学习了关于WebSocket的知识,觉得挺有用的,在这记录一下,也和大家分享一下!!有兴趣的可以看看哦 WebSocket简介 Web领域的实时推送技术,也被称作Realtime技术.这种技术要达 ...
- WebSocket和kafka实现数据实时推送到前端
一. 需求背景 最近新接触一个需求,需要将kafka中的数据实时推送到前端展示.最开始想到的是前端轮询接口数据,但是无法保证轮询的频率和消费的频率完全一致,或造成数据缺失等问题.最终确定用利 ...
- 基于APNs最新HTTP/2接口实现iOS的高性能消息推送(服务端篇)
1.前言 本文要分享的消息推送指的是当iOS端APP被关闭或者处于后台时,还能收到消息/信息/指令的能力. 这种在APP处于后台或关闭情况下的消息推送能力,通常在以下场景下非常有用: 1)IM即时通讯 ...
随机推荐
- [GO]文件的读写
首先写一个文件 package main import ( "os" "fmt" ) func WriteFile(path string) { //打开文件, ...
- JavaWeb项目导入MyEclipse后变为JAVA项目项目【解决方法】
问题描述:之前有个项目是Java web的项目,但是后来我导入到我电脑里的myEclipse里后就变成了Java项目.查找了资料解决了,网上大部分都是说在eclipse里解决这个问题,在myEclip ...
- css中padding和magin的区别
1.Margin 用来设置页面中一个元素所占空间的边缘到相邻元素之间的距离. 如果提供全部四个参数值,将按上-右-下-左的顺序作用于四边. 如果只提供一个,将用于全部的四边. 如果提供两个,第 ...
- win10家庭版系统安装SQL2005
安装sql2005花了两天的时间,现在总结下,刚开始不知道win10家庭版系统没有本地用户和组的(详细说明 https://www.kafan.cn/A/5vz17o5jne.html) 一定要升级到 ...
- Delphi 中调用JS文件中的方法
unit Unit1; interface uses Windows, Messages, SysUtils, Variants, Classes, Graphics, Controls, Forms ...
- base64编码问题
最近遇到一个很奇怪的问题:post方式上传文件,因为文件不大,所以直接base64后作为参数扔给服务器.一开始好用,后来出问题了,上传的压缩包再下载后,能双击打开看到压缩包里面的文件,但是解压就报错, ...
- selenium爬取网易云
from selenium import webdriver from selenium.webdriver import ActionChains from selenium.webdriver.c ...
- STM32开发(一):简介及开发环境
1. 背景 STM32是意法(ST)公司开发的基于ARM Cortex-M系列的一系列微控制器(MCU). 有两种库 标准外设库(StdPeriph_Driver.Standard Periphera ...
- Linux Shell 编程学习笔记
1:Shell Script中if语句的条件部分要以分号来分隔 2:要注意条件测试部分中的空格.在方括号的两侧都有空格 3:echo "Hi, ${a}s" 单引号中的变量不会进行 ...
- pageadmin建站软如何修改和设置iis站点应用程序池
很多用户第一次安装PageAdmin建站系统时候会出现这个错误,主要原因: 1.首选打开iis站点基本设置,可以看到当前站点对应的应用程序池,如下图: 可以看到当前站点用的程序池名为MyAppPool ...