定时从多个Excel导入数据到SQL数据库
Scheduling Data Imports in SQL Server
Importing data into a SQL Server database isn't really that tricky: there's a straightforward wizard that you can follow to get information from Microsoft Excel, Access and even text files. But what if you want to perform the same import of data on a regular basis? Having to go through the wizard on a weekly, daily, or even hourly basis could become very tedious very quickly!
Fortunately, there's a way to set up a scheduled data import in SQL Server meaning that you don't have to go through the same process each time you want to import a set of data. There are two main steps involved in this process:
- Use the SQL Server Import and Export Wizard to create a SQL Server Integration Services (SSIS) package.
- Schedule a job which executes the SSIS package according the schedule you want.
Launching the Import Wizard
The first step in this process is launching the wizard that is used to import data. To do this:
- In SQL Server Management Studio, locate your database in the Object Explorer pane at the left hand side of the screen.
- Right-click on the name of the database and choose: Tasks -> Import Data...
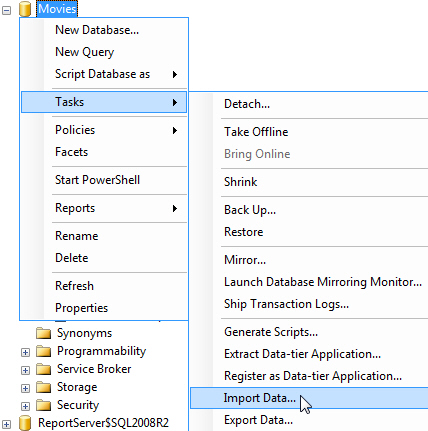
Choose this option to start the import wizard.
The next part of this blog series explains the steps to follow in the import wizard in order to create an SSIS package.
Using the Import Wizard in SQL Server
Once you have opened the import wizard there are several steps to follow in order to create an SSIS package. This part of the series explains what you need to do.
Before we get started, if you've opened the wizard and you see a welcome message, just click Next to get to the useful part!
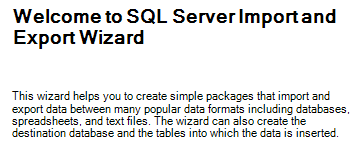
If you see this message, just click Next.
Step 1 - Choosing a Data Source
The first real step of the wizard asks you where your data comes from.
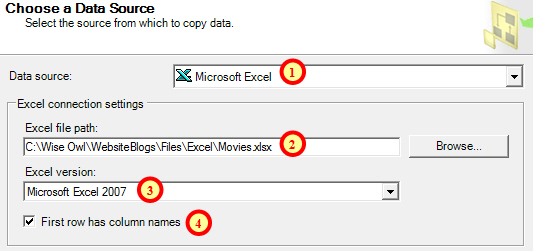
Tell the wizard where your data is stored. The numbered steps are explained below.
- Choose the type of file that contains your data. Here we've chosen Microsoft Excel. The option you select here affects the subsequent options on this page of the wizard.
- For an Excel spreadsheet you must say where the file is saved.
- Different versions of Excel store their data in different ways so it's important to say which version your file is saved as. Excel 2007 and 2010 file types are grouped together as Microsoft Excel 2007.
- Specify whether the first row of your data contains the column headings.
- Click Next at the bottom of the dialog box.
如果出现如下错误:
TITLE: SQL Server Import and Export Wizard
The operation could not be completed.
ADDITIONAL INFORMATION: The 'Microsoft.ACE.OLEDB.12.0' provider is not registered on the local machine. (System.Data)
需要下载组件:https://www.microsoft.com/en-us/download/details.aspx?id=23734
Step 2 - Choosing a Destination Database
The next step is to tell the wizard which database you want the data to be imported to.
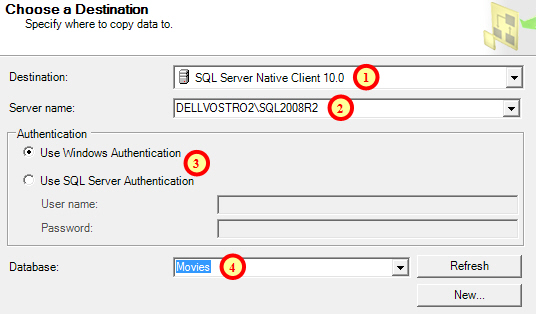
Specify where the data should go when it is imported. The numbered steps are explained below.
- Choose the type of destination source for your data. The option you select here affects the other options on this page of the wizard.
- As we selected a SQL Server destination for part 1, we need to say which SQL Server we want to use here.
- This option specifies the authentication to be used to connect to the server you've chosen.
- Choose the database you want to send the data to, or click New... to create a new database.
- Click the Next button at the bottom of the wizard.
Step 6 - Saving the SSIS Package
If you chose to save the package in the previous step you can specify the name and location here.
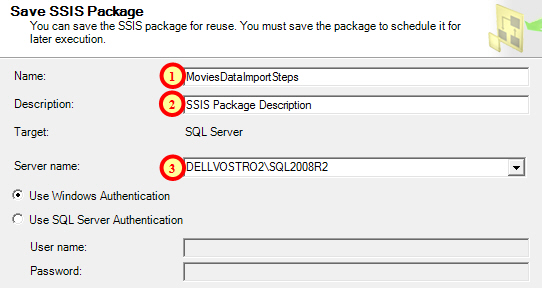
Save the SSIS package according to the options you select here.
- Type in a recognisable name for the package - we'll need this later on when we choose to schedule the import steps.
- You can optionally type in a description here.
- Choose the server or filename to save the package depending on the option you selected in the previous step of the wizard.
- Click Next at the bottom of the dialog box.
Step 7 - Completing the Wizard
The final step summarises the choices you have made and simply asks to you to confirm everything you have done by clicking Finish at the bottom of the dialog box.
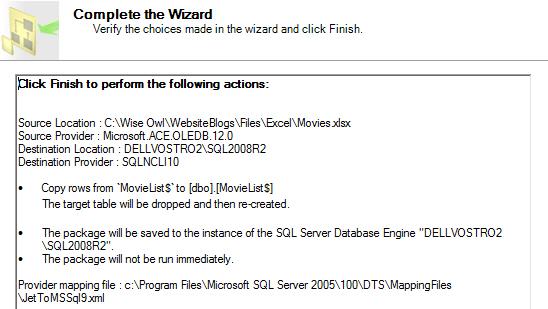
Simply click Finish to confirm the settings you have applied.
If everything works properly you should see a list of tasks being performed in a separate dialog box.
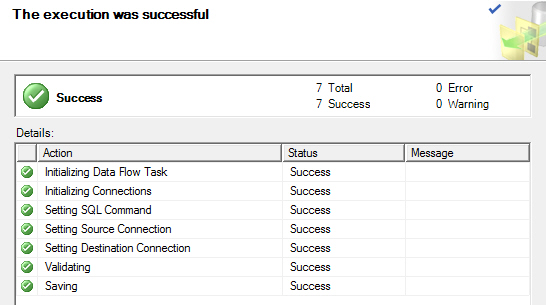
Success! Now all you need to do is click Close.
Viewing an SSIS Package Saved as a File
You can view your SSIS package in one of two different ways, depending on whether you saved it as part of your computer's file system or on the SQL Server.
If the package is saved as a file on your computer you can simply browse for it in a Windows Explorer window.

The file will have a dtsx extension.
Viewing an SSIS Package Saved in SQL Server
In order to view a package saved in SQL Server you must first connect to an SSIS server:
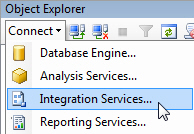
Click Connect at the top of the Object Explorer window and choose Integration Services...
需要使用Run As管理员才能打开
You will be able to see your SSIS package by expanding the sequence of folders shown below:
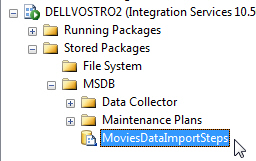
The SSIS package that we created earlier is shown here.
You can even run the package by right-clicking on it and choosing Run Package.
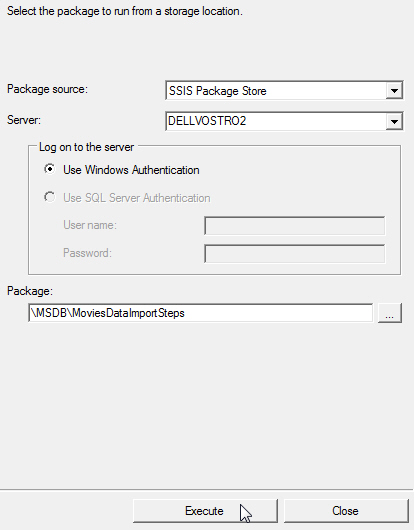
Simply click Execute to run the import steps you saved earlier.
Step 3 - Choose which Data to Import
In this step you can specify exactly which data you want to import from the data source you selected in step 1.

Here we're going to select all of the data from the Excel spreadsheet, rather than write a separate query to get the data. Click Next to move on to the next step.
Step 4 - Configure the Tables to which the Data will be Imported
This step lets you choose which tables the data you are importing will end up in, and also what should happen to the existing data in those tables.

Choose what will be imported and where it will be imported to. The numbered steps are described below.
- Choose the tables, or in this case worksheets, you want to import the data from.
- Choose which table the selected worksheet will be imported to.
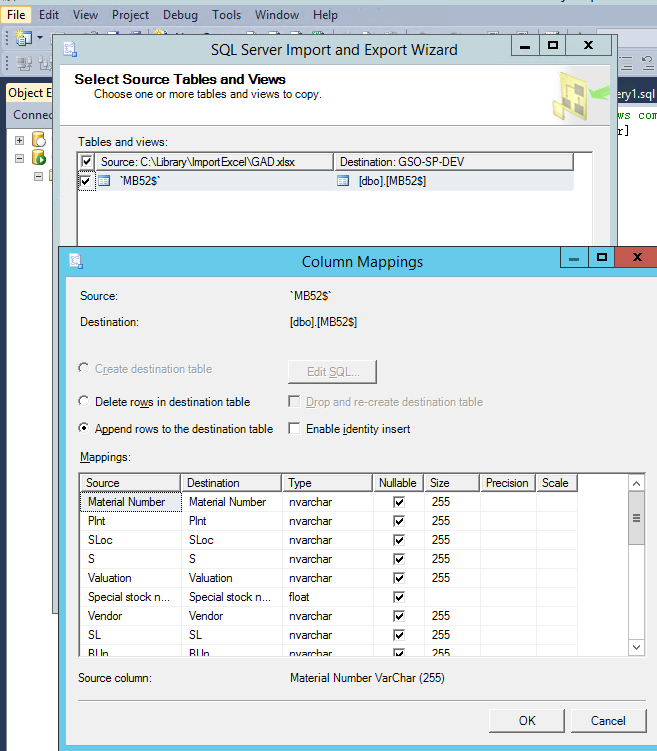
- Click Edit Mappings... for more options, as described below.

Use this dialog box to customise the individual fields in the imported data.
- Choose what to do with data that is already in the table you are importing into. Here we're creating the destination table each time.
- We've also chosen to drop and re-create the destination table each time we run the import.
- Use the Mappings table to control the names and data types of the imported fields.
- Click OK and then Next.
Step 5 - Choose When to Run the Import Steps
In this step you can choose whether to run the import immediately or to save the import steps for use later on.

Choose when you want the import to happen.
- We've chosen to not run our import when the wizard ends.
- We've also chosen to save an SSIS Package that contains all of the information required to run the import at a later time. We've selected to save the package onto the SQL Server, rather than as a separate file on our computer.
- Choose the level of protection for the package. Here we've chosen not to save sensitive data in the package, meaning that if other people attempt to use this package they will be prompted to fill in the missing information.
- Click Next at the bottom of the dialog box.
Step 7 - Completing the Wizard
The final step summarises the choices you have made and simply asks to you to confirm everything you have done by clicking Finish at the bottom of the dialog box.

Simply click Finish to confirm the settings you have applied.
If everything works properly you should see a list of tasks being performed in a separate dialog box.

Success! Now all you need to do is click Close.
Viewing an SSIS Package Saved as a File
You can view your SSIS package in one of two different ways, depending on whether you saved it as part of your computer's file system or on the SQL Server.
If the package is saved as a file on your computer you can simply browse for it in a Windows Explorer window.

The file will have a dtsx extension.
Viewing an SSIS Package Saved in SQL Server
In order to view a package saved in SQL Server you must first connect to an SSIS server:

Click Connect at the top of the Object Explorer window and choose Integration Services...
You will be able to see your SSIS package by expanding the sequence of folders shown below:

The SSIS package that we created earlier is shown here.
You can even run the package by right-clicking on it and choosing Run Package.

Simply click Execute to run the import steps you saved earlier.
Scheduling a Job in SQL Server
The final stage of this blog series is to create a scheduled job to execute the SSIS package on a regular basis.
The SQL Server Agent
You can schedule jobs using the SQL Server Agent. You should find this at the bottom of the list of objects in any database server that you've connected to in SQL Server Management Studio:

The SQL Server Agent appears at the bottom of the list of objects in a database server.
Creating a Job
To create a new job using SQL Server Agent:

Right-click the Jobs folder and choose New Job...
You can then use the dialog box to set up the job you want to create. The steps we need to follow in order to schedule our SSIS package execution are described below.
Step 1 - Enter a Name for the Job
The first step is to give the new job a sensible name, as shown below:

In the General category, enter a descriptive name for the job.
Step 2 - Create the Job Steps
Next, you can create the steps that will make up the job. Our job should have only one step and here's how to create it:
- Select the Steps page of the dialog box.

Build a list of steps for the job using this page of the dialog box.
- Click the New... button to add a new step to the job.

Use this dialog box to specify the settings for this job step.
- Enter a sensible name for this step of the job.
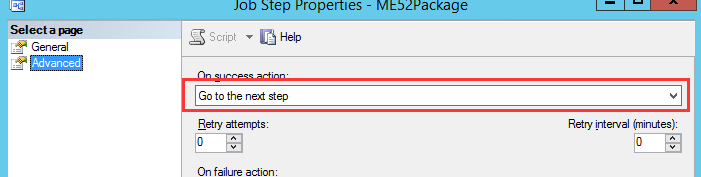
- Choose the type of action to perform. Here we want to execute an SSIS package.
- Choose where the SSIS package is stored. Here we've selected the package that we saved earlier on our SQL Server.
- Click the ellipsis (...) to choose the package you want to execute.
- Click OK to return to the New Job dialog box.
The job should now consist of a single step:

Our entire job consists of a single step, but we could always add more to this by clicking the New...button at the bottom of the dialog box.
Step 3 - Creating the Job Schedule
To ensure that the job runs at a specific time you need to specify the schedule for the job. To do this:
- Select the Schedules page of the dialog box.

Use this page to set up the job schedule.
- Click New... to create a new schedule.
- Complete the dialog box as shown below:

The options in this page of the dialog box are self-explanatory. The options we have selected here ensures the job will be carried out each week at 9am on a Monday morning.
- Click OK to return to the New Job dialog box.
Step 5 - Creating the Job
When you have finished applying all of the settings listed above, you can create the job by simply clicking OK on the New Job dialog box.

Your new job will appear in the Jobs folder within SQL Server Agent.
定时从多个Excel导入数据到SQL数据库的更多相关文章
- Excel导入数据到Sql server 中出错:“文本被截断,或者一个或多个字符在目标代码页中没有匹配项”
从Excel导入数据到Sql server 时,由于表中的数据有的很长,导入时出现如下错误(如果数据不是很长,255内以内,则不会出现错误): 出错原因: SQL Server的导入导出为了确定数据表 ...
- PHP Excel导入数据到MySQL数据库
数据导出已经有了,怎么能没有数据导入呢,同样使用TP5框架,首先需要下载phpexcel.zip,放到第三方类库目录vendor目录下,然后有一个页面可以让你选择要导入的Excel文件,然后点击导入按 ...
- EXCEL导入数据到SQL SERVER 2008
项目中需要导入excel到SQL SERVER数据库 总是报截断, 本质问题是,SQL SERVER导入程序是根据EXCEL的第一行记录 (非标题行)来决定数据长度的 碰到这个问题,可以伪造第一行,然 ...
- Kettle从excel导入数据到sql server
从excel工作表中读取数据逐行执行insert语句插入到sqlserver 为了简单起见只选取了三个个字段作为参数,日期,字符类型的需要加上'' Spoon是作业配置的GUI界面,配置好后可以通过控 ...
- Open XML操作Excel导入数据
项目中发现使用OleDb(using System.Data.OleDb)相关对象处理Excel导入功能,不是很稳定经常出问题,需要把这个问题解决掉.项目组提出使用OpenXML来处理Excel的导入 ...
- 用代码从文件中导入数据到SQL Server
引言 导入数据到SQL Server 是常见的需求,特别是定期导入这种需求. 对于定期导入主要有以下几种方式可选择: Bulk Insert Bcp Utility OpenRowSet 写程序导入( ...
- 检验Excel中数据是否与数据库中数据重复
#region 记录Excel中的重复列 /// <summary> /// 记录Excel中的重复列 /// </summary> /// <param name=&q ...
- php通用安装程序,导入数据文件(.sql)的安装程序
php通用安装程序,导入数据文件(.sql)的安装程序 该程序只需要1个php文件 和 1个数据文件,很方便调用.install/index.php 程序文件install/mycms ...
- JAVA处理Excel表格数据并写入数据库
package com.hncj.test; import java.io.FileInputStream; import java.sql.Connection; import java.sql.D ...
随机推荐
- android 中resources管理
主要存在于res/value文件夹中 定义: dimen.xml:主要用于设置像素默认值 <resources> res/values/dimens.xml <dimen name= ...
- TextView显示html文件中的图片
fromHtml还有另一个重构:fromHtml(String source, Html.ImageGetter imageGetter, Html.TagHandler tagHandler) 而I ...
- 创建数据库和表相关的SQL语句
SQL server注释语句有两种: 一种是单行注释,一种是多行注释. ******************** 单行注释用:--注释一行内容 多行注释用:/* *注释 *多行内容 */ 创建数据库: ...
- MAC Objective-C 开发经典书籍推荐
MAC Objective-C 开发经典书籍推荐 闻道有先后,术业有专攻,这句话放到计算机科学领域的理解可能每个人都会不同. 有些人选择一个操作系统,一个体系的编程语言,作一个领域的开发. 有些人选择 ...
- 7 款免费的 Metro UI 模板
#1 – Free Metro Ui Style template by Asif Aleem 很棒的蓝色调 Metro UI 管理模板 #2: Metro-Bootstrap by TalksLab ...
- 基于HTML5的3D网络拓扑自动布局
上篇将HT for Web的3D拓扑弹力布局的算法运行在Web Workers后台(http://www.hightopo.com/blog/70.html),这篇我们将进一步折腾,将算法运行到真正的 ...
- [Offer收割]编程练习赛3 - 题目3 : 智力竞赛
智力竞赛 Problem's Link ---------------------------------------------------------------------------- Mea ...
- 瀑布式开发、迭代开发、敏捷开发、XP与SCRUM的区别
瀑布式开发.迭代开发,区别[都属于,生命周期模型] 两者都是一种开发模式,就像设计模式一样,考虑的角度不一样,个人感觉谈不到取代一说. 传统的瀑布式开发,也就是从需求到 ...
- asp.net网站优化经验之谈
最近公司一个项目上线后,经常崩溃,于是开始重视性能问题,在网上看到了许多相关文章,整理下发了上来.以备参考. 在用ASP.NET开发网站的时候,性能是永远需要考虑和关注的问题,性能不仅仅只是程序代码执 ...
- PowerDesigner中Table视图怎样同时显示Code和Name
1.创建一个简单table视图步骤: 1)打开软件,创建model,选择Physical Data