
UITableView传值(自己使用)(属性,代理传值)
今天有些匆忙。
效果图如下:
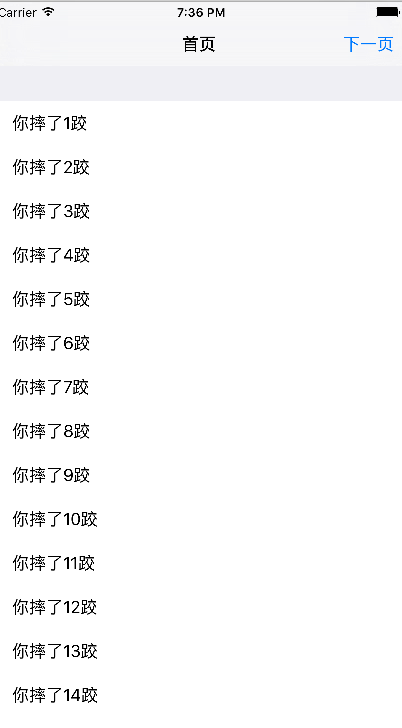


代码如下:
#import <UIKit/UIKit.h>

#import "FirstViewController.h"

@interface AppDelegate : UIResponder <UIApplicationDelegate>

@property (strong, nonatomic) UIWindow *window;

@end
- (BOOL)application:(UIApplication *)application didFinishLaunchingWithOptions:(NSDictionary *)launchOptions {

    FirstViewController *first=[[FirstViewController alloc]init];

    UINavigationController *navc=[[UINavigationController alloc]initWithRootViewController:first];

    self.window.rootViewController=navc;

    return YES;

}
#import <UIKit/UIKit.h>

#import "SecondViewController.h"

@interface FirstViewController : UIViewController<UITableViewDataSource,UITableViewDelegate,postValueDelegate>

@property(strong,nonatomic)UITableView * tableview;

@property(strong,nonatomic)NSMutableArray *array;

@property(strong,nonatomic)NSString *st;

@end
#import "FirstViewController.h"

@interface FirstViewController ()

@property(assign,nonatomic)int a;

@end

@implementation FirstViewController

- (void)viewDidLoad {

    [super viewDidLoad];

    self.view.backgroundColor=[UIColor yellowColor];

    self.title=@"首页";

    UIBarButtonItem *nextItem=[[UIBarButtonItem alloc]initWithTitle:@"下一页" style:UIBarButtonItemStylePlain target:self action:@selector(nextpage)];

    self.navigationItem.rightBarButtonItem=nextItem;

    self.array=[NSMutableArray array];

    for (int i=1; i<20; i++) {

        [self.array addObject:[NSString stringWithFormat:@"你摔了%d跤",i]];

    }

    self.tableview=[[UITableView alloc]initWithFrame:self.view.frame style:1];

    self.tableview.separatorColor=[UIColor redColor];

    self.tableview.delegate=self;

    self.tableview.dataSource=self;

    [self.view addSubview:self.tableview];

    [self.tableview registerClass:[UITableViewCell class] forCellReuseIdentifier:@"cell"];

}

-(void)postvalue:(NSString *)str

{

//    self.st=str;

    [self.array replaceObjectAtIndex:self.a withObject:str];

    [self.tableview reloadData];

//    NSLog(@"%@",self.st);

}

#pragma mark 数据源  每个分区显示行数设置

- (NSInteger)tableView:(UITableView *)tableView numberOfRowsInSection:(NSInteger)section

{

    return self.array.count;

}

#pragma mark 数据源  每个单元格显示的内容

- (UITableViewCell *)tableView:(UITableView *)tableView cellForRowAtIndexPath:(NSIndexPath *)indexPath

{

    //单元格重用机制

    static NSString * cellIdentity=@"cell";

    UITableViewCell *cell=[tableView dequeueReusableCellWithIdentifier:cellIdentity forIndexPath:indexPath];

    cell.textLabel.text=self.array[indexPath.row];

    return cell;

}

-(void)tableView:(UITableView *)tableView didSelectRowAtIndexPath:(NSIndexPath *)indexPath

{

    NSLog(@"%@",self.array[indexPath.row]);

    self.st=self.array[indexPath.row];

    SecondViewController *second=[[SecondViewController alloc]init];

     second.str=self.st;

    second.delegate=self;

    self.a=(int)indexPath.row;

    NSLog(@"%d",self.a);

    [self.navigationController pushViewController:second animated:YES];

}

-(void)nextpage

{

    SecondViewController *second=[[SecondViewController alloc]init];

    second.str=self.st;

    [self.navigationController pushViewController:second animated:YES];

}

- (void)didReceiveMemoryWarning {

    [super didReceiveMemoryWarning];

    // Dispose of any resources that can be recreated.

}

/*

#pragma mark - Navigation

// In a storyboard-based application, you will often want to do a little preparation before navigation

- (void)prepareForSegue:(UIStoryboardSegue *)segue sender:(id)sender {

    // Get the new view controller using [segue destinationViewController].

    // Pass the selected object to the new view controller.

}

*/

@end
#import <UIKit/UIKit.h>

//创建协议,声明方法

@protocol postValueDelegate <NSObject>

-(void)postvalue:(NSString* )str;

@end

@interface SecondViewController : UIViewController<UITextFieldDelegate>

@property(strong,nonatomic) UITextField  * textName;

@property(strong,nonatomic) NSString *str;

@property(strong,nonatomic) id<postValueDelegate> delegate;

@end
#import "SecondViewController.h"

@interface SecondViewController ()

@end

@implementation SecondViewController

- (void)viewDidLoad {

    [super viewDidLoad];

    self.view.backgroundColor=[UIColor greenColor];

    self.navigationItem.hidesBackButton=YES;

    self.title=@"尾页";

    self.navigationItem.leftBarButtonItem=[[UIBarButtonItem alloc]initWithTitle:@"back" style:2 target:self action:@selector(backpage)];

    self.textName=[[UITextField alloc]initWithFrame:CGRectMake(100, 300, 150, 60)];

    self.textName.borderStyle=1;

    self.textName.text=self.str;

    self.textName.delegate=self;

    [self.view addSubview:self.textName];

}

-(BOOL)textFieldShouldReturn:(UITextField *)textField

{

    if ([textField isFirstResponder]) {

        [textField resignFirstResponder];

    }

    if (self.delegate) {

        [self.delegate postvalue:self.textName.text];

    }

    [self.navigationController popToRootViewControllerAnimated:YES];

    return YES;

}

-(void)backpage

{

    if (self.delegate) {

        [self.delegate postvalue:self.textName.text];

        NSLog(@"%@",self.textName.text);

    }

    [self.navigationController popToRootViewControllerAnimated:YES];

}

- (void)didReceiveMemoryWarning {

    [super didReceiveMemoryWarning];

    // Dispose of any resources that can be recreated.

}

/*

#pragma mark - Navigation

// In a storyboard-based application, you will often want to do a little preparation before navigation

- (void)prepareForSegue:(UIStoryboardSegue *)segue sender:(id)sender {

    // Get the new view controller using [segue destinationViewController].

    // Pass the selected object to the new view controller.

}

*/

@end
UITableView传值(自己使用)(属性,代理传值)的更多相关文章
- iOS 页面间几种传值方式(属性,代理,block,单例,通知)
第二个视图控制器如何获取第一个视图控制器的部分信息 例如 :第二个界面中的lable显示第一个界面textField中的文本 这就需要用到属性传值.block传值 那么第一个视图控制器如何获的第二个视 ...
- iOS传值方式:属性,代理,block,单例,通知
正向传值均可,反向传值除属性传值不可,其余均可.下面简单介绍: (一)属性传值 第二个界面中的lable显示第一个界面textField中的文本 首先我们建立一个RootViewControllers ...
- 四大传值详解:属性传值,单例传值,代理传值,block传值
一:属性传值 传值情景:从前一个页面向后一个页面传值 a.在后一个页面,根据传值类型和个数,写属性 b.在前一个页面, 为属性赋值 c.在后一个页面, 使用值 例如: 第一个视图: #import & ...
- iOS 页面跳转传值,属性传值,代理传值,代码块传值,单例传值,通知传值
有时候我们在页面跳转的时候回传递相应的参数,如,你想把在第一个页面的文本框里的内容显示在第二个文本框中,或者你又想把第二个文本框中的内容改变之后到第一个页面的文本框中,所有,这个时候我们就要用到页面跳 ...
- iOS--页面间的代理传值(属性、代理(委托)、代码块、单例、通知)
(一)属性传值 (二)代理(委托)传值 代理传值 适用于 反向传值 (从后往前传) 1.1 创建协议 及协议方法 在反向传值的页面(SecondViewController)中 1.2 创建协议类型的 ...
- iOS 页面间传值 之 属性传值,代理传值
手机 APP 运行,不同页面间传值是必不可少,传值的方式有很多(方法传值,属性传值,代理传值,单例传值) ,这里主要总结下属性传值和代理传值. 属性传值:属性传值是最简单,也是最常见的一种传值方式,但 ...
- Swift进阶之路(一)——单例模式、属性传值、代理传值、闭包传值
一.单例模式 单例模式是设计模式中最简单的一种,甚至有些模式大师都不称其为模式,称其为一种实现技巧,因为设计模式讲究对象之间的关系的抽象,而单例模式只有自己一个对象. 关于单例,有三个重要的准则需要牢 ...
- OS笔记047代理传值和block传值
在两个不同的控制器之间传递数据,可以使用代理传值或者block传值. 例子是一个简单通讯录. 主界面如下: 添加联系人界面 查看/编辑联系人界面:默认是查看模式,点击编辑后进入编辑模式 编辑模式 数据 ...
- View 与 Controller 之间的delegate(代理)传值
这个代理传值是经常使用的一种传值方式,下面介绍一种View 和 Controller 之间的代理传值方法. 先建立一个View视图 如 LoginView 是继承于一个UIView 在LoginVie ...
- IOS pop使用代理传值
假如oneViewController页面push到OtherViewController页面,然后你想从OtherViewController页面pop到oneViewController页面的时候 ...
随机推荐
- Ionic2学习笔记(2):自定义Component
作者:Grey 原文地址: http://www.cnblogs.com/greyzeng/p/5536298.html 上一篇提到,Ionic2提供了很多Co ...
- Clipboard.js实现复制内容到剪切板
<script type="text/javascript"> var clipboard1 = new Clipboard('.bt01'); clipboard1. ...
- 检测IP地址的正则表达式
正则表达式: ((2[0-4]\d|25[0-5]|[01]?\d\d?)\.){3}(2[0-4]\d|25[0-5]|[01]?\d\d?) ((2[0-4]\d|25[0-5]|[01]?\d\ ...
- 仿Office的程序载入窗体
初次接触启动界面记不清是在哪一年了,估计是小学四年级第一次打开Office Word的时候吧,更记不清楚当时的启动界面是长啥样了.后来随着使用的软件越来越多,也见到各式各样的启动界面.下面就列举了两个 ...
- C# 委托和事件(二):使用.Net框架中的EventArgs和EventHandler
前面一篇里提到事件是通过委托来进行关联的,而委托是可以带各种各样的参数的,其中就可以用事件参数(EventArgs),同时,也可以用.Net框架里边提供的一个委托EventHandler来Handle ...
- MongoDB管理工具的插件系统
MongoDB管理工具 MongoCola的开发已经进入第三个年头了. 官方对于C#驱动的投入不够导致了很多东西都必须自己实现,但是不管怎么样,工具现在已经很强大了. 最近准备着手插件系统的开发,简 ...
- 新型编译器将原生代码转换为JavaScript
导读:Emscripten C/C++到JavaScript项目利用来自LLVM的后端构建起更具速度与针对性优势的编译方案. 在当初刚刚公布时,Emsripten听起来完全像是个冲劲十足的技术笑谈:一 ...
- jquery的ajax可以传入的三种参数类型
在jquery的ajax函数中,可以传入3种类型的数据 1.文本:"uname=alice&mobileIpt=110&birthday=1983-05-12" 2 ...
- ThinkCMF-smeta扩展字段
ThinkCMF - 添加文章功能 没有上传文件功能,为了扩展这一功能,在页面加入如下代码: <tr> <td> <div style="text-align: ...
- mysql 更改默认数据目录
http://www.cnblogs.com/chenny7/p/3642363.html 本文主要介绍在CentOS下通过yum命令安装MySQL之后,如何移动默认数据目录到指定位置. 安装mysq ...