Generating Names and Classifying Names with Character-Level RNN
原文地址: Generating Names with Character-Level RNN
搬运只为督促自己学习,没有其他目的。
Preparing the Data
Download the data from here and extract it to the current directory
In short, there are a bunch of plain text files data/names/[Language].txt with a name per line. We split lines into an array, convert Unicode to ASCII, and end up with a dictionary {language: [names ...]}.
from __future__ import unicode_literals, print_function, division

from io import open

import glob

import os

import unicodedata

import string

all_letters = string.ascii_letters + " .,;'-"

n_letters = len(all_letters) + 1 # Plus EOS marker

def findFiles(path): return glob.glob(path)

# Turn a Unicode string to plain ASCII, thanks to http://stackoverflow.com/a/518232/2809427

def unicodeToAscii(s):

    return ''.join(

        c for c in unicodedata.normalize('NFD', s)

        if unicodedata.category(c) != 'Mn'

        and c in all_letters

    )

# Read a file and split into lines

def readLines(filename):

    lines = open(filename, encoding='utf-8').read().strip().split('\n')

    return [unicodeToAscii(line) for line in lines]

# Build the category_lines dictionary, a list of lines per category

category_lines = {}

all_categories = []

for filename in findFiles('data/names/*.txt'):

    category = os.path.splitext(os.path.basename(filename))[0]

    all_categories.append(category)

    lines = readLines(filename)

    category_lines[category] = lines

n_categories = len(all_categories)

if n_categories == 0:

    raise RuntimeError('Data not found. Make sure that you downloaded data '

        'from https://download.pytorch.org/tutorial/data.zip and extract it to '

        'the current directory.')

print('# categories:', n_categories, all_categories)

print(unicodeToAscii("O'Néàl"))
Creating the Network

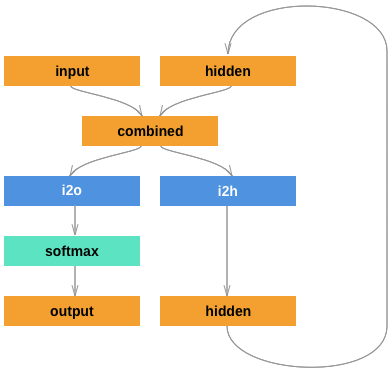
The category tensor is a one-hot vector just like the letter input.
We will interpret the output as the probability of the next letter. When sampling, the most likely output letter is used as the next input letter.
import torch

import torch.nn as nn

class RNN(nn.Module):

    def __init__(self, input_size, hidden_size, output_size):

        super(RNN, self).__init__()

        self.hidden_size = hidden_size

        self.i2h = nn.Linear(n_categories + input_size + hidden_size, hidden_size)

        self.i2o = nn.Linear(n_categories + input_size + hidden_size, output_size)

        self.o2o = nn.Linear(hidden_size + output_size, output_size)

        self.dropout = nn.Dropout(0.1)

        self.softmax = nn.LogSoftmax(dim=1)

    def forward(self, category, input, hidden):

        input_combined = torch.cat((category, input, hidden), 1)

        hidden = self.i2h(input_combined)

        output = self.i2o(input_combined)

        output_combined = torch.cat((hidden, output), 1)

        output = self.o2o(output_combined)

        output = self.dropout(output)

        output = self.softmax(output)

        return output, hidden

    def initHidden(self):

        return torch.zeros(1, self.hidden_size)
Training
Preparing for Training
First of all, helper functions to get random pairs of (category, line):
import random

# Random item from a list

def randomChoice(l):

    return l[random.randint(0, len(l) - 1)]

# Get a random category and random line from that category

def randomTrainingPair():

    category = randomChoice(all_categories)

    line = randomChoice(category_lines[category])

    return category, line
For each timestep (that is, for each letter in a training word) the inputs of the network will be (category, current letter, hidden state) and the outputs will be (next letter, next hidden state). So for each training set, we’ll need the category, a set of input letters, and a set of output/target letters.
The category tensor is a one-hot tensor of size <1 x n_categories>. When training we feed it to the network at every timestep - this is a design choice, it could have been included as part of initial hidden state or some other strategy.
# One-hot vector for category

def categoryTensor(category):

    li = all_categories.index(category)

    tensor = torch.zeros(1, n_categories)

    tensor[0][li] = 1

    return tensor

# One-hot matrix of first to last letters (not including EOS) for input

def inputTensor(line):

    tensor = torch.zeros(len(line), 1, n_letters)

    for li in range(len(line)):

        letter = line[li]

        tensor[li][0][all_letters.find(letter)] = 1

    return tensor

# LongTensor of second letter to end (EOS) for target

def targetTensor(line):

    letter_indexes = [all_letters.find(line[li]) for li in range(1, len(line))]

    letter_indexes.append(n_letters - 1) # EOS

    return torch.LongTensor(letter_indexes)
For convenience during training we’ll make a randomTrainingExample function that fetches a random (category, line) pair and turns them into the required (category, input, target) tensors.
# Make category, input, and target tensors from a random category, line pair

def randomTrainingExample():

    category, line = randomTrainingPair()

    category_tensor = categoryTensor(category)

    input_line_tensor = inputTensor(line)

    target_line_tensor = targetTensor(line)

    return category_tensor, input_line_tensor, target_line_tensor
Training the Network
In contrast to classification, where only the last output is used, we are making a prediction at every step, so we are calculating loss at every step.
The magic of autograd allows you to simply sum these losses at each step and call backward at the end.
criterion = nn.NLLLoss()

learning_rate = 0.0005

def train(category_tensor, input_line_tensor, target_line_tensor):

    target_line_tensor.unsqueeze_(-1)

    hidden = rnn.initHidden()

    rnn.zero_grad()

    loss = 0

    for i in range(input_line_tensor.size(0)):

        output, hidden = rnn(category_tensor, input_line_tensor[i], hidden)

        l = criterion(output, target_line_tensor[i])

        loss += l

    loss.backward()

    for p in rnn.parameters():

        p.data.add_(-learning_rate, p.grad.data)

    return output, loss.item() / input_line_tensor.size(0)
To keep track of how long training takes I am adding a timeSince(timestamp) function which returns a human readable string:
import time

import math

def timeSince(since):

    now = time.time()

    s = now - since

    m = math.floor(s / 60)

    s -= m * 60

    return '%dm %ds' % (m, s)
Training is business as usual - call train a bunch of times and wait a few minutes, printing the current time and loss every print_every examples, and keeping store of an average loss per plot_every examples in all_losses for plotting later.
rnn = RNN(n_letters, 128, n_letters)

n_iters = 100000

print_every = 5000

plot_every = 500

all_losses = []

total_loss = 0 # Reset every plot_every iters

start = time.time()

for iter in range(1, n_iters + 1):

    output, loss = train(*randomTrainingExample())

    total_loss += loss

    if iter % print_every == 0:

        print('%s (%d %d%%) %.4f' % (timeSince(start), iter, iter / n_iters * 100, loss))

    if iter % plot_every == 0:

        all_losses.append(total_loss / plot_every)

        total_loss = 0
Plotting the Losses
import matplotlib.pyplot as plt

import matplotlib.ticker as ticker

plt.figure()

plt.plot(all_losses)

Sampling the Network
To sample we give the network a letter and ask what the next one is, feed that in as the next letter, and repeat until the EOS token.
- Create tensors for input category, starting letter, and empty hidden state
- Create a string
output_namewith the starting letter - Up to a maximum output length,
- Feed the current letter to the network
- Get the next letter from highest output, and next hidden state
- If the letter is EOS, stop here
- If a regular letter, add to
output_nameand continue
- Return the final name
Note:Rather than having to give it a starting letter, another strategy would have been to include a “start of string” token in training and have the network choose its own starting letter.
max_length = 20

# Sample from a category and starting letter

def sample(category, start_letter='A'):

    with torch.no_grad():  # no need to track history in sampling

        category_tensor = categoryTensor(category)

        input = inputTensor(start_letter)

        hidden = rnn.initHidden()

        output_name = start_letter

        for i in range(max_length):

            output, hidden = rnn(category_tensor, input[0], hidden)

            topv, topi = output.topk(1)

            topi = topi[0][0]

            if topi == n_letters - 1:

                break

            else:

                letter = all_letters[topi]

                output_name += letter

            input = inputTensor(letter)

        return output_name

# Get multiple samples from one category and multiple starting letters

def samples(category, start_letters='ABC'):

    for start_letter in start_letters:

        print(sample(category, start_letter))

samples('Russian', 'RUS')

samples('German', 'GER')

samples('Spanish', 'SPA')

samples('Chinese', 'CHI')
原文地址: Classifying Names with Character-Level RNN
搬运只为督促自己学习,没有其他目的。
Preparing the Data
Data is the same as the previous!
from __future__ import unicode_literals, print_function, division

from io import open

import glob

import os

def findFiles(path): return glob.glob(path)

print(findFiles('data/names/*.txt'))

import unicodedata

import string

all_letters = string.ascii_letters + " .,;'"

n_letters = len(all_letters)

# Turn a Unicode string to plain ASCII, thanks to http://stackoverflow.com/a/518232/2809427

def unicodeToAscii(s):

    return ''.join(

        c for c in unicodedata.normalize('NFD', s)

        if unicodedata.category(c) != 'Mn'

        and c in all_letters

    )

print(unicodeToAscii('Ślusàrski'))

# Build the category_lines dictionary, a list of names per language

category_lines = {}

all_categories = []

# Read a file and split into lines

def readLines(filename):

    lines = open(filename, encoding='utf-8').read().strip().split('\n')

    return [unicodeToAscii(line) for line in lines]

for filename in findFiles('data/names/*.txt'):

    category = os.path.splitext(os.path.basename(filename))[0]

    all_categories.append(category)

    lines = readLines(filename)

    category_lines[category] = lines

n_categories = len(all_categories)
Now we have category_lines, a dictionary mapping each category (language) to a list of lines (names). We also kept track of all_categories (just a list of languages) and n_categories for later reference.
Turning Names into Tensors
Now that we have all the names organized, we need to turn them into Tensors to make any use of them.
To represent a single letter, we use a “one-hot vector” of size <1 x n_letters>. A one-hot vector is filled with 0s except for a 1 at index of the current letter, e.g. "b" = <0 1 0 0 0 ...>.
To make a word we join a bunch of those into a 3D matrix <line_length x 1 x n_letters>.
That extra 1 dimension is because PyTorch assumes everything is in batches - we’re just using a batch size of 1 here.
import torch

# Find letter index from all_letters, e.g. "a" = 0

def letterToIndex(letter):

    return all_letters.find(letter)

# Just for demonstration, turn a letter into a <1 x n_letters> Tensor

def letterToTensor(letter):

    tensor = torch.zeros(1, n_letters)

    tensor[0][letterToIndex(letter)] = 1

    return tensor

# Turn a line into a <line_length x 1 x n_letters>,

# or an array of one-hot letter vectors

def lineToTensor(line):

    tensor = torch.zeros(len(line), 1, n_letters)

    for li, letter in enumerate(line):

        tensor[li][0][letterToIndex(letter)] = 1

    return tensor

print(letterToTensor('J'))

print(lineToTensor('Jones').size())
Creating the Network
import torch.nn as nn

class RNN(nn.Module):

    def __init__(self, input_size, hidden_size, output_size):

        super(RNN, self).__init__()

        self.hidden_size = hidden_size

        self.i2h = nn.Linear(input_size + hidden_size, hidden_size)

        self.i2o = nn.Linear(input_size + hidden_size, output_size)

        self.softmax = nn.LogSoftmax(dim=1)

    def forward(self, input, hidden):

        combined = torch.cat((input, hidden), 1)

        hidden = self.i2h(combined)

        output = self.i2o(combined)

        output = self.softmax(output)

        return output, hidden

    def initHidden(self):

        return torch.zeros(1, self.hidden_size)

n_hidden = 128

rnn = RNN(n_letters, n_hidden, n_categories)
To run a step of this network we need to pass an input (in our case, the Tensor for the current letter) and a previous hidden state (which we initialize as zeros at first). We’ll get back the output (probability of each language) and a next hidden state (which we keep for the next step).
input = letterToTensor('A')

hidden =torch.zeros(1, n_hidden)

output, next_hidden = rnn(input, hidden)
For the sake of efficiency we don’t want to be creating a new Tensor for every step, so we will use lineToTensor instead of letterToTensor and use slices. This could be further optimized by pre-computing batches of Tensors.
input = lineToTensor('Albert')

hidden = torch.zeros(1, n_hidden)

output, next_hidden = rnn(input[0], hidden)

print(output)
As you can see the output is a <1 x n_categories> Tensor, where every item is the likelihood of that category (higher is more likely).
Training
Preparing for Training
Before going into training we should make a few helper functions. The first is to interpret the output of the network, which we know to be a likelihood of each category. We can use Tensor.topk to get the index of the greatest value:
def categoryFromOutput(output):

    top_n, top_i = output.topk(1)

    category_i = top_i[0].item()

    return all_categories[category_i], category_i

print(categoryFromOutput(output))
A quick way to get a training example (a name and its language):
import random

def randomChoice(l):

    return l[random.randint(0, len(l) - 1)]

def randomTrainingExample():

    category = randomChoice(all_categories)

    line = randomChoice(category_lines[category])

    category_tensor = torch.tensor([all_categories.index(category)], dtype=torch.long)

    line_tensor = lineToTensor(line)

    return category, line, category_tensor, line_tensor

for i in range(10):

    category, line, category_tensor, line_tensor = randomTrainingExample()

    print('category =', category, '/ line =', line)
Training the Network
Now all it takes to train this network is show it a bunch of examples, have it make guesses, and tell it if it’s wrong.
For the loss function nn.NLLLoss is appropriate, since the last layer of the RNN is nn.LogSoftmax.
Each loop of training will:
- Create input and target tensors
- Create a zeroed initial hidden state
- Read each letter in and
- Keep hidden state for next letter
- Compare final output to target
- Back-propagate
- Return the output and loss
criterion = nn.NLLLoss() #Negative log likelihood loss It is useful to train a classification problem with C classes.

learning_rate = 0.005 # If you set this too high, it might explode. If too low, it might not learn

def train(category_tensor, line_tensor):

    hidden = rnn.initHidden()

    rnn.zero_grad()

    for i in range(line_tensor.size()[0]):

        output, hidden = rnn(line_tensor[i], hidden)

    loss = criterion(output, category_tensor)

    loss.backward()

    # Add parameters' gradients to their values, multiplied by learning rate

    for p in rnn.parameters():

        p.data.add_(-learning_rate, p.grad.data)

    return output, loss.item()
Now we just have to run that with a bunch of examples. Since the train function returns both the output and loss we can print its guesses and also keep track of loss for plotting. Since there are 1000s of examples we print only every print_every examples, and take an average of the loss.
import time

import math

n_iters = 100000

print_every = 5000

plot_every = 1000

# Keep track of losses for plotting

current_loss = 0

all_losses = []

def timeSince(since):

    now = time.time()

    s = now - since

    m = math.floor(s / 60)

    s -= m * 60

    return '%dm %ds' % (m, s)

start = time.time()

for iter in range(1, n_iters + 1):

    category, line, category_tensor, line_tensor = randomTrainingExample()

    output, loss = train(category_tensor, line_tensor)

    current_loss += loss

    # Print iter number, loss, name and guess

    if iter % print_every == 0:

        guess, guess_i = categoryFromOutput(output)

        correct = '✓' if guess == category else '✗ (%s)' % category

        print('%d %d%% (%s) %.4f %s / %s %s' % (iter, iter / n_iters * 100, timeSince(start), loss, line, guess, correct))

    # Add current loss avg to list of losses

    if iter % plot_every == 0:

        all_losses.append(current_loss / plot_every)

        current_loss = 0
Plotting the Results
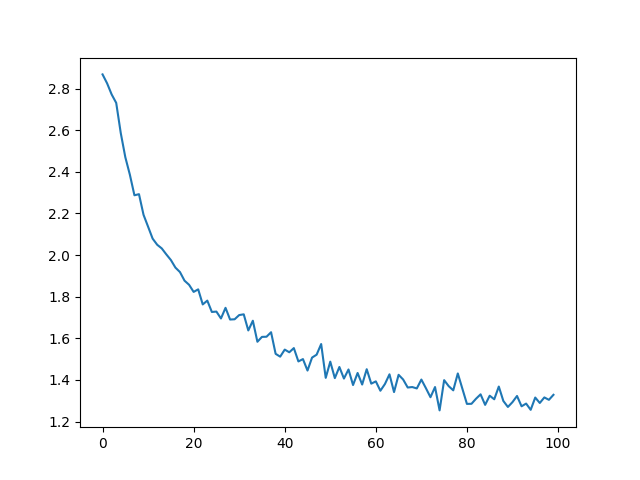
Plotting the historical loss from all_losses shows the network learning:
import matplotlib.pyplot as plt

import matplotlib.ticker as ticker

plt.figure()

plt.plot(all_losses)
Evaluating the Results
To see how well the network performs on different categories, we will create a confusion matrix, indicating for every actual language (rows) which language the network guesses (columns). To calculate the confusion matrix a bunch of samples are run through the network with evaluate(), which is the same as train() minus the backprop.
# Keep track of correct guesses in a confusion matrix

confusion = torch.zeros(n_categories, n_categories)

n_confusion = 10000

# Just return an output given a line

def evaluate(line_tensor):

    hidden = rnn.initHidden()

    for i in range(line_tensor.size()[0]):

        output, hidden = rnn(line_tensor[i], hidden)

    return output

# Go through a bunch of examples and record which are correctly guessed

for i in range(n_confusion):

    category, line, category_tensor, line_tensor = randomTrainingExample()

    output = evaluate(line_tensor)

    guess, guess_i = categoryFromOutput(output)

    category_i = all_categories.index(category)

    confusion[category_i][guess_i] += 1

# Normalize by dividing every row by its sum

for i in range(n_categories):

    confusion[i] = confusion[i] / confusion[i].sum()

# Set up plot

fig = plt.figure()

ax = fig.add_subplot(111)

cax = ax.matshow(confusion.numpy())

fig.colorbar(cax)

# Set up axes

ax.set_xticklabels([''] + all_categories, rotation=90)

ax.set_yticklabels([''] + all_categories)

# Force label at every tick

ax.xaxis.set_major_locator(ticker.MultipleLocator(1))

ax.yaxis.set_major_locator(ticker.MultipleLocator(1))

# sphinx_gallery_thumbnail_number = 2

plt.show()
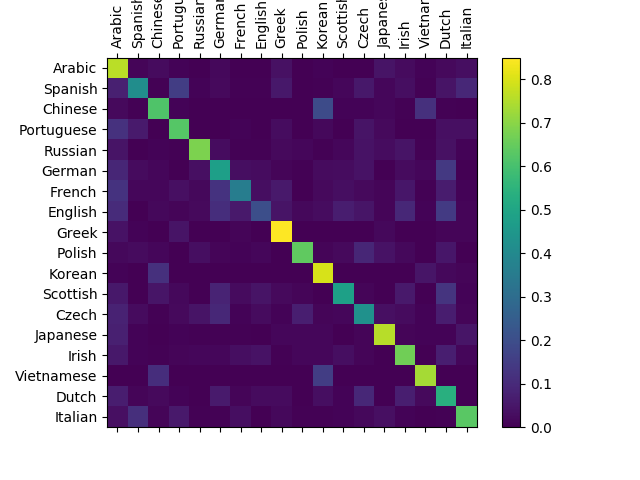
You can pick out bright spots off the main axis that show which languages it guesses incorrectly, e.g. Chinese for Korean, and Spanish for Italian. It seems to do very well with Greek, and very poorly with English (perhaps because of overlap with other languages).
Running on User Input
def predict(input_line, n_predictions=3):

    print('\n> %s' % input_line)

    with torch.no_grad():

        output = evaluate(lineToTensor(input_line))

        # Get top N categories

        topv, topi = output.topk(n_predictions, 1, True)

        predictions = []

        for i in range(n_predictions):

            value = topv[0][i].item()

            category_index = topi[0][i].item()

            print('(%.2f) %s' % (value, all_categories[category_index]))

            predictions.append([value, all_categories[category_index]])

predict('Dovesky')

predict('Jackson')

predict('Satoshi')
Generating Names and Classifying Names with Character-Level RNN的更多相关文章
- Sequence Models Week 1 Character level language model - Dinosaurus land
Character level language model - Dinosaurus land Welcome to Dinosaurus Island! 65 million years ago, ...
- [C7] Andrew Ng - Sequence Models
About this Course This course will teach you how to build models for natural language, audio, and ot ...
- 课程五(Sequence Models),第一 周(Recurrent Neural Networks) —— 2.Programming assignments:Dinosaur Island - Character-Level Language Modeling
Character level language model - Dinosaurus land Welcome to Dinosaurus Island! 65 million years ago, ...
- Coursera Deep Learning笔记 序列模型(一)循环序列模型[RNN GRU LSTM]
参考1 参考2 参考3 1. 为什么选择序列模型 序列模型能够应用在许多领域,例如: 语音识别 音乐发生器 情感分类 DNA序列分析 机器翻译 视频动作识别 命名实体识别 这些序列模型都可以称作使用标 ...
- MYSQL: set names utf8是什么意思?
set names utf8 是用于设置编码,可以再在建数据库的时候设置,也可以在创建表的时候设置,或只是对部分字段进行设置,而且在设置编码的时候,这些地方最好是一致的,这样能最大程度上避免数据记录出 ...
- [CF #290-C] Fox And Names (拓扑排序)
题目链接:http://codeforces.com/contest/510/problem/C 题目大意:构造一个字母表,使得按照你的字母表能够满足输入的是按照字典序排下来. 递归建图:竖着切下来, ...
- clean code meaningful names
---恢复内容开始--- Meaningful Names: use Intention-Revealing Names //nice,Everyone who reads your code (in ...
- Get and Set Column/Row Names for Data Frames
row.names(x)row.names(x) <- value rownames(x, do.NULL = TRUE, prefix = "row") rownames( ...
- set names utf8 【mysql导入中文乱码问题解决】
由于工作的关系需要经常导入一些sql脚本,但是经常会遇到导入中文出现乱码的问题,搞得自己每次导入sql脚本时都很害怕,自己也上网找了一些资料,尝 试了许多办法,有些方法可以正常导入中文,有些办法却不行 ...
随机推荐
- zxing的使用及优化
二维码介绍 zxing项目是谷歌推出的用来识别多种格式条形码的开源项目,项目地址为https://github.com/zxing/zxing,zxing有多个人在维护,覆盖主流编程语言,也是目前还在 ...
- MySQL key分区(五)
具体描写叙述总结请看MySQL分区(一) 样例:该样例为本人个人学习总结分享->具体说明-->有问题欢迎前来交流
- VS关于 _CRT_SECURE_NO_WARNINGS 警告说明
在VS中调用 strcpy.strcat 等函数时会提示 _CRT_SECURE_NO_WARNINGS 警告.原因是这些函数不安全.可能会造成内存泄露等. 所以建议採用带_s的函数,如strcpy_ ...
- SQL Server高速生成SQL增删改查语句
你还在手写程序生成SQL语句吗?你还在为由于马虎出错的SQL语句而感到无语吗?你还在为不知如何表达复杂的SQL语句而纠结吗?假设你的回答为"是".那你就OUT啦.快来试试应用SQL ...
- NET C#转Java
NET C#转Java .NET C#转Java没那么难,都是面向对象的语言,而且语法还是相似的,先对比一下开发环境,再到Servlet,再到MVC,都是一样一样的,只是JAVA的配制项比较多而已,只 ...
- 01_Git的安装和简单使用(命令行模式+图形化模式)
刚开始用git的小白适用,参考链接:http://www.cnblogs.com/qijunjun/p/7137207.html 实际项目开发中,我们经常会用一些版本控制器来托管自己的代码,今天 ...
- 【codeforces 779B】Weird Rounding
[题目链接]:http://codeforces.com/contest/779/problem/B [题意] 问你要删掉几个数字才能让原来的数字能够被10^k整除; [题解] /* 数字的长度不大; ...
- 一个简易版的Function.prototype.bind实现
重新看<JavaScript设计模式与开发实践>一书,第32页发现个简易版的Function.prototype.bind实现,非常容易理解,记录在这了. Function.prototy ...
- Python3.7环境配置
1.官网下载 https://www.python.org/ 我这是3.7.0 for windows executable installer Download Windows x86 web-ba ...
- IdentityServer4实战 - 谈谈 JWT Token 的安全策略
原文:IdentityServer4实战 - 谈谈 JWT Token 的安全策略 一.前言 众所周知,IdentityServer4 默认支持两种类型的 Token,一种是 Reference To ...