
Java并发编程 (四) 线程安全性
个人博客网:https://wushaopei.github.io/ (你想要这里多有)
一、线程安全性-原子性-atomic-1
1、线程安全性
定义: 当某个线程访问某个类时,不管运行时环境采用何种调度方式或者这些锦城南将如何交替执行,并且在主调代码中不需要任何额外的同步或协同,这个类都能表现出正确的行为,那么就称这个类是线程安全的。
特点:
原子性:提供了互斥访问,同一时刻只能有一个线程来对它进行操作
可见性:一个线程对主内存的修改可以及时的被其他线程观察到
有序性:一个线程观察其他线程中的指令执行顺序,由于指令 重排序的存在,该观察结果一般杂乱无序
2、原子性 - Atomic包
Atomic包下的类可以 实现线程并发的原子性,主要的类有:
① AtomicXXX : CAS 、Unsafe.compareAndSwapInt
② AtomicLong、LongAdder
3、AtomicXXX 案例实测
使用Atomic确保线程并发的原子性,代码演示:
package com.mmall.concurrency.example.count;

import com.mmall.concurrency.annoations.NoThreadSafe;

import lombok.extern.slf4j.Slf4j;

import java.util.concurrent.CountDownLatch;

import java.util.concurrent.ExecutorService;

import java.util.concurrent.Executors;

import java.util.concurrent.Semaphore;

import java.util.concurrent.atomic.AtomicInteger;

/**

 * @ClassName CountExample1

 * @Description TODO

 * @Author wushaopei

 * @Date 2019/10/30 17:10

 * @Version 1.0

 */

@Slf4j

@NoThreadSafe

public class CountExample2 {

    //请求总数

    public static int clientTotal = 5000;

    // 同时并发执行的线程数

    public static int threadTotal = 200;

    public static  AtomicInteger count = new AtomicInteger(0);

    public static void main(String[] args) throws InterruptedException {

        ExecutorService executorService = Executors.newCachedThreadPool();

        final Semaphore semaphore = new Semaphore(threadTotal);

        final CountDownLatch countDownLatch = new CountDownLatch(clientTotal);

        for (int i = 0 ; i < clientTotal ; i++){

            executorService.execute(()->{

                try {

                    semaphore.acquire();

                    add();

                    semaphore.release();

                }catch (Exception e){

                    log.error("exception",e);

                }

                countDownLatch.countDown();

            });

        }

        countDownLatch.await();

        executorService.shutdown();

        log.info("count:{}",count.get());

    }

    private static void  add(){

        count.incrementAndGet();

    }

}
执行结果:
17:14:59.658 [main] INFO com.mmall.concurrency.example.count.CountExample2 - count:5000

Process finished with exit code 0
由结果可知,无论执行多少次,count都是5000的值,说明了Atomic可以确保线程的安全性。
原理解析:
这里对add()方法所做的修改,即将count++改为count.incrementAndGet()是保证线程安全的主要原因!
从源码进行分析:
点击计入incrementAndGet( )类中:

由源码可知,incrementAndGet()方法里使用了一个叫unsafe的类,该类实现了一个getAndAddInt()的方法,

进入getAndAddInt方法进一步分析:

由源码可知,getAndAddInt方法内部调用了do-while循环结构,在while循环条件中,调用了compareAndSwapInt()方法,这是一个重点,进一步查看该方法:

由图中源码可知,该方法被native所修饰,这是代表是java底层的方法,而不是通过java去实现的。
分析getAndAddInt()方法源码:

这里传过来的var1对象值相当于案例中的 count 值,其中的var2 值则是当前的值。
compareAndSwapInt()方法的作用是,在count值时,var2=2和var5=2的值相同时,将他的值更新为后面的var5+var4的值。这里的var5是从底层取的。
安全原则示例:当var2=2,var4=4,进入do作用域中,调用this.getIntVolatile()方法进行修改,然后进入while循环,此时会对var2和var5进行判断,var2是上一次修改后被返回的校验字段,而var5则是对应保存在底层的校验字段,单线程执行时,每一次var5都会在执行compareAndSwapInt()方法后进行变更,即每一次var4+var5都会++;
重点:当程序并发请求,当前线程执行var2=2时,有其他线程抢夺CPU执行权执行了一次compareAndSwapInt()方法后,当前线程再获得锁进入执行compareAndSwapInt()方法后var5发生改变,被替换为var4+var5(2+1=3)的值,var2=2和var5=3(此时底层取的是3)是不同的值,校验不通过。此时var2的值会重新从 count中取值,当var2取值为3后,再与var5=3进行比较,比较通过后,再对var4+var5进行执行,结果为3+1=4 ; 逻辑依次循环判断,不断对底层值进行覆盖,从而保证执行线程的安全。
4、AtomicLong、LongAdder 案例实测
1)AtomicLong代码实例:
package com.mmall.concurrency.example.atomic;

import lombok.extern.slf4j.Slf4j;

import java.util.concurrent.CountDownLatch;

import java.util.concurrent.ExecutorService;

import java.util.concurrent.Executors;

import java.util.concurrent.Semaphore;

import java.util.concurrent.atomic.AtomicInteger;

import java.util.concurrent.atomic.AtomicLong;

/**

 * @ClassName AtomicExample1

 * @Description TODO

 * @Author wushaopei

 * @Date 2019/10/31 10:23

 * @Version 1.0

 */

@Slf4j

@ThreadSafe

public class AtomicExample2 {

    //请求总数

    public static int clientTotal = 5000;

    // 同时并发执行的线程数

    public static int threadTotal = 200;

    public static AtomicLong count = new AtomicLong(0);

    public static void main(String[] args) throws InterruptedException {

        ExecutorService executorService = Executors.newCachedThreadPool();

        final Semaphore semaphore = new Semaphore(threadTotal);

        final CountDownLatch countDownLatch = new CountDownLatch(clientTotal);

        for (int i = 0 ; i < clientTotal ; i++){

            executorService.execute(()->{

                try {

                    semaphore.acquire();

                    add();

                    semaphore.release();

                }catch (Exception e){

                    log.error("exception",e);

                }

                countDownLatch.countDown();

            });

        }

        countDownLatch.await();

        executorService.shutdown();

        log.info("count:{}",count);

    }

    private static void  add(){

        count.incrementAndGet();

    }

}
执行结果:
10:30:44.260 [main] INFO com.mmall.concurrency.example.atomic.AtomicExample2 - count:5000

Process finished with exit code 0
2)LongAdder代码实例:
package com.mmall.concurrency.example.atomic;

import lombok.extern.slf4j.Slf4j;

import java.util.concurrent.CountDownLatch;

import java.util.concurrent.ExecutorService;

import java.util.concurrent.Executors;

import java.util.concurrent.Semaphore;

import java.util.concurrent.atomic.AtomicLong;

import java.util.concurrent.atomic.LongAdder;

/**

 * @ClassName AtomicExample1

 * @Description TODO

 * @Author wushaopei

 * @Date 2019/10/31 10:23

 * @Version 1.0

 */

@Slf4j

@ThreadSafe

public class AtomicExample3 {

    //请求总数

    public static int clientTotal = 5000;

    // 同时并发执行的线程数

    public static int threadTotal = 200;

    public static LongAdder count = new LongAdder();

    public static void main(String[] args) throws InterruptedException {

        ExecutorService executorService = Executors.newCachedThreadPool();

        final Semaphore semaphore = new Semaphore(threadTotal);

        final CountDownLatch countDownLatch = new CountDownLatch(clientTotal);

        for (int i = 0 ; i < clientTotal ; i++){

            executorService.execute(()->{

                try {

                    semaphore.acquire();

                    add();

                    semaphore.release();

                }catch (Exception e){

                    log.error("exception",e);

                }

                countDownLatch.countDown();

            });

        }

        countDownLatch.await();

        executorService.shutdown();

        log.info("count:{}",count);

    }

    private static void  add(){

        count.increment();

    }

}
执行结果:
10:32:09.818 [main] INFO com.mmall.concurrency.example.atomic.AtomicExample3 - count:5000

Process finished with exit code 0
知识点:
对于普通类型的long、double变量,JVM允许将64位的读操作或写操作拆成两个32位的操作。
LongAdder的实现是基于什么思想?
LongAdder的核心是将核心数据分离;比如LongAdder内部的value分离成为一个数组,每个线程访问时通过hash等算法映射到其中一个数字进行计数,而最终的计数结果则为这个数组的求和累加,其中热点单元的数据会被分离为多个单元的shell,每个shell独自维护内部的值,当前对象的值由所有shell累计而成。这样的话,热点就进行了有效的分离并提高了并行度,这样一来LongAdder相当于在AtomicLong的基础上将单点的更新压力分散到各个节点上,在低并发的时候通过对base的值进行更新可以很好的保障和Atomic的性能基本一致,而在高并发的时候则通过分散提高了性能。
注意:实际在处理并发更新统计时,优先使用LongAdder。并发要求低时使用AtomicLong,效率高。
二、线程安全性-原子性-atomic-2
1、AtomicReference代码实例
package com.mmall.concurrency.example.atomic;

/**

 * @ClassName AtomicExample1

 * @Description TODO

 * @Author wushaopei

 * @Date 2019/10/31 10:23

 * @Version 1.0

 */

@Slf4j

@ThreadSafe

public class AtomicExample4 {

   private static AtomicReference<Integer> count = new AtomicReference<>(0);

    public static void main(String[] args) {

        count.compareAndSet(0,2); // 2

        count.compareAndSet(0,1); // no

        count.compareAndSet(1,3); // no

        count.compareAndSet(2,4); // 4

        count.compareAndSet(3,5); // no

        log.info("count:{}",count.get());

    }

}
执行结果:
10:55:53.811 [main] INFO com.mmall.concurrency.example.atomic.AtomicExample4 - count:4

Process finished with exit code 0
2、AtomicIntegerFieldUpdater代码实例
package com.mmall.concurrency.example.atomic;

import com.mmall.concurrency.annoations.ThreadSafe;

import lombok.Getter;

import lombok.extern.slf4j.Slf4j;

import java.util.concurrent.atomic.AtomicIntegerFieldUpdater;

import java.util.concurrent.atomic.AtomicReference;

/**

 * @ClassName AtomicExample1

 * @Description TODO

 * @Author wushaopei

 * @Date 2019/10/31 10:23

 * @Version 1.0

 */

@Slf4j

@ThreadSafe

public class AtomicExample5 {

    @Getter

    public volatile int count = 100;

    private static AtomicExample5 example5 = new AtomicExample5();

    private static AtomicIntegerFieldUpdater<AtomicExample5> updater = AtomicIntegerFieldUpdater.newUpdater(AtomicExample5.class,"count");

    public static void main(String[] args) {

        if (updater.compareAndSet(example5,100,120)){

            log.info("update success 1, {}",example5.getCount());

        }

        if (updater.compareAndSet(example5,100,120)){

            log.info("update success 2, {}",example5.getCount());

        }else {

            log.info("update failed,{}",example5.getCount());

        }

    }

}
执行结果:
11:02:48.170 [main] INFO com.mmall.concurrency.example.atomic.AtomicExample5 - update success 1, 120

11:02:48.177 [main] INFO com.mmall.concurrency.example.atomic.AtomicExample5 - update failed,120

Process finished with exit code 0
分析执行结果:
AtomicIntegerFieldUpdater的核心是根据原子性去更新某个类的实例,当前案例修改的是AtomicExample5 类的example5 的某一个字段 count;这里要求count 必须被volatile进行修饰;执行第一个compareAndSet方法时,compareAndSet方法中是将第二个变量100修改为第三个变量120,此时example5通过getCount()更新成了120;再执行第二个compareAndSet方法时,example5与100校验不相同,不执行当前compareAndSet方法,所以没有日志打印,流程进入到else中,打印 “update failed ,120 ”。
3、AtomicStampReference:CAS的ABA问题
关于ABA问题:
ABA问题是指在CAS操作的时候,其他线程将变量的值A改成了B,但是又改回了A,本线程使用期望值A与当前变量进行比较的时候,发现A变量没有变,于是CAS就将A值进行了交换操作,这个时候,其实该值已经被其他线程改变过,这与设计思想是不符合的。
因此,ABA问题的解决思路是:每次变量更新的时候,把变量的版本号加一,那么之前那个A改成B,再改成A,就会变成A变成1版本,改成B变成2版本,再改回A变成3版本,这个时候只要变量被某一个线程修改过,该变量对应的版本号就会发生过递增变化。从而解决了ABA问题。
package com.mmall.concurrency.example.atomic;

import com.mmall.concurrency.annoations.ThreadSafe;

import lombok.Getter;

import lombok.extern.slf4j.Slf4j;

import java.util.concurrent.CountDownLatch;

import java.util.concurrent.ExecutorService;

import java.util.concurrent.Executors;

import java.util.concurrent.Semaphore;

import java.util.concurrent.atomic.AtomicBoolean;

import java.util.concurrent.atomic.AtomicIntegerFieldUpdater;

import java.util.concurrent.atomic.AtomicLong;

/**

 * @ClassName AtomicExample1

 * @Description TODO

 * @Author wushaopei

 * @Date 2019/10/31 10:23

 * @Version 1.0

 */

@Slf4j

@ThreadSafe

public class AtomicExample6 {

    //请求总数

    public static int clientTotal = 5000;

    // 同时并发执行的线程数

    public static int threadTotal = 200;

    public static AtomicBoolean isHappened = new AtomicBoolean(false);

    public static void main(String[] args) throws InterruptedException {

        ExecutorService executorService = Executors.newCachedThreadPool();

        final Semaphore semaphore = new Semaphore(threadTotal);

        final CountDownLatch countDownLatch = new CountDownLatch(clientTotal);

        for (int i = 0 ; i < clientTotal ; i++){

            executorService.execute(()->{

                try {

                    semaphore.acquire();

                    test();

                    semaphore.release();

                }catch (Exception e){

                    log.error("exception",e);

                }

                countDownLatch.countDown();

            });

        }

        countDownLatch.await();

        executorService.shutdown();

        log.info("isHappened:{}",isHappened.get());

    }

    private static void test(){

        if (isHappened.compareAndSet(false,true)){

            log.info("execute");

        }

    }

}
执行结果:
11:25:55.399 [pool-1-thread-1] INFO com.mmall.concurrency.example.atomic.AtomicExample6 - execute

11:25:55.429 [main] INFO com.mmall.concurrency.example.atomic.AtomicExample6 - isHappened:true
结果分析:为什么声明了5000次线程,却只执行了一次?
因为AtomicBoolean的compareAndSet具有原子性,它可以保证从false变成true只有一次,之后的4999次在compareAndSet的判断当前值为true后,不会再执行变成true的操作。
使用场景: 让某一段代码只执行一次,而不会发生重复。
三、线程安全性-原子性-synchronized
原子性的实现是 加锁;而加锁的方式有两种:synchronized 、Lock
区别:
synchronized : 依赖JVM
Lock : 依赖特殊的CPU指令,代码实现,ReentrantLock
1、原子性 - synchronized
1)synchronized 的使用:
- 修饰代码块: 大括号括起来的代码,作用于调用的对象
- 修饰方法:整个方法,作用于调用的对象
- 修饰静态方法:整个静态方法,作用于所有对象
- 修饰类:括号括起来的部分,作用于所有对象
同步操作:
修饰代码块也叫同步代码块
修饰方法也叫同步方法
synchronized关键字代码演示:
2、同一对象的两个线程调用同步代码块:
package com.mmall.concurrency.example.sync;

import lombok.extern.slf4j.Slf4j;

import java.util.concurrent.ExecutorService;

import java.util.concurrent.Executors;

/**

 * @ClassName SynchronizedExample1

 * @Description TODO

 * @Author wushaopei

 * @Date 2019/10/31 14:11

 * @Version 1.0

 */

@Slf4j

public class SynchronizedExample1 {

    //修饰一个代码块

    //作用的对象是调用的对象

    public void test1(){

        synchronized (this){

            for (int i = 0 ; i < 10 ; i ++){

                log.info("test1 - {}",i);

            }

        }

    }

    //修饰一个方法

    public synchronized void test2(){

        for (int i = 0 ; i < 10 ; i ++){

            log.info("test - {}",i);

        }

    }

    public static void main(String[] args) {

        SynchronizedExample1 example1 = new SynchronizedExample1();

        ExecutorService executorService = Executors.newCachedThreadPool();

        //在不使用线程池的情况下,本身就是同步执行,synchronized修饰意义不大,

        //使用线程池后,存在两条线程,同时执行代码,在没有synchronized修饰时是并发异步的执行,交替穿插打印结果

        //使用synchronized修饰后,由于锁定的是当前对象example1,所以只有第一个线程执行完,第二个线程才会执行

        executorService.execute(()->{

            example1.test2();

        });

        executorService.execute(()->{

            example1.test2();

        });

    }

}
执行test1()同步方法,结果:
14:21:22.164 [pool-1-thread-1] INFO com.mmall.concurrency.example.sync.SynchronizedExample1 - test1 - 0

14:21:22.168 [pool-1-thread-1] INFO com.mmall.concurrency.example.sync.SynchronizedExample1 - test1 - 1

14:21:22.168 [pool-1-thread-1] INFO com.mmall.concurrency.example.sync.SynchronizedExample1 - test1 - 2

14:21:22.168 [pool-1-thread-1] INFO com.mmall.concurrency.example.sync.SynchronizedExample1 - test1 - 3

14:21:22.168 [pool-1-thread-1] INFO com.mmall.concurrency.example.sync.SynchronizedExample1 - test1 - 4

14:21:22.168 [pool-1-thread-1] INFO com.mmall.concurrency.example.sync.SynchronizedExample1 - test1 - 5

14:21:22.168 [pool-1-thread-1] INFO com.mmall.concurrency.example.sync.SynchronizedExample1 - test1 - 6

14:21:22.168 [pool-1-thread-1] INFO com.mmall.concurrency.example.sync.SynchronizedExample1 - test1 - 7

14:21:22.168 [pool-1-thread-1] INFO com.mmall.concurrency.example.sync.SynchronizedExample1 - test1 - 8

14:21:22.168 [pool-1-thread-1] INFO com.mmall.concurrency.example.sync.SynchronizedExample1 - test1 - 9

14:21:22.168 [pool-1-thread-2] INFO com.mmall.concurrency.example.sync.SynchronizedExample1 - test1 - 0

14:21:22.168 [pool-1-thread-2] INFO com.mmall.concurrency.example.sync.SynchronizedExample1 - test1 - 1

14:21:22.168 [pool-1-thread-2] INFO com.mmall.concurrency.example.sync.SynchronizedExample1 - test1 - 2

14:21:22.168 [pool-1-thread-2] INFO com.mmall.concurrency.example.sync.SynchronizedExample1 - test1 - 3

14:21:22.168 [pool-1-thread-2] INFO com.mmall.concurrency.example.sync.SynchronizedExample1 - test1 - 4

14:21:22.168 [pool-1-thread-2] INFO
由结果可知,先执行完线程1的test1-0到test1-9,再执行线程2的test0到test9
执行test2()同步方法
    executorService.execute(()->{

        example1.test2();

    });

    executorService.execute(()->{

        example1.test2();

    });
运行test2()方法,打印结果:
14:24:17.003 [pool-1-thread-1] INFO com.mmall.concurrency.example.sync.SynchronizedExample1 - test2 - 0

14:24:17.008 [pool-1-thread-1] INFO com.mmall.concurrency.example.sync.SynchronizedExample1 - test2 - 1

14:24:17.008 [pool-1-thread-1] INFO com.mmall.concurrency.example.sync.SynchronizedExample1 - test2 - 2

14:24:17.008 [pool-1-thread-1] INFO com.mmall.concurrency.example.sync.SynchronizedExample1 - test2 - 3

14:24:17.008 [pool-1-thread-1] INFO com.mmall.concurrency.example.sync.SynchronizedExample1 - test2 - 4

14:24:17.008 [pool-1-thread-1] INFO com.mmall.concurrency.example.sync.SynchronizedExample1 - test2 - 5

14:24:17.008 [pool-1-thread-1] INFO com.mmall.concurrency.example.sync.SynchronizedExample1 - test2 - 6

14:24:17.008 [pool-1-thread-1] INFO com.mmall.concurrency.example.sync.SynchronizedExample1 - test2 - 7

14:24:17.008 [pool-1-thread-1] INFO com.mmall.concurrency.example.sync.SynchronizedExample1 - test2 - 8

14:24:17.008 [pool-1-thread-1] INFO com.mmall.concurrency.example.sync.SynchronizedExample1 - test2 - 9

14:24:17.008 [pool-1-thread-2] INFO com.mmall.concurrency.example.sync.SynchronizedExample1 - test2 - 0

14:24:17.008 [pool-1-thread-2] INFO com.mmall.concurrency.example.sync.SynchronizedExample1 - test2 - 1

14:24:17.008 [pool-1-thread-2] INFO com.mmall.concurrency.example.sync.SynchronizedExample1 - test2 - 2
由结果可知,先执行完线程1的test2-0到test2-9,再执行线程2的test2-0到test2-9
3、不同对象调用同步代码块:
public void test1(int j){

    synchronized (this){

        for (int i = 0 ; i < 10 ; i ++){

            log.info("test1 {} - {}",j,i);

        }

    }

}

public static void main(String[] args) {

    SynchronizedExample1 example1 = new SynchronizedExample1();

    SynchronizedExample1 example2 = new SynchronizedExample1();

    ExecutorService executorService = Executors.newCachedThreadPool();

executorService.execute(()->{

        example1.test1(1);

    });

    executorService.execute(()->{

        example2.test1(2);

    });

}
执行结果:
14:31:42.315 [pool-1-thread-1] INFO com.mmall.concurrency.example.sync.SynchronizedExample1 - test1 1 - 0

14:31:42.315 [pool-1-thread-2] INFO com.mmall.concurrency.example.sync.SynchronizedExample1 - test1 2 - 0

14:31:42.320 [pool-1-thread-1] INFO com.mmall.concurrency.example.sync.SynchronizedExample1 - test1 1 - 1

14:31:42.320 [pool-1-thread-2] INFO com.mmall.concurrency.example.sync.SynchronizedExample1 - test1 2 - 1

14:31:42.320 [pool-1-thread-1] INFO com.mmall.concurrency.example.sync.SynchronizedExample1 - test1 1 - 2

14:31:42.320 [pool-1-thread-1] INFO com.mmall.concurrency.example.sync.SynchronizedExample1 - test1 1 - 3

14:31:42.320 [pool-1-thread-2] INFO com.mmall.concurrency.example.sync.SynchronizedExample1 - test1 2 - 2

14:31:42.320 [pool-1-thread-1] INFO com.mmall.concurrency.example.sync.SynchronizedExample1 - test1 1 - 4

14:31:42.320 [pool-1-thread-2] INFO com.mmall.concurrency.example.sync.SynchronizedExample1 - test1 2 - 3

14:31:42.320 [pool-1-thread-1] INFO com.mmall.concurrency.example.sync.SynchronizedExample1 - test1 1 - 5

14:31:42.320 [pool-1-thread-2] INFO com.mmall.concurrency.example.sync.SynchronizedExample1 - test1 2 - 4

14:31:42.321 [pool-1-thread-2] INFO com.mmall.concurrency.example.sync.SynchronizedExample1 - test1 2 - 5

14:31:42.321 [pool-1-thread-1] INFO com.mmall.concurrency.example.sync.SynchronizedExample1 - test1 1 - 6

14:31:42.321 [pool-1-thread-2] INFO com.mmall.concurrency.example.sync.SynchronizedExample1 - test1 2 - 6

14:31:42.321 [pool-1-thread-2] INFO com.mmall.concurrency.example.sync.SynchronizedExample1 - test1 2 - 7

14:31:42.321 [pool-1-thread-1] INFO com.mmall.concurrency.example.sync.SynchronizedExample1 - test1 1 - 7

14:31:42.321 [pool-1-thread-2] INFO com.mmall.concurrency.example.sync.SynchronizedExample1 - test1 2 - 8

14:31:42.321 [pool-1-thread-1] INFO com.mmall.concurrency.example.sync.SynchronizedExample1 - test1 1 - 8

14:31:42.321 [pool-1-thread-2] INFO com.mmall.concurrency.example.sync.SynchronizedExample1 - test1 2 - 9

14:31:42.321 [pool-1-thread-1] INFO com.mmall.concurrency.example.sync.SynchronizedExample1 - test1 1 - 9
由结果可知,两个不同的对象调用同步代码块时,它们的结果是互相不影响的。
执行test2()同步方法,
//修饰一个方法

public synchronized void test2(int j){

    for (int i = 0 ; i < 10 ; i ++){

        log.info("test2 {} - {}",j,i);

    }

}

executorService.execute(()->{

    example1.test2(1);

});

executorService.execute(()->{

    example2.test2(2);

});
执行结果:
14:37:14.704 [pool-1-thread-2] INFO com.mmall.concurrency.example.sync.SynchronizedExample1 - test2 2 - 0

14:37:14.704 [pool-1-thread-1] INFO com.mmall.concurrency.example.sync.SynchronizedExample1 - test2 1 - 0

14:37:14.708 [pool-1-thread-1] INFO com.mmall.concurrency.example.sync.SynchronizedExample1 - test2 1 - 1

14:37:14.708 [pool-1-thread-2] INFO com.mmall.concurrency.example.sync.SynchronizedExample1 - test2 2 - 1

14:37:14.708 [pool-1-thread-1] INFO com.mmall.concurrency.example.sync.SynchronizedExample1 - test2 1 - 2

14:37:14.708 [pool-1-thread-2] INFO com.mmall.concurrency.example.sync.SynchronizedExample1 - test2 2 - 2

14:37:14.708 [pool-1-thread-1] INFO com.mmall.concurrency.example.sync.SynchronizedExample1 - test2 1 - 3

14:37:14.708 [pool-1-thread-2] INFO com.mmall.concurrency.example.sync.SynchronizedExample1 - test2 2 - 3

14:37:14.708 [pool-1-thread-1] INFO com.mmall.concurrency.example.sync.SynchronizedExample1 - test2 1 - 4

14:37:14.708 [pool-1-thread-2] INFO com.mmall.concurrency.example.sync.SynchronizedExample1 - test2 2 - 4

14:37:14.708 [pool-1-thread-1] INFO com.mmall.concurrency.example.sync.SynchronizedExample1 - test2 1 - 5

14:37:14.708 [pool-1-thread-2] INFO com.mmall.concurrency.example.sync.SynchronizedExample1 - test2 2 - 5

14:37:14.708 [pool-1-thread-1] INFO com.mmall.concurrency.example.sync.SynchronizedExample1 - test2 1 - 6

14:37:14.708 [pool-1-thread-2] INFO com.mmall.concurrency.example.sync.SynchronizedExample1 - test2 2 - 6

14:37:14.708 [pool-1-thread-1] INFO com.mmall.concurrency.example.sync.SynchronizedExample1 - test2 1 - 7

14:37:14.708 [pool-1-thread-1] INFO com.mmall.concurrency.example.sync.SynchronizedExample1 - test2 1 - 8

14:37:14.708 [pool-1-thread-2] INFO com.mmall.concurrency.example.sync.SynchronizedExample1 - test2 2 - 7

14:37:14.708 [pool-1-thread-1] INFO com.mmall.concurrency.example.sync.SynchronizedExample1 - test2 1 - 9

14:37:14.708 [pool-1-thread-2] INFO com.mmall.concurrency.example.sync.SynchronizedExample1 - test2 2 - 8

14:37:14.708 [pool-1-thread-2] INFO com.mmall.concurrency.example.sync.SynchronizedExample1 - test2 2 - 9
有结果可知,两个不同的对象调用同步方法时,它们的结果是互相不影响的。
4、静态同步方法、静态同步代码块:
package com.mmall.concurrency.example.sync;

import lombok.extern.slf4j.Slf4j;

import java.util.concurrent.ExecutorService;

import java.util.concurrent.Executors;

/**

 * @ClassName SynchronizedExample1

 * @Description TODO

 * @Author wushaopei

 * @Date 2019/10/31 14:11

 * @Version 1.0

 */

@Slf4j

public class SynchronizedExample2 {

    //修饰一个代码块

    //作用的对象是调用的对象

    public static void test1(int j){

         synchronized  (SynchronizedExample2.class){

            for (int i = 0 ; i < 10 ; i ++){

                log.info("test1 {} - {}",j,i);

            }

        }

    }

    //修饰一个静态方法

    public static synchronized void test2(int j){

        for (int i = 0 ; i < 10 ; i ++){

            log.info("test2 {} - {}",j,i);

        }

    }

    public static void main(String[] args) {

        SynchronizedExample2 example1 = new SynchronizedExample2();

        SynchronizedExample2 example2 = new SynchronizedExample2();

        ExecutorService executorService = Executors.newCachedThreadPool();

        executorService.execute(()->{

            example1.test2(1);

        });

        executorService.execute(()->{

            example2.test2(2);

        });

    }

}
静态同步代码块测试结果:
14:46:52.930 [pool-1-thread-1] INFO com.mmall.concurrency.example.sync.SynchronizedExample2 - test1 1 - 0

14:46:52.935 [pool-1-thread-1] INFO com.mmall.concurrency.example.sync.SynchronizedExample2 - test1 1 - 1

14:46:52.935 [pool-1-thread-1] INFO com.mmall.concurrency.example.sync.SynchronizedExample2 - test1 1 - 2

14:46:52.935 [pool-1-thread-1] INFO com.mmall.concurrency.example.sync.SynchronizedExample2 - test1 1 - 3

14:46:52.935 [pool-1-thread-1] INFO com.mmall.concurrency.example.sync.SynchronizedExample2 - test1 1 - 4

14:46:52.935 [pool-1-thread-1] INFO com.mmall.concurrency.example.sync.SynchronizedExample2 - test1 1 - 5

14:46:52.935 [pool-1-thread-1] INFO com.mmall.concurrency.example.sync.SynchronizedExample2 - test1 1 - 6

14:46:52.935 [pool-1-thread-1] INFO com.mmall.concurrency.example.sync.SynchronizedExample2 - test1 1 - 7

14:46:52.935 [pool-1-thread-1] INFO com.mmall.concurrency.example.sync.SynchronizedExample2 - test1 1 - 8

14:46:52.935 [pool-1-thread-1] INFO com.mmall.concurrency.example.sync.SynchronizedExample2 - test1 1 - 9

14:46:52.935 [pool-1-thread-2] INFO com.mmall.concurrency.example.sync.SynchronizedExample2 - test1 2 - 0

14:46:52.935 [pool-1-thread-2] INFO com.mmall.concurrency.example.sync.SynchronizedExample2 - test1 2 - 1

14:46:52.935 [pool-1-thread-2] INFO com.mmall.concurrency.example.sync.SynchronizedExample2 - test1 2 - 2

14:46:52.935 [pool-1-thread-2] INFO com.mmall.concurrency.example.sync.SynchronizedExample2 - test1 2 - 3

14:46:52.935 [pool-1-thread-2] INFO com.mmall.concurrency.example.sync.SynchronizedExample2 - test1 2 - 4

14:46:52.935 [pool-1-thread-2] INFO com.mmall.concurrency.example.sync.SynchronizedExample2 - test1 2 - 5

14:46:52.935 [pool-1-thread-2] INFO com.mmall.concurrency.example.sync.SynchronizedExample2 - test1 2 - 6

14:46:52.935 [pool-1-thread-2] INFO com.mmall.concurrency.example.sync.SynchronizedExample2 - test1 2 - 7

14:46:52.935 [pool-1-thread-2] INFO com.mmall.concurrency.example.sync.SynchronizedExample2 - test1 2 - 8

14:46:52.935 [pool-1-thread-2] INFO com.mmall.concurrency.example.sync.SynchronizedExample2 - test1 2 - 9
静态同步方法测试结果:
14:43:19.042 [pool-1-thread-1] INFO com.mmall.concurrency.example.sync.SynchronizedExample2 - test2 1 - 0

14:43:19.046 [pool-1-thread-1] INFO com.mmall.concurrency.example.sync.SynchronizedExample2 - test2 1 - 1

14:43:19.046 [pool-1-thread-1] INFO com.mmall.concurrency.example.sync.SynchronizedExample2 - test2 1 - 2

14:43:19.046 [pool-1-thread-1] INFO com.mmall.concurrency.example.sync.SynchronizedExample2 - test2 1 - 3

14:43:19.046 [pool-1-thread-1] INFO com.mmall.concurrency.example.sync.SynchronizedExample2 - test2 1 - 4

14:43:19.046 [pool-1-thread-1] INFO com.mmall.concurrency.example.sync.SynchronizedExample2 - test2 1 - 5

14:43:19.046 [pool-1-thread-1] INFO com.mmall.concurrency.example.sync.SynchronizedExample2 - test2 1 - 6

14:43:19.046 [pool-1-thread-1] INFO com.mmall.concurrency.example.sync.SynchronizedExample2 - test2 1 - 7

14:43:19.046 [pool-1-thread-1] INFO com.mmall.concurrency.example.sync.SynchronizedExample2 - test2 1 - 8

14:43:19.046 [pool-1-thread-1] INFO com.mmall.concurrency.example.sync.SynchronizedExample2 - test2 1 - 9

14:43:19.046 [pool-1-thread-2] INFO com.mmall.concurrency.example.sync.SynchronizedExample2 - test2 2 - 0

14:43:19.046 [pool-1-thread-2] INFO com.mmall.concurrency.example.sync.SynchronizedExample2 - test2 2 - 1

14:43:19.047 [pool-1-thread-2] INFO com.mmall.concurrency.example.sync.SynchronizedExample2 - test2 2 - 2

14:43:19.047 [pool-1-thread-2] INFO com.mmall.concurrency.example.sync.SynchronizedExample2 - test2 2 - 3

14:43:19.047 [pool-1-thread-2] INFO com.mmall.concurrency.example.sync.SynchronizedExample2 - test2 2 - 4

14:43:19.047 [pool-1-thread-2] INFO com.mmall.concurrency.example.sync.SynchronizedExample2 - test2 2 - 5

14:43:19.047 [pool-1-thread-2] INFO com.mmall.concurrency.example.sync.SynchronizedExample2 - test2 2 - 6

14:43:19.047 [pool-1-thread-2] INFO com.mmall.concurrency.example.sync.SynchronizedExample2 - test2 2 - 7

14:43:19.047 [pool-1-thread-2] INFO com.mmall.concurrency.example.sync.SynchronizedExample2 - test2 2 - 8

14:43:19.047 [pool-1-thread-2] INFO com.mmall.concurrency.example.sync.SynchronizedExample2 - test2 2 - 9

Process finished with exit code 0
5、对并发执行增加操作线程使用synchronized修饰:
@Slf4j

@ThreadSafe

public class CountExample3 {

    //请求总数

    public static int clientTotal = 5000;

    // 同时并发执行的线程数

    public static int threadTotal = 200;

    public static int count = 0;

    public static void main(String[] args) throws InterruptedException {

        ExecutorService executorService = Executors.newCachedThreadPool();

        final Semaphore semaphore = new Semaphore(threadTotal);

        final CountDownLatch countDownLatch = new CountDownLatch(clientTotal);

        for (int i = 0 ; i < clientTotal ; i++){

            executorService.execute(()->{

                try {

                    semaphore.acquire();

                    add();

                    semaphore.release();

                }catch (Exception e){

                    log.error("exception",e);

                }

                countDownLatch.countDown();

            });

        }

        countDownLatch.await();

        executorService.shutdown();

        log.info("count:{}",count);

    }

    //同步方法锁 --- synchronized

    private synchronized static void  add(){

        count ++;

    }

}
14:49:18.636 [main] INFO com.mmall.concurrency.example.count.CountExample3 - count:5000

Process finished with exit code 0
由执行结果可知,count符合执行的要求,说明当前程序是线程安全的
6、原子性 - 对比
synchronized : 不可中断锁,适合竞争不激烈,可读性好
Lock : 可中断锁,多样化同步,竞争激烈时能维持常态
Atomic : 竞争激烈时能维持常态,比Lock性能好;只能同步一个值
四、线程安全性-可见性
可见性:一个线程对主内存的修改可以及时的被其他线程观察到
1、导致共享变量在线程间不可见的原因
- 线程交叉执行
- 重排序结合线程交叉执行
- 共享变量更新后的值没有在工作内存与主存间及时更新
保证线程可见性的方法 —— synchronized 、volatile
2、JMM关于synchronized的两条规定
- 线程解锁前,必须把共享变量的最新值刷新到主内存
- 线程加锁时,将清空工作内存中共享变量的值,从而使用共享变量时需要从主内存中重新读取最新的值(注意,加锁与解锁是同一把锁)
3、可见性 - volatile
volatile实现内存可见性的原理:通过加入内存屏障和禁止重排序优化来实现
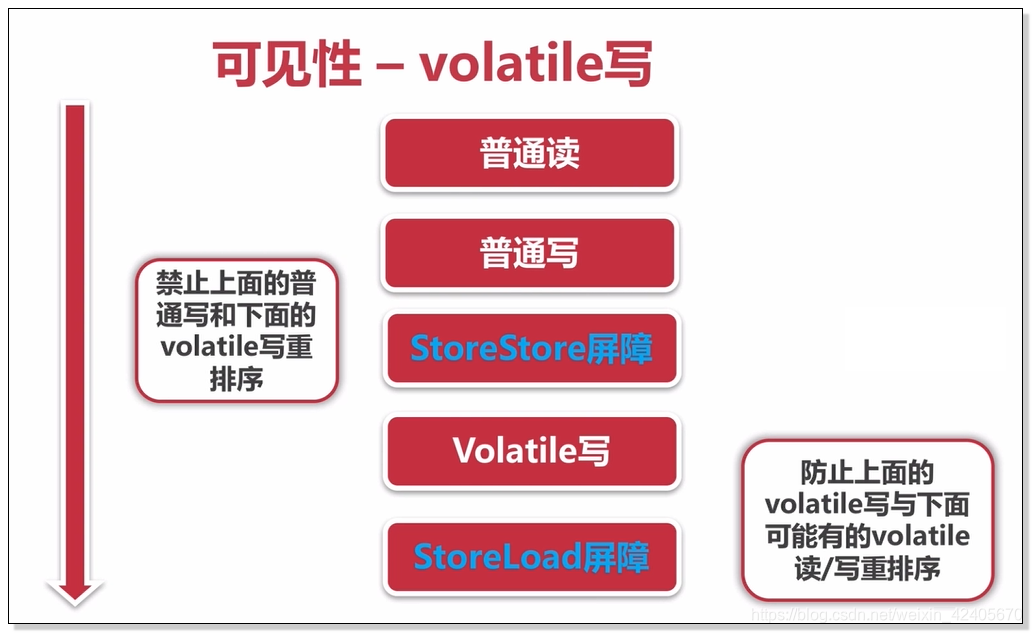
① 对volatile变量写操作时,会在写操作后加入一条store屏障指令,将本地内存中的共享变量值刷新到主内存
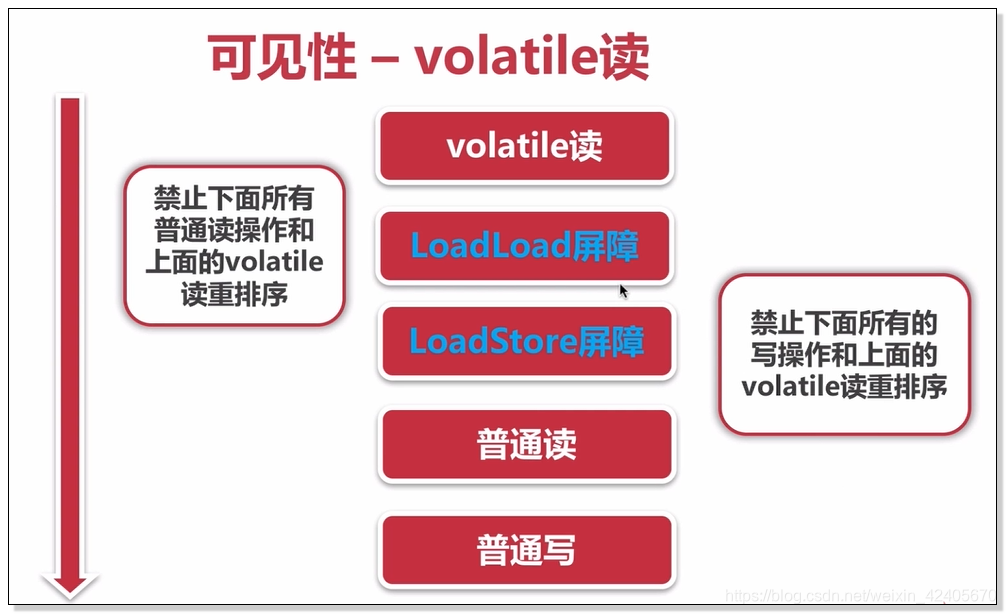
② 对volatile变量读操作时,会在读操作前加入一条load屏障指令,从主内存中读取共享变量
4、Volatile 代码示例
public class CountExample4 {

    //请求总数

    public static int clientTotal = 5000;

    // 同时并发执行的线程数

    public static int threadTotal = 200;

    public static volatile int count = 0;

    public static void main(String[] args) throws InterruptedException {

        ExecutorService executorService = Executors.newCachedThreadPool();

        final Semaphore semaphore = new Semaphore(threadTotal);

        final CountDownLatch countDownLatch = new CountDownLatch(clientTotal);

        for (int i = 0 ; i < clientTotal ; i++){

            executorService.execute(()->{

                try {

                    semaphore.acquire();

                    add();

                    semaphore.release();

                }catch (Exception e){

                    log.error("exception",e);

                }

                countDownLatch.countDown();

            });

        }

        countDownLatch.await();

        executorService.shutdown();

        log.info("count:{}",count);

    }

    private static void  add(){

        count ++;

    }

}
执行结果:
15:04:05.623 [main] INFO com.mmall.concurrency.example.count.CountExample4 - count:4922

Process finished with exit code 0
由结果可知,count小于5000,说明当前线程依旧是不安全的
结果说明了直接使用volatile做加操作,是线程不安全的;同时也说明了volatile不具有原子性。
5、Volatile适合什么样的场景?
使用volatile必须具备两个条件:
- 对变量的写操作不依赖于当前值;
- 该变量没有包含在具有其他变量的独变量的式子中。
6、volatile代码片段分析:
 volatile boolean inited = false;

 //线程1:

 context = loadContext();

 inited = true;

 //线程2:

 while(!inited){

    sleep():

 }

 doSomethingWithConfig(context);
分析:当线程1初始化完成后,inited变为true,此时线程2的while会!Inited变为false,知道了线程1初始化已经完成,可以继续从主内存读取变量值并执行相应的业务。这时候线程2去使用初始化好的context就不会出问题了。
五、线程安全性-有序性与总结
1、有序性
定义: Java内存模型中,允许编译器和处理器对指令进行重排序,但是重排序过程不会影响到单线程程序的执行,却会影响到多线程并发执行的正确性;
实现方式: volatile 、synchronized、Lock
2、有序性 - happens - before原则
程序次序规则:一个线程内,按照代码顺序,书写在前面的操作先行发生于书写在后面的操作;
锁定规则: 一个unlOCK操作先行发生于后面对同一个锁的lock操作
volatile变量你规则: 对一个变量的写操作先行发生于后面对这个变量的读操作
传递规则:如果操作A线性发生于操作B,而操作B又先行发生于操作C,则可以得出操作A先行发生于操作C
线程启动规则: Thread对象的start()方法先行于发生于此线程的每一个动作
线程中断规则:对线程interrupt()方法的调用先行发生于被中断线程的代码检测到中断事件的发生
线程终结规则:线程中所有的操作都先行发生于线程的终止检测,我们可以通过Thread.join()方法结束 、 Thread.isAlive()的返回值手段检测到线程已经终止执行
对象终结规则:一个对象的初始化完成先行发生于它的finalize()方法的开始
小结 :
原子性 : Atomic包、CAS算法、synchronized、Lock
可见性:synchronized 、volatile
有序性:happens-before
Java并发编程 (四) 线程安全性的更多相关文章
- JAVA并发编程之线程安全性
1.一个对象是否是线程安全的,取决于它是否被多个线程访问.想要使得线程安全,需要通过同步机制来协同对对象可变状态的访问. 2.修复多线程访问可变状态变量出现的错误:1.程序间不共享状态变量 2.状态变 ...
- Java并发编程 (五) 线程安全性
个人博客网:https://wushaopei.github.io/ (你想要这里多有) 一.安全发布对象-发布与逸出 1.发布与逸出定义 发布对象 : 使一个对象能够被当前范围之外的代码所使用 ...
- Java并发编程:线程池的使用
Java并发编程:线程池的使用 在前面的文章中,我们使用线程的时候就去创建一个线程,这样实现起来非常简便,但是就会有一个问题: 如果并发的线程数量很多,并且每个线程都是执行一个时间很短的任务就结束了, ...
- Java并发编程:线程池的使用(转)
Java并发编程:线程池的使用 在前面的文章中,我们使用线程的时候就去创建一个线程,这样实现起来非常简便,但是就会有一个问题: 如果并发的线程数量很多,并且每个线程都是执行一个时间很短的任务就结束了, ...
- Java并发编程:线程控制
在上一篇文章中(Java并发编程:线程的基本状态)我们介绍了线程状态的 5 种基本状态以及线程的声明周期.这篇文章将深入讲解Java如何对线程进行状态控制,比如:如何将一个线程从一个状态转到另一个状态 ...
- Java 并发编程:线程间的协作(wait/notify/sleep/yield/join)
Java并发编程系列: Java 并发编程:核心理论 Java并发编程:Synchronized及其实现原理 Java并发编程:Synchronized底层优化(轻量级锁.偏向锁) Java 并发编程 ...
- Java并发编程:线程池的使用(转载)
转载自:https://www.cnblogs.com/dolphin0520/p/3932921.html Java并发编程:线程池的使用 在前面的文章中,我们使用线程的时候就去创建一个线程,这样实 ...
- Java并发编程:线程池的使用(转载)
文章出处:http://www.cnblogs.com/dolphin0520/p/3932921.html Java并发编程:线程池的使用 在前面的文章中,我们使用线程的时候就去创建一个线程,这样实 ...
- [转]Java并发编程:线程池的使用
Java并发编程:线程池的使用 在前面的文章中,我们使用线程的时候就去创建一个线程,这样实现起来非常简便,但是就会有一个问题: 如果并发的线程数量很多,并且每个线程都是执行一个时间很短的任务就结束了, ...
随机推荐
- Spring源码阅读 之 搭建源码阅读环境(IDEA)
检出源码: GitHub:https://github.com/spring-projects/spring-framework.git 可以按如下步骤:(须确保Git已正确安装) Git正确安装后, ...
- Kafka的参数调优
这篇文章主要说一下在生产过程中的kafka常用的调优参数, 首先kafka的版本是0.9.0.1,针对以下几个方面来说, 针对kafka的堆内存: 针对kafka的集群调优: kafka的的消息机制有 ...
- 05_CSS入门和高级技巧(3)
上节课复习 !important不能影响就近原则,远的标签如果加上!important也干不过近的标签! !important不能影响继承权重是0,通过继承的标签加上!important也干不过直接选 ...
- JDK/Java 14 发布
3 月 17 日,JDK/Java 14 正式 GA. 此版本包含的 JEP(Java/JDK Enhancement Proposals,JDK 增强提案)比 Java 12 和 13 加起来的还要 ...
- Vue3语法快速入门以及写一个倒计时组件
Vue3写一个倒计时组件 vue3 beta版本发布已有一段时间了,文档也大概看了一下,不过对于学一门技术,最好的方法还是实战,于是找了一个比较简单的组件用vue3来实现,参考的是vant的count ...
- flink优化总结
一.高性能Flink SQL优化技巧 1.Group Aggregate优化技巧 开启MicroBatch或MiniBatch(提升吞吐) MicroBatch和MiniBatch都是微批处理,只是微 ...
- CentOS7.2 安装 MongoDB 3.4
服务器版本 CentOS7.2 MongoDB版本 3.4 1/ 下载所需资源 阿里镜像地址 http://mirrors.aliyun.com/mongodb/yum/redhat/7/mongod ...
- 手把手教系列之IIR滤波器设计
[导读]:在嵌入式系统中经常需要采集模拟信号,采集模拟信号的信号链中难免引入干扰,那么如何滤除干扰呢?今天就来个一步一步描述如何设计部署一个IIR滤波器到你的系统. 何为IIR滤波器? 无限冲激响应( ...
- 计算机组成及系统结构-第九章 输入输出(I/O)设备
输入输出(I/O)设备 一.外部设备概述 二.输入设备 1.键盘 2.光笔.图形板和画笔(或游动标)输入 3.鼠标.跟踪球和操作杆输入 4.触摸屏 5.图像输入设备 6.条形码 7.光学字符识别(OC ...
- Spring初学笔记(二):Bean的注入
关于Bean的注入 在上一篇中,已经说到虽然注入确实可以降低类与类之间的耦合,但并没有解决调用者必须知道类的创建方法的问题,也可以说是没有实现调用者与类实现的解耦,我们也提到,为了实现两者的解耦,可以 ...