
android LinearLayout
Android的布局方式共有6种,分别是LinearLayout(线性布局)、TableLayout(表格布局)、FrameLayout(帧布局)、RelativeLayout(相对布局)、GridLayout(网格布局)以及AbsoluteLayout(绝对布局)。
LinearLayout 常用属性介绍
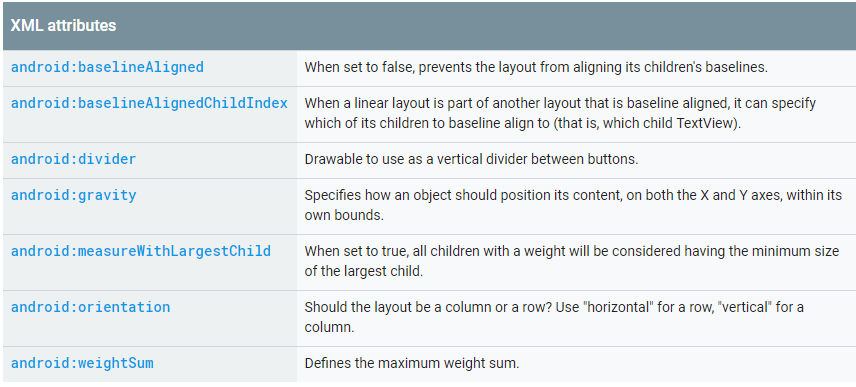
android:baselineAligned: 基准线对齐,默认为true.当设置为false时,布局文件和它的孩子的基准线不对齐。
android:baselineAlignedChildIndex:当作为layout的子控件时,设置自己的第几(0开始)个子文本(必须是文本),和外面layout内元素的基准线对其
android:measureWithLargestChild:
android:divider:分割线
android:weightSum:总权重和,即页面剩余的划分。和子控件的weight配合实现页面效果
android:orientation:horizontal(水平:0),vertical(垂直分布:1)
注意:水平不会换行,超出屏幕被隐藏
android:gravity
设置布局管理器内组件的对齐方式,该属性值可设为 top(顶部对齐) 、bottom(底部对齐) 、left(左对齐) 、right(右对齐) 、center_vertical(垂直方向居中) 、 fill_vertical(垂直方向填充) 、 center_horizontal(水平方向居中) 、 fill_horizontal(水平方向填充) 、center(垂直与水平方向都居中) 、 fill (填充)、 clip_vertical(垂直方向裁剪) 、 clip_horizontal(水平方向裁剪) 。
可同时指定多种对其方式的组合,中间用“|”连接,如下方代码设置对齐方式为 left|center_vertical 表示出现在屏幕左边且垂直居中,
<!--

    第一个线性布局, 我们可以视为html中的div,用于对于整个界面进行布局

    这里面 xmlns:android和xmlns:tools指定的是xml文件的命名空间,不是对布局的主要设置

    但是要有

    android:layout_width="match_parent"指的是当前的线性布局宽度占整个父元素,这里相对于

    当前的线性布局父元素为当前的窗体,所以宽度占满窗体

    android:layout_height="match_parent"指的是当前的线性布局高度占整个父元素,这里相对于

    当前的线性布局父元素为当前的窗体,所以高度占满窗体

    tools:context="com.example.activitylife.MainActivity":用于指定渲染上下文

    android:orientation="vertical":指的是当前控件为垂直摆放

-->

<LinearLayout xmlns:android="http://schemas.android.com/apk/res/android"

    xmlns:tools="http://schemas.android.com/tools"

    android:layout_width="match_parent"

    android:layout_height="match_parent"

    tools:context="com.example.activitylife.MainActivity"

    android:orientation="vertical">

</LinearLayout>
1.android:baselineAligned 属性
baselineAligned:基准线对齐。
首先要解释什么是基准线,这个在中文中不常见,但在以字母为书写语言的其他国家非常常见,尤其是英文
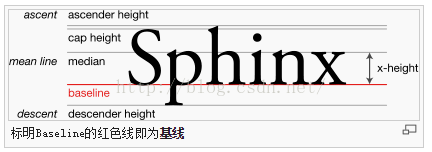
如上图所示,红线就是基线(baseline),是不是很熟悉,这不就是我们经常写英文的四条线中的第三条吗。

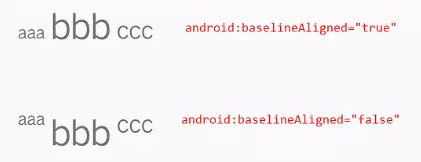
那baselineAligned是做什么用的呢?根据官方文档,baselineAligned默认设置为true,当设置为false时,
布局文件和它的孩子的基准线不对齐。
举个栗子:
这是将baselineAligned值设置为false时,也就是不对齐。把baselineAligned值改为true,就是对齐。
2、android:baselineAlignedChildIndex属性:
线性布局(LinearLayout)中使用,设置LinearLayout中第几个(从0开始计数)子组件作为基线对齐的控件,来和LinearLayout外的基线对齐。
android:baselineAlignedChildIndex对应的view必须是可以显示文字的View
测试代码
    <LinearLayout xmlns:android="http://schemas.android.com/apk/res/android"

                  android:layout_width="match_parent"

                  android:layout_height="match_parent"

                  android:orientation="horizontal">

        <TextView

            android:layout_width="wrap_content"

            android:layout_height="wrap_content"

            android:text="aaa"

            android:textSize="20sp"/>

        <!--测试LinearLayout-->

        <LinearLayout

            android:layout_width="wrap_content"

            android:layout_height="wrap_content"

            android:layout_marginLeft="10dp"

            android:orientation="vertical">

            <TextView

                android:layout_width="wrap_content"

                android:layout_height="wrap_content"

                android:text="fdfdfdf"/>

            <ImageView

                android:layout_width="wrap_content"

                android:layout_height="wrap_content"

                android:src="@mipmap/ic_launcher"/>

            <TextView

                android:layout_width="wrap_content"

                android:layout_height="wrap_content"

                android:text="rgtgtgtgt"/>

        </LinearLayout>

        <TextView

            android:layout_width="wrap_content"

            android:layout_height="wrap_content"

            android:layout_marginLeft="10dp"

            android:text="ffsdfr"

            android:textSize="40sp"/>

    </LinearLayout>
1 、测试LinearLayout不设置android:baselineAlignedChildIndex时,只
![Uploading 1489473079(1)_583231.jpg . . .]
有前后TextView基线对其

2、测试LinearLayout设置android:baselineAlignedChildIndex=0,对应view为TextVIew时

3、测试LinearLayout设置android:baselineAlignedChildIndex=1,对应view为ImageView时,崩溃了,异常现象如下,不能对不是文本的进行设置基准线的对齐

4、测试LinearLayout设置android:baselineAlignedChildIndex=2,对应view为TextView时

3、weightSum 属性
weightSum属性与weight属性有很大关系,通过weightSum控制weight的最大占比。比如我们这样设置 :
<LinearLayout xmlns:android="http://schemas.android.com/apk/res/android"

    android:layout_width="match_parent"

    android:layout_height="match_parent"

    android:weightSum=""

    android:orientation="horizontal">

    <TextView

        android:layout_width="wrap_content"

        android:layout_height="wrap_content"

        android:gravity="center"

        android:layout_weight=""

        android:background="#FF0000"

        android:text="text1" />

    <TextView

        android:layout_width="wrap_content"

        android:layout_height="wrap_content"

        android:gravity="center"

        android:layout_weight=""

        android:background="#00FF00"

        android:text="text2" />

</LinearLayout>

text1与text2本来是一样的weight,可是结果它们都没有撑满屏幕。因为weightSum="3",也就是说text1、text2占用的宽度是 (text1文本宽度)120 + (1080-240两个文本)840 / 3 = 400px ,右边还有剩余280px。如果text1与text2的weight超过了weightSum会怎样,我们设置如下看看效果 :
<LinearLayout xmlns:android="http://schemas.android.com/apk/res/android"

    android:layout_width="match_parent"

    android:layout_height="match_parent"

    android:weightSum=""

    android:orientation="horizontal">

    <TextView

        android:layout_width="wrap_content"

        android:layout_height="wrap_content"

        android:gravity="center"

        android:layout_weight=""

        android:background="#FF0000"

        android:text="text1" />

    <TextView

        android:layout_width="wrap_content"

        android:layout_height="wrap_content"

        android:gravity="center"

        android:layout_weight=""

        android:background="#00FF00"

        android:text="text2" />

</LinearLayout>

结果发现text2的文字快到屏幕外了,说明text2的宽度超出了屏幕。其实计算方式还是一样的,它们各占剩余空间的 2/3。我们上面说过text1与text2的宽度都是120px,剩余840,那么此时text1的宽度为 120 + 840 * 2 / 3 = 680px ,两个都是 680px,那text2当然被挤到屏幕外去了。
weightSum属性可以用来控制weight属性占用剩余空间的比例。比如我们要做一个布局,一个按钮居中,它宽度是屏幕的一半,还要自适应屏幕,效果如下:

我们可以利用weightSum属性,代码如下:
<LinearLayout xmlns:android="http://schemas.android.com/apk/res/android"

    android:layout_width="match_parent"

    android:layout_height="wrap_content"

    android:gravity="center"

    android:orientation="horizontal"

    android:weightSum="">

    <Button

        android:layout_width="wrap_content"

        android:layout_height="wrap_content"

        android:layout_weight=""

        android:text="按钮" />

</LinearLayout>
运行代码看到按钮半宽居中,自适应所有分辨率的屏幕,符合要求。注意LinearLayout中设置的android:gravity="center",它让子View居中放置。
4、divider 、showDividers 属性
以往我在设置分割线时,都是新增一个View,用来显示分割线,直到我发现在LinearLayout中添加分割线的新方法。LinearLayout显示分割线主要涉及divider 、showDividers 属性 : android:divider用于设置分割线的样式,可以是xml的drawable也可以是图片。android:showDividers = "middle|end|beginning|none" 其每个选项的作用:
- middle 在每一项中间添加分割线
- end 在整体的最后一项添加分割线
- beginning 在整体的最上方添加分割线
- none 不显示分割线
我们先创建一个custom.xml的drawable ,注意设置了宽高,不然是显示不出来的:
<?xml version="1.0" encoding="utf-8"?>

<shape xmlns:android="http://schemas.android.com/apk/res/android">

    <solid android:color="@android:color/holo_red_light" />

    <size android:height="12dp" android:width="2dp"/>

</shape>
设置成android:showDividers = "beginning"时:

设置成android:showDividers = "end"时:

设置成android:showDividers = "middle"时:

还可以组合设置 ,android:showDividers="beginning|end|middle" ,显示结果:

最后如果大家发现了什么的重要的属性或巧妙的用法,也可以一起交流哈。
参考转自以下文档:
https://blog.csdn.net/chenbengang/article/details/48154057
https://www.jianshu.com/p/ae0762d2f922
https://www.jianshu.com/p/21db6618baa0
android LinearLayout的更多相关文章
- 关于android LinearLayout的比例布局(转载)
关于android LinearLayout的比例布局,主要有以下三个属性需要设置: 1,android:layout_width,android:layout_height,android:layo ...
- Android LinearLayout的android:layout_weight属性
本文主要介绍Android LinearLayout的android:layout_weight属性意义 android:layout_weight为大小权重,相当于在页面上显示的百分比,它的计算是根 ...
- Android linearlayout常用布局
用linearlayout完成这样的布局效果,这样的布局还是比较常用的,具体的xml代码如下: <LinearLayout xmlns:android="http://schemas. ...
- android LinearLayout 实现两端对齐
<?xml version="1.0″ encoding="utf-8″?> <LinearLayout xmlns:android="http://s ...
- 关于Android LinearLayout添加分隔线的方法
目前了解的办法有两个:1.自定义一个view当作分隔线:2.使用高版本的分隔线属性 一.在需要添加分隔线的地方,添加一个view,比如ImageView,TextView等都可以,如代码,关键是设置高 ...
- android LinearLayout android:layout_weight 作用,固定比例
android 中的 LinearLayout 是线性布局有水平布局horizontal 垂直布局vertical .本文针对 水平布局horizontal 布局的weight属性做一个标记,以免 ...
- android LinearLayout和RelativeLayout实现精确布局
先明确几个概念的区别: padding margin:都是边距的含义,关键问题得明白是什么相对什么的边距padding:是控件的内容相对控件的边缘的边距. margin :是控件边缘相对父空间的边距 ...
- android linearlayout 把控件view置底部(放在页面最下方)
<LinearLayout android:id="@+id/recLayout" android:layout_width="fill_parent" ...
- android linearlayout imageview置顶摆放
在练习android时,想在Linearlayout内放一图片,使其图片置顶,预期效果是这样的: 但xml代码imageview写成这样后, <ImageView android:layout_ ...
- android LinearLayout等view如何获取button效果
我们可以给LinearLayout以及一切继承自View的控件,设置View.onClickListener监听,例如LInearLayout. 但是我们发现LinearLayout可以执行监听方法体 ...
随机推荐
- 手动开发PHP模板引擎 一 (35)
模板叫做TPL,模仿于smarty模板引擎. 我们所说的模板是Web模板,是主要由HTML标记组成的语言来编写的页面,但也有如何表示包含动态生成内容的方式(解析标签).模板引擎是一种软件库,允许我们从 ...
- 北航操作系统实验2019:Lab4-1代码实现参考
北航操作系统实验2019:Lab4-1代码实现参考 部分实现参考自Github前辈们的项目,经过一定程度的勘误. 如果这份代码中存在任何问题或错误,请务必不吝在评论区指出. Exercise 4.1 ...
- robot framework踩坑记录
一.报错:FAIL : 'Return' is a reserved keyword. 给Retrun加上中括号即可 二.报错:True != true 三.报错 /Library/Python/2. ...
- python 之 爬普房网
from bs4 import BeautifulSoupimport reimport requestsimport pandas## pa pufangwangclass down(object) ...
- UVA10140 Prime Distance
UVA10140 Prime Distance 给定两个整数L,R(1<=L<=R<=2^{31},R-L<=10^6)L,R(1<=L<=R<=231,R− ...
- 架构师养成记--32.Redis高级(安全 主从复制)
Redis高级命令及特性 keys * 返回满足的所有键值(*表示模糊匹配) exists 是否存在指定的key(返回1表示存在,0表示不存在) expire 设置某个key的过期时间,使用ttl查看 ...
- QuantLib 金融计算——基本组件之 Index 类
目录 QuantLib 金融计算--基本组件之 Index 类 QuantLib 金融计算--基本组件之 Index 类 Index 类用于表示已知的指数或者收益率,例如 Libor 或 Shibor ...
- Eigenface与PCA人脸识别算法实验
简单的特征脸识别实验 实现特征脸的过程其实就是主成分分析(Principal Component Analysis,PCA)的一个过程.关于PCA的原理问题,它是一种数学降维的方法.是为了简化问题.在 ...
- Java 线程类别
Java 线程类别 守护线程和非守护线程 守护线程和非守护线程之前的唯一区别在于:是否阻止JVM的正常退出. JVM正常退出是与异常退出相对的概念,异常退出如调用System.exit(status) ...
- Mac下使用Wine安装正则表达式工具RegexBuddy 4
下载: (链接: https://pan.baidu.com/s/1bzRae6 密码: b5d3) 安装: 1.安装Wine 参考:http://www.cnblogs.com/EasonJim/p ...