关于 PHPMailer 邮件发送类的使用心得(含多文件上传)
This is important for send mail
PHPMailer 核心文件
class.phpmailer.php
class.phpmaileroauth.php
class.phpmaileroauthgoogle.php
class.pop3.php
class.smtp.php
get_oauth_token.php
PHPMailerAutoload.php
在使用PHPMailer之前,首先查看PHP环境扩展中是否开启了
socket和openssl扩展,如若没有开启,请在php.ini配置文件中开启两者扩展支持大多数主流邮箱都支持SMTP协议,除去QQ邮箱,在作为三方代发邮箱时,需要开启SMTP服务支持,并需要授权码登录使用邮箱。对于其他像163、sina等邮箱直接使用代发邮箱账号和密码即可。
code of demo
<?php

// 引入PHPMailer核心类文件(SMTP协议方式)

require_once('class.phpmailer.php');

require_once('class.smtp.php');

$mail = new PHPMailer();

// 是否开启debug调试模式,默认为false,非开发环境建议关闭

$mail->SMTPDebug = 0;

// 使用SMTP鉴权方式发送邮件(通用必写方法)

$mail->isSMTP();

// 一旦使用SMTP鉴权方式,必须为True(通用必写方法)

$mail->SMTPAuth = true;

/**

 * 以下开始分为QQ邮箱和非QQ邮箱方式,以sina邮箱为例

 * QQ邮箱方式需要使用ssl方式加密登录,登录密码使用所

 * 给授权码,在邮箱设置中的账号中,开启IMAP/SMTP服务

 * 并验证密保成功,会给出授权码

 */

// 连接的SMTP服务器主机地址(QQ)

$mail->HOST = 'smtp.qq.com';

// 设置使用ssl加密方式登录鉴权(QQ),其他邮箱请注释或者令属性值为空

$mail->SMTPSecure = 'ssl';

// 设置ssl连接SMTP服务器远程连接端口号(QQ)

$mali->Port = '465';

// 设置发送邮件编码

$mail->CharSet = 'UTF-8';

// 设置发送人昵称

$mail->FromName = '发件人昵称';

// 设置发件人邮箱账户

$mail->Usename = '10011@qq.com';

// QQ邮箱使用获取到的授权码作为账户的登录密码,其他邮箱使用邮箱密码登录即可

$mail->Password = '***********';

//发件人邮箱地址,同发件人邮箱

$mail->From = '10011@qq.com';

// 设置邮件正文是否为HTML编码

$mail->isHTML(true);

// 添加收件人邮箱地址,如若需要群发多人,可多次调用此方法即可

$mail->addAddress('20011@163.com');

//$mail->addAddress('30011@sina.com');

// 设置邮件主题

$mail->Subject = '邮件主题';

// 设置邮件正文(可使用定界符来定义大量正文内容)

$mail->Body = <<< EOR

<h1>Test mail</h1>

EOR;

/* 设置邮件附件,此方法两个参数,分别是附件的位置路径(绝对或者相对路径)以及附件的命名,可  多次调用此方法,添加多个附件 */

$mail->addAttachment($path,$name);

//$mail->addAttachment($path,$name);

// 发送邮件并返回 bool

$status = $mail->send();

// 根据返回 bool 值进行判断操作

if($status){

    #code ...

    $mail->smtpClose();

}else{

    echo 'Send Mail Error! Error Message is '.$mail->ErrorInfo;

}- 常见的(SMTP、POP3)邮箱服务器以及端口
<?php

/**

 * 此处列举的各大主流或者常见的邮箱服务器如果在连接时出现错误,请注册相应邮箱,在其邮箱

 * 设置中查看相应邮箱服务器的主机地址以及端口

 */

sina.com

POP3服务器地址:pop3.sina.com.cn(端口:110)

SMTP服务器地址:smtp.sina.com.cn(端口:25)

sina.cn

POP3服务器地址:pop3.sina.com(端口:110)      ------- > pop.sina.com

SMTP服务器地址:smtp.sina.com(端口:25)

sinaVIP

POP3服务器:pop3.vip.sina.com (端口:110)

SMTP服务器:smtp.vip.sina.com (端口:25)

sohu.com

POP3服务器地址:pop3.sohu.com(端口:110)

SMTP服务器地址:smtp.sohu.com(端口:25)

 126邮箱

  POP3服务器地址:pop.126.com(端口:110)

  SMTP服务器地址:smtp.126.com(端口:25)

  139邮箱

  POP3服务器地址:POP.139.com(端口:110)

  SMTP服务器地址:SMTP.139.com(端口:25)

  163.com

  POP3服务器地址:pop.163.com(端口:110)

  SMTP服务器地址:smtp.163.com(端口:25)

  QQ邮箱

  POP3服务器地址:pop.qq.com(端口:110)

  SMTP服务器地址:smtp.qq.com(端口:ssl/465|Tls/587)

  QQ企业邮箱

  POP3服务器地址:pop.exmail.qq.com (SSL启用 端口:995)

  SMTP服务器地址:smtp.exmail.qq.com(SSL启用 端口:ssl/465|Tls/587)

  yahoo.com

  POP3服务器地址:pop.mail.yahoo.com

  SMTP服务器地址:smtp.mail.yahoo.com

  yahoo.com.cn

  POP3服务器地址:pop.mail.yahoo.com.cn(端口:995)

  SMTP服务器地址:smtp.mail.yahoo.com.cn(端口:587

  HotMail

  POP3服务器地址:pop3.live.com(端口:995)

  SMTP服务器地址:smtp.live.com(端口:587)

  gmail(google.com)

  POP3服务器地址:pop.gmail.com(SSL启用端口:995)

  SMTP服务器地址:smtp.gmail.com(SSL启用 端口:587)

  263.net

  POP3服务器地址:pop3.263.net(端口:110)

  SMTP服务器地址:smtp.263.net(端口:25)

  263.net.cn

  POP3服务器地址:pop.263.net.cn(端口:110)

  SMTP服务器地址:smtp.263.net.cn(端口:25)

  x263.net

  POP3服务器地址:pop.x263.net(端口:110)

  SMTP服务器地址:smtp.x263.net(端口:25)

  21cn.com

  POP3服务器地址:pop.21cn.com(端口:110)

  SMTP服务器地址:smtp.21cn.com(端口:25)

  Foxmail

  POP3服务器地址:POP.foxmail.com(端口:110)

  SMTP服务器地址:SMTP.foxmail.com(端口:25)

  china.com

  POP3服务器地址:pop.china.com(端口:110)

  SMTP服务器地址:smtp.china.com(端口:25)

  tom.com

  POP3服务器地址:pop.tom.com(端口:110)

  SMTP服务器地址:smtp.tom.com(端口:25)

  etang.com

  POP3服务器地址:pop.etang.com(端口:110)

  SMTP服务器地址:smtp.etang.com(端口:25)
关于表单多文件上传并发送邮箱 demo
<html>

    <head>

        <title></title>

    </head>

    <body>

        <form method="POST" enctype="multipart/form-data" action="form_test.php">

            <input type="file" name="upload[]" multiple="multiple" />

            <button type="submit">提交</button>

        </form>

    </body>

</html>- 多文件选择上传,表单提交
$_FILES数据形式打印,如图 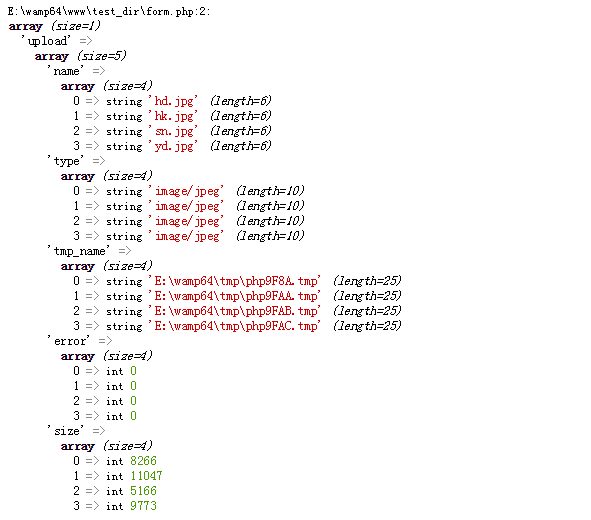
- form_test.php
<?php

header("content-type:text/html;charset=utf-8");

if($_FILES['upload']['error'][0] == 4){

    echo("<script type='text/javascript'> alert('请上传文件'); window.history.back();</script>");

    exit;

}else{

    // 设置文件保存目录

    $uploaddir = "../upload/file/";

    require_once 'upload_img.php';

    $FJ = array();

    for($i=0; $i<count($_FILES['upload']['name']); $i++) {

        if(file_exists($_FILES['upload']['tmp_name'][$i]) && is_uploaded_file($_FILES['upload']['tmp_name'][$i]))

        {

            //判断文件类型

            if(!in_array(strtolower(fileext($_FILES['upload']['name'][$i])),$type))

            {

                $text=implode(",",$type);

                $page_result=$text;

                echo("<script type='text/javascript'> alert('请上传格式为 ".$page_result." 的图片'); window.history.back();</script>");

                exit;

            }else{

                //生成目标文件的文件名

                $filename=explode(".",$_FILES['upload']['name'][$i]);

                do

                {

                    $filename[0]=random(10);

                    $name=implode(".",$filename);

                    $uploadfile=$uploaddir.$name;

                }

                while(file_exists($uploadfile));

                if (move_uploaded_file($_FILES['upload']['tmp_name'][$i],$uploadfile))

                {

                    $FJ[] = $uploadfile;

                }

            }

        }else{

            echo("<script type='text/javascript'> alert('上传失败,请重试'); window.history.back();</script>");

            exit;

        }

    }

}

// 发送邮件(QQ)

require_once("class.phpmailer.php");

require_once("class.smtp.php");

$mail = new PHPMailer();

$mail->SMTPDebug = 0;

$mail->isSMTP();

$mail->SMTPAuth = true;

$mail->SMTPSecure = 'ssl';

$mail->Host = 'smtp.qq.com';

$mail->Port = '465';

$mail->CharSet = 'UTF-8';

$mail->FromName = 'Form Data';

$mail->Username = '发送人邮箱账户';

$mail->Password = '发件人账户授权码';

$mail->From = '发件人邮箱账户';

$mail->isHTML(true);

$mail->addAddress('收件人邮箱');

$mail->Subject = 'mail title';

$mail->Body = '<h1>Form Data<h1>';

// 根据当前脚本文件位置获取所需目录绝对地址

$Active_path = dirname(dirname(__FILE__));

// 循环拼接附件绝对路径并调用附件添加方法加入邮件附件中

for ($i=0; $i < count($FJ) ; $i++) {

    if(file_exists($FJ[$i])){

        $FJ[$i] = $Active_path.'/'.str_replace('../', '', $FJ[$i]);

        $mail->addAttachment($FJ[$i]);

    }else{

        continue;

    }

}

$status = $mail->send();

if($status){

    // 发送成功,根据需要是否将上传附件文件删除,上传失败亦然

    for ($i=0; $i < count($FJ) ; $i++) {

        if(file_exists($FJ[$i])){

            unlink($FJ[$i]);

        }

    }

    echo("<script type='text/javascript'> alert('send mail success!'); window.history.back();</script>");

    exit;

}else{

    for ($i=0; $i < count($FJ) ; $i++) {

        if(file_exists($FJ[$i])){

            unlink($FJ[$i]);

        }

    }

     echo("<script type='text/javascript'> alert('send mail fail,please try again!Error message: '".$mail->ErrorInfo."'); window.history.back();</script>");

    exit;

}- upload_img.php
<?php

//设置允许上传文件的类型

$type=array("jpg","gif","bmp","jpeg","png");

//获取文件后缀名函数

function fileext($filename)

{

    return substr(strrchr($filename, '.'), 1);

}

//生成随机文件名函数

function random($length)

{

    $hash = 'SC-';

    $chars = 'ABCDEFGHIJKLMNOPQRSTUVWXYZ0123456789abcdefghijklmnopqrstuvwxyz';

    $max = strlen($chars) - 1;

    mt_srand((double)microtime() * 1000000);

    for($i = 0; $i < $length; $i++)

    {

        $hash .= $chars[mt_rand(0, $max)];

    }

    return $hash;

}

// 获取不同比例的缩略图

function ResizeImage($uploadfile,$maxwidth,$maxheight,$name)

{

    //取得当前图片大小

    $width = imagesx($uploadfile);

    $height = imagesy($uploadfile);

    $i=0.5;

    //生成缩略图的大小

    if(($width > $maxwidth) || ($height > $maxheight))

    {

        /*

        $widthratio = $maxwidth/$width;

        $heightratio = $maxheight/$height;

        if($widthratio < $heightratio)

        {

            $ratio = $widthratio;

        }

        else

        {

             $ratio = $heightratio;

        }

        $newwidth = $width * $ratio;

        $newheight = $height * $ratio;

        */

        $newwidth = $width * $i;

        $newheight = $height * $i;

        if(function_exists("imagecopyresampled"))

        {

            $uploaddir_resize = imagecreatetruecolor($newwidth, $newheight);

            imagecopyresampled($uploaddir_resize, $uploadfile, 0, 0, 0, 0, $newwidth, $newheight, $width, $height);

        }

        else

        {

            $uploaddir_resize = imagecreate($newwidth, $newheight);

            imagecopyresized($uploaddir_resize, $uploadfile, 0, 0, 0, 0, $newwidth, $newheight, $width, $height);

        }

        ImageJpeg ($uploaddir_resize,$name);

        ImageDestroy ($uploaddir_resize);

    }

    else

    {

        ImageJpeg ($uploadfile,$name);

    }

}

// 此处注释内容为图片文件的比例缩放

// if($_FILES["filename"]['size'])

// {

//     if($file_type == "image/pjpeg"||$file_type == "image/jpg"|$file_type == "image/jpeg")

//     {

//         //$im = imagecreatefromjpeg($_FILES[$upload_input_name]['tmp_name']);

//         $im = imagecreatefromjpeg($uploadfile);

//     }

//     elseif($file_type == "image/x-png")

//     {

//         //$im = imagecreatefrompng($_FILES[$upload_input_name]['tmp_name']);

//         $im = imagecreatefromjpeg($uploadfile);

//     }

//     elseif($file_type == "image/gif")

//     {

//         //$im = imagecreatefromgif($_FILES[$upload_input_name]['tmp_name']);

//         $im = imagecreatefromjpeg($uploadfile);

//     }

//     else//默认jpg

//     {

//         $im = imagecreatefromjpeg($uploadfile);

//     }

//     if($im)

//     {

//         ResizeImage($im,$pic_width_max,$pic_height_max,$uploadfile_resize);

//         ImageDestroy ($im);

//     }

// }
关于 PHPMailer 邮件发送类的使用心得(含多文件上传)的更多相关文章
- Android 开发工具类 32_通过 HTTP 协议实现文件上传
完成像带有文件的用户数据表单的上传,而且可以上传多个文件,这在用户注册并拍照时尤其有用. import java.io.BufferedReader; import java.io.ByteArray ...
- SpringCloud 之 Fegin —— 发送GET、POST请求以及文件上传
由于项目需要调用其他微服务的数据,首先想到的就是写一个http网络请求的工具类,但是想到在之前看springCloud的时候里面有这个Fegin可以实现,就顺便实践一下,虽然过程有点坎坷,好在都顺利解 ...
- PHP封装一个通用好用的文件上传处理类
封装一个文件上传类完成基本功能如下: 1.可上传多个或单个文件 2.上传成功返回一个或多个文件名 3.上传失败则返回每个失败文件的错误信息 上传类中的基本功能: 1.构造参数,用户可以自定义配置参数, ...
- php 文件上传类 实例分享
最近在研究php上传的内容,找到一个不错的php上传类,分享下. <?php /** * 文件上传类 * class: uploadFile * edit: www.jbxue.com */ c ...
- phpMailer邮件发送
<!DOCTYPE html PUBLIC "-//W3C//DTD XHTML 1.0 Transitional//EN" "http://www.w3.org/ ...
- PHP 邮件发送类
mail.php <?php /** * 邮件发送类 * 支持发送纯文本邮件和HTML格式的邮件,可以多收件人,多抄送,多秘密抄送,带附件的邮件 * 需要的php扩展,sockets和Filei ...
- .NET开发邮件发送功能的全面教程(含邮件组件源码)
今天,给大家分享的是如何在.NET平台中开发“邮件发送”功能.在网上搜的到的各种资料一般都介绍的比较简单,那今天我想比较细的整理介绍下: 1) 邮件基础理论知识 2) ...
- SpringBoot项目实现文件上传和邮件发送
前言 本篇文章主要介绍的是SpringBoot项目实现文件上传和邮件发送的功能. SpringBoot 文件上传 说明:如果想直接获取工程那么可以直接跳到底部,通过链接下载工程代码. 开发准备 环境要 ...
- 19、文件上传与下载/JavaMail邮件开发
回顾: 一. 监听器 生命周期监听器 ServletRequestListener HttpSessionListener ServletContextListener 属性监听器 ServletRe ...
随机推荐
- opencv 将视频分解成图片和使用本地图片合成视频
代码如下: // cvTest.cpp : Defines the entry point for the console application. #include "stdafx.h&q ...
- python全栈开发_day15_函数回调和模块
一:函数回调 def a(fn=None): print("run1") if fn: fn() print("run 2") def b(): print(& ...
- Gradle学习系列(二)
AS的逐渐成熟和完善,已有越来越多的项目开发都开始转向AS了,必然的对Gradel的认识和使用是很有必要了.我们已经知道 Gradle 是用来架构 Java项目了,对于Android Project来 ...
- (转)一张图学会Dockerfile
原文:http://blog.51cto.com/kusorz/1942816 前言 Dockerfile是非常容易学的,和SHELL相比那简单的太多了. Dockerfile是为快速构建docker ...
- (转)InnoDB存储引擎MVCC实现原理
InnoDB存储引擎MVCC实现原理 原文:https://liuzhengyang.github.io/2017/04/18/innodb-mvcc/ 简单背景介绍 MySQL MySQL是现在最流 ...
- 数据库主键ID生成策略
前言: 系统唯一ID是我们在设计一个系统的时候常常会遇见的问题,下面介绍一些常见的ID生成策略. Sequence ID UUID GUID COMB Snowflake 最开始的自增ID为了实现分库 ...
- Win10 VS2015 静态编译Qt5.6.2源码
由于VS2015需要CRT等拓展组件,因此把内部编写的工具软件以静态发布,固需要编译Qt源码.Qt5.6.2版本,VS2015,Win10 1.安装python,perl,下载jom 2.改文件com ...
- 【数组】Subsets II
题目: Given a collection of integers that might contain duplicates, nums, return all possible subsets. ...
- 阅读The Java® Language Specification需要知道的术语
Null Pointer Exception,简称NPE 在java中,static final修饰的是常量.根据编译器的不同行为,常量又可分为编译时常量和运行时常量. 举例说明吧 public st ...
- nginx安装及其配置详细教程
1 nginx 介绍 1 什么是nginx Nginx是一款高性能的http 服务器/反向代理服务器及电子邮件(IMAP/POP3)代理服务器. 由俄罗斯的程序设计师Igor Sysoev所开发,官方 ...