怎么用Python写爬虫抓取网页数据
机器学习首先面临的一个问题就是准备数据,数据的来源大概有这么几种:公司积累数据,购买,交换,政府机构及企业公开的数据,通过爬虫从网上抓取。本篇介绍怎么写一个爬虫从网上抓取公开的数据。
很多语言都可以写爬虫,但是不同语言的难易程度不同,Python作为一种解释型的胶水语言,上手简单、入门容易,标准库齐全,还有丰富的各种开源库,语言本身提供了很多提高开发效率的语法糖,开发效率高,总之“人生苦短,快用Python”(Life is short, you need Python!)。在Web网站开发,科学计算,数据挖掘/分析,人工智能等很多领域广泛使用。
开发环境配置,Python3.5.2,Scrapy1.2.1,使用pip安装scrapy,命令:pip3 install Scrapy,此命令在Mac下会自动安装Scrapy的依赖包,安装过程中如果出现网络超时,多试几次。
创建工程
首先创建一个Scrapy工程,工程名为:kiwi,命令:scrapy startproject kiwi,将创建一些文件夹和文件模板。

定义数据结构
settings.py是一些设置信息,items.py用来保存解析出来的数据,在此文件里定义一些数据结构,示例代码:
 # -*- coding: utf-8 -*-

 # Define here the models for your scraped items

 #

 # See documentation in:

 # http://doc.scrapy.org/en/latest/topics/items.html

 import scrapy

 class AuthorInfo(scrapy.Item):

     authorName = scrapy.Field()  # 作者昵称

     authorUrl = scrapy.Field()  # 作者Url

 class ReplyItem(scrapy.Item):

     content = scrapy.Field()  # 回复内容

     time = scrapy.Field()  # 发布时间

     author = scrapy.Field() # 回复人(AuthorInfo)

 class TopicItem(scrapy.Item):

     title = scrapy.Field() # 帖子标题

     url = scrapy.Field() # 帖子页面Url

     content = scrapy.Field() # 帖子内容

     time = scrapy.Field()  # 发布时间

     author = scrapy.Field() # 发帖人(AuthorInfo)

     reply = scrapy.Field() # 回复列表(ReplyItem list)

     replyCount = scrapy.Field() # 回复条数
上面TopicItem中嵌套了AuthorInfo和ReplyItem list,但是初始化类型必须是scrapy.Field(),注意这三个类都需要从scrapy.Item继续。
创建爬虫蜘蛛
工程目录spiders下的kiwi_spider.py文件是爬虫蜘蛛代码,爬虫代码写在这个文件里。示例以爬豆瓣群组里的帖子和回复为例。
 # -*- coding: utf-8 -*-

 from scrapy.selector import Selector

 from scrapy.spiders import CrawlSpider, Rule

 from scrapy.linkextractors import LinkExtractor

 from kiwi.items import TopicItem, AuthorInfo, ReplyItem

 class KiwiSpider(CrawlSpider):

     name = "kiwi"

     allowed_domains = ["douban.com"]

     anchorTitleXPath = 'a/text()'

     anchorHrefXPath = 'a/@href'

     start_urls = [

         "https://www.douban.com/group/topic/90895393/?start=0",

     ]

     rules = (

         Rule(

             LinkExtractor(allow=(r'/group/[^/]+/discussion\?start=\d+',)),

                 callback='parse_topic_list',

                 follow=True

         ),

         Rule(

             LinkExtractor(allow=(r'/group/topic/\d+/$',)),  # 帖子内容页面

                 callback='parse_topic_content',

                 follow=True

         ),

         Rule(

             LinkExtractor(allow=(r'/group/topic/\d+/\?start=\d+',)), # 帖子内容页面

                 callback='parse_topic_content',

                 follow=True

         ),

     )

     # 帖子详情页面

     def parse_topic_content(self, response):

         # 标题XPath

         titleXPath = '//html/head/title/text()'

         # 帖子内容XPath

         contentXPath = '//div[@class="topic-content"]/p/text()'

         # 发帖时间XPath

         timeXPath = '//div[@class="topic-doc"]/h3/span[@class="color-green"]/text()'

         # 发帖人XPath

         authorXPath = '//div[@class="topic-doc"]/h3/span[@class="from"]'

         item = TopicItem()

         # 当前页面Url

         item['url'] = response.url

         # 标题

         titleFragment = Selector(response).xpath(titleXPath)

         item['title'] = str(titleFragment.extract()[0]).strip()

         # 帖子内容

         contentFragment = Selector(response).xpath(contentXPath)

         strs = [line.extract().strip() for line in contentFragment]

         item['content'] = '\n'.join(strs)

         # 发帖时间

         timeFragment = Selector(response).xpath(timeXPath)

         if timeFragment:

             item['time'] = timeFragment[0].extract()

         # 发帖人信息

         authorInfo = AuthorInfo()

         authorFragment = Selector(response).xpath(authorXPath)

         if authorFragment:

             authorInfo['authorName'] = authorFragment[0].xpath(self.anchorTitleXPath).extract()[0]

             authorInfo['authorUrl'] = authorFragment[0].xpath(self.anchorHrefXPath).extract()[0]

         item['author'] = dict(authorInfo)

         # 回复列表XPath

         replyRootXPath = r'//div[@class="reply-doc content"]'

         # 回复时间XPath

         replyTimeXPath = r'div[@class="bg-img-green"]/h4/span[@class="pubtime"]/text()'

         # 回复人XPath

         replyAuthorXPath = r'div[@class="bg-img-green"]/h4'

         replies = []

         itemsFragment = Selector(response).xpath(replyRootXPath)

         for replyItemXPath in itemsFragment:

             replyItem = ReplyItem()

             # 回复内容

             contents = replyItemXPath.xpath('p/text()')

             strs = [line.extract().strip() for line in contents]

             replyItem['content'] = '\n'.join(strs)

             # 回复时间

             timeFragment = replyItemXPath.xpath(replyTimeXPath)

             if timeFragment:

                 replyItem['time'] = timeFragment[0].extract()

             # 回复人

             replyAuthorInfo = AuthorInfo()

             authorFragment = replyItemXPath.xpath(replyAuthorXPath)

             if authorFragment:

                 replyAuthorInfo['authorName'] = authorFragment[0].xpath(self.anchorTitleXPath).extract()[0]

                 replyAuthorInfo['authorUrl'] = authorFragment[0].xpath(self.anchorHrefXPath).extract()[0]

             replyItem['author'] = dict(replyAuthorInfo)

             # 添加进回复列表

             replies.append(dict(replyItem))

         item['reply'] = replies

         yield item

     # 帖子列表页面

     def parse_topic_list(self, response):

         # 帖子列表XPath(跳过表头行)

         topicRootXPath = r'//table[@class="olt"]/tr[position()>1]'

         # 单条帖子条目XPath

         titleXPath = r'td[@class="title"]'

         # 发帖人XPath

         authorXPath = r'td[2]'

         # 回复条数XPath

         replyCountXPath = r'td[3]/text()'

         # 发帖时间XPath

         timeXPath = r'td[@class="time"]/text()'

         topicsPath = Selector(response).xpath(topicRootXPath)

         for topicItemPath in topicsPath:

             item = TopicItem()

             titlePath = topicItemPath.xpath(titleXPath)

             item['title'] = titlePath.xpath(self.anchorTitleXPath).extract()[0]

             item['url'] = titlePath.xpath(self.anchorHrefXPath).extract()[0]

             # 发帖时间

             timePath = topicItemPath.xpath(timeXPath)

             if timePath:

                 item['time'] = timePath[0].extract()

                 # 发帖人

                 authorPath = topicItemPath.xpath(authorXPath)

                 authInfo = AuthorInfo()

                 authInfo['authorName'] = authorPath[0].xpath(self.anchorTitleXPath).extract()[0]

                 authInfo['authorUrl'] = authorPath[0].xpath(self.anchorHrefXPath).extract()[0]

                 item['author'] = dict(authInfo)

                 # 回复条数

                 replyCountPath = topicItemPath.xpath(replyCountXPath)

                 item['replyCount'] = replyCountPath[0].extract()

             item['content'] = ''

             yield item

     parse_start_url = parse_topic_content
特别注意
1、KiwiSpider需要改成从CrawlSpider类继承,模板生成的代码是从Spider继承的,那样的话不会去爬rules里的页面。
2、parse_start_url = parse_topic_list 是定义入口函数,从CrawlSpider类的代码里可以看到parse函数回调的是parse_start_url函数,子类可以重写这个函数,也可以像上面代码那样给它赋值一个新函数。
3、start_urls里是入口网址,可以添加多个网址。
4、rules里定义在抓取到的网页中哪些网址需要进去爬,规则和对应的回调函数,规则用正则表达式写。上面的示例代码,定义了继续抓取帖子详情首页及分页。
5、注意代码里用dict()包装的部分,items.py文件里定义数据结构的时候,author属性实际需要的是AuthorInfo类型,赋值的时候必须用dict包装起来,item['author'] = authInfo 赋值会报Error。
6、提取内容的时候利用XPath取出需要的内容,有关XPath的资料参看:XPath教程 http://www.w3school.com.cn/xpath/。开发过程中可以利用浏览器提供的工具查看XPath,比如Firefox 浏览器中的FireBug、FirePath插件,对于https://www.douban.com/group/python/discussion?start=0这个页面,XPath规则“//td[@class="title"]”可以获取到帖子标题列表,示例:
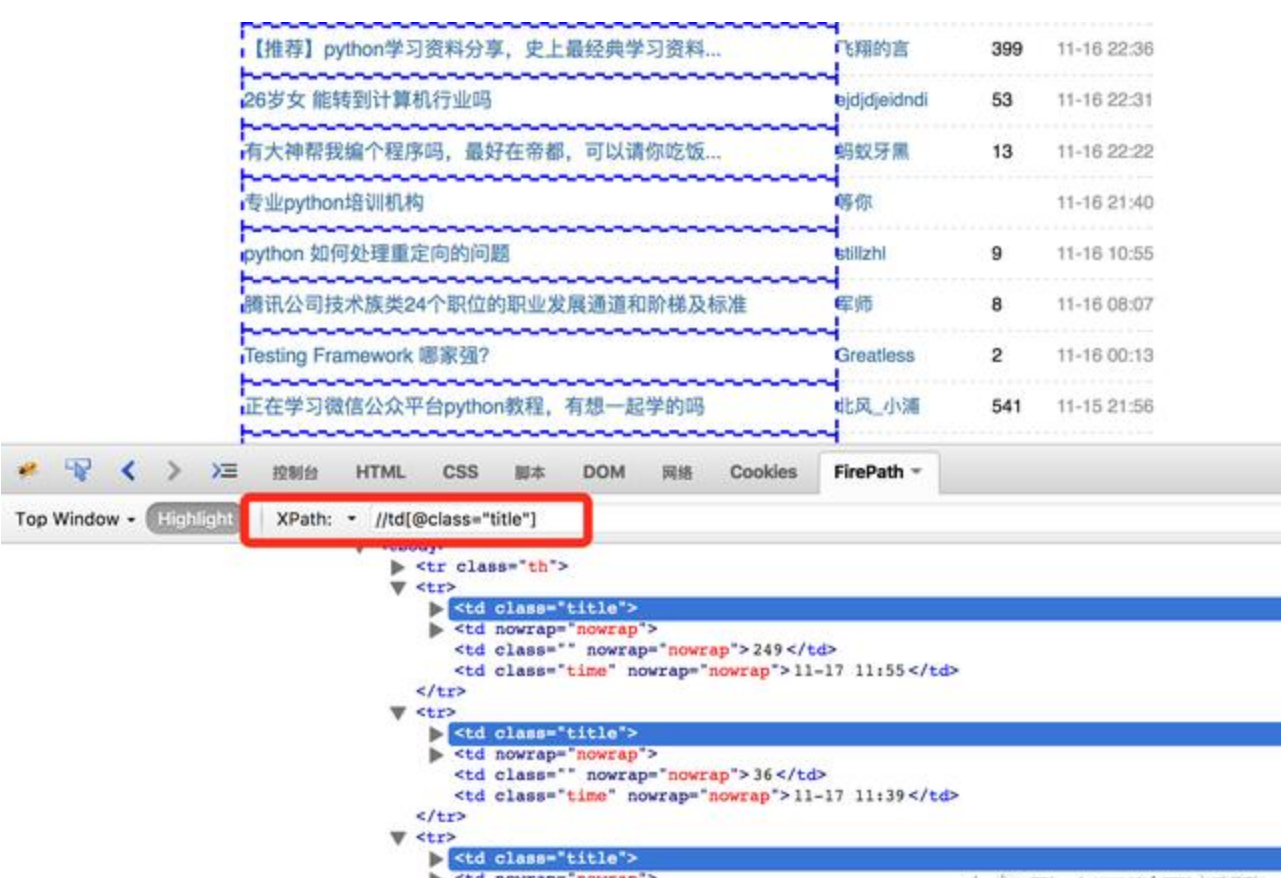
上图红框中可以输入XPath规则,方便测试XPath的规则是否符合要求。新版Firefox可以安装 Try XPath 这个插件 查看XPath,Chrome浏览器可以安装 XPath Helper 插件。
使用随机UserAgent
为了让网站看来更像是正常的浏览器访问,可以写一个Middleware提供随机的User-Agent,在工程根目录下添加文件useragentmiddleware.py,示例代码:
 # -*-coding:utf-8-*-

 import random

 from scrapy.downloadermiddlewares.useragent import UserAgentMiddleware

 class RotateUserAgentMiddleware(UserAgentMiddleware):

     def __init__(self, user_agent=''):

         self.user_agent = user_agent

     def process_request(self, request, spider):

         ua = random.choice(self.user_agent_list)

         if ua:

             request.headers.setdefault('User-Agent', ua)

     # for more user agent strings,you can find it in http://www.useragentstring.com/pages/useragentstring.php

     user_agent_list = [ \

         "Mozilla/5.0 (Windows NT 6.1; WOW64) AppleWebKit/537.1 (KHTML, like Gecko) Chrome/22.0.1207.1 Safari/537.1" \

         "Mozilla/5.0 (X11; CrOS i686 2268.111.0) AppleWebKit/536.11 (KHTML, like Gecko) Chrome/20.0.1132.57 Safari/536.11", \

         "Mozilla/5.0 (Windows NT 6.1; WOW64) AppleWebKit/536.6 (KHTML, like Gecko) Chrome/20.0.1092.0 Safari/536.6", \

         "Mozilla/5.0 (Windows NT 6.2) AppleWebKit/536.6 (KHTML, like Gecko) Chrome/20.0.1090.0 Safari/536.6", \

         "Mozilla/5.0 (Windows NT 6.2; WOW64) AppleWebKit/537.1 (KHTML, like Gecko) Chrome/19.77.34.5 Safari/537.1", \

         "Mozilla/5.0 (X11; Linux x86_64) AppleWebKit/536.5 (KHTML, like Gecko) Chrome/19.0.1084.9 Safari/536.5", \

         "Mozilla/5.0 (Windows NT 6.0) AppleWebKit/536.5 (KHTML, like Gecko) Chrome/19.0.1084.36 Safari/536.5", \

         "Mozilla/5.0 (Windows NT 6.1; WOW64) AppleWebKit/536.3 (KHTML, like Gecko) Chrome/19.0.1063.0 Safari/536.3", \

         "Mozilla/5.0 (Windows NT 5.1) AppleWebKit/536.3 (KHTML, like Gecko) Chrome/19.0.1063.0 Safari/536.3", \

         "Mozilla/5.0 (Macintosh; Intel Mac OS X 10_8_0) AppleWebKit/536.3 (KHTML, like Gecko) Chrome/19.0.1063.0 Safari/536.3", \

         "Mozilla/5.0 (Windows NT 6.2) AppleWebKit/536.3 (KHTML, like Gecko) Chrome/19.0.1062.0 Safari/536.3", \

         "Mozilla/5.0 (Windows NT 6.1; WOW64) AppleWebKit/536.3 (KHTML, like Gecko) Chrome/19.0.1062.0 Safari/536.3", \

         "Mozilla/5.0 (Windows NT 6.2) AppleWebKit/536.3 (KHTML, like Gecko) Chrome/19.0.1061.1 Safari/536.3", \

         "Mozilla/5.0 (Windows NT 6.1; WOW64) AppleWebKit/536.3 (KHTML, like Gecko) Chrome/19.0.1061.1 Safari/536.3", \

         "Mozilla/5.0 (Windows NT 6.1) AppleWebKit/536.3 (KHTML, like Gecko) Chrome/19.0.1061.1 Safari/536.3", \

         "Mozilla/5.0 (Windows NT 6.2) AppleWebKit/536.3 (KHTML, like Gecko) Chrome/19.0.1061.0 Safari/536.3", \

         "Mozilla/5.0 (X11; Linux x86_64) AppleWebKit/535.24 (KHTML, like Gecko) Chrome/19.0.1055.1 Safari/535.24", \

         "Mozilla/5.0 (Windows NT 6.2; WOW64) AppleWebKit/535.24 (KHTML, like Gecko) Chrome/19.0.1055.1 Safari/535.24"

     ]
修改settings.py,添加下面的设置,
DOWNLOADER_MIDDLEWARES = {

   'kiwi.useragentmiddleware.RotateUserAgentMiddleware': 1,

}
同时禁用cookie,COOKIES_ENABLED = False。
运行爬虫
切换到工程根目录,输入命令:scrapy crawl kiwi,console窗口可以看到打印出来的数据,或者使用命令“scrapy crawl kiwi -o result.json -t json”将结果保存到文件里。
怎么抓取用JS代码动态输出的网页数据
上面的例子对由执行js代码输出数据的页面不适用,好在Python的工具库多,可以安装phantomjs这个工具,从官网下载解压即可。下面以抓取 http://www.kjj.com/index_kfjj.html 这个网页的基金净值数据为例,这个页面的数据是由js代码动态输出的,js代码执行之后才会输出基金净值列表。fund_spider.py代码
 # -*- coding: utf-8 -*-

 from scrapy.selector import Selector

 from datetime import  datetime

 from selenium import webdriver

 from fundequity import FundEquity

 class PageSpider(object):

     def __init__(self):

         phantomjsPath = "/Library/Frameworks/Python.framework/Versions/3.5/phantomjs/bin/phantomjs"

         cap = webdriver.DesiredCapabilities.PHANTOMJS

         cap["phantomjs.page.settings.resourceTimeout"] = 1000

         cap["phantomjs.page.settings.loadImages"] = False

         cap["phantomjs.page.settings.disk-cache"] = False

         self.driver = webdriver.PhantomJS(executable_path=phantomjsPath, desired_capabilities=cap)

     def fetchPage(self, url):

         self.driver.get(url)

         html = self.driver.page_source

         return html

     def parse(self, html):

         fundListXPath = r'//div[@id="maininfo_all"]/table[@id="ilist"]/tbody/tr[position()>1]'

         itemsFragment = Selector(text=html).xpath(fundListXPath)

         for itemXPath in itemsFragment:

             attrXPath = itemXPath.xpath(r'td[1]/text()')

             text = attrXPath[0].extract().strip()

             if text != "-":

                 fe = FundEquity()

                 fe.serial = text

                 attrXPath = itemXPath.xpath(r'td[2]/text()')

                 text = attrXPath[0].extract().strip()

                 fe.date = datetime.strptime(text, "%Y-%m-%d")

                 attrXPath = itemXPath.xpath(r'td[3]/text()')

                 text = attrXPath[0].extract().strip()

                 fe.code = text

                 attrXPath = itemXPath.xpath(r'td[4]/a/text()')

                 text = attrXPath[0].extract().strip()

                 fe.name = text

                 attrXPath = itemXPath.xpath(r'td[5]/text()')

                 text = attrXPath[0].extract().strip()

                 fe.equity = text

                 attrXPath = itemXPath.xpath(r'td[6]/text()')

                 text = attrXPath[0].extract().strip()

                 fe.accumulationEquity = text

                 attrXPath = itemXPath.xpath(r'td[7]/font/text()')

                 text = attrXPath[0].extract().strip()

                 fe.increment = text

                 attrXPath = itemXPath.xpath(r'td[8]/font/text()')

                 text = attrXPath[0].extract().strip().strip('%')

                 fe.growthRate = text

                 attrXPath = itemXPath.xpath(r'td[9]/a/text()')

                 if len(attrXPath) > 0:

                     text = attrXPath[0].extract().strip()

                     if text == "购买":

                         fe.canBuy = True

                     else:

                         fe.canBuy = False

                 attrXPath = itemXPath.xpath(r'td[10]/font/text()')

                 if len(attrXPath) > 0:

                     text = attrXPath[0].extract().strip()

                     if text == "赎回":

                         fe.canRedeem = True

                     else:

                         fe.canRedeem = False

                 yield fe

     def __del__(self):

         self.driver.quit()

 def test():

     spider = PageSpider()

     html = spider.fetchPage("http://www.kjj.com/index_kfjj.html")

     for item in spider.parse(html):

         print(item)

     del spider

 if __name__ == "__main__":

     test()
  1 # -*- coding: utf-8 -*-

 from datetime import date

 # 基金净值信息

 class FundEquity(object):

     def __init__(self):

         # 类实例即对象的属性

         self.__serial = 0  # 序号

         self.__date = None  # 日期

         self.__code = ""  # 基金代码

         self.__name = ""  # 基金名称

         self.__equity = 0.0  # 单位净值

         self.__accumulationEquity = 0.0  # 累计净值

         self.__increment = 0.0  # 增长值

         self.__growthRate = 0.0  # 增长率

         self.__canBuy = False # 是否可以购买

         self.__canRedeem = True # 是否能赎回

     @property

     def serial(self):

         return self.__serial

     @serial.setter

     def serial(self, value):

         self.__serial = value

     @property

     def date(self):

         return self.__date

     @date.setter

     def date(self, value):

         # 数据检查

         if not isinstance(value, date):

             raise ValueError('date must be date type!')

         self.__date = value

     @property

     def code(self):

         return self.__code

     @code.setter

     def code(self, value):

         self.__code = value

     @property

     def name(self):

         return self.__name

     @name.setter

     def name(self, value):

         self.__name = value

     @property

     def equity(self):

         return self.__equity

     @equity.setter

     def equity(self, value):

         self.__equity = value

     @property

     def accumulationEquity(self):

         return self.__accumulationEquity

     @accumulationEquity.setter

     def accumulationEquity(self, value):

         self.__accumulationEquity = value

     @property

     def increment(self):

         return self.__increment

     @increment.setter

     def increment(self, value):

         self.__increment = value

     @property

     def growthRate(self):

         return self.__growthRate

     @growthRate.setter

     def growthRate(self, value):

         self.__growthRate = value

     @property

     def canBuy(self):

         return self.__canBuy

     @canBuy.setter

     def canBuy(self, value):

         self.__canBuy = value

     @property

     def canRedeem(self):

         return self.__canRedeem

     @canRedeem.setter

     def canRedeem(self, value):

         self.__canRedeem = value

     # 类似其它语言中的toString()函数

     def __str__(self):

         return '[serial:%s,date:%s,code:%s,name:%s,equity:%.4f,\

 accumulationEquity:%.4f,increment:%.4f,growthRate:%.4f%%,canBuy:%s,canRedeem:%s]'\

                % (self.serial, self.date.strftime("%Y-%m-%d"), self.code, self.name, float(self.equity), \

                   float(self.accumulationEquity), float(self.increment), \

 float(self.growthRate), self.canBuy, self.canRedeem)
上述代码中FundEquity类的属性值使用getter/setter函数方式定义的,这种方式可以对值进行检查。__str__(self)函数类似其它语言里的toString()。
在命令行运行fund_spider.py代码,console窗口会输出净值数据。
小结
从以上的示例代码中可见少量代码就能把豆瓣网上小组中的帖子和回复数据抓取、内容解析、存储下来,可见Python语言的简洁、高效。
例子的代码比较简单,唯一比较花时间的是调 XPath规则,借助于浏览器辅助插件工具能大大提高效率。
例子中没有提及Pipeline(管道)、Middleware(中间件) 这些复杂东西。没有考虑爬虫请求太频繁导致站方封禁IP(可以通过不断更换HTTP Proxy 方式破解),没有考虑需要登录才能抓取数据的情况(代码模拟用户登录破解)。
实际项目中提取内容的XPath规则、正则表达式 这类易变动的部分不应该硬编码写在代码里,网页抓取、内容解析、解析结果的存储等应该使用分布式架构的方式独立运行。总之实际生产环境中运行的爬虫系统需要考虑的问题很多,github上也有一些开源的网络爬虫系统,可以参考。
怎么用Python写爬虫抓取网页数据的更多相关文章
- 如何利用Python网络爬虫抓取微信朋友圈的动态(上)
今天小编给大家分享一下如何利用Python网络爬虫抓取微信朋友圈的动态信息,实际上如果单独的去爬取朋友圈的话,难度会非常大,因为微信没有提供向网易云音乐这样的API接口,所以很容易找不到门.不过不要慌 ...
- 如何利用Python网络爬虫抓取微信好友数量以及微信好友的男女比例
前几天给大家分享了利用Python网络爬虫抓取微信朋友圈的动态(上)和利用Python网络爬虫爬取微信朋友圈动态——附代码(下),并且对抓取到的数据进行了Python词云和wordart可视化,感兴趣 ...
- Python3简单爬虫抓取网页图片
现在网上有很多python2写的爬虫抓取网页图片的实例,但不适用新手(新手都使用python3环境,不兼容python2), 所以我用Python3的语法写了一个简单抓取网页图片的实例,希望能够帮助到 ...
- 利用Python网络爬虫抓取微信好友的签名及其可视化展示
前几天给大家分享了如何利用Python词云和wordart可视化工具对朋友圈数据进行可视化,利用Python网络爬虫抓取微信好友数量以及微信好友的男女比例,以及利用Python网络爬虫抓取微信好友的所 ...
- 利用Python网络爬虫抓取微信好友的所在省位和城市分布及其可视化
前几天给大家分享了如何利用Python网络爬虫抓取微信好友数量以及微信好友的男女比例,感兴趣的小伙伴可以点击链接进行查看.今天小编给大家介绍如何利用Python网络爬虫抓取微信好友的省位和城市,并且将 ...
- 爬虫抓取页面数据原理(php爬虫框架有很多 )
爬虫抓取页面数据原理(php爬虫框架有很多 ) 一.总结 1.php爬虫框架有很多,包括很多傻瓜式的软件 2.照以前写过java爬虫的例子来看,真的非常简单,就是一个获取网页数据的类或者方法(这里的话 ...
- web scraper 抓取网页数据的几个常见问题
如果你想抓取数据,又懒得写代码了,可以试试 web scraper 抓取数据. 相关文章: 最简单的数据抓取教程,人人都用得上 web scraper 进阶教程,人人都用得上 如果你在使用 web s ...
- c#抓取网页数据
写了一个简单的抓取网页数据的小例子,代码如下: //根据Url地址得到网页的html源码 private string GetWebContent(string Url) { string strRe ...
- 【iOS】正則表達式抓取网页数据制作小词典
版权声明:本文为博主原创文章,未经博主同意不得转载. https://blog.csdn.net/xn4545945/article/details/37684127 应用程序不一定要自己去提供数据. ...
随机推荐
- JSP总结摘要
一 概述 1.什么是JSP? Java Server Pages,服务器端负责页面展示的技术,可以嵌套java语言,以取代使用Servlet生成页面的方式,底层被转化为Servlet. 二 路径 1. ...
- 最简单,有效的学习mysql教程(一)
数据库 1 定义 数据库,可以简单的解释为:高效的存储和处理数据的介质(主要分为磁盘和内存两种). 2 分类 根据数据库存储介质的不同,可以将其分为两类,即:关系型数据库(SQL)和非关系型数据库(N ...
- JDBC中处理事务,小Demo
事务的四大特性(ACID): 原子性(Atomicity):事务中所有操作是不可再分割的原子单位.事务中所有操作要么全部执行成功,要么全部执行失败. 一致性(Consistency):事务执行 ...
- C/C++遍历进程和进程ID的小工具
原文:http://blog.csdn.net/qq78442761/article/details/54646010 当我们写某些具有破坏性的程序时就需要对进程进行遍历和提取ID 对于上述功能,我们 ...
- The difference between a local variable and a member variable
package com.itheima_04; /* * 成员变量和局部变量的区别: * A:在类中的位置不同 * 成员变量:类中,方法外 * 局部变量:方法中或者方法声明上(形式参数) * B:在内 ...
- python item repr doc format slots doc module class 析构 call 描述符
1.item # __getitem__ __setitem__ __delitem__ obj['属性']操作触发 class Foo: def __getitem__(self, item): r ...
- 同步(Synchronous)和异步(Asynchronous)的概念
web项目中的同步与异步 在我们平时的web项目开发中会经常听到ajax请求这样一个称呼,在web项目中可以通过js或者jquery发送同步请求又或者异步请求,同步请求呢往往代表着你必须等待这次请求结 ...
- zabbix共享内存报错cannot create semaphore set
zabbix共享内存报错 cannot open log: cannot create semaphore set: [28] No space left on device 报错原因: kernel ...
- vim常用快捷汇总
移动光标的方法 h 或 向左箭头键(←) 光标向左移动一个字符 j 或 向下箭头键(↓) 光标向下移动一个字符 k 或 向上箭头键(↑) 光标向上移动一个字符 l 或 向右箭头键(→) 光标向右移动一 ...
- 如何在 Azure 虚拟机里配置条带化
什么是条带化(striping) 条带 (strip) 是把连续的数据分割成相同大小的数据块,把每段数据分别写入到阵列中的不同磁盘上的方法.简单的说,条带是一种将多个磁盘驱动器合并为一个卷的方法. 许 ...