基于Centos7.2使用Cobbler工具定制化批量安装Centos7.2系统
1.1 定制Centos_7_x86_64.ks文件内容
# Cobbler for Kickstart Configurator for CentOS 7.2.1511 by Wolf_Dreams

# Install OS instead of upgrade

install

# Use network installation(The starting "$" variables are all values in the call configuration file)

url --url=$tree  #引用cobbler配置文件来进行安装

# Use text mode install(graphical, text, or cmdline)

text  #采用文本方式安装

# System language

lang en_US.UTF-8  #指定系统语言

# System keyboard

keyboard us  #指定键盘使用语言

# Clear the Master Boot Record

zerombr  #清空系统主引导记录(原机器有系统)

# System bootloader configuration

bootloader --location=mbr --driveorder=sda --append="crashkernel=auto net.ifnames=0 biosdevname=0 rhgb quiet"  #引导启动器

# Network information

$SNIPPET('network_config')

# System timezone

timezone --utc Asia/Shanghai --ntpservers=ntp1.aliyun.com

# System authorization information(Use shadow passwords,set up the SHA-512 hashing)

authconfig --enableshadow --passalgo=sha512  #设置认证信息

#Root password

rootpw  --iscrypted $default_password_crypted  #新装系统默认密码

# Partition clearing information

clearpart --all –initlabel  #删除分区信息

# Allow manual partitioning of the system as needed(default fstype xfs or default units MB)

part /boot --fstype xfs --size 500

part swap --size 2048

part / --fstype xfs --grow  #逻辑磁盘的所有分区都划分给根(/)分区

# Run the Setup Agent on first boot

firstboot --disable

# SELinux configuration

selinux --disabled

# Firewall configuration

firewall --disabled

#Controls the error logging of Anaconda during installation. It has no effect on the installed system.

logging --level=info

# Do not configure the X Window System

skipx  #不配置x window桌面系统

# Creates a new user group

group --name=development

# Creates a new user on the system

user --name=gandalf --groups=development --homedir=/data/gandalf --password=123456 --shell=/bin/sh

# Reboot after installation

reboot

# Pre-installation Script(The %pre script is run on the system immediately after the Kickstart file has been parsed, but before installation begins. )

%pre --log=/var/log/ks-pre.log

$SNIPPET('log_ks_pre')  #调用的文件存放在/var/lib/cobbler/snippets目录下

$SNIPPET('kickstart_start')  #调用kickstart开始安装

$SNIPPET('pre_install_network_config')

# Enable installation monitoring

$SNIPPET('pre_anamon')

%end

# Package Selection(The %packages section must end with the %end command.)

%packages  #定制安装完的系统安装有什么软件包(@代表安装软件包组-代表不安装什么软件包,没有前缀代表单个软件包)

@base

@compat-libraries

@debugging

@development

net-tools

tree

lrzsz

vim

telnet

nmap

sysstat

dos2unix

iptraf

ncurses-devel

openssl-devel

zlib-devel

OpenIPMI-tools

screen

%end

# Post-installation Script(You have the option of adding commands to run on the system once the installation is complete, but before the system is rebooted for the first time)

#Logs the script's output into the specified log file(/var/log/ks-post.log)

%post --log=/var/log/ks-post.log

systemctl disable postfix.service

%end

# kdump configuration(enable,The amount of memory you want to reserve for kdump, in MiB)

%addon com_redhat_kdump --enable --reserve-mb=128  #开启系统崩溃转存机制kdump

%end

# Jump to local drive boot start

%post

# Start final steps

$SNIPPET('kickstart_done')  #防止系统循环安装,即调用pxe_just_once=1

%end
1.2 指定Centos_7_x86_64.ks文件及调整内核net.ifnames=0 biosdevname=0参数
1、切换到存放kickstarts文件目录并查看其目录所有文件
[root@cobbler-server ~]# cd /var/lib/cobbler/kickstarts/

[root@cobbler-server kickstarts]# ls

default.ks    install_profiles  sample_autoyast.xml  sample_esxi4.ks  sample.ks

esxi4-ks.cfg  legacy.ks         sample_end.ks #默认ks文件        sample_esxi5.ks  sample_old.seed

esxi5-ks.cfg  pxerescue.ks      sample_esx4.ks       sample_esxi6.ks  sample.seed
2、执行rz命令上传定制的Centos_7_x86_64.ks文件
[root@cobbler-server kickstarts]# rz

rz waiting to receive.

Starting zmodem transfer.  Press Ctrl+C to cancel.

Transferring Centos_7_x86_64.ks...

  100%       2 KB       2 KB/sec    00:00:01       0 Errors
3、查看定制的Centos_7_x86_64.ks文件属性
[root@cobbler-server kickstarts]# ls -ldh Centos_7_x86_64.ks

-rw-r--r-- 1 root root 2.7K May 26 13:30 Centos_7_x86_64.ks
4、查看cobbler镜像文件及profile配置文件
[root@cobbler-server kickstarts]# cobbler distro list

   CentOS-6.8-x86_64

   CentOS-7-x86_64

[root@cobbler-server kickstarts]# cobbler profile list

   CentOS-6.8-x86_64

   CentOS-7-x86_64
5、查看首次导入系统镜像后,安装镜像的文件信息
[root@cobbler-server kickstarts]# cobbler distro report --name=CentOS-7-x86_64

Name                           : CentOS-7-x86_64

Architecture                   : x86_64

TFTP Boot Files                : {}

Breed                          : redhat

Comment                        :

Fetchable Files                : {}

Initrd                         : /var/www/cobbler/ks_mirror/CentOS-7-x86_64/images/pxeboot/initrd.img

Kernel                         : /var/www/cobbler/ks_mirror/CentOS-7-x86_64/images/pxeboot/vmlinuz

Kernel Options                 : {}

Kernel Options (Post Install)  : {}

Kickstart Metadata             : {'tree': 'http://@@http_server@@/cblr/links/CentOS-7-x86_64'}

Management Classes             : []

OS Version                     : rhel7

Owners                         : ['admin']

Red Hat Management Key         : <<inherit>>

Red Hat Management Server      : <<inherit>>

Template Files                 : {}
6、查看指定的profile设置,cobbler默认使用/var/lib/cobbler/kickstarts/sample_end.ks文件
[root@cobbler-server kickstarts]# cobbler profile report --name=CentOS-7-x86_64

Name                           : CentOS-7-x86_64

TFTP Boot Files                : {}

Comment                        :

DHCP Tag                       : default

Distribution                   : CentOS-7-x86_64

Enable gPXE?                   : 0

Enable PXE Menu?               : 1

Fetchable Files                : {}

Kernel Options                 : {}

Kernel Options (Post Install)  : {}

Kickstart                      : /var/lib/cobbler/kickstarts/sample_end.ks #系统默认使用的kickstart文件

Kickstart Metadata             : {}

Management Classes             : []

Management Parameters          : <<inherit>>

Name Servers                   : []

Name Servers Search Path       : []

Owners                         : ['admin']

Parent Profile                 :

Internal proxy                 :

Red Hat Management Key         : <<inherit>>

Red Hat Management Server      : <<inherit>>

Repos                          : []

Server Override                : <<inherit>>

Template Files                 : {}

Virt Auto Boot                 : 1

Virt Bridge                    : xenbr0

Virt CPUs                      : 1

Virt Disk Driver Type          : raw

Virt File Size(GB)             : 5

Virt Path                      :

Virt RAM (MB)                  : 512

Virt Type                      : kvm
7、检查kickstart文件的完整性
[root@cobbler-server kickstarts]# ksvalidator Centos_7_x86_64.ks

The following problem occurred on line 18 of the kickstart file:

Unknown command: $SNIPPET(network_config)  #忽略该项
8、编辑profile配置文件,修改关联的kickstart文件
[root@cobbler-server kickstarts]# cobbler profile edit --name=CentOS-7-x86_64 --kickstart=/var/lib/cobbler/kickstarts/Centos_7_x86_64.ks
9、指定更改Centos7网卡名称为ethx,指定参数--kopts='net.ifnames=0 biosdevname=0'
[root@cobbler-server kickstarts]# cobbler profile edit --name=CentOS-7-x86_64 --kopts='net.ifnames=0 biosdevname=0'
10、再次查看指定的profile设置,kickstart文件/var/lib/cobbler/kickstarts/Centos_7_x86_64.ks
[root@cobbler-server kickstarts]# cobbler profile report --name=CentOS-7-x86_64

Name                           : CentOS-7-x86_64

TFTP Boot Files                : {}

Comment                        :

DHCP Tag                       : default

Distribution                   : CentOS-7-x86_64

Enable gPXE?                   : 0

Enable PXE Menu?               : 1

Fetchable Files                : {}

Kernel Options                 : {'biosdevname': '0', 'net.ifnames': '0'}  #centos7需要设置,centos6不需要设置

Kernel Options (Post Install)  : {}

Kickstart                      : /var/lib/cobbler/kickstarts/Centos_7_x86_64.ks #更改成指定的kickstart文件

Kickstart Metadata             : {}

Management Classes             : []

Management Parameters          : <<inherit>>

Name Servers                   : []

Name Servers Search Path       : []

Owners                         : ['admin']

Parent Profile                 :

Internal proxy                 :

Red Hat Management Key         : <<inherit>>

Red Hat Management Server      : <<inherit>>

Repos                          : []

Server Override                : <<inherit>>

Template Files                 : {}

Virt Auto Boot                 : 1

Virt Bridge                    : xenbr0

Virt CPUs                      : 1

Virt Disk Driver Type          : raw

Virt File Size(GB)             : 5

Virt Path                      :

Virt RAM (MB)                  : 512

Virt Type                      : kvm

[root@cobbler-server kickstarts]# cobbler sync
1.3 定制化安装指定操作系统方法
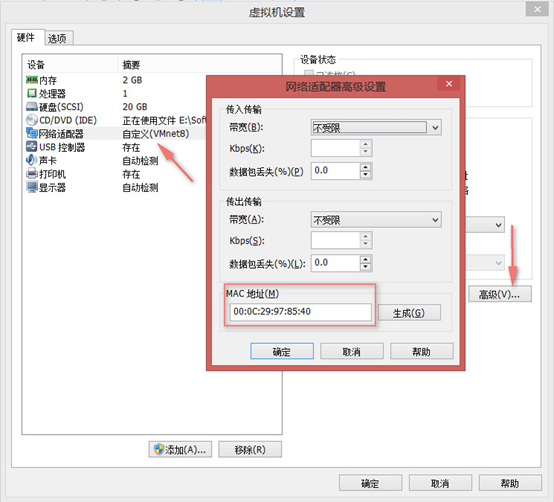
1、查看指定服务器的MAC地址(区分不同物理服务器采用MAC地址区分)
2、指定服务器使用指定的kickstart文件
[root@cobbler-server kickstarts]# cobbler system add --name=cobbler-client --mac-address=00:0C:29:97:85:40 --profile=CentOS-7-x86_64 --ip-address=172.16.0.100 --netmask=255.255.255.0 --gateway=172.16.0.1 --interface=eth0 --static=1 --hostname=cobbler-client --name-servers="114.114.114.114 8.8.8.8"

[root@cobbler-server kickstarts]# cobbler system list

   cobbler-client

[root@cobbler-server kickstarts]# cobbler sysnc
3、修改指定系统的IP地址
[root@cobbler-server kickstarts]# cobbler system edit --name=cobbler-client --ip-address=172.16.0.190

[root@cobbler-server kickstarts]# cobbler system report --name=cobbler-client

Name                           : cobbler-client

TFTP Boot Files                : {}

Comment                        :

Enable gPXE?                   : <<inherit>>

Fetchable Files                : {}

Gateway                        : 172.16.0.1

Hostname                       : cobbler-client

Image                          :

IPv6 Autoconfiguration         : False

IPv6 Default Device            :

Kernel Options                 : {}

Kernel Options (Post Install)  : {}

Kickstart                      : <<inherit>>

Kickstart Metadata             : {}

LDAP Enabled                   : False

LDAP Management Type           : authconfig

Management Classes             : <<inherit>>

Management Parameters          : <<inherit>>

Monit Enabled                  : False

Name Servers                   : ['114.114.114.114', '8.8.8.8']

Name Servers Search Path       : []

Netboot Enabled                : True

Owners                         : <<inherit>>

Power Management Address       :

Power Management ID            :

Power Management Password      :

Power Management Type          : ipmitool

Power Management Username      :

Profile                        : CentOS-7-x86_64

Internal proxy                 : <<inherit>>

Red Hat Management Key         : <<inherit>>

Red Hat Management Server      : <<inherit>>

Repos Enabled                  : False

Server Override                : <<inherit>>

Status                         : production

Template Files                 : {}

Virt Auto Boot                 : <<inherit>>

Virt CPUs                      : <<inherit>>

Virt Disk Driver Type          : <<inherit>>

Virt File Size(GB)             : <<inherit>>

Virt Path                      : <<inherit>>

Virt PXE Boot                  : 0

Virt RAM (MB)                  : <<inherit>>

Virt Type                      : <<inherit>>

Interface =====                : eth0

Bonding Opts                   :

Bridge Opts                    :

CNAMES                         : []

InfiniBand Connected Mode      : False

DHCP Tag                       :

DNS Name                       :

Per-Interface Gateway          :

Master Interface               :

Interface Type                 :

IP Address                     : 172.16.0.190

IPv6 Address                   :

IPv6 Default Gateway           :

IPv6 MTU                       :

IPv6 Prefix                    :

IPv6 Secondaries               : []

IPv6 Static Routes             : []

MAC Address                    : 00:0C:29:97:85:40

Management Interface           : False

MTU                            :

Subnet Mask                    : 255.255.255.0

Static                         : True

Static Routes                  : []

Virt Bridge                    :

[root@cobbler-server kickstarts]# cobbler sync
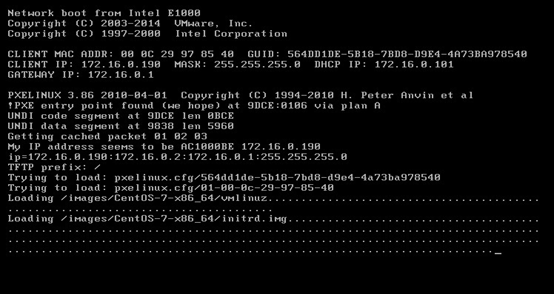
4、开启服务器自动安装指定的操作系统
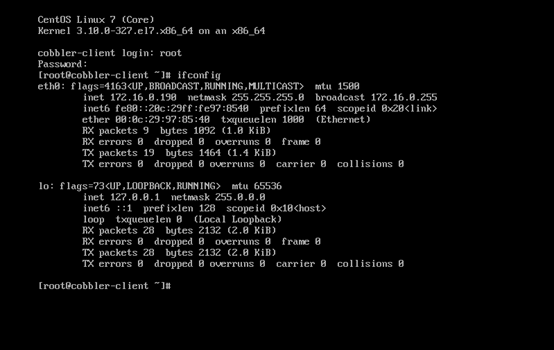
5、操作系统安装完成后进行基本验证
定制kickstart文件的语法参考网址
CentOS7:https://access.redhat.com/documentation/en-us/red_hat_enterprise_linux/7/html/installation_guide/sect-kickstart-syntax#sect-kickstart-commands
Centos6:https://access.redhat.com/documentation/en-us/red_hat_enterprise_linux/6/html/installation_guide/s1-kickstart2-options
基于Centos7.2使用Cobbler工具定制化批量安装Centos7.2系统的更多相关文章
- Cobbler全自动批量安装部署Linux系统
说明: Cobbler服务器系统:CentOS 5.10 64位 IP地址:192.168.21.128 需要安装部署的Linux系统: eth0(第一块网卡,用于外网)IP地址段:192.168.2 ...
- kickstart 实现批量安装centos7.x系统
1.1 安装系统的方法 l 光盘(ISO文件,光盘的镜像文件)===>>每一台物理机都得给一个光驱,如果用外置光驱的话,是不是每台机器都需要插一下 l U盘:ISO镜像刻录到U盘==& ...
- kickstart模式实现批量安装centos7.x系统
1.1 安装系统的方法 l 光盘(ISO文件,光盘的镜像文件)===>>每一台物理机都得给一个光驱,如果用外置光驱的话,是不是每台机器都需要插一下 l U盘:ISO镜像刻录到U盘==& ...
- 005-(已测试成功的方案)kickstart模式实现批量安装centos7.x系统
1.1 安装系统的方法 l 光盘(ISO文件,光盘的镜像文件)===>>每一台物理机都得给一个光驱,如果用外置光驱的话,是不是每台机器都需要插一下 l U盘:ISO镜像刻录到U盘==& ...
- Cobbler批量安装Ubuntu/CentOS系统
2013-07-25 一.安装和修改cobbler配置 1. Cobbler不在CentOS的基本源中,需要导入EPEL源升级软件包, 确保epel-release包的版本为最新,当前最新版本为 ...
- centOS7 mini配置linux服务器(一)安装centOs7
1. 准备centos-7 (minni镜像) 官网地址http://isoredirect.centos.org/centos/7/isos/x86_64/CentOS-7-x86_64-Minim ...
- Monodraw for Mac(基于 ASCII 码设计编辑工具)破解版安装
1.软件简介 Monodrawp 是 macOS 系统上一款专为 Mac 设计的强大的 ASCII 码设计编辑器,纯文本历经几十年而不衰.Monodraw for mac 可以创建基于文本的艺术 ...
- 在Mac OS X 通过抓包、“第三方下载工具”加速下载、安装APP或系统
#!/bin/bash ######################################################################################## ...
- Vagrant批量安装CentOS7
环境准备 下载virtualbox https://download.virtualbox.org/virtualbox/6.1.10/VirtualBox-6.1.10-138449-Win.exe ...
随机推荐
- Js 数组对象排序
1.定义函数 /** * 数组对象排序函数 * @param {any} name 排序字段 * @param {any} order 升.降(这里事true.false记得处理下) */ var b ...
- 079 Word Search 单词搜索
给定一个二维面板和一个单词,找出该单词是否存在于网格中.这个词可由顺序相邻的单元格内的字母构成,其中“相邻”单元格是那些水平相邻或垂直相邻的单元格.同一个单元格内的字母不允许被重复使用.例如,给定 二 ...
- 050 Pow(x, n)
实现 pow(x, n).示例 1:输入: 2.00000, 10输出: 1024.00000示例 2:输入: 2.10000, 3输出: 9.26100详见:https://leetcode.com ...
- Json规范
标准格式 书写使用首字母小写驼峰式 {" status":0 //状态 大于0代表正常.小于等于0代表异常 "message":"",/ ...
- kindeditor 修改上传图片的路径的方法
默认情况下kindeditor上传的图片在编辑器的根目录/attached/目录下.以日期建一个目录,然后保存文件.有些时候大概我们并不想这样.考虑到更新编辑器,或更换编辑器不太方便.比如我现在想把上 ...
- c#进行MD5加密方式和解密算法
--------------- 因为加密个解密都需要用到key所有在加密的后需要把key和加密码都存到数据库中 /// <summary> /// 唯一加密方式 /// </summ ...
- Jsp动态生成表格
输入行列: <body> <form action="Train2ResultJsp.jsp"> row:<input type="text ...
- 一条shell统计代码行数
Xcode统计代码,用shell命令即可,非常简单.打开终端,进入你的工程目录,执行下列代码 find . -name "*.m" -or -name "*.h" ...
- 洛谷P1435 回文字串(dp)
题意 题目链接 回文词是一种对称的字符串.任意给定一个字符串,通过插入若干字符,都可以变成回文词.此题的任务是,求出将给定字符串变成回文词所需要插入的最少字符数. 比如 “Ab3bd”插入2个字符后可 ...
- Cannot load JDBC driver class 'com.mysql.jdbc.Driver解决方法
“Cannot load JDBC driver class 'com.mysql.jdbc.Driver ” 表示没有JDBC连接MySql的驱动包,因此需要手动添加驱动包到WEB-INF目录下的l ...