
OpenCV开发笔记(七十二):红胖子8分钟带你使用opencv+dnn+tensorFlow识别物体
前言
级联分类器的效果并不是很好,准确度相对深度学习较低,本章使用opencv通过tensorflow深度学习,检测已有模型的分类。
Demo


可以猜测,1其实是人,18序号类是狗,因为笔者未找到对应的分类具体信息。
Tensorflow模型下载
https://github.com/opencv/opencv_extra
(注意:未找到对应的分类具体信息。)
OpenCV深度识别基本流程
opencv3.4.x支持了各种模型。
支持的模型
opencv3.4.x支持一下深度学习的模型:
- caffe:.caffemodel
官网:http://caffe.berkeleyvision.org
- tensorflow:.pb
官网:https://www.tensorflow.org
- torch:.t7 | .net
官网:http://torch.ch
- darknet:.weights
官网:https://pjreddie.com/darknet
- DLDT:.bin
官网:https://software.intel.com/openvino-toolkit
操作步骤:tensorflow
- 步骤一:加载模型和配置文件,建立神经网络。
根据不同的模型,使用cv::dnn::readNetFromXXX系列函数进行读取,opencv3.4.x系列支持的dnn模型(支持模型往上看)。
举例tensorflow模型如下:
std::string weights = "E:/qtProject/openCVDemo/dnnData/" \

                      "ssd_mobilenet_v1_coco_2017_11_17/frozen_inference_graph.pb";

std::string prototxt = "E:/qtProject/openCVDemo/dnnData/" \

                      "ssd_mobilenet_v1_coco_2017_11_17.pbtxt";

cv::dnn::Net net = cv::dnn::readNetFromTensorflow(weights, prototxt);
- 步骤二:将要预测的图片加入到神经网络中
加入之后,需要识别图片,那么需要把图片输入到神经网络当中去,如下:
cv::Mat mat;

cv::Mat blob;

mat = cv::imread("E:/testFile/14.jpg");

cv::dnn::blobFromImage(mat, blob);
- 步骤三:分类预测,获取识别的结果
输入之后,就进行识别,识别是向前预测(分类预测),并且拿到结果。
cv::Mat prob = net.forward();
对于预测的结果,存于cv::Mat类型的prob,然后需要统一对prob进行处理,使其成为我们可以使用的数据,代码如下:
cv::Mat detectionMat(prob.size[2], prob.size[3], CV_32F, prob.ptr<float>());
对于从结果prob转换为detectionMat后,其结构如下:
cv::Mat为多行七列,每一行代表一个检测到的分类,具体列信息如下表:
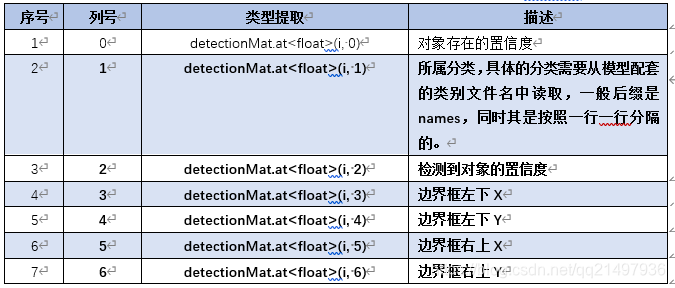
(注意:具体的使用,请参照“步骤四”)
- 步骤四:对达到置信度的可以通过输出的mat进行分类和框选
cv::Mat detectionMat(prob.size[2], prob.size[3], CV_32F, prob.ptr<float>());

// 置信度预制,大于执行度的将其使用rect框出来

float confidenceThreshold = 0.75;

for(int i = 0; i < detectionMat.rows; i++)

{

    float confidence = detectionMat.at<float>(i, 2);

    if (confidence > confidenceThreshold)

    {

        // 高于置信度的,获取其x、y、以及对应的宽度高度,进行框选

        int classId = (detectionMat.at<float>(i, 1));

        int xLeftBottom = static_cast<int>(detectionMat.at<float>(i, 3) * mat.cols);

        int yLeftBottom = static_cast<int>(detectionMat.at<float>(i, 4) * mat.rows);

        int xRightTop = static_cast<int>(detectionMat.at<float>(i, 5) * mat.cols);

        int yRightTop = static_cast<int>(detectionMat.at<float>(i, 6) * mat.rows);

        cv::Rect object((int)xLeftBottom,

                     (int)yLeftBottom,

                     (int)(xRightTop - xLeftBottom),

                     (int)(yRightTop - yLeftBottom));

        cv::rectangle(mat, object, cv::Scalar(0, 255, 0), 2);

        qDebug() << __FILE__ << __LINE__

                << classId

                << confidence << confidenceThreshold

                << object.x << object.y << object.width << object.height;

    }

}
函数原型
读取tensorflow模型与配置文件函数原型
Net readNetFromTensorflow(const String &model,

                         const String &config = String());
从文件中读取。
- 参数一:用二进制协议描述网络体系结构的.pb文件的路径;
- 参数二:包含protobuf格式的文本图形定义的.pbtxt文件的路径。生成的网络对象由文本图构建,使用来自二进制的权重让我们更灵活些;
Net readNetFromTensorflow(const std::vector<uchar>& bufferModel,

                         const std::vector<uchar>& bufferConfig = std::vector<uchar>());
从缓存中读取。
- 参数一:包含pb文件内容的bufferModel缓冲区;
- 参数二:包含pbtxt文件内容的bufferConfig缓冲区;
Net readNetFromTensorflow(const char *bufferModel,

                        size_t lenModel,

                        const char *bufferConfig = NULL,

                        size_t lenConfig = 0);
- 参数一:包含pb文件内容的bufferModel缓冲区;
- 参数二:bufferModel缓冲长度;
- 参数三:包含pbtxt文件内容的bufferConfig缓冲区;
- 参数四:bufferConfig缓冲长度;
读取图片(需要识别的)函数原型
Mat blobFromImage(InputArray image,

                  double scalefactor=1.0,

                  const Size& size = Size(),

                  const Scalar& mean = Scalar(),

                  bool swapRB=false,

                  bool crop=false,

                  int ddepth=CV_32F);
void blobFromImage(InputArray image,

                  OutputArray blob,

                  double scalefactor=1.0,

                  const Size& size = Size(),

                  const Scalar& mean = Scalar(),

                  bool swapRB=false,

                  bool crop=false,

                  int ddepth=CV_32F);.
Mat blobFromImages(InputArrayOfArrays images,

                   double scalefactor=1.0,

                   Size size = Size(),

                   const Scalar& mean = Scalar(),

                   bool swapRB=false,

                   bool crop=false,

                   int ddepth=CV_32F);
void blobFromImages(InputArrayOfArrays images,

                   OutputArray blob,

                   double scalefactor=1.0,

                   Size size = Size(),

                   const Scalar& mean = Scalar(),

                   bool swapRB=false,

                   bool crop=false,

                   int ddepth=CV_32F);
从图像创建区域。可选择从中心调整和裁剪图像。
- 参数一:图像输入图像(1、3或4通道);
- 参数二:大小输出图像的空间大小;
- 参数三:从通道中减去平均值的平均标量。价值是有意的,如果image有BGR顺序,swapRB为真,则按(mean-R,mean-G,mean-B)顺序排列;
- 参数四:图像值的缩放因子乘数;
- 参数五:swapRB标志,指示交换第一个和最后一个通道,在三通道图像是必要的;
- 参数六:裁剪标志,指示调整大小后是否裁剪图像;
- 参数七:输出blob的深度,选择CV_32F或CV_8U;
设置神经网络输入函数原型
void cv::dnn::Net::setInput(InputArray blob,

                      const String& name = "",

                      double scalefactor = 1.0,

                      const Scalar& mean = Scalar());
设置网络的新输入值。
- 参数一:一个新的blob。应具有CV_32F或CV_8U深度。
- 参数二:输入层的名称。
- 参数三:可选的标准化刻度。
- 参数四:可选的平均减去值。
深度检测识别(向前预测)函数原型
void cv::dnn::Net::Mat forward(const String& outputName = String());
向前预测,返回指定层的第一个输出的blob,一般是返回最后一层,可使用cv::Net::getLayarNames()获取所有的层名称。
- 参数一:outputName需要获取输出的层的名称
Demo源码
void OpenCVManager::testTensorflow()

{

    // 训练好的模型以及其模型的后缀名

    // .caffemodel (Caffe, http://caffe.berkeleyvision.org/)

    // .pb (TensorFlow, https://www.tensorflow.org/)

    // .t7 | *.net (Torch, http://torch.ch/)

    // .weights (Darknet, https://pjreddie.com/darknet/)

    // .bin (DLDT, https://software.intel.com/openvino-toolkit)

    // https://github.com/opencv/opencv/wiki/TensorFlow-Object-Detection-API

    std::string weights = "E:/qtProject/openCVDemo/dnnData/" \

                          "ssd_mobilenet_v1_coco_2017_11_17/"frozen_inference_graph.pb";

    std::string prototxt = "E:/qtProject/openCVDemo/dnnData/" \

                           "ssd_mobilenet_v1_coco_2017_11_17.pbtxt";

    cv::dnn::Net net = cv::dnn::readNetFromTensorflow(weights, prototxt);

    if(net.empty())

    {

        qDebug() << __FILE__ << __LINE__ << "net is empty!!!";

        return;

    }

    cv::Mat mat;

    cv::Mat blob;

    // 获得所有层的名称和索引

    std::vector<cv::String> layerNames = net.getLayerNames();

    int lastLayerId = net.getLayerId(layerNames[layerNames.size() - 1]);

    cv::Ptr<cv::dnn::Layer> lastLayer = net.getLayer(cv::dnn::DictValue(lastLayerId));

    qDebug() << __FILE__ << __LINE__

             << QString(lastLayer->type.c_str())

             << QString(lastLayer->getDefaultName().c_str())

             << QString(layerNames[layerNames.size()-1].c_str());

#if 0

    // 视频里面的识别

    cv::VideoCapture capture;

    if(!capture.open("E:/testFile/4.avi"))

    {

        qDebug() << __FILE__ << __LINE__ << "Failed to open videofile!!!";

        return;

    }

#endif

    while(true)

    {

#if 1

        // 读取图片识别

        mat = cv::imread("E:/testFile/15.jpg");

        if(!mat.data)

        {

            qDebug() << __FILE__ << __LINE__ << "Failed to read image!!!";

            return;

        }

#else

        // 视频里面的识别

        capture >> mat;

        if(mat.empty())

        {

            cv::waitKey(0);

            break;

        }

#endif

        cv::dnn::blobFromImage(mat, blob);

        net.setInput(blob);

        // 推理预测:可以输入预测的图层名称

//        cv::Mat prob = net.forward("detection_out");

        cv::Mat prob = net.forward();

        // 显示识别花费的时间

        std::vector<double> layersTimes;

        double freq = cv::getTickFrequency() / 1000;

        double t = net.getPerfProfile(layersTimes) / freq;

        std::string label = cv::format("Inference time: %.2f ms", t);

        cv::putText(mat, label, cv::Point(0, 15), cv::FONT_HERSHEY_SIMPLEX, 0.5, cv::Scalar(0, 255, 0));

        cv::Mat detectionMat(prob.size[2], prob.size[3], CV_32F, prob.ptr<float>());

        // 置信度预制,大于执行度的将其使用rect框出来

        float confidenceThreshold = 0.75;

        for(int i = 0; i < detectionMat.rows; i++)

        {

            float confidence = detectionMat.at<float>(i, 2);

            if (confidence > confidenceThreshold)

            {

                // 高于置信度的,获取其x、y、以及对应的宽度高度,进行框选

                int classId = (detectionMat.at<float>(i, 1));

                int xLeftBottom = static_cast<int>(detectionMat.at<float>(i, 3) * mat.cols);

                int yLeftBottom = static_cast<int>(detectionMat.at<float>(i, 4) * mat.rows);

                int xRightTop = static_cast<int>(detectionMat.at<float>(i, 5) * mat.cols);

                int yRightTop = static_cast<int>(detectionMat.at<float>(i, 6) * mat.rows);

                cv::Rect object((int)xLeftBottom,

                                (int)yLeftBottom,

                                (int)(xRightTop - xLeftBottom),

                                (int)(yRightTop - yLeftBottom));

                cv::rectangle(mat, object, cv::Scalar(0, 255, 0), 2);

                qDebug() << __FILE__ << __LINE__

                         << classId

                         << confidence << confidenceThreshold

                         << object.x << object.y << object.width << object.height;

            }

         }

        cv::imshow(_windowTitle.toStdString(), mat);

        cv::waitKey(0);

    }

}
对应工程模板v1.64.0
openCVDemo_v1.64.0_基础模板_tensorFlow分类检测.rar。
入坑
入坑一:加载模型时候错误
错误

原因
.pb模型文件与.pbtxt文件不对应,版本也有关系。
解决
更换模型,使用正确的pb与pbtxt对应的文件。
上一篇:《OpenCV开发笔记(七十一):红胖子8分钟带你深入级联分类器训练》
下一篇:持续补充中…
OpenCV开发笔记(七十二):红胖子8分钟带你使用opencv+dnn+tensorFlow识别物体的更多相关文章
- OpenCV开发笔记(七十三):红胖子8分钟带你使用opencv+dnn+yolov3识别物体
前言 级联分类器的效果并不是很好,准确度相对深度学习较低,上一章节使用了dnn中的tensorflow,本章使用yolov3模型,识别出具体的分类. Demo 320x320,置信度0 ...
- OpenCV开发笔记(六十五):红胖子8分钟带你深入了解ORB特征点(图文并茂+浅显易懂+程序源码)
若该文为原创文章,未经允许不得转载原博主博客地址:https://blog.csdn.net/qq21497936原博主博客导航:https://blog.csdn.net/qq21497936/ar ...
- OpenCV开发笔记(六十九):红胖子8分钟带你使用传统方法识别已知物体(图文并茂+浅显易懂+程序源码)
若该文为原创文章,未经允许不得转载原博主博客地址:https://blog.csdn.net/qq21497936原博主博客导航:https://blog.csdn.net/qq21497936/ar ...
- OpenCV开发笔记(五十六):红胖子8分钟带你深入了解多种图形拟合逼近轮廓(图文并茂+浅显易懂+程序源码)
若该文为原创文章,未经允许不得转载原博主博客地址:https://blog.csdn.net/qq21497936原博主博客导航:https://blog.csdn.net/qq21497936/ar ...
- OpenCV开发笔记(六十四):红胖子8分钟带你深入了解SURF特征点(图文并茂+浅显易懂+程序源码)
若该文为原创文章,未经允许不得转载原博主博客地址:https://blog.csdn.net/qq21497936原博主博客导航:https://blog.csdn.net/qq21497936/ar ...
- OpenCV开发笔记(七十一):红胖子8分钟带你深入级联分类器训练
前言 红胖子,来也! 做图像处理,经常头痛的是明明分离出来了(非颜色的),分为几块区域,那怎么知道这几块区域到底哪一块是我们需要的,那么这部分就涉及到需要识别了. 识别可以自己写模板匹配.特征 ...
- OpenCV开发笔记(五十五):红胖子8分钟带你深入了解Haar、LBP特征以及级联分类器识别过程(图文并茂+浅显易懂+程序源码)
若该文为原创文章,未经允许不得转载原博主博客地址:https://blog.csdn.net/qq21497936原博主博客导航:https://blog.csdn.net/qq21497936/ar ...
- 树莓派开发笔记(十二):入手研华ADVANTECH工控树莓派UNO-220套件(一):介绍和运行系统
前言 树莓派也可以做商业应用,工业控制,其稳定性和可靠性已经得到了验证,故而工业控制,一些停车场等场景也有采用树莓派作为主控的,本片介绍了研华ADVANTECH的树莓派套件组UNO-220-P4N ...
- .net开发笔记(十二) 设计时与运行时的区别(续)
上一篇博客详细讲到了设计时(DesignTime)和运行时(RunTime)的概念与区别,不过没有给出实际的Demo,今天整理了一下,做了一个例子,贴出来分享一下,巩固前一篇博客讲到的内容. 简单回顾 ...
随机推荐
- netty之handler read
有时候会有一系列的处理in的handler,使用fireChannelRead处理传递 转载自https://blog.csdn.net/u011702633/article/details/8205 ...
- java ThreadLocal理解和使用
一.ThreadLoal的理解 ThreadLoal 变量,它的基本原理是,同一个 ThreadLocal 所包含的对象(对ThreadLocal< String >而言即为 String ...
- Oracle学习(十三)优化专题
一.查询频繁,数据量大 索引 使用时机:表中经常查询的字段可以考虑添加索引. 联合索引:若能确认多个条件会同时使用时,可以将这几个条件作为联合索引. 单列索引:若条件查询时,这几个条件不是同时用到的话 ...
- Processing 网格纹理制作(棋盘格)使用pixel() set()像素点绘制方式
接上 我们趁热打铁,紧接上一回的棋盘格绘制,来挖掘一些不同绘制思路,使用pixel()函数来绘画.这是一个以每个像素点作为对象来绘制的思路,而不是以图形的方式来填充.这就改变了绘画思路.实际上,Pro ...
- Quartz.NET集成UI版
Quartz.NET Quartz.NET是NET的开源作业调度系统. Quartz.NET是一个功能齐全的开源作业调度系统,可用于从最小的应用程序到大型企业系统. Quartz.NET目前支持NET ...
- 深度预警:深入理解HBase的系统架构
HBase的构成 物理上来说,HBase是由三种类型的服务器以主从模式构成的.这三种服务器分别是:Region server,HBase HMaster,ZooKeeper. 其中Region ser ...
- Vue学习笔记使用系列一【表单】
脚手架的搭建,请查看另外一篇日记:https://www.cnblogs.com/Fengge518/p/11837078.html 1:直接代码了 1 <!DOCTYPE html> 2 ...
- mysql-3-orderby
#进阶3:排序查询 /* 语法: SELECT FROM WHERE ORDER BY ASC|DESC */ USE myemployees; #案例1:查询员工信息,按工资从高到低排 SELECT ...
- Java 文件 IO 操作
window 路径分割符: \ 表示 windows 系统文件目录分割符 java 代码在 windows 下写某个文件的话需要下面的方式 D:\\soft\\sdclass.txt 其中一个单斜杠 ...
- 2020我终于成功搭建了Metasploitable3靶机
0x00前言 在学习metasploit时我们往往需要一个靶场,下面为大家介绍一下如何在虚拟机中安装metasploitable 3靶场.Metasploitable3是Metasploitable2 ...