
Alluxio+HDFS+MapReduce集成及测试
1、在 HDFS 上配置 Alluxio
注意:这里使用单个 master。 但是,这个单个 master 在 Alluxio 集群中存在单点故障(SPOF),即如果该机器或进程不可用,整个集群将不可用。
1.1、节点角色
采用 3 台虚拟机
| 主机名 | IP地址 | 角色 |
|---|---|---|
| node1 | 192.168.253.131 | master |
| node2 | 192.168.253.132 | worker |
| node3 | 192.168.253.133 | worker |
1.2、软件版本
| 软件 | 版本 |
|---|---|
| JDK | jdk1.8.0_281 |
| HADOOP | hadoop-2.7.3 |
| ALLUXIO | alluxio-2.1.0 |
1.3、准备工作
1.3.1、设置 SSH 免密登录
三台虚拟机可以互相免密登录
1.3.2、安装 JDK
1.3.3、安装 Hadoop
完全分布式安装
1.5、安装 Alluxio
在 node1 上,下载、解压、配置环境变量:
[root@node1 opt]# tar -zxvf alluxio-2.1.0-bin.tar.gz

[root@node1 opt]# ls

alluxio-2.1.0  alluxio-2.1.0-bin.tar.gz  hadoop-2.7.3

[root@node1 opt]# vi  /etc/profile

[root@node1 opt]# source  /etc/profile

[root@node1 opt]# cat  /etc/profile

# /etc/profile

...

export JAVA_HOME=/opt/jdk1.8.0_281

export HADOOP_HOME=/opt/hadoop-2.7.3

export ALLUXIO_HOME=/opt/alluxio-2.1.0

export PATH=.:$HADOOP_HOME/bin:$JAVA_HOME/bin:$ALLUXIO_HOME/bin:$PATH
将 /etc/profile 文件分发到其他三个节点,并执行 source /etc/profile
[root@node1 opt]# scp /etc/profile node2:/etc

.....

[root@node1 opt]# source  /etc/profile
配置配置文件:
[root@node1 conf]# pwd

/opt/alluxio-2.1.0/conf

[root@node1 conf]# cat alluxio-site.properties

...

alluxio.master.hostname=node1

alluxio.master.mount.table.root.ufs=hdfs://node1:9000/alluxio

[root@node1 conf]# cat masters

node1

[root@node1 conf]# cat workers

node2

node3

node4

[root@node1 conf]# cat alluxio-env.sh

export JAVA_HOME=/opt/jdk1.8.0_281
将配置文件复制到所有其他 Alluxio 节点:
# 要在各个节点安装RSYNC:yum -y install RSYNC

[root@node1 alluxio-2.1.0]# bin/alluxio copyDir conf/

RSYNC'ing /opt/alluxio-2.1.0/conf to masters...

node1

RSYNC'ing /opt/alluxio-2.1.0/conf to workers...

node2

node3

node4
将 Alluxio 挂载到本地磁盘
[root@node1 alluxio-2.1.0]# bin/alluxio-mount.sh Mount workers
检查 Alluxio 运行环境
[root@node1 alluxio-2.1.0]# bin/alluxio validateEnv master

[root@node1 alluxio-2.1.0]# bin/alluxio validateEnv workers
在 node1 节点上,使用以下命令进行格式化
# 在首次启动Alluxio之前,必须先格式化

[root@node1 alluxio-2.1.0]# bin/alluxio format

Executing the following command on all worker nodes and logging to /opt/alluxio-2.1.0/logs/task.log: /opt/alluxio-2.1.0/bin/alluxio formatWorker

Waiting for tasks to finish...

All tasks finished

Executing the following command on all master nodes and logging to /opt/alluxio-2.1.0/logs/task.log: /opt/alluxio-2.1.0/bin/alluxio formatJournal

Waiting for tasks to finish...

All tasks finished
在 node1 节点上,使用以下命令启动 Alluxio 集群
[root@node1 alluxio-2.1.0]# bin/alluxio-start.sh all

[root@node1 alluxio-2.1.0]# jps

1809 NameNode

2082 ResourceManager

57514 AlluxioMaster

57836 AlluxioJobMaster

59004 Jps

58317 AlluxioProxy

[root@node2 opt]# jps

30433 AlluxioWorker

1988 NodeManager

1815 DataNode

30585 AlluxioJobWorker

30762 AlluxioProxy

31165 Jps

1902 SecondaryNameNode
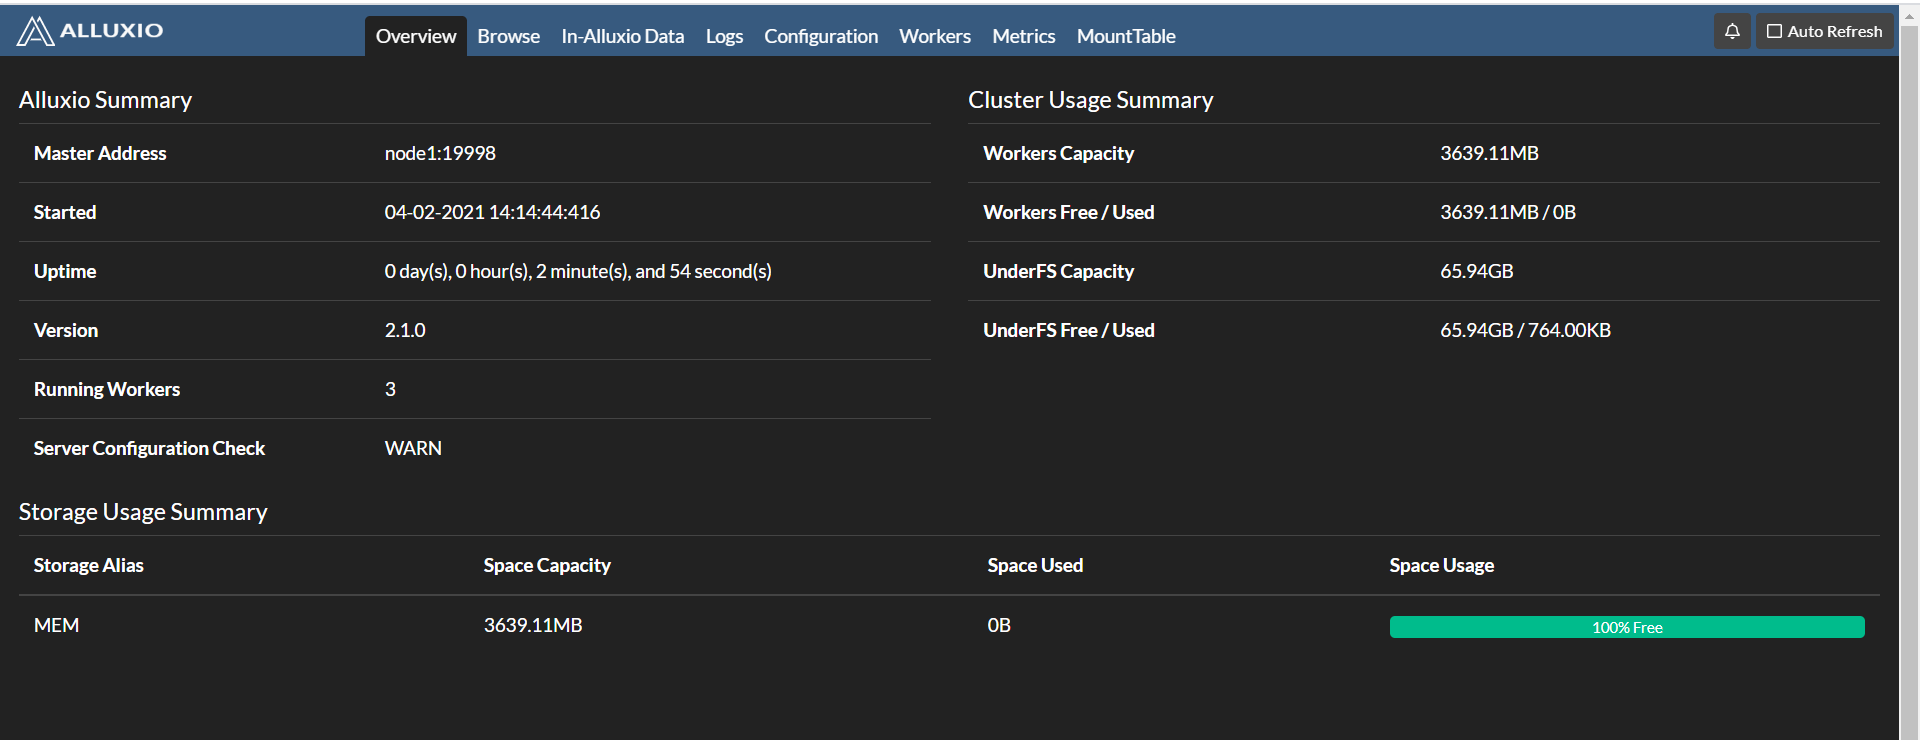
浏览器输入 http://node1:19999/ 查看 web 界面
测试:
[root@node1 alluxio-2.1.0]# bin/alluxio fs mkdir /test

Successfully created directory /test

[root@node1 alluxio-2.1.0]# bin/alluxio fs ls /

drwxr-xr-x  root           root                         0   NOT_PERSISTED 04-02-2021 14:20:06:985  DIR /test

# 在 Alluxio 中读写示例文件

[root@node1 alluxio-2.1.0]# bin/alluxio runTests

# 挂载目录下查看

[root@node1 alluxio-2.1.0]# hadoop fs -ls /alluxio

Found 1 items

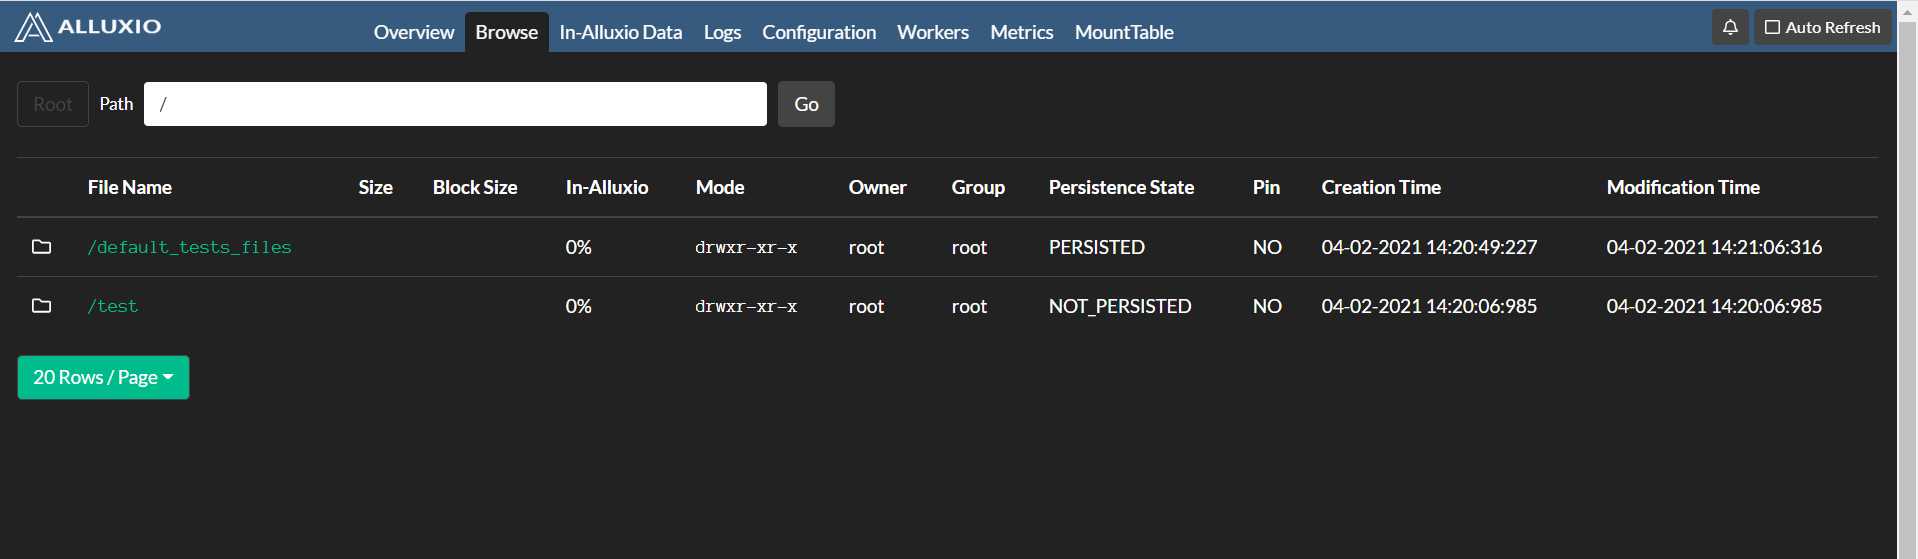
drwxr-xr-x   - root root          0 2021-04-02 14:21 /alluxio/default_tests_files
再次在 web 查看
1.6、问题
问题一:安装 2.5.0 版本时,出现 No Under File System Factory found for: hdfs://node1:9000/alluxio/underFSStorage 错误。
问题二:执行 alluxio-start.sh all 命令重新启动 Alluxio 后,AlluxioWorker 进程启动失败,出现 WARN RetryUtils - Failed to load cluster default configuration with master (attempt 16): alluxio.exception.status.UnavailableException: Failed to handshake with master node1:19998 to load cluster default configuration values: UNAVAILABLE: io exception。执行 alluxio-start.sh all Mount 则成功启动。
2、在 Alluxio 上运行 MapReduce
2.1、前提
- 已安装 JDK
- 已安装 Alluxio
2.2、配置
将 Alluxio Client 的 Jar 包包含在各个 MapReduce 节点的 classpaths 中。
[root@node1 ~]# cd /opt/alluxio-2.1.0/client/

[root@node1 client]# ls

alluxio-2.1.0-client.jar  presto

[root@node1 client]# cp alluxio-2.1.0-client.jar /opt/hadoop-2.7.3/share/hadoop/mapreduce/

[root@node1 client]# scp alluxio-2.1.0-client.jar node2:/opt/hadoop-2.7.3/share/hadoop/mapreduce/

.....
在 node1 节点上,将以下两个属性添加到 core-site.xml 文件中
<property>

    <name>fs.alluxio.impl</name>

    <value>alluxio.hadoop.FileSystem</value>

    <description>The Alluxio FileSystem (Hadoop 1.x and 2.x)</description>

</property>

<property>

    <name>fs.AbstractFileSystem.alluxio.impl</name>

    <value>alluxio.hadoop.AlluxioFileSystem</value>

    <description>The Alluxio AbstractFileSystem (Hadoop 2.x)</description>

</property>
在 node1 节点上,修改 hadoop-env.sh 文件中的 $HADOOP_CLASSPATH
[root@node1 hadoop]# cat hadoop-env.sh

.....

export HADOOP_CLASSPATH=/opt/alluxio-2.1.0/client/alluxio-2.1.0-client.jar:${HADOOP_CLASSPATH}

.....
将上述修改的 core-site.xml 和 hadoop-env.sh 文件分发到其他节点
[root@node1 hadoop]# scp hadoop-env.sh node2:/opt/hadoop-2.7.3/etc/hadoop/

.....

[root@node1 hadoop]# scp core-site.xml node2:/opt/hadoop-2.7.3/etc/hadoop/

.....
检查 MapReduce 与 Alluxio 的集成
[root@node1 alluxio-2.1.0]# integration/checker/bin/alluxio-checker.sh mapreduce

.....

***** Integration test passed. *****
2.3、测试 WordCount
在 Alluxio 中加入输入文件,在 Alluxio 目录中运行:
[root@node1 ~]# alluxio fs copyFromLocal wc.txt /

Copied file:///root/wc.txt to /

[root@node1 ~]# alluxio fs cat /wc.txt

aa

bb

aa

cc

[root@node1 ~]# alluxio fs ls /

-rw-r--r--  root           root                        12       PERSISTED 04-03-2021 21:58:56:558 100% /wc.txt
运行一个 WordCount 的 MapReduce 作业
[root@node1 ~]# hadoop jar share/hadoop/mapreduce/hadoop-mapreduce-examples-2.7.3.jar wordcount \

alluxio://node1:19998/wc.txt \

alluxio://node1:19998/wc-out
查看结果
[root@node1 ~]# alluxio fs ls /wc-out

-rw-r--r--  root           root                         0       PERSISTED 04-03-2021 22:01:52:905 100% /wc-out/_SUCCESS

-rw-r--r--  root           root                        15       PERSISTED 04-03-2021 22:01:51:718 100% /wc-out/part-r-00000

[root@node1 ~]# alluxio fs cat /wc-out/part-r-00000

aa      2

bb      1

cc      1
Alluxio+HDFS+MapReduce集成及测试的更多相关文章
- Hdfs&MapReduce测试
Hdfs&MapReduce测试 测试 上传文件到hdfs 随意打开一个文件夹传一个文件试试(把javafx-src.zip传到hdfs的/根目录下):hadoop fs -put javaf ...
- HBase概念学习(七)HBase与Mapreduce集成
这篇文章是看了HBase权威指南之后,依据上面的解说搬下来的样例,可是略微有些不一样. HBase与mapreduce的集成无非就是mapreduce作业以HBase表作为输入,或者作为输出,也或者作 ...
- HBase 与 MapReduce 集成
6. HBase 与 MapReduce 集成 6.1 官方 HBase 与 MapReduce 集成 查看 HBase 的 MapReduce 任务的执行:bin/hbase mapredcp; 环 ...
- 云计算分布式大数据Hadoop实战高手之路第七讲Hadoop图文训练课程:通过HDFS的心跳来测试replication具体的工作机制和流程
这一讲主要深入使用HDFS命令行工具操作Hadoop分布式集群,主要是通过实验的配置hdfs-site.xml文件的心跳来测试replication具体的工作和流程. 通过HDFS的心跳来测试repl ...
- 大数据Hadoop核心架构HDFS+MapReduce+Hbase+Hive内部机理详解
微信公众号[程序员江湖] 作者黄小斜,斜杠青年,某985硕士,阿里 Java 研发工程师,于 2018 年秋招拿到 BAT 头条.网易.滴滴等 8 个大厂 offer,目前致力于分享这几年的学习经验. ...
- Hadoop核心架构HDFS+MapReduce+Hbase+Hive内部机理详解
转自:http://blog.csdn.net/iamdll/article/details/20998035 分类: 分布式 2014-03-11 10:31 156人阅读 评论(0) 收藏 举报 ...
- springboot集成junit测试与javamail测试遇到的问题
1.springboot如何集成junit测试? 导入junit的jar包 使用下面注解: @RunWith()关于这个的解释看下这两篇文章: http://www.imooc.com/qadetai ...
- Docker持续化集成和测试
基于容器的自动构建:Docker在美团的应用 https://linux.cn/article-5465-1.html Docker持续化集成和测试,关于docker-in-docker问题 h ...
- Pytest权威教程11-模块及测试文件中集成doctest测试
目录 模块及测试文件中集成doctest测试 编码 使用doctest选项 输出格式 pytest-specific 特性 返回: Pytest权威教程 模块及测试文件中集成doctest测试 编码 ...
随机推荐
- brew & apply2files bug
brew & apply2files bug Error: Permission denied @ apply2files - /usr/local/lib/node_modules/npm/ ...
- Android 开发 权限管理
Android 开发 权限管理 https://sspai.com/post/42779 $ adb shell pm list permissions -d -g https://zhuanlan. ...
- 如何在Pycharm中自动添加时间日期、作者等信息
参考下面的内容 #_author_='Lucky';#date: ${DATE}
- close() 和fluse()区别
1.close()默认包含了一次flush()操作,关闭之后,就不能再写入了. 2.flush()刷新,flush()之后,可以接着写入. 3.缓冲区默认大小是8192字节,如果小于8192字节,不会 ...
- Java基础语法:注释
书写注释是一个非常好的习惯. 注释并不会被执行,是给我们写代码的人看的. Java中的注释有三种: 单行注释(Line comment) 多行注释(Block comment) 文档注释(JavaDo ...
- 后端程序员之路 2、nginx、php
nginx是由俄罗斯人开发的一种实现web服务器的工具,主要是为俄罗斯的第三大门户网站实现反向代理加速的服务器. Linux(CentOS)下,下载安装Nginx并配置 - jtlgb - 博客园ht ...
- Markdown基础使用方法
Markdown基础使用方法 标题的几种用法 * 选中标题(Ctrl+1~Crtl+6),分别为标题1-6.* #+空格+内容 为一级标题##+空格+内容为二级标题:以此类推. 字体快捷键及使用方法 ...
- E: Some index files failed to download. They have been**
转: E: Some index files failed to download. They have been** 问题描述: 当使用Dockerfile从包含cuda的镜像建立新的image的时 ...
- 基于CameraLink的逻辑综合和版图设计
前期接口设计用的是Vivado18.3+Modelsim10.6,逻辑综合及版图生成的环境是Ubuntu16,逻辑综合用的工具Design Compiler,生成版图用的工具是Encounter. 下 ...
- Oracle VM VirtualBox下创建CentOS虚拟系统
下载镜像 创建虚拟电脑 点击新建,输入服务器命名(根据自己喜好),选择好类型和版本(我下载的是64位的CentOS系统,所以选择类型为Linux,版本为其他版本). 修改内存大小 系统建议为512M, ...