Token Based Authentication in Web API 2
原文地址:http://www.c-sharpcorner.com/uploadfile/736ca4/token-based-authentication-in-web-api-2/
Introduction
This article explains the OWIN OAuth 2.0 Authorization and how to implement an OAuth 2.0 Authorization server using the OWIN OAuth middleware.
The OAuth 2.0 Authorization framwork is defined in RFC 6749. It enables third-party applications to obtain limited access to HTTP services, either on behalf of a resource owner by producing a desired effect on approval interaction between the resource owner and the HTTP service or by allowing the third-party application to obtain access on its own behalf.
Now let us talk about how OAuth 2.0 works. It supports the following two (2) different authentication variants:
- Three-Legged
- Two-Legged
Three-Legged Approach: In this approach, a resource owner (user) can assure a third-party client (mobile applicant) about the identity, using a content provider (OAuthServer) without sharing any credentials to the third-party client.
Two-Legged Approach: This approach is known as a typical client-server approach where the client can directly authenticate the user with the content provider.
Multiple classes are in OAuth Authorization
OAuth Authorization can be done using the following two classes:
- IOAuthorizationServerProvider
- OAuthorizationServerOptions
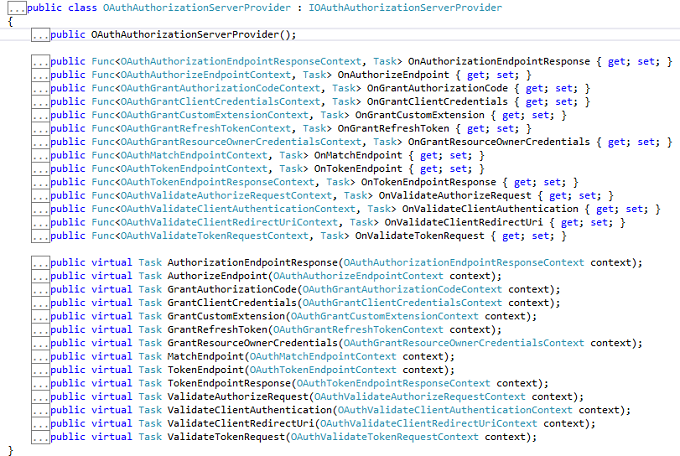
IOAuthorizationServerProvider
It extends the abstract AuthenticationOptions from Microsoft.Owin.Security and is used by the core server options such as:
- Enforcing HTTPS
- Error detail level
- Token expiry
- Endpoint paths
We can use the IOAuthorizationServerProvider class to control the security of the data contained in the access tokens and authorization codes. System.Web will use machine key data protection, whereas HttpListener will rely on the Data Protection Application Programming Interface (DPAPI). We can see the various methods in this class.
OAuthorizationServerOptions
IOAuthAuthorizationServerProvider is responsible for processing events raised by the authorization server. Katana ships with a default implementation of IOAuthAuthorizationServerProvider called OAuthAuthorizationServerProvider. It is a very simple starting point for configuring the authorization server, since it allows us to either attach individual event handlers or to inherit from the class and override the relevant method directly.We can see the various methods in this class.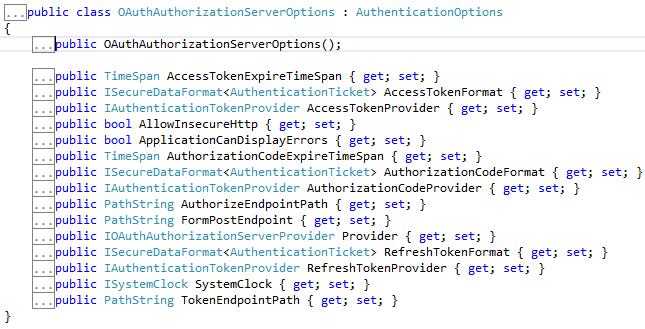
From now we can start to learn how to build an application having token-based authentication.
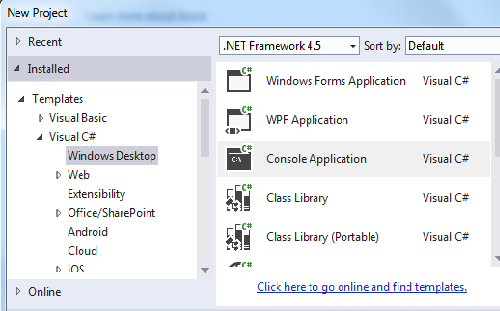
Step 1
Open the Visual Studio 2013 and click New Project.
Step 2
Select the Console based application and provide a nice name for the project.
Step 3
Create a Token class and Add some Property.
- public class Token
- {
- [JsonProperty("access_token")]
- public string AccessToken { get; set; }
- [JsonProperty("token_type")]
- public string TokenType { get; set; }
- [JsonProperty("expires_in")]
- public int ExpiresIn { get; set; }
- [JsonProperty("refresh_token")]
- public string RefreshToken { get; set; }
- }
Step 4
Create a startup class and use the IOAuthorizationServerProvider class as well as the OAuthorizationServerOptions class and set the dummy password and username. I have also set the default TokenEndpoint and TokenExpire time.
- public class Startup
- {
- public void Configuration(IAppBuilder app)
- {
- var oauthProvider = new OAuthAuthorizationServerProvider
- {
- OnGrantResourceOwnerCredentials = async context =>
- {
- if (context.UserName == "rranjan" && context.Password == "password@123")
- {
- var claimsIdentity = new ClaimsIdentity(context.Options.AuthenticationType);
- claimsIdentity.AddClaim(new Claim("user", context.UserName));
- context.Validated(claimsIdentity);
- return;
- }
- context.Rejected();
- },
- OnValidateClientAuthentication = async context =>
- {
- string clientId;
- string clientSecret;
- if (context.TryGetBasicCredentials(out clientId, out clientSecret))
- {
- if (clientId == "rajeev" && clientSecret == "secretKey")
- {
- context.Validated();
- }
- }
- }
- };
- var oauthOptions = new OAuthAuthorizationServerOptions
- {
- AllowInsecureHttp = true,
- TokenEndpointPath = new PathString("/accesstoken"),
- Provider = oauthProvider,
- AuthorizationCodeExpireTimeSpan= TimeSpan.FromMinutes(1),
- AccessTokenExpireTimeSpan=TimeSpan.FromMinutes(3),
- SystemClock= new SystemClock()
- };
- app.UseOAuthAuthorizationServer(oauthOptions);
- app.UseOAuthBearerAuthentication(new OAuthBearerAuthenticationOptions());
- var config = new HttpConfiguration();
- config.MapHttpAttributeRoutes();
- app.UseWebApi(config);
- }
- }
Step 5
Add a controller inherited from API controller.
- [Authorize]
- public class TestController : ApiController
- {
- [Route("test")]
- public HttpResponseMessage Get()
- {
- return Request.CreateResponse(HttpStatusCode.OK, "hello from a secured resource!");
- }
- }
Step 6
Now check the authorization on the basis of the token, so in the Program class validate it.
- static void Main()
- {
- string baseAddress = "http://localhost:9000/";
- // Start OWIN host
- using (WebApp.Start<Startup>(url: baseAddress))
- {
- var client = new HttpClient();
- var response = client.GetAsync(baseAddress + "test").Result;
- Console.WriteLine(response);
- Console.WriteLine();
- var authorizationHeader = Convert.ToBase64String(Encoding.UTF8.GetBytes("rajeev:secretKey"));
- client.DefaultRequestHeaders.Authorization = new AuthenticationHeaderValue("Basic", authorizationHeader);
- var form = new Dictionary<string, string>
- {
- {"grant_type", "password"},
- {"username", "rranjan"},
- {"password", "password@123"},
- };
- var tokenResponse = client.PostAsync(baseAddress + "accesstoken", new FormUrlEncodedContent(form)).Result;
- var token = tokenResponse.Content.ReadAsAsync<Token>(new[] { new JsonMediaTypeFormatter() }).Result;
- Console.WriteLine("Token issued is: {0}", token.AccessToken);
- Console.WriteLine();
- client.DefaultRequestHeaders.Authorization = new AuthenticationHeaderValue("Bearer", token.AccessToken);
- var authorizedResponse = client.GetAsync(baseAddress + "test").Result;
- Console.WriteLine(authorizedResponse);
- Console.WriteLine(authorizedResponse.Content.ReadAsStringAsync().Result);
- }
- Console.ReadLine();
- }
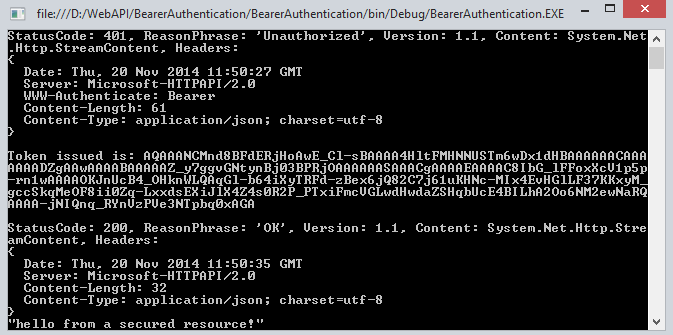
Output
When all the authentication of username and password is not correct then it doesn't generate the token.
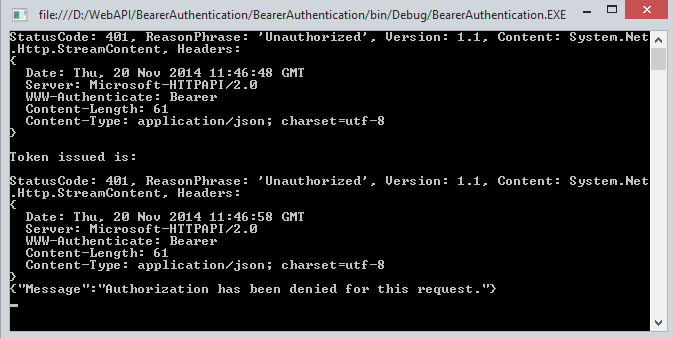
When the Authentication is passed we get success and we get a token.
Summary
In this article we have understand the token-based authentication in Web API 2. I hope you will like it.
Token Based Authentication in Web API 2的更多相关文章
- Claims Based Authentication and Token Based Authentication和WIF
基于声明的认证方式,其最大特性是可传递(一方面是由授信的Issuer,即claims持有方,发送到你的应用上,注意信任是单向的.例如QQ集成登录,登录成功后,QQ会向你的应用发送claims.另一方面 ...
- [转] JSON Web Token in ASP.NET Web API 2 using Owin
本文转自:http://bitoftech.net/2014/10/27/json-web-token-asp-net-web-api-2-jwt-owin-authorization-server/ ...
- JSON Web Token in ASP.NET Web API 2 using Owin
In the previous post Decouple OWIN Authorization Server from Resource Server we saw how we can separ ...
- Dynamics CRM模拟OAuth请求获得Token后在外部调用Web API
关注本人微信和易信公众号: 微软动态CRM专家罗勇 ,回复233或者20161104可方便获取本文,同时可以在第一间得到我发布的最新的博文信息,follow me!我的网站是 www.luoyong. ...
- Asp.Net MVC webAPI Token based authentication
1. 需要安装的nuget <package id="Microsoft.AspNet.Identity.Core" version="2.2.1" ta ...
- 基于JWT(Json Web Token)的ASP.NET Web API授权方式
token应用流程 初次登录:用户初次登录,输入用户名密码 密码验证:服务器从数据库取出用户名和密码进行验证 生成JWT:服务器端验证通过,根据从数据库返回的信息,以及预设规则,生成JWT 返还JWT ...
- Token Based Authentication -- Implementation Demonstration
https://www.w3.org/2001/sw/Europe/events/foaf-galway/papers/fp/token_based_authentication/
- Implement JSON Web Tokens Authentication in ASP.NET Web API and Identity 2.1 Part 3 (by TAISEER)
http://bitoftech.net/2015/02/16/implement-oauth-json-web-tokens-authentication-in-asp-net-web-api-an ...
- 在ASP.NET Web API 2中使用Owin基于Token令牌的身份验证
基于令牌的身份验证 基于令牌的身份验证主要区别于以前常用的常用的基于cookie的身份验证,基于cookie的身份验证在B/S架构中使用比较多,但是在Web Api中因其特殊性,基于cookie的身份 ...
随机推荐
- 系统配置文件的加载设置-以xml文件为例
前言:开发中经常会遇到加载一些配置文件信息,这些信息变化的概率很小,不需要实时的更新.这样的信息放在数据库里自然是不合适的,所以最好的办法是写在配置文件中,在程序第一次运行的时候加载到内存,以后用到的 ...
- cnodejs社区论坛1--登陆
- Trumbowyg - 轻量的 WYSIWYG 编辑器
Trumbowyg 是一个轻量,可定制的 jQuery 所见即所得(WYSIWYG)的编辑器插件.美丽的设计,生成语义化代码,带有功能强大的 API .编辑器和生成的代码进行了优化以支持 HTML5. ...
- windows Python 3.4.3 安装图文
1.去官网(https://www.python.org/downloads/)下载软件. 2.运行安装程序: 下一步 next. 下一步 next 全部选中,下一步 next. 安装中..来自:ht ...
- JScript中的条件注释详解(转载自网络)
JScript中的条件注释详解-转载 这篇文章主要介绍了JScript中的条件注释详解,本文讲解了@cc_on.@if.@set.@_win32.@_win16.@_mac等条件注释语句及可用于条件编 ...
- jQuery.buildFragment源码分析以及在构造jQuery对象的作用
这个方法在jQuery源码中比较靠后的位置出现,主要用于两处.1是构造jQuery对象的时候使用 2.是为DOM操作提供底层支持,这也就是为什么先学习它的原因.之前的随笔已经分析过jQuery的构造函 ...
- 频率直方图(hist)
频率直方图(frequency histogram)亦称频率分布直方图.统计学中表示频率分布的图形.在直角坐标系中,用横轴表示随机变量的取值,横轴上的每个小区间对应一个组的组距,作为小矩形的底边:纵轴 ...
- html5学习笔记:canvas
1.什么是canvas? 可以绘制图形的标签.一般用javascript来绘制. 2.创建一个画布 <!DOCTYPE html> <html> <head> &l ...
- UIApplicationDelegate
App受到干扰时,UIApplication会通知它的delegate对象,让delegate处理系统事件. 项目中的AppDelegate已经遵守了UIApplicationDelegate协议 ...
- XML解析之SAX详解
XML解析之SAX详解 本文属于作者原创 http://www.cnblogs.com/ldnh/ XML解析的五个步骤 1.打开文档 (void)parserDidStartDocument:(NS ...