给大家介绍一款强大的抓包代理工具--mitmproxy
最近工作中涉及到和app相关的测试工作,需要用到mock,特意网上查了些资料,发现有很多工具可以实现app的mock,但是经过我反复试用后,发现mitmproxy这个工具非常的强大
我认为mitmproxy的最大优势有2个
a、使用简单,上手成本极低
b、可以完美的python脚本集成,可以对http请求/websock请求做高度定制化且自动化的处理,更重要的是,他可以热加载
另外如果大家的工作涉及到app的测试,我强烈建议大家要使用代理抓包分析接口请求,有以下几个优势
a、可以比较不同平台app的接口处理逻辑,请求频率、触发条件 是否一样
b、可以观察app的请求频率是否合理,不合理的请求频率会浪费客户的流量
下面我们进入正题
一、前期准备
1、官网地址(有非常详细的介绍,建议去看下)
https://mitmproxy.org/
2、安装(直接使用pip安装即可)
pip install mitmproxy
安装后大家可以使用搜索工具搜索如下文件:mitmproxy.exe\mitmweb.exe\mitmweb.exe,然后执行下面的命令,有输出即可证明安装成功
>mitmdump.exe --version

Mitmproxy: 8.0.0

Python:    3.8.10

OpenSSL:   OpenSSL 1.1.1n  15 Mar 2022

Platform:  Windows-10-10.0.19045-SP0

>mitmproxy.exe --version

Mitmproxy: 8.0.0

Python:    3.8.10

OpenSSL:   OpenSSL 1.1.1n  15 Mar 2022

Platform:  Windows-10-10.0.19045-SP0

>mitmweb.exe --version

Mitmproxy: 8.0.0

Python:    3.8.10

OpenSSL:   OpenSSL 1.1.1n  15 Mar 2022

Platform:  Windows-10-10.0.19045-SP0
3、启动
其实3个命令的启动是一样的,这里我认为mitmweb.exe是最适合的最强大,既有web界面,也可以集成python脚本,所以今天以介绍mitmweb.exe这个命令为主
>mitmweb.exe --help

usage: mitmweb [options]

optional arguments:

  -h, --help            show this help message and exit

  --version             show version number and exit

  --options             Show all options and their default values

  --commands            Show all commands and their signatures

  --set option[=value]  Set an option. When the value is omitted, booleans are set to true, strings and integers are

                        set to None (if permitted), and sequences are emptied. Boolean values can be true, false or

                        toggle. Sequences are set using multiple invocations to set for the same option.

  -q, --quiet           Quiet.

  -v, --verbose         Increase log verbosity.

  --mode MODE, -m MODE  Mode can be "regular", "transparent", "socks5", "reverse:SPEC", or "upstream:SPEC". For

                        reverse and upstream proxy modes, SPEC is host specification in the form of

                        "http[s]://host[:port]".

  --no-anticache

  --anticache           Strip out request headers that might cause the server to return 304-not-modified.

  --no-showhost

  --showhost            Use the Host header to construct URLs for display.

  --rfile PATH, -r PATH

                        Read flows from file.

  --scripts SCRIPT, -s SCRIPT

                        Execute a script. May be passed multiple times.

  --stickycookie FILTER

                        Set sticky cookie filter. Matched against requests.

  --stickyauth FILTER   Set sticky auth filter. Matched against requests.

  --save-stream-file PATH, -w PATH

                        Stream flows to file as they arrive. Prefix path with + to append. The full path can use

                        python strftime() formating, missing directories are created as needed. A new file is opened

                        every time the formatted string changes.

  --no-anticomp

  --anticomp            Try to convince servers to send us un-compressed data.

Mitmweb:

  --no-web-open-browser

  --web-open-browser    Start a browser.

  --web-port PORT       Web UI port.

  --web-host HOST       Web UI host.

  --web-columns WEB_COLUMNS

                        Columns to show in the flow list May be passed multiple times.

Proxy Options:

  --listen-host HOST    Address to bind proxy to.

  --listen-port PORT, -p PORT

                        Proxy service port.

  --no-server, -n

  --server              Start a proxy server. Enabled by default.

  --ignore-hosts HOST   Ignore host and forward all traffic without processing it. In transparent mode, it is

                        recommended to use an IP address (range), not the hostname. In regular mode, only SSL traffic

                        is ignored and the hostname should be used. The supplied value is interpreted as a regular

                        expression and matched on the ip or the hostname. May be passed multiple times.

  --allow-hosts HOST    Opposite of --ignore-hosts. May be passed multiple times.

  --tcp-hosts HOST      Generic TCP SSL proxy mode for all hosts that match the pattern. Similar to --ignore-hosts,

                        but SSL connections are intercepted. The communication contents are printed to the log in

                        verbose mode. May be passed multiple times.

  --upstream-auth USER:PASS

                        Add HTTP Basic authentication to upstream proxy and reverse proxy requests. Format:

                        username:password.

  --proxyauth SPEC      Require proxy authentication. Format: "username:pass", "any" to accept any user/pass

                        combination, "@path" to use an Apache htpasswd file, or

                        "ldap[s]:url_server_ldap[:port]:dn_auth:password:dn_subtree" for LDAP authentication.

  --no-rawtcp

  --rawtcp              Enable/disable raw TCP connections. TCP connections are enabled by default.

  --no-http2

  --http2               Enable/disable HTTP/2 support. HTTP/2 support is enabled by default.

SSL:

  --certs SPEC          SSL certificates of the form "[domain=]path". The domain may include a wildcard, and is equal

                        to "*" if not specified. The file at path is a certificate in PEM format. If a private key is

                        included in the PEM, it is used, else the default key in the conf dir is used. The PEM file

                        should contain the full certificate chain, with the leaf certificate as the first entry. May

                        be passed multiple times.

  --cert-passphrase PASS

                        Passphrase for decrypting the private key provided in the --cert option. Note that passing

                        cert_passphrase on the command line makes your passphrase visible in your system's process

                        list. Specify it in config.yaml to avoid this.

  --no-ssl-insecure

  --ssl-insecure, -k    Do not verify upstream server SSL/TLS certificates.

  --key-size KEY_SIZE   TLS key size for certificates and CA.

Client Replay:

  --client-replay PATH, -C PATH

                        Replay client requests from a saved file. May be passed multiple times.

Server Replay:

  --server-replay PATH, -S PATH

                        Replay server responses from a saved file. May be passed multiple times.

  --no-server-replay-kill-extra

  --server-replay-kill-extra

                        Kill extra requests during replay (for which no replayable response was found).

  --no-server-replay-nopop

  --server-replay-nopop

                        Don't remove flows from server replay state after use. This makes it possible to replay same

                        response multiple times.

  --no-server-replay-refresh

  --server-replay-refresh

                        Refresh server replay responses by adjusting date, expires and last-modified headers, as well

                        as adjusting cookie expiration.

Map Remote:

  --map-remote PATTERN, -M PATTERN

                        Map remote resources to another remote URL using a pattern of the form "[/flow-filter]/url-

                        regex/replacement", where the separator can be any character. May be passed multiple times.

Map Local:

  --map-local PATTERN   Map remote resources to a local file using a pattern of the form "[/flow-filter]/url-

                        regex/file-or-directory-path", where the separator can be any character. May be passed

                        multiple times.

Modify Body:

  --modify-body PATTERN, -B PATTERN

                        Replacement pattern of the form "[/flow-filter]/regex/[@]replacement", where the separator can

                        be any character. The @ allows to provide a file path that is used to read the replacement

                        string. May be passed multiple times.

Modify Headers:

  --modify-headers PATTERN, -H PATTERN

                        Header modify pattern of the form "[/flow-filter]/header-name/[@]header-value", where the

                        separator can be any character. The @ allows to provide a file path that is used to read the

                        header value string. An empty header-value removes existing header-name headers. May be passed

                        multiple times.

Filters:

  See help in mitmproxy for filter expression syntax.

  --intercept FILTER    Intercept filter expression.
说实话有这么命令参数,其实我们常用的就2个
mitmweb.exe -p 8888 -s D:\code\test\mitm4.py
-p指定代理服务的启动端口
-s指定我们执行的脚本

4、配置代理
正常情况下,我们app和笔记本连在同一个wifi就可以代理抓包,但是在我实际测试工程中,会发现有的时候会抓不到包。所以这个时候建议大家在笔记本上开热点,然后手机连这个热点,然后在配置代理,就基本上没问题
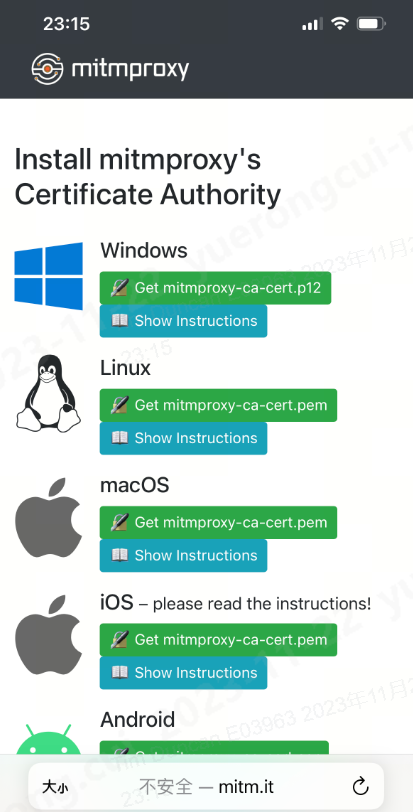
5、安装证书
由于目前的请求基本上都是https,所以我们需要安装证书,以便mitmproxy可以帮我们解密https的报文
如果mitmweb已经启动成功,我们就可以访问下面这个地址
http://mitm.it/

如果出现这个,就说明我们的代理还没有配置对
如果出现下面的窗口,则证明正常,我们根据当前的客户端类型安装证书即可
二、进入实战(这里我们用51cto这个app来做测试)
1、脚本的模板(当然还有其他钩子方法,但是基本不常用,我也没有去使用,所以这里不讲,这里只讲request和response,其他可以看官网)
import mitmproxy.http
from mitmproxy import ctx, http

class Mit():
    def request(self,flow:mitmproxy.http.HTTPFlow):
        #在这里写对request请求的流程处理
        pass

    def response(self,flow:mitmproxy.http.HTTPFlow):
        #在这里写对response请求的流程处理
        pass

addons = [
    Mit(),
]
1、修改请求的报文(ctx.log是proxy自己写的一个日志工具,可以根据日志的级别在控制台打印不同的颜色,你也可以用print打印)
a、先用下面的方法获取请求这个对象有什么方法
class Mit():

    def request(self,flow:mitmproxy.http.HTTPFlow):

        #在这里写对request请求的流程处理

        if flow.request.url == "edu.51cto.com/app.php":

            ctx.log.error("匹配到请求报文")

            ctx.log.error(dir(flow.request))

    def response(self,flow:mitmproxy.http.HTTPFlow):

        #在这里写对response请求的流程处理

        pass

addons = [

    Mit(),

]
可以看到控制台输出,request这个请求有如下方法,所有大家可想而知mitmproxy这个工具有多强大了,也就是说我们几乎可以对请求字任何字段删除和更改,甚至可以对新增字段
['__abstractmethods__',
'__annotations__',
'__class__',
'__delattr__',
'__dict__',
'__dir__',
'__doc__',
'__eq__',
'__format__',
'__ge__',
'__getattribute__',
'__gt__',
'__hash__',
'__init__',
'__init_subclass__',
 '__le__',
'__lt__',
'__module__',
'__ne__',
'__new__',
'__reduce__',
'__reduce_ex__',
'__repr__',
'__setattr__',
'__sizeof__',
'__str__',
'__subclasshook__',
'__weakref__',
'_abc_impl',
'_get_content_type_charset',
'_get_cookies',
'_get_multipart_form',
'_get_query',
'_get_urlencoded_form',
'_guess_encoding',
'_set_cookies',
'_set_multipart_form',
'_set_query',
'_set_urlencoded_form',
'anticache',
'anticomp',
'authority',
'constrain_encoding',
'content',
'cookies',
'copy',
'data',
'decode',
'encode',
'first_line_format',
'from_state',
'get_content',
'get_state',
'get_text',
'headers',
'host',
'host_header',
'http_version',
'is_http10',
'is_http11',
'is_http2',
'json',
'make',
'method',
'multipart_form',
'path',
'path_components',
'port',
'pretty_host',
'pretty_url',
'query',
'raw_content',
'scheme',
'set_content',
'set_state',
'set_text',
'stream',
'text',
'timestamp_end',
'timestamp_start',
'trailers',
'url',
'urlencoded_form']
b、获取参数和修改参数的例子
我们常用用法,下面的代码我演示了获取参数和修改的参数的用法,大家注意看我的注释
    def request(self,flow:mitmproxy.http.HTTPFlow):

        #在这里写对request请求的流程处理

        if "edu.51cto.com/app.php" in flow.request.url:

            ctx.log.error("匹配到请求报文")

            # ctx.log.error(dir(flow.request))

            ctx.log.error(flow.request.query)

            # 返回url的参数的值

            ctx.log.error(flow.request.query.items())

            # 返回url参数值的dict形式

            ctx.log.debug(flow.request.query.keys())

            # url参数的key

            ctx.log.info(flow.request.query.values())

            # url参数的values值

            ctx.log.info(flow.request.method)

            # 获取请求的方法

            ctx.log.info(flow.request.scheme)

            # 获取请求的类型,http还是https

            ctx.log.info(flow.request.host)

            # 获取请求的host

            ctx.log.info(flow.request.headers)

            # 获取请求的头部

            ctx.log.info(flow.request.url)

            # 获取请求的url

            flow.request.url = "https://www.baidu.com"

            #修改url

            flow.request.query.set_all("wd",["test"])

            #设置url参数
大家看到我在app上请求51cto的地址,被代理到了百度,且新增了url的参数

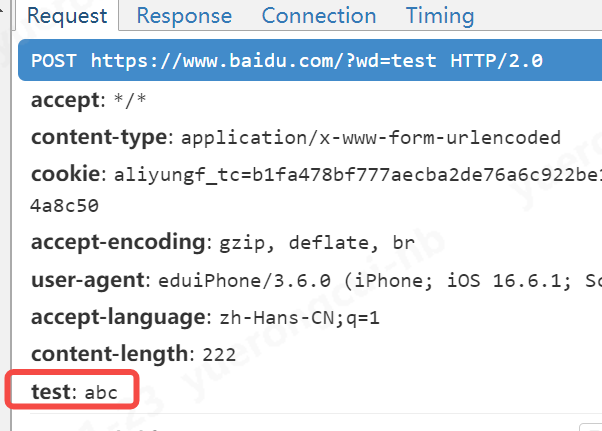
c、新增参数的例子
另外,我们不仅仅可以修改已有参数,还可以给请求头新增参数
flow.request.headers["test"] = "abc"
2、修改响应
a、先用下面的方法看下响应请求有什么属性和方法
class Mit():

    def request(self, flow: mitmproxy.http.HTTPFlow):

        # 在这里写对request请求的流程处理

        if "edu.51cto.com/app.php" in flow.request.url:

            pass

    def response(self, flow: mitmproxy.http.HTTPFlow):

        # 在这里写对response请求的流程处理

        if "edu.51cto.com/app.php" in flow.request.url:

            ctx.log.error(dir(flow.response))

addons = [

    Mit(),

]
可以看到控制台输出,response这个请求有如下方法,所有大家可想而知mitmproxy这个工具有多强大了,也就是说我们几乎可以对请求的任何做增删改
['__abstractmethods__',
 '__annotations__',
'__class__',
'__delattr__',
'__dict__',
'__dir__',
'__doc__',
'__eq__',
'__format__',
'__ge__',
'__getattribute__',
'__gt__',
'__hash__',
'__init__',
'__init_subclass__',
'__le__',
'__lt__',
'__module__',
'__ne__',
'__new__',
'__reduce__',
'__reduce_ex__',
'__repr__',
'__setattr__',
'__sizeof__',
'__str__',
'__subclasshook__',
'__weakref__',
'_abc_impl',
'_get_content_type_charset',
'_get_cookies',
'_guess_encoding',
'_set_cookies',
'content',
'cookies',
'copy',
'data',
'decode',
'encode',
'from_state',
'get_content',
'get_state',
'get_text',
'headers',
'http_version',
'is_http10',
'is_http11',
'is_http2',
'json',
'make',
'raw_content',
'reason',
'refresh',
'set_content',
'set_state',
'set_text',
'status_code',
'stream',
'text',
'timestamp_end',
'timestamp_start',
'trailers']
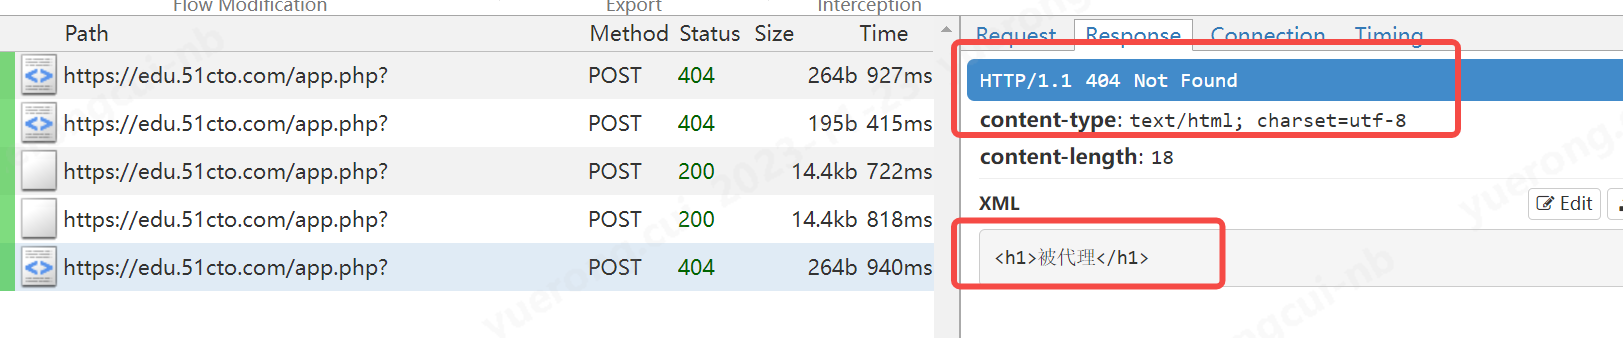
b、演示一个拒绝响应的例子
class Mit():

    def request(self, flow: mitmproxy.http.HTTPFlow):

        # 在这里写对request请求的流程处理

        if "edu.51cto.com/app.php" in flow.request.url:

            pass

    def response(self, flow: mitmproxy.http.HTTPFlow):

        # 在这里写对response请求的流程处理

        if "edu.51cto.com/app.php" in flow.request.url:

            ctx.log.error(dir(flow.response))

            ctx.log.error("测试拒绝响应")

            flow.response = flow.response.make(status_code=404,

                                                content="<h1>被代理</h1>",

                                                headers={"content-type":"text/html"}

                                                )

addons = [

    Mit(),

]
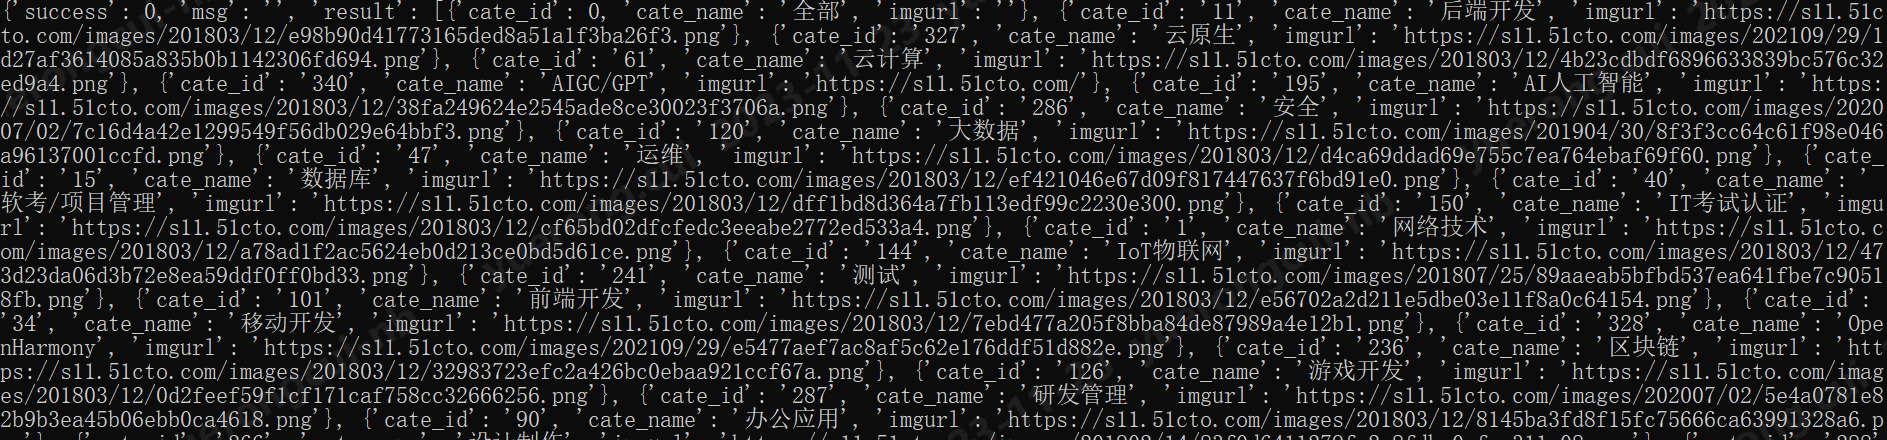
c、演示一个获取参数的例子
import json

class Mit():

    def request(self, flow: mitmproxy.http.HTTPFlow):

        # 在这里写对request请求的流程处理

        if "edu.51cto.com/app.php" in flow.request.url:

            pass

    def response(self, flow: mitmproxy.http.HTTPFlow):

        # 在这里写对response请求的流程处理

        if "edu.51cto.com/app.php" in flow.request.url:

            res_text = json.loads(flow.response.text,encoding="utf-8")

            ctx.log.info(res_text)

            res_get_text = flow.response.get_text("result")

            ctx.log.warn(res_get_text)

            res_get_header = flow.response.headers

            ctx.log.error(res_get_header)

addons = [

    Mit(),

]
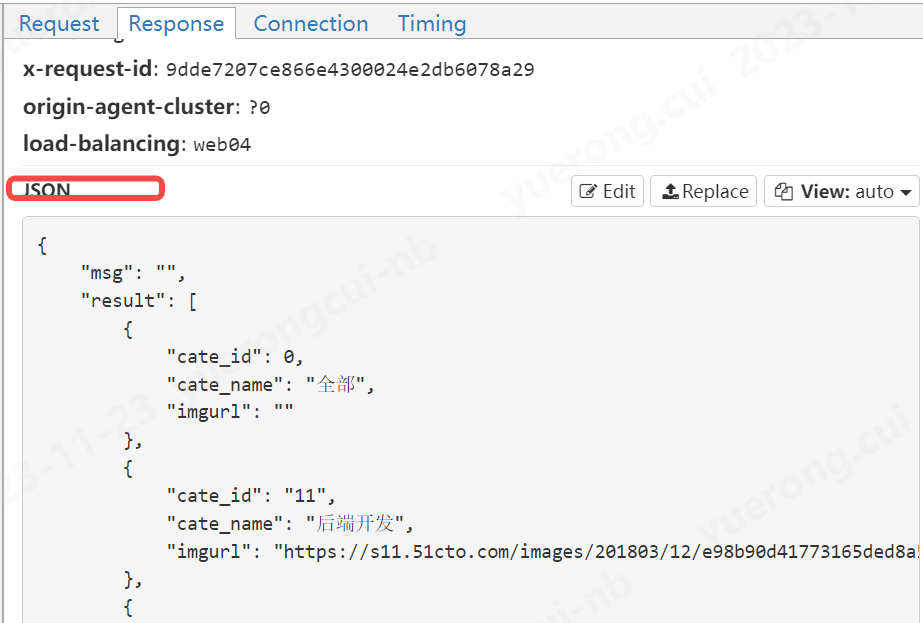
看一下返回的结果
flow.response.text的值,也就是响应体的值
d、演示一个修改参数的例子
import json class Mit():
def request(self, flow: mitmproxy.http.HTTPFlow):
# 在这里写对request请求的流程处理 if "edu.51cto.com/app.php" in flow.request.url:
pass def response(self, flow: mitmproxy.http.HTTPFlow):
# 在这里写对response请求的流程处理
if "edu.51cto.com/app.php" in flow.request.url:
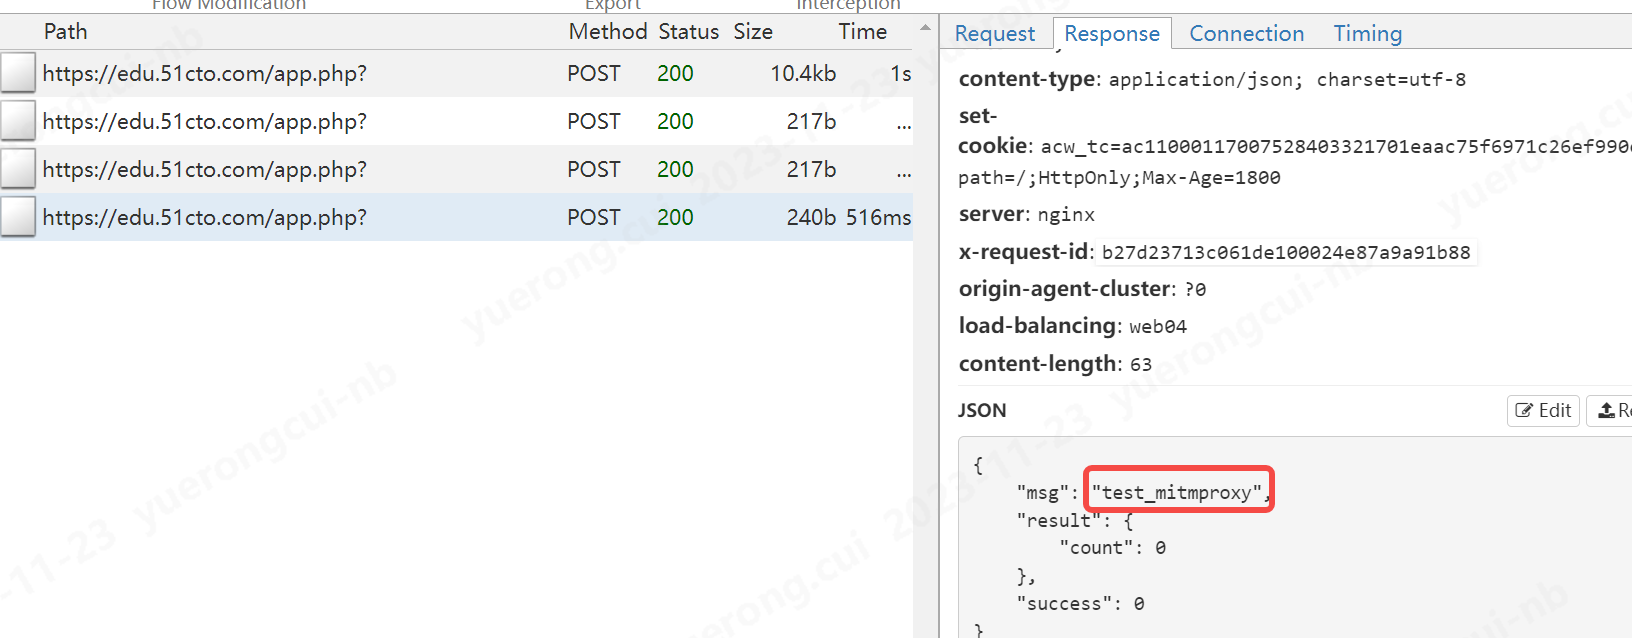
res_text = json.loads(flow.response.text,encoding="utf-8") res_text["msg"] = "test_mitmproxy" flow.response.text = json.dumps(res_text,ensure_ascii=True) addons = [
Mit(),
]
我们修改了msg的信息
至此我认为主要的作用已经讲完了
给大家介绍一款强大的抓包代理工具--mitmproxy的更多相关文章
- 介绍一款替代SSMS的sqlserver管理工具 toad for sqlserver5.7
原文:介绍一款替代SSMS的sqlserver管理工具 toad for sqlserver5.7 toad for sqlserver5.7 虽然SSMS很好很强大,不过有时候使用一些第三方工具可以 ...
- wireshark抓包分析工具的使用
# wireshark抓包分析工具的使用 ## 常用抓包指令 - `ip.src==192.168.60.26 and ip.dst==111.7.187.220 and tcp.port == 80 ...
- fiddler -- 一个强大的抓包工具
一.fiddler常用功能: 1. Fiddler 是位于客户端和服务器端的http代理,也是目前最常用的http抓包工具之一.它能够记录客户端和服务器之间的所有http请求,可以针对特定的http请 ...
- 介绍一款好用的命令行工具Cmder
一.Cmder的介绍: 在大多数情况下,我们都想复制命令行窗口中的命令行,但是cmd复制粘贴大家都懂得:有没有更好的工具替代呢? 答案是肯定的,今天我将为大家介绍一款工具--Cmder. Cmder可 ...
- fiddler——一款莱斯的抓包工具
进行页面和接口调试时候,好使得抓包工具还是有作用得,如postman,fiddler,相比,postman更适合用来接口调试和与其他人一起联调,而抓包监控web得时候我更喜欢用fiddler: 当然, ...
- Charles 抓包的工具
下面是整个链接. http://www.winshy.com/2013/08/something_about_charlesproxy/?utm_source=rss Charles:移动端抓包工具安 ...
- 用Web抓包分析工具Livepool 实现本地替换开发
这是官方的介绍: LivePool 是一个基于 NodeJS,类似 Fiddler 支持抓包和本地替换的 Web 开发调试工具,是 Tencent AlloyTeam 在开发实践过程总结出的一套的便捷 ...
- 安全测试6_Web安全工具第二节(代理抓包分析工具)
上节课讲了浏览器及扩展,这节课继续来学习下抓包分析. 首先看下下图,了解下代理工具的原理:代理就相当于收费站一样,任何要通过的车辆必须经过它. 浏览器的代理我们可以通过设置进行手动设置代理,或者通过P ...
- - Charles 简介 总结 HTTP 抓包 代理 MD
目录 目录 Charles 简介 Charles 破解工具 界面介绍 主菜单 会话右键菜单 两种显示模式 内容区域 抓包 HTTP 抓包 HTTPS 抓包 HTTPS 抓包原理 请求重定向 Map r ...
- Wireshark网络抓包(四)——工具
一.基本信息统计工具 1)捕获文件属性(Summary) 1. File:了解抓包文件的各种属性,例如抓包文件的名称.路径.文件所含数据包的规模等信息 2. Time:获悉抓包的开始.结束和持续时间 ...
随机推荐
- 王道oj/problem10
地址:http://oj.lgwenda.com/problem/10 思路:首先创建字符串赋初值,其次用gets()输入字符串[fgets()相对于gets()会多识别"\n", ...
- Windows 环境下载、安装、使用(.Net 5.0) Redis 数据库及常见问题的解决
〇.前言 Redis (Remote Dictionary Server 远程字典服务)是一个使用 ANSI C 编写的开源.包含多种数据结构,支持网络.基于内存.可选持久性的键值对存储数据库,是现在 ...
- K210 调节颜色阈值识别红绿黄三色
官方在机器视觉的API中提供了寻找绿色色块的例程 https://wiki.sipeed.com/soft/maixpy/zh/api_reference/machine_vision/image/i ...
- .NET6.0实现IOC容器
.NET6.0实现IOC容器 IOC的作用这里省略-只对如何使用进行说明. 1. 创建一个.NET6应用程序 这里使用 .NET6.0 WebAPI 应用 2. 声明接口 public interfa ...
- ios添加库文件
- C++ 算法竞赛、02 周赛篇 | AcWing 第2场周赛
AcWing 第2场周赛 竞赛 - AcWing 3626 三元一次方程 AcWing 3626. 三元一次方程 - AcWing 两层循环 #include <iostream> usi ...
- Redis从入门到放弃(12):pipeline管道技术
1.引言 在现代应用程序中,高性能和低延迟是至关重要的因素.而在处理大规模数据操作时,Redis作为一种快速.可靠的内存数据库,成为了许多开发人员的首选. 在Redis中,每个操作都需要与服务器进行往 ...
- 10款Visual Studio实用插件
前言 俗话说的好工欲善其事必先利其器,安装一些Visual Studio实用插件对自己日常的开发和工作效率能够大大的提升,避免996从选一款好的IDE实用插件开始.以下是我认为比较实用的Visual ...
- Solution -「洛谷 P5072」「YunoOI 2015」盼君勿忘
Description Link. 无修支持查询:查询一个区间 \([l,r]\) 中所有子序列分别去重后的和 \(\bmod\ p\) Solution 这是数据结构一百题的第50题(一半了哦)的纪 ...
- Oracle-复制表结构存在的问题
在生产中,创建一个新表tbl_A,要求与已有表结构tbl_B一致 create table tbl_A AS select * from tbl_B where 1=2; --拷贝表结构tbl_B给t ...