梳理Langchain-Chatchat-UI接口文档
在 Langchain-Chatchat v0.1.17 版本及以前是有前后端分离的 Vue 项目的,但是 v0.2.0 后就没有了。所以本文使用的是 Langchain-Chatchat v0.1.17 版本中的 Vue 项目。经过一番折腾终于将 Langchain-Chatchat v0.1.17 版本前端 Vue 接口和 Langchain-Chatchat v0.2.8 后端 API 接口调通了。
一.运行 Langchain-Chatchat
1.拉取源码
拉取 Langchain-Chatchat 源码(Langchain-Chatchat v0.2.8),如下所示:
git clone https://github.com/chatchat-space/Langchain-Chatchat.git
2.安装依赖包
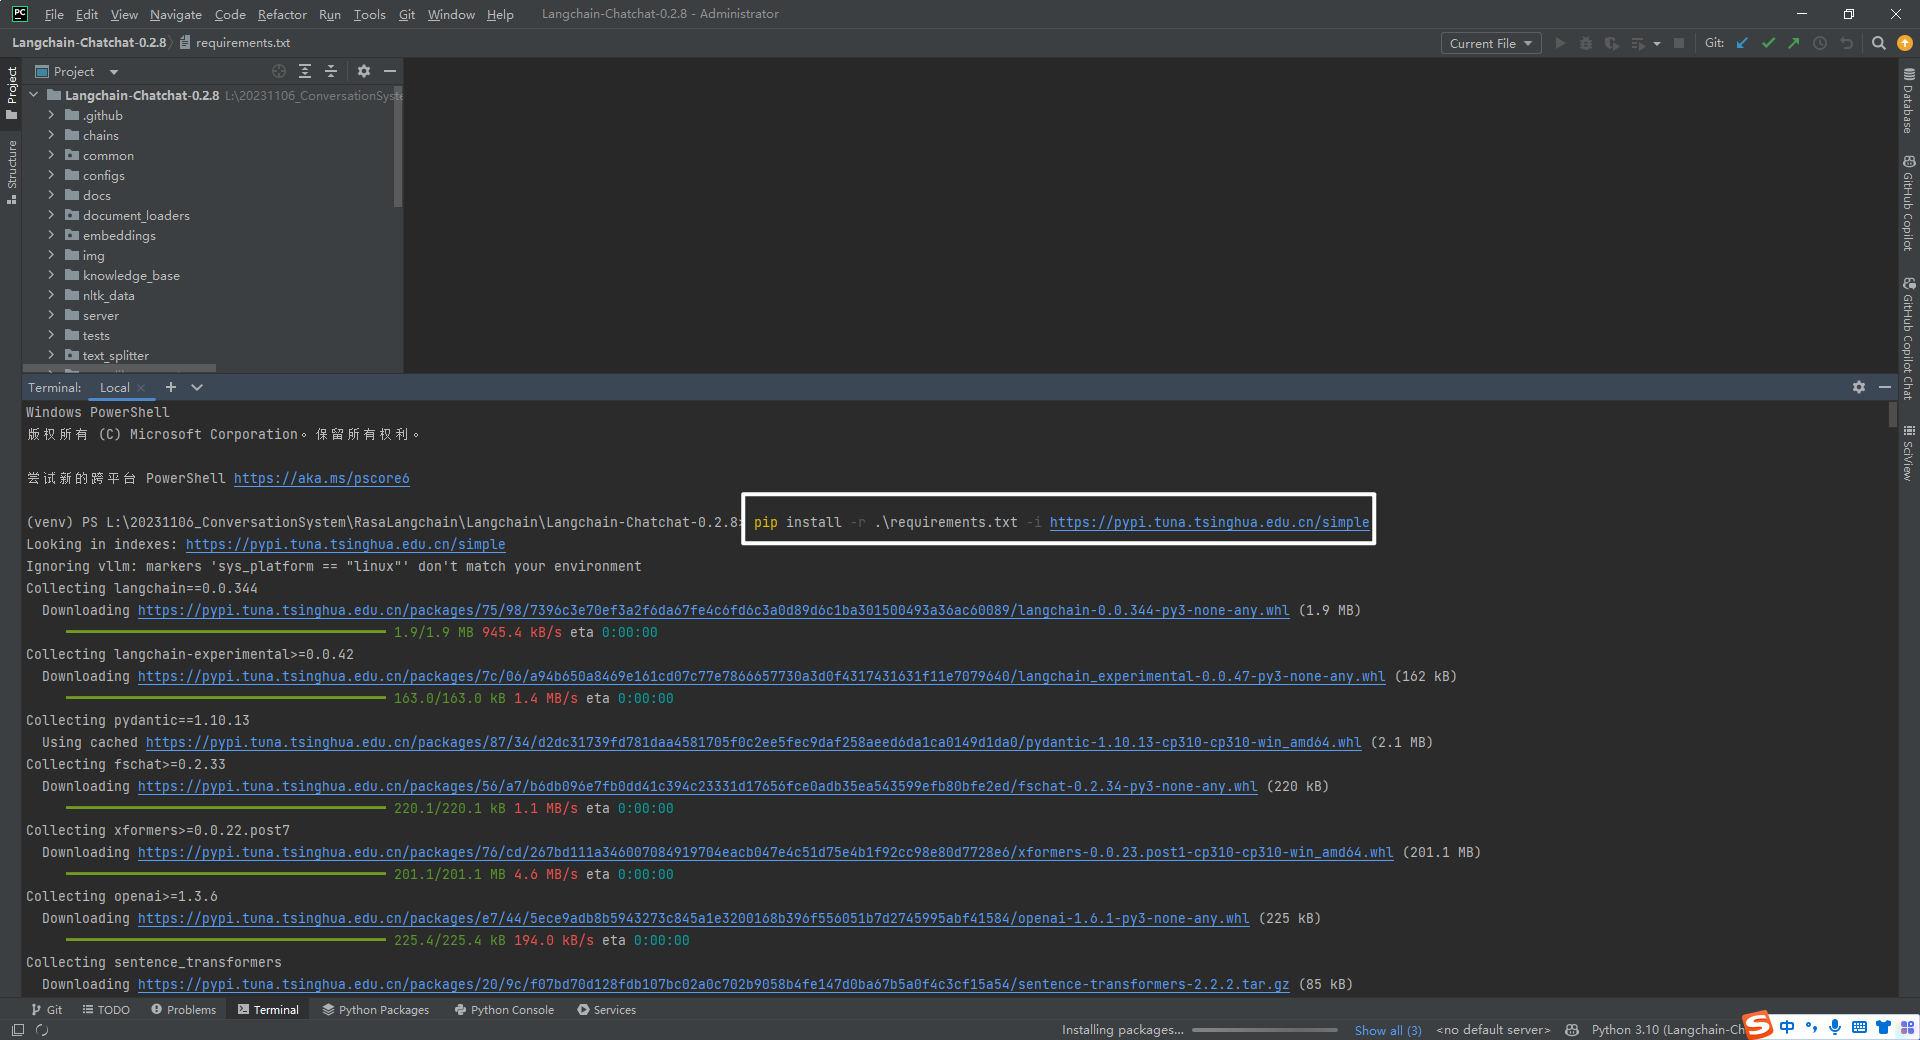
安装依赖包,如下所示:
pip install -r .\requirements.txt -i https://pypi.tuna.tsinghua.edu.cn/simple
3.模型下载和配置
模型下载和配置(加速参考文献[3]),如下所示:
python hf_download.py --model THUDM/ChatGLM3-6B --save_dir ./hf_hub
python hf_download.py --model BAAI/bge-large-zh --save_dir ./hf_hub
4.初始化知识库和配置文件
初始化知识库和配置文件,如下所示:
$ python copy_config_example.py
$ python init_database.py --recreate-vs
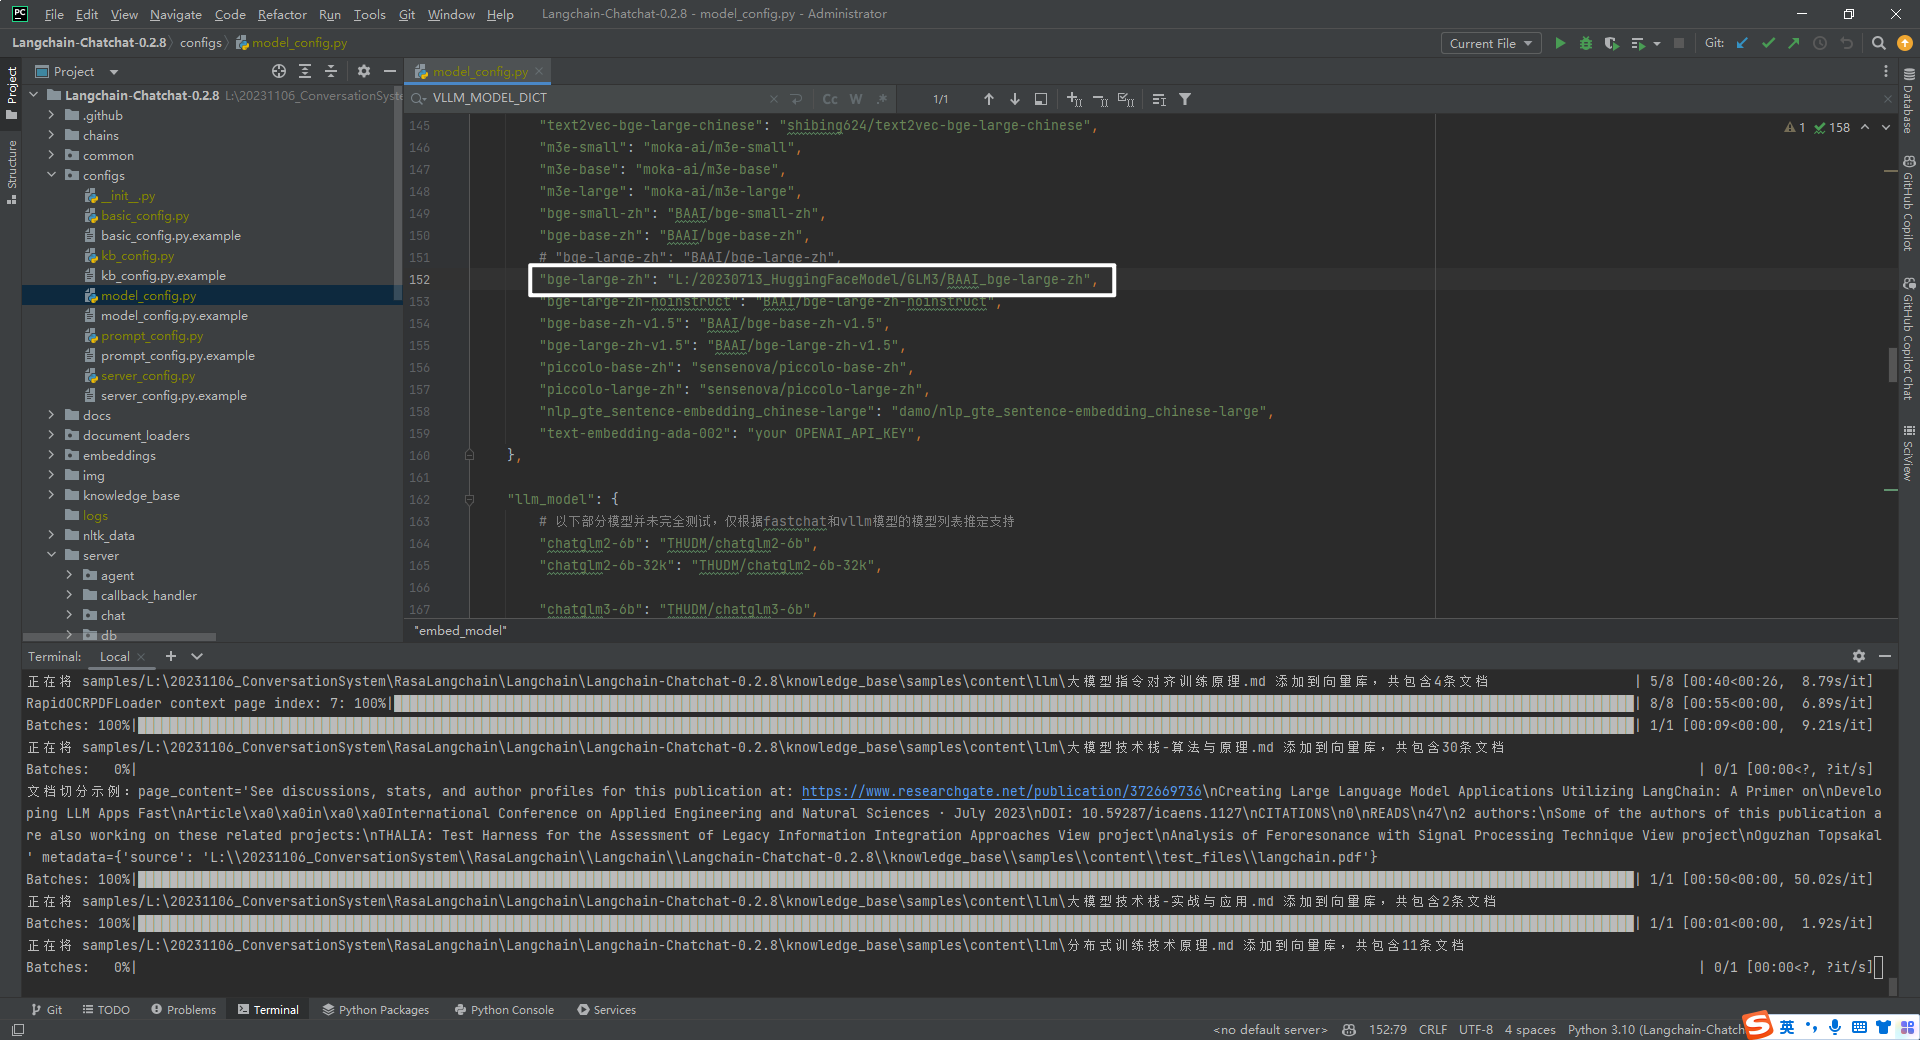
Langchain-Chatchat-0.2.8->configs->model_config.py->embed_model-> 设置 bge-large-zh 本地路径,如下所示:
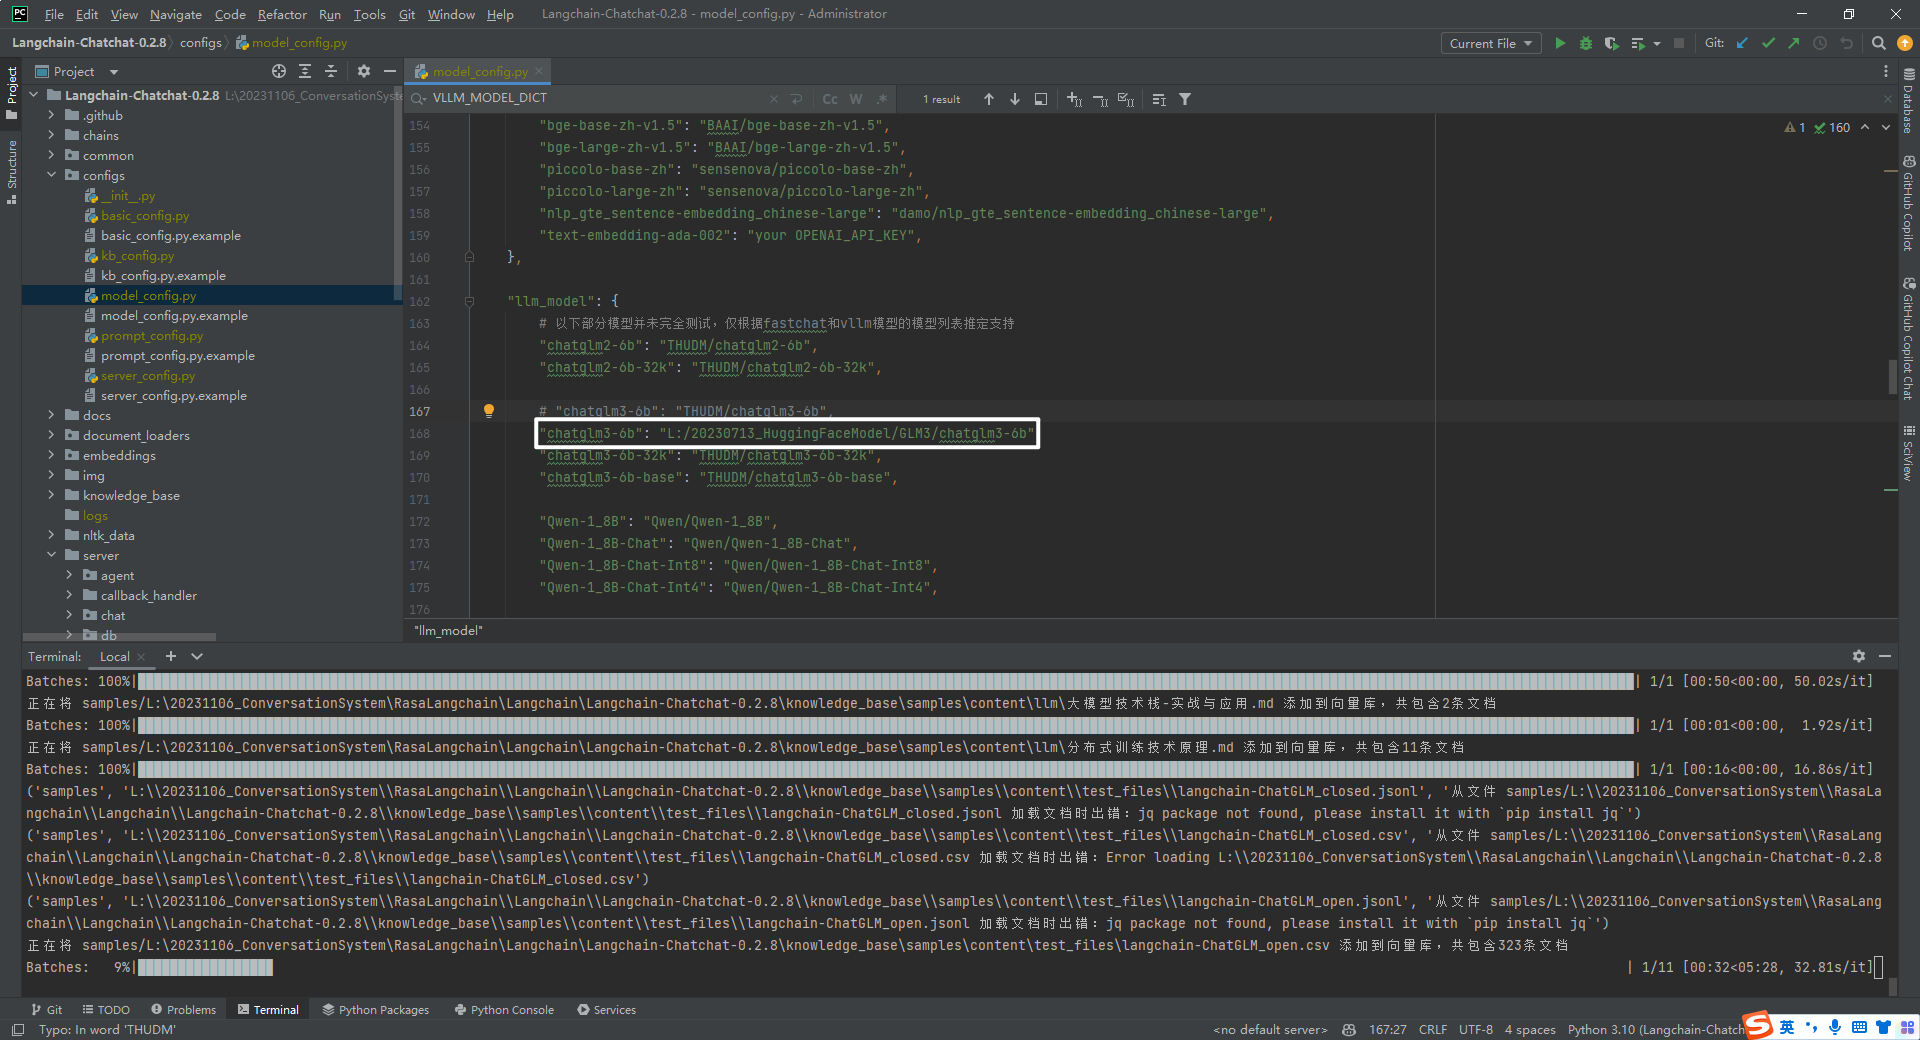
Langchain-Chatchat-0.2.8->configs->model_config.py->llm_model-> 设置 chatglm3-6b 本地路径,如下所示:
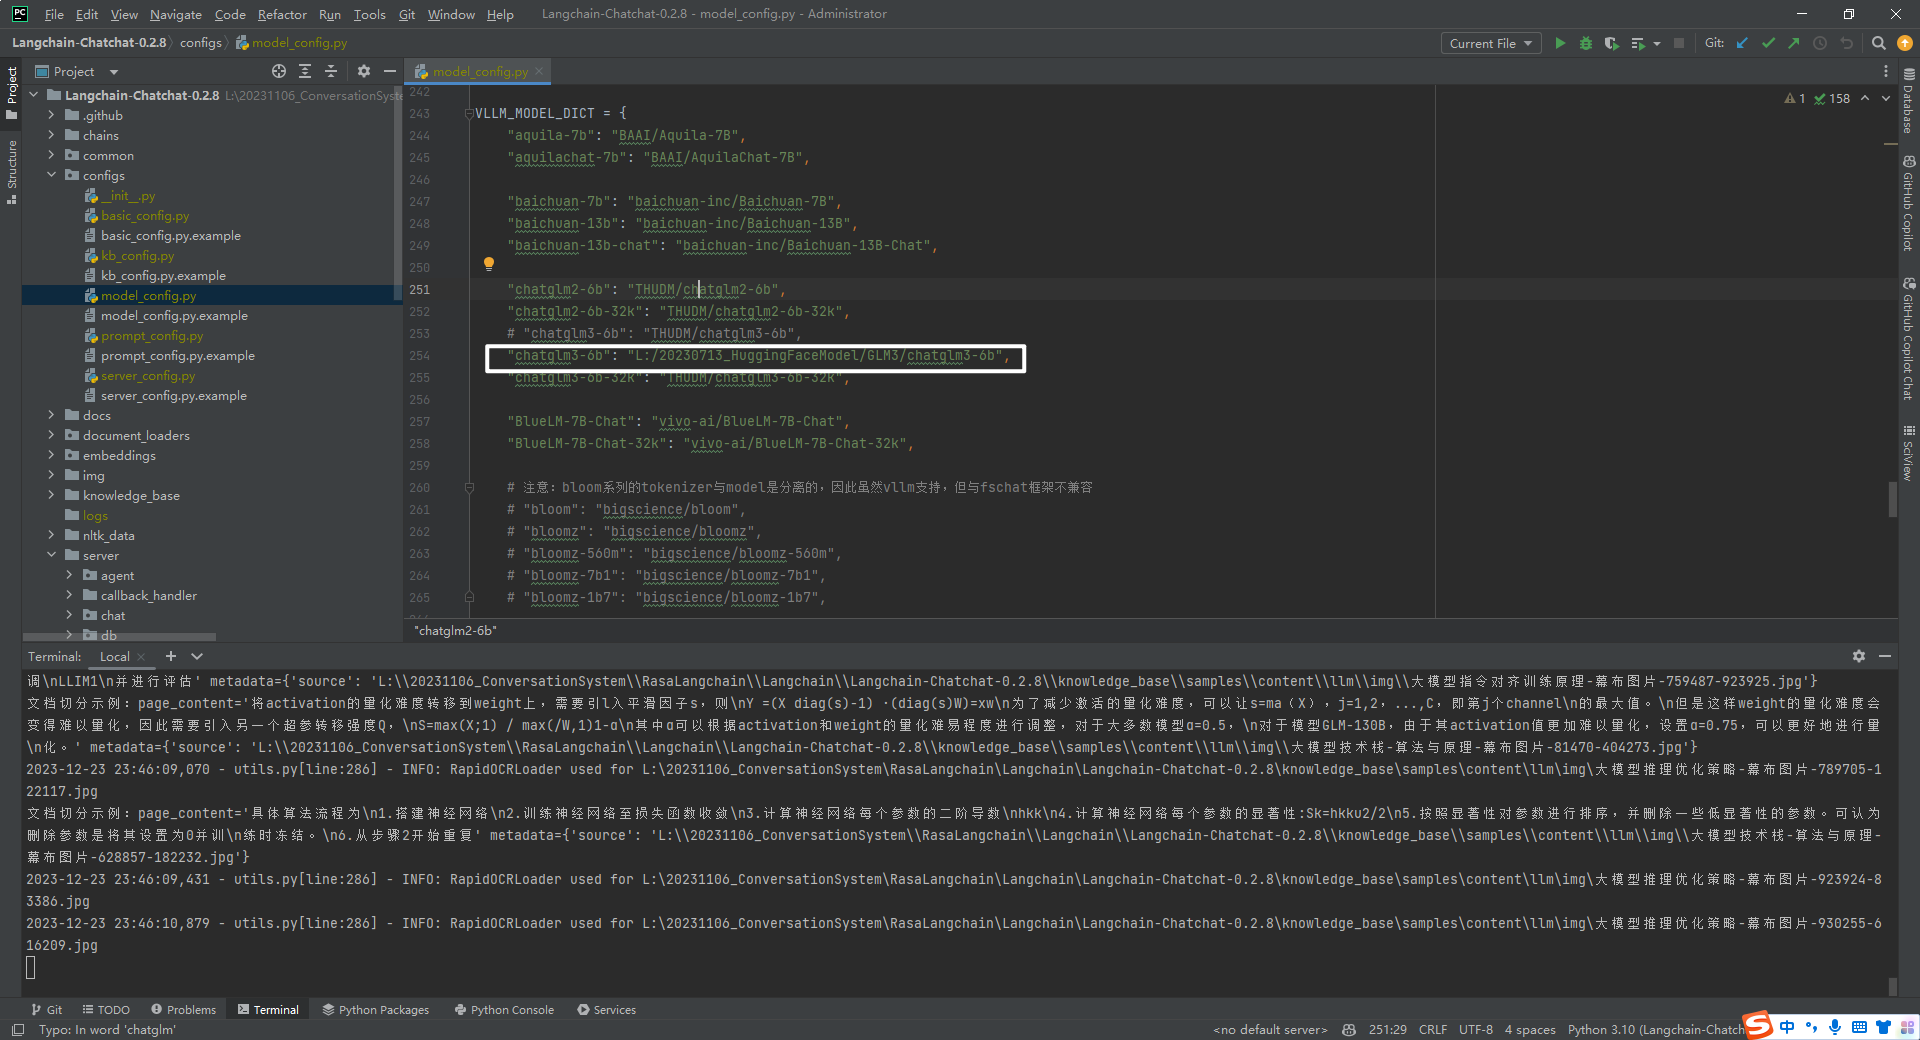
Langchain-Chatchat-0.2.8->configs->model_config.py->VLLM_MODEL_DICT-> 设置 chatglm3-6b 本地路径,如下所示:
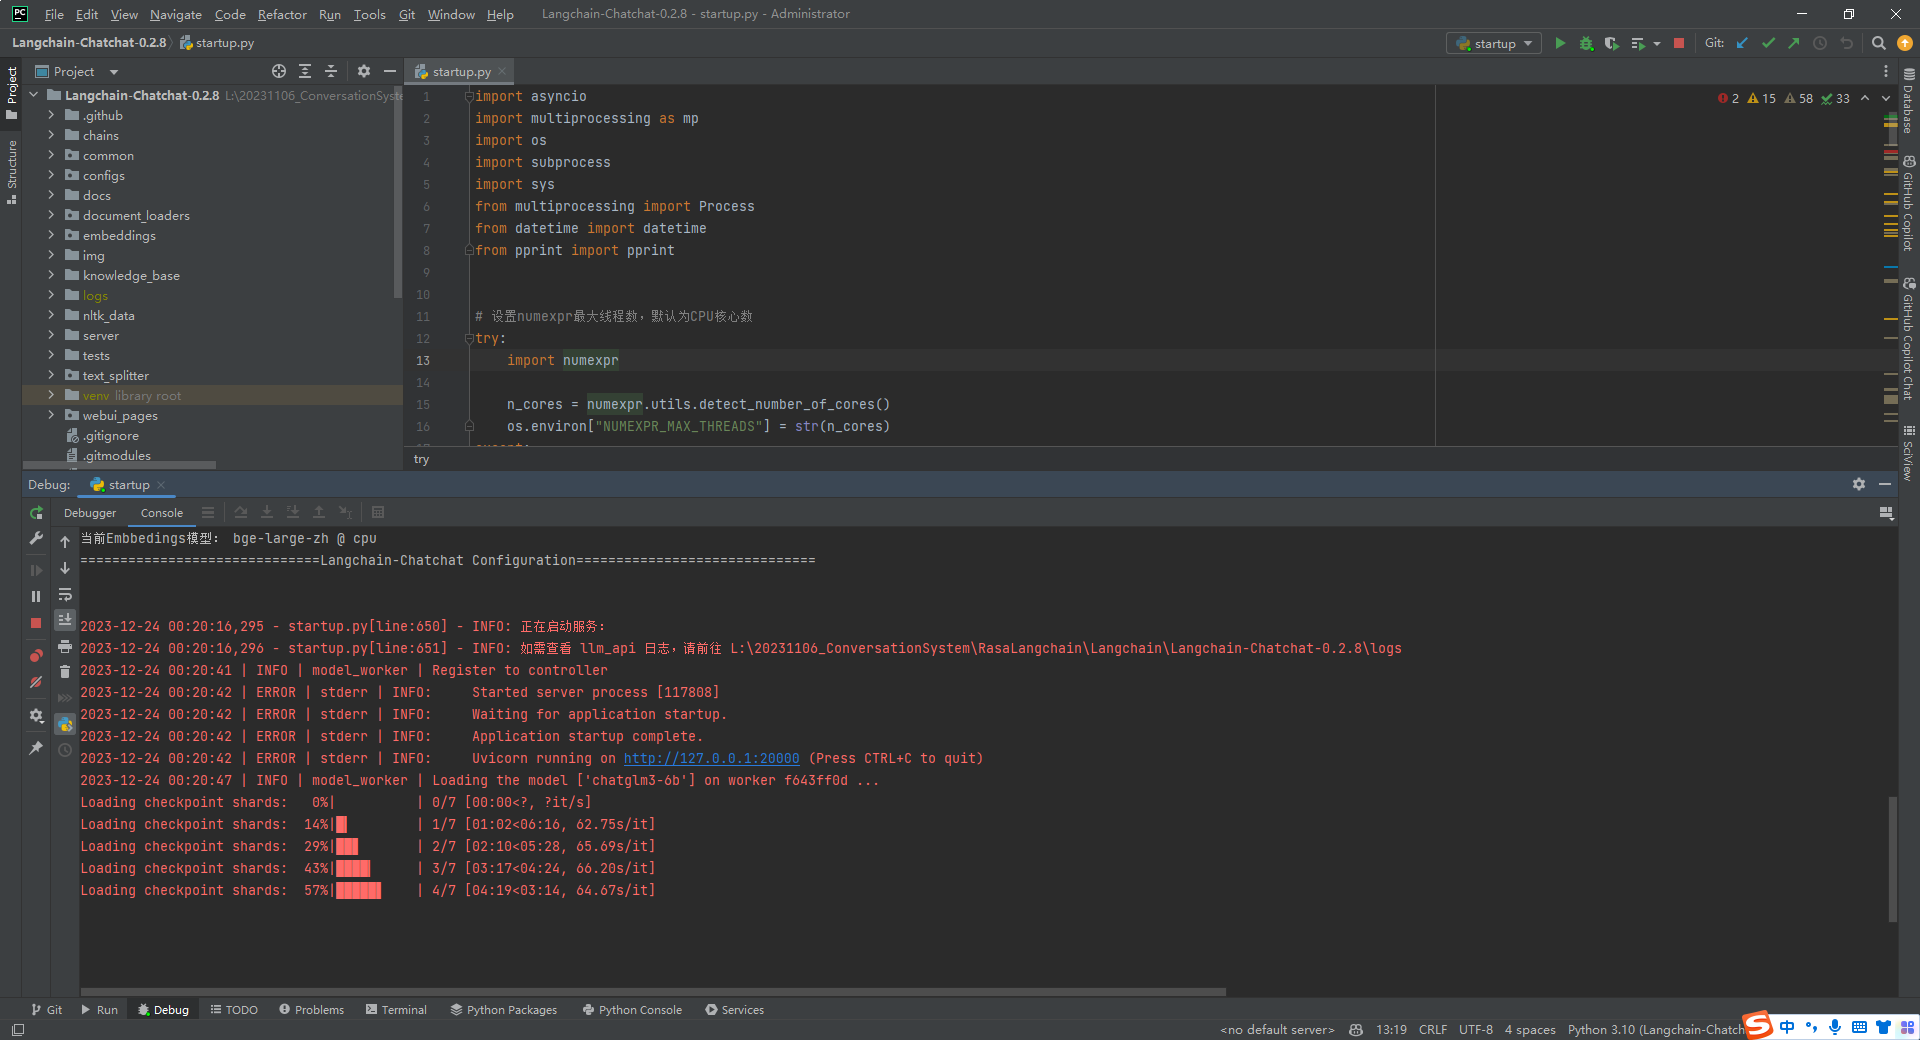
5.python startup.py -a
$ python startup.py -a
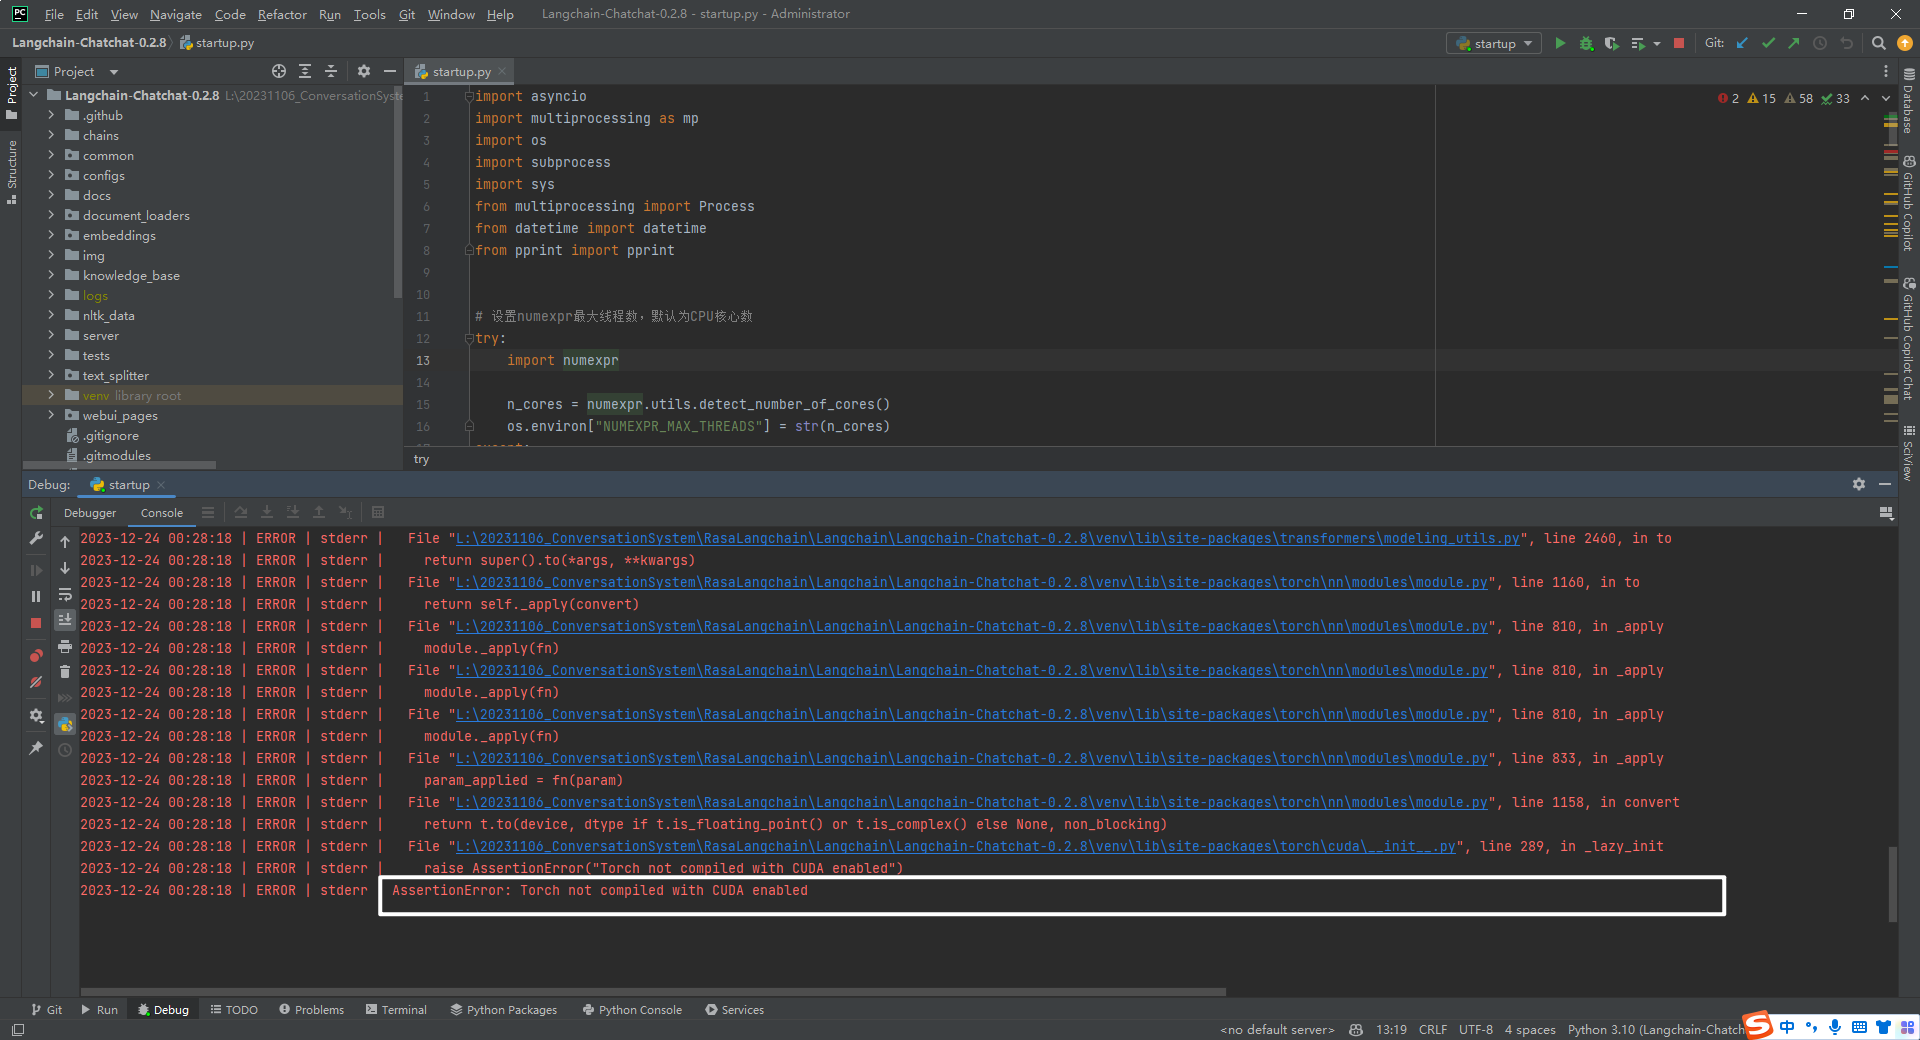
手动安装 PyTorch 的 CUDA 版本,如下所示:
pip install torch==2.1.0 torchvision==0.16.0 torchaudio==2.1.0 --index-url https://download.pytorch.org/whl/cu118
控制台输出的日志信息,如下所示:
import sys; print('Python %s on %s' % (sys.version, sys.platform))
Connected to pydev debugger (build 232.9559.58)
L:\20231106_ConversationSystem\ChatCopilot\Langchain\Langchain-Chatchat-0.2.8\venv\Scripts\python.exe "D:/Program Files/JetBrains/PyCharm 2023.1.3/plugins/python/helpers/pydev/pydevd.py" --multiprocess --qt-support=auto --client 127.0.0.1 --port 36490 --file L:\20231106_ConversationSystem\RasaLangchain\Langchain\Langchain-Chatchat-0.2.8\startup.py -a
==============================Langchain-Chatchat Configuration==============================
操作系统:Windows-10-10.0.19044-SP0.
python版本:3.10.9 (tags/v3.10.9:1dd9be6, Dec  6 2022, 20:01:21) [MSC v.1934 64 bit (AMD64)]
项目版本:v0.2.8
langchain版本:0.0.344. fastchat版本:0.2.34
当前使用的分词器:ChineseRecursiveTextSplitter
<strong>当前启动的LLM模型:['chatglm3-6b', 'zhipu-api', 'openai-api'] @ cuda</strong>
{'device': 'cuda',
 'host': '127.0.0.1',
 'infer_turbo': False,
 'model_path': 'L:\\20230713_HuggingFaceModel\\GLM3\\chatglm3-6b',
 'model_path_exists': True,
 'port': 20002}
{'api_key': '',
 'device': 'auto',
 'host': '127.0.0.1',
 'infer_turbo': False,
 'online_api': True,
 'port': 21001,
 'provider': 'ChatGLMWorker',
 'version': 'chatglm_turbo',
 'worker_class': <class 'server.model_workers.zhipu.ChatGLMWorker'>}
{'api_base_url': 'https://api.openai.com/v1',
 'api_key': '',
 'device': 'auto',
 'host': '127.0.0.1',
 'infer_turbo': False,
 'model_name': 'gpt-3.5-turbo',
 'online_api': True,
 'openai_proxy': '',
 'port': 20002}
<strong>当前Embbedings模型: bge-large-zh @ cuda</strong>
==============================Langchain-Chatchat Configuration==============================
2023-12-24 08:18:36,235 - startup.py[line:650] - INFO: 正在启动服务:
2023-12-24 08:18:36,236 - startup.py[line:651] - INFO: 如需查看 llm_api 日志,请前往 L:\20231106_ConversationSystem\RasaLangchain\Langchain\Langchain-Chatchat-0.2.8\logs
2023-12-24 08:19:30 | INFO | model_worker | Register to controller
2023-12-24 08:19:37 | ERROR | stderr | INFO:     Started server process [126488]
2023-12-24 08:19:37 | ERROR | stderr | INFO:     Waiting for application startup.
2023-12-24 08:19:37 | ERROR | stderr | INFO:     Application startup complete.
2023-12-24 08:19:37 | ERROR | stderr | INFO:     Uvicorn running on http://127.0.0.1:20000 (Press CTRL+C to quit)
2023-12-24 08:21:18 | INFO | model_worker | Loading the model ['chatglm3-6b'] on worker bc7ce098 ...
Loading checkpoint shards:   0%|          | 0/7 [00:00<?, ?it/s]
Loading checkpoint shards:  14%|█▍        | 1/7 [01:08<06:51, 68.62s/it]
Loading checkpoint shards:  29%|██▊       | 2/7 [02:16<05:42, 68.43s/it]
Loading checkpoint shards:  43%|████▎     | 3/7 [03:24<04:31, 67.83s/it]
Loading checkpoint shards:  57%|█████▋    | 4/7 [04:28<03:19, 66.62s/it]
Loading checkpoint shards:  71%|███████▏  | 5/7 [05:36<02:14, 67.16s/it]
Loading checkpoint shards:  86%|████████▌ | 6/7 [06:48<01:08, 68.75s/it]
Loading checkpoint shards: 100%|██████████| 7/7 [07:29<00:00, 59.44s/it]
Loading checkpoint shards: 100%|██████████| 7/7 [07:29<00:00, 64.15s/it]
2023-12-24 08:29:30 | ERROR | stderr |
2023-12-24 08:30:45 | INFO | model_worker | Register to controller
INFO:     Started server process [125172]
INFO:     Waiting for application startup.
INFO:     Application startup complete.
INFO:     Uvicorn running on http://127.0.0.1:7861 (Press CTRL+C to quit)
==============================Langchain-Chatchat Configuration==============================
操作系统:Windows-10-10.0.19044-SP0.
python版本:3.10.9 (tags/v3.10.9:1dd9be6, Dec  6 2022, 20:01:21) [MSC v.1934 64 bit (AMD64)]
项目版本:v0.2.8
langchain版本:0.0.344. fastchat版本:0.2.34
当前使用的分词器:ChineseRecursiveTextSplitter
当前启动的LLM模型:['chatglm3-6b', 'zhipu-api', 'openai-api'] @ cuda
{'device': 'cuda',
 'host': '127.0.0.1',
 'infer_turbo': False,
 'model_path': 'L:\\20230713_HuggingFaceModel\\GLM3\\chatglm3-6b',
 'model_path_exists': True,
 'port': 20002}
{'api_key': '',
 'device': 'auto',
 'host': '127.0.0.1',
 'infer_turbo': False,
 'online_api': True,
 'port': 21001,
 'provider': 'ChatGLMWorker',
 'version': 'chatglm_turbo',
 'worker_class': <class 'server.model_workers.zhipu.ChatGLMWorker'>}
{'api_base_url': 'https://api.openai.com/v1',
 'api_key': '',
 'device': 'auto',
 'host': '127.0.0.1',
 'infer_turbo': False,
 'model_name': 'gpt-3.5-turbo',
 'online_api': True,
 'openai_proxy': '',
 'port': 20002}
当前Embbedings模型: bge-large-zh @ cuda
<strong>服务端运行信息:</strong>
<strong>    OpenAI API Server: http://127.0.0.1:20000/v1</strong>
<strong>    Chatchat  API  Server: http://127.0.0.1:7861</strong>
<strong>    Chatchat WEBUI Server: http://127.0.0.1:8501</strong>
==============================Langchain-Chatchat Configuration==============================
  You can now view your Streamlit app in your browser.
  URL: http://127.0.0.1:8501
2023-12-24 08:37:51,151 - _client.py[line:1027] - INFO: HTTP Request: POST http://127.0.0.1:20001/list_models "HTTP/1.1 200 OK"
INFO:     127.0.0.1:31565 - "POST /llm_model/list_running_models HTTP/1.1" 200 OK
2023-12-24 08:37:51,188 - _client.py[line:1027] - INFO: HTTP Request: POST http://127.0.0.1:7861/llm_model/list_running_models "HTTP/1.1 200 OK"
2023-12-24 08:37:51,331 - _client.py[line:1027] - INFO: HTTP Request: POST http://127.0.0.1:20001/list_models "HTTP/1.1 200 OK"
2023-12-24 08:37:51,337 - _client.py[line:1027] - INFO: HTTP Request: POST http://127.0.0.1:7861/llm_model/list_running_models "HTTP/1.1 200 OK"
INFO:     127.0.0.1:31565 - "POST /llm_model/list_running_models HTTP/1.1" 200 OK
INFO:     127.0.0.1:31565 - "POST /llm_model/list_config_models HTTP/1.1" 200 OK
2023-12-24 08:37:51,413 - _client.py[line:1027] - INFO: HTTP Request: POST http://127.0.0.1:7861/llm_model/list_config_models "HTTP/1.1 200 OK"
(1)OpenAI API Server: http://127.0.0.1/v1

(2)Chatchat API Server: http://127.0.0.1
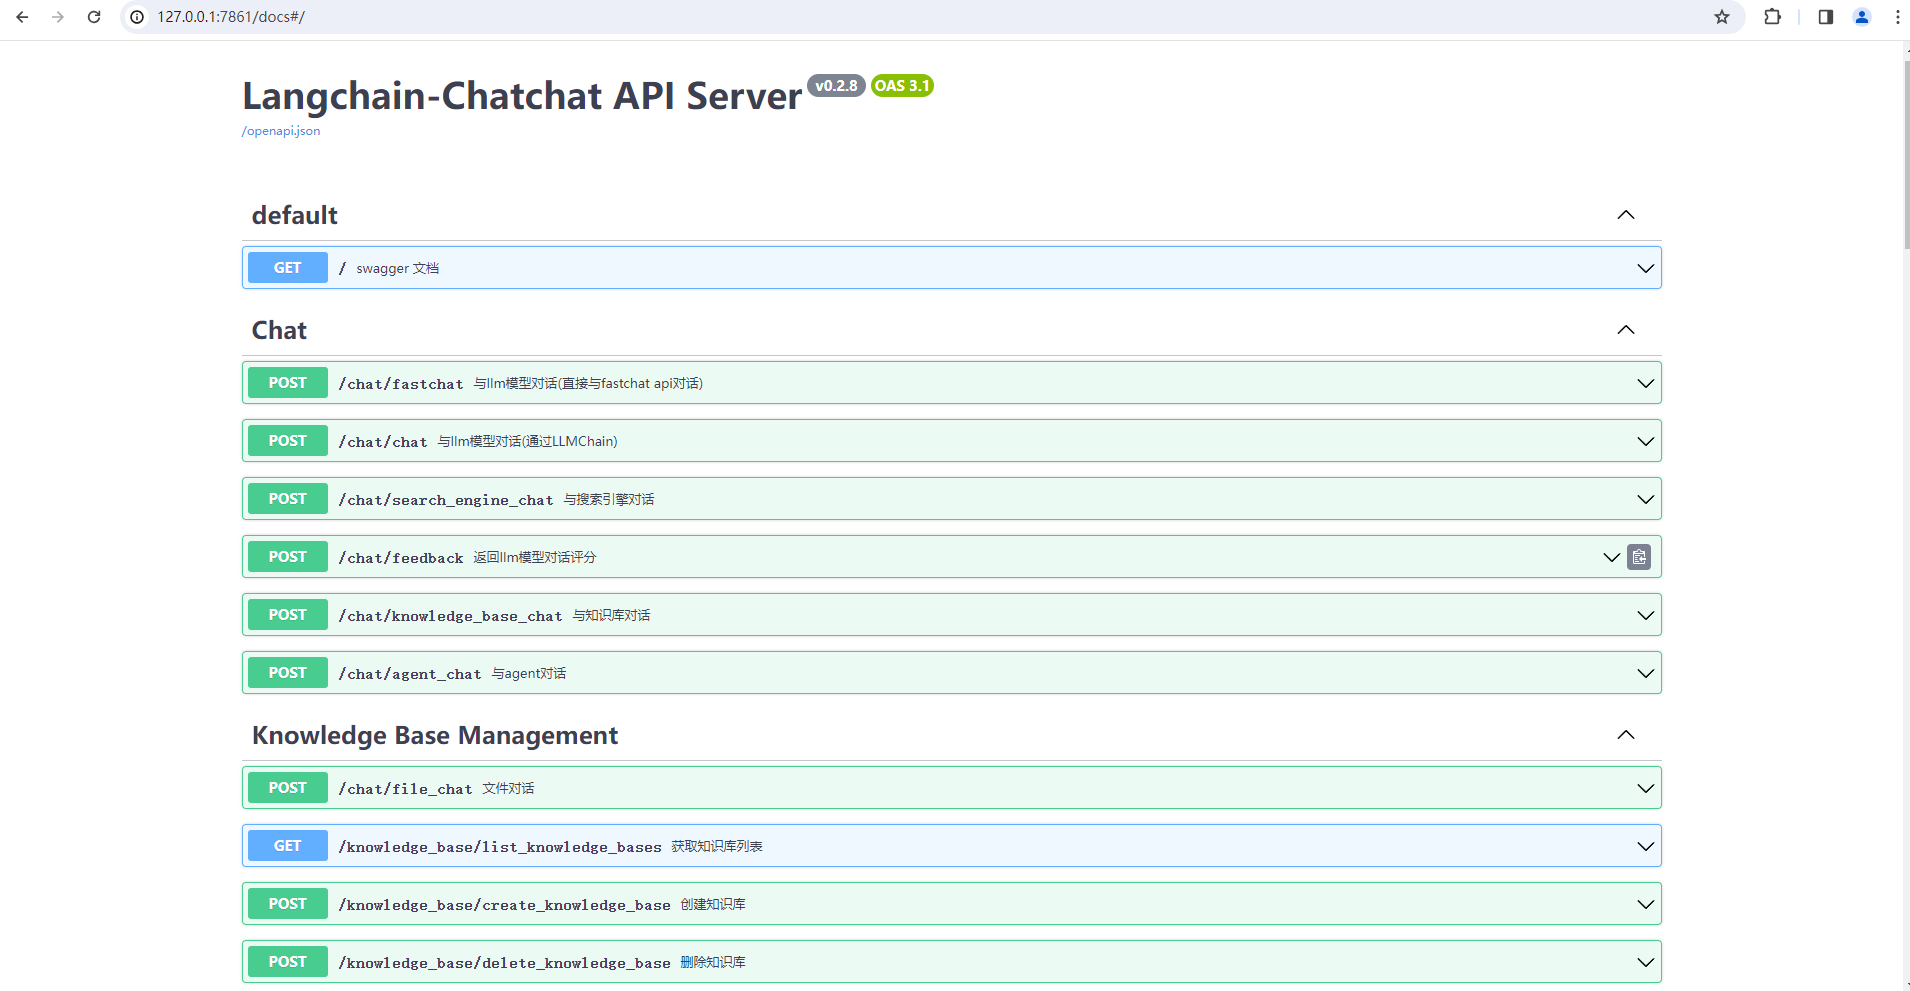
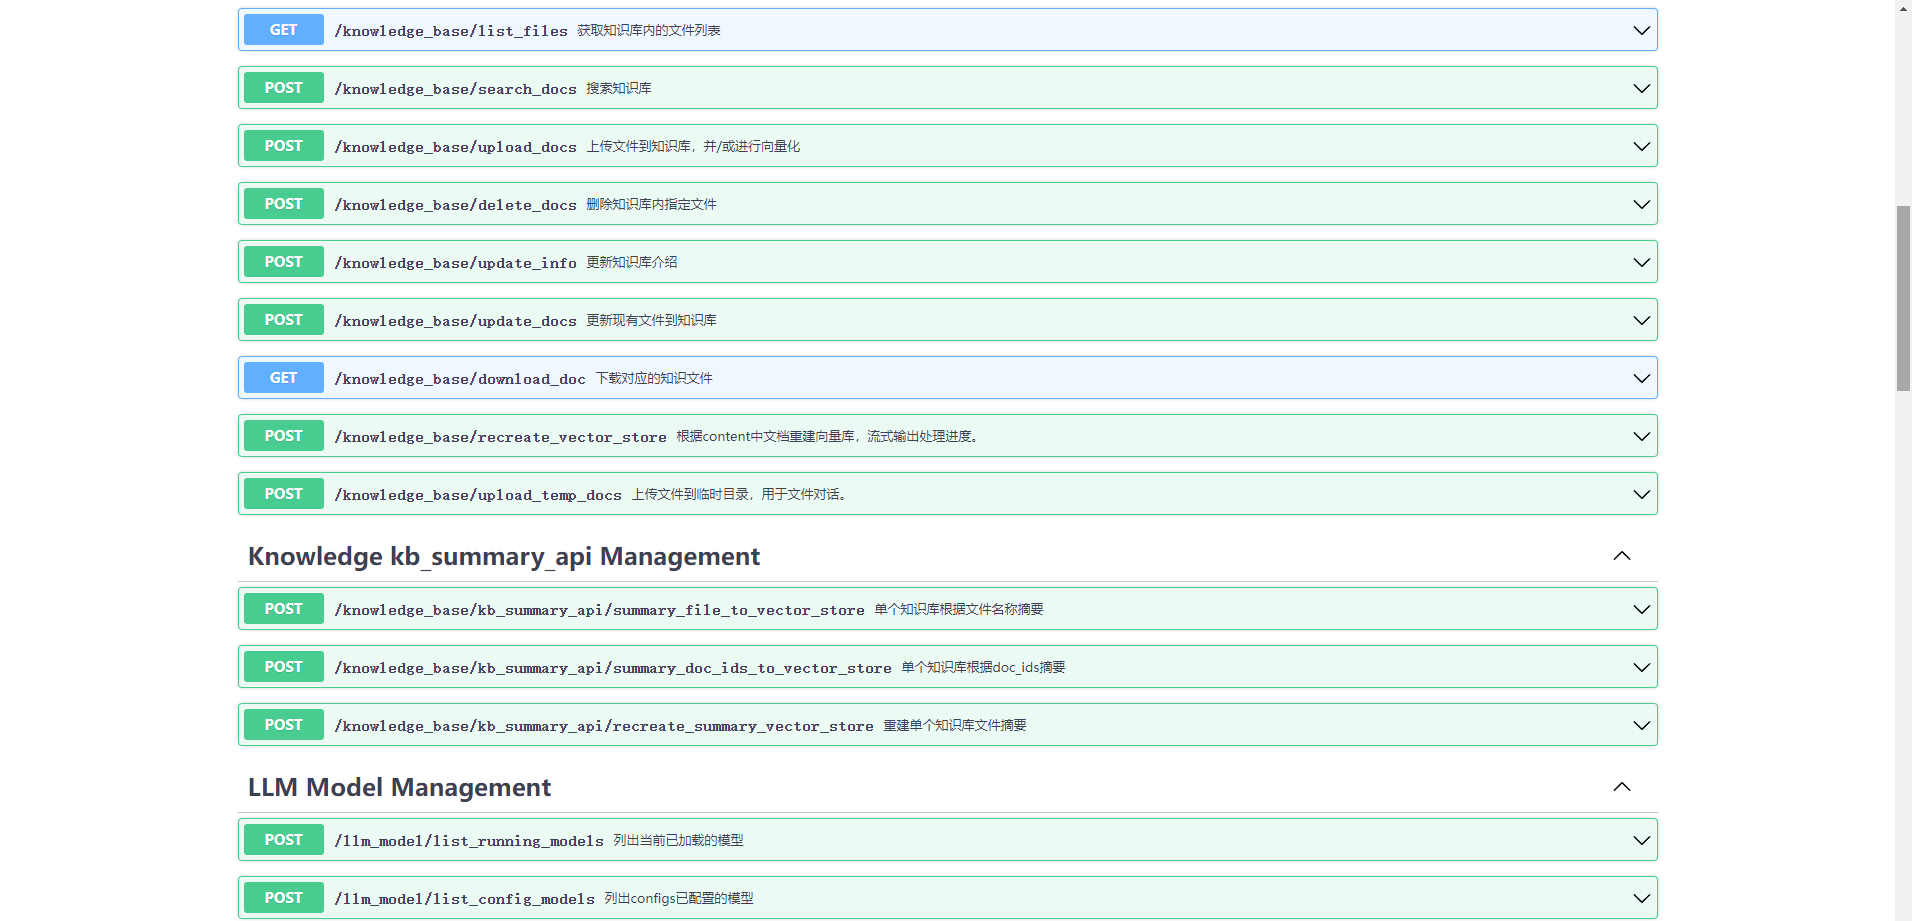
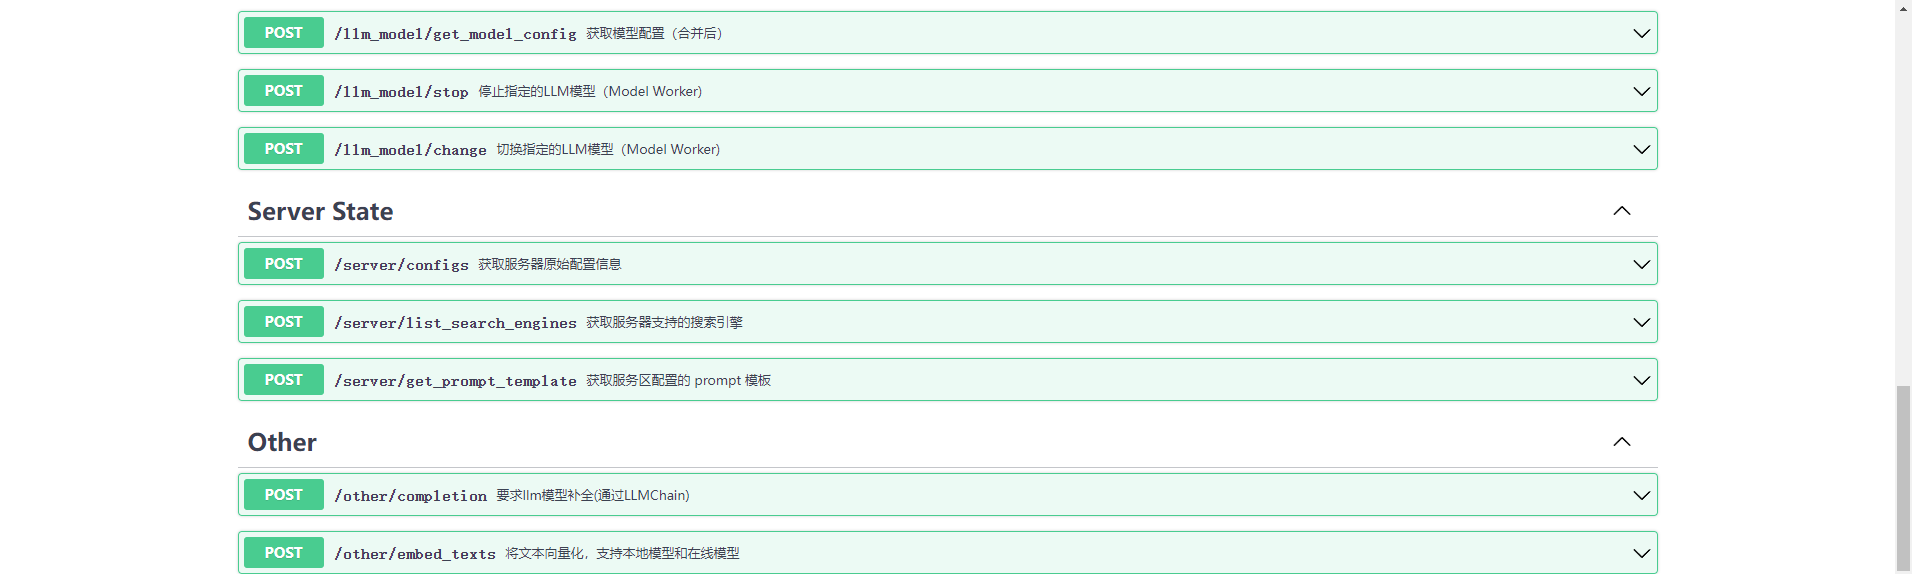
这个是 Langchain-Chatchat v0.2.8 版本后端 API 接口文档,如下所示:
(3)Chatchat WEBUI Server: http://127.0.0.1
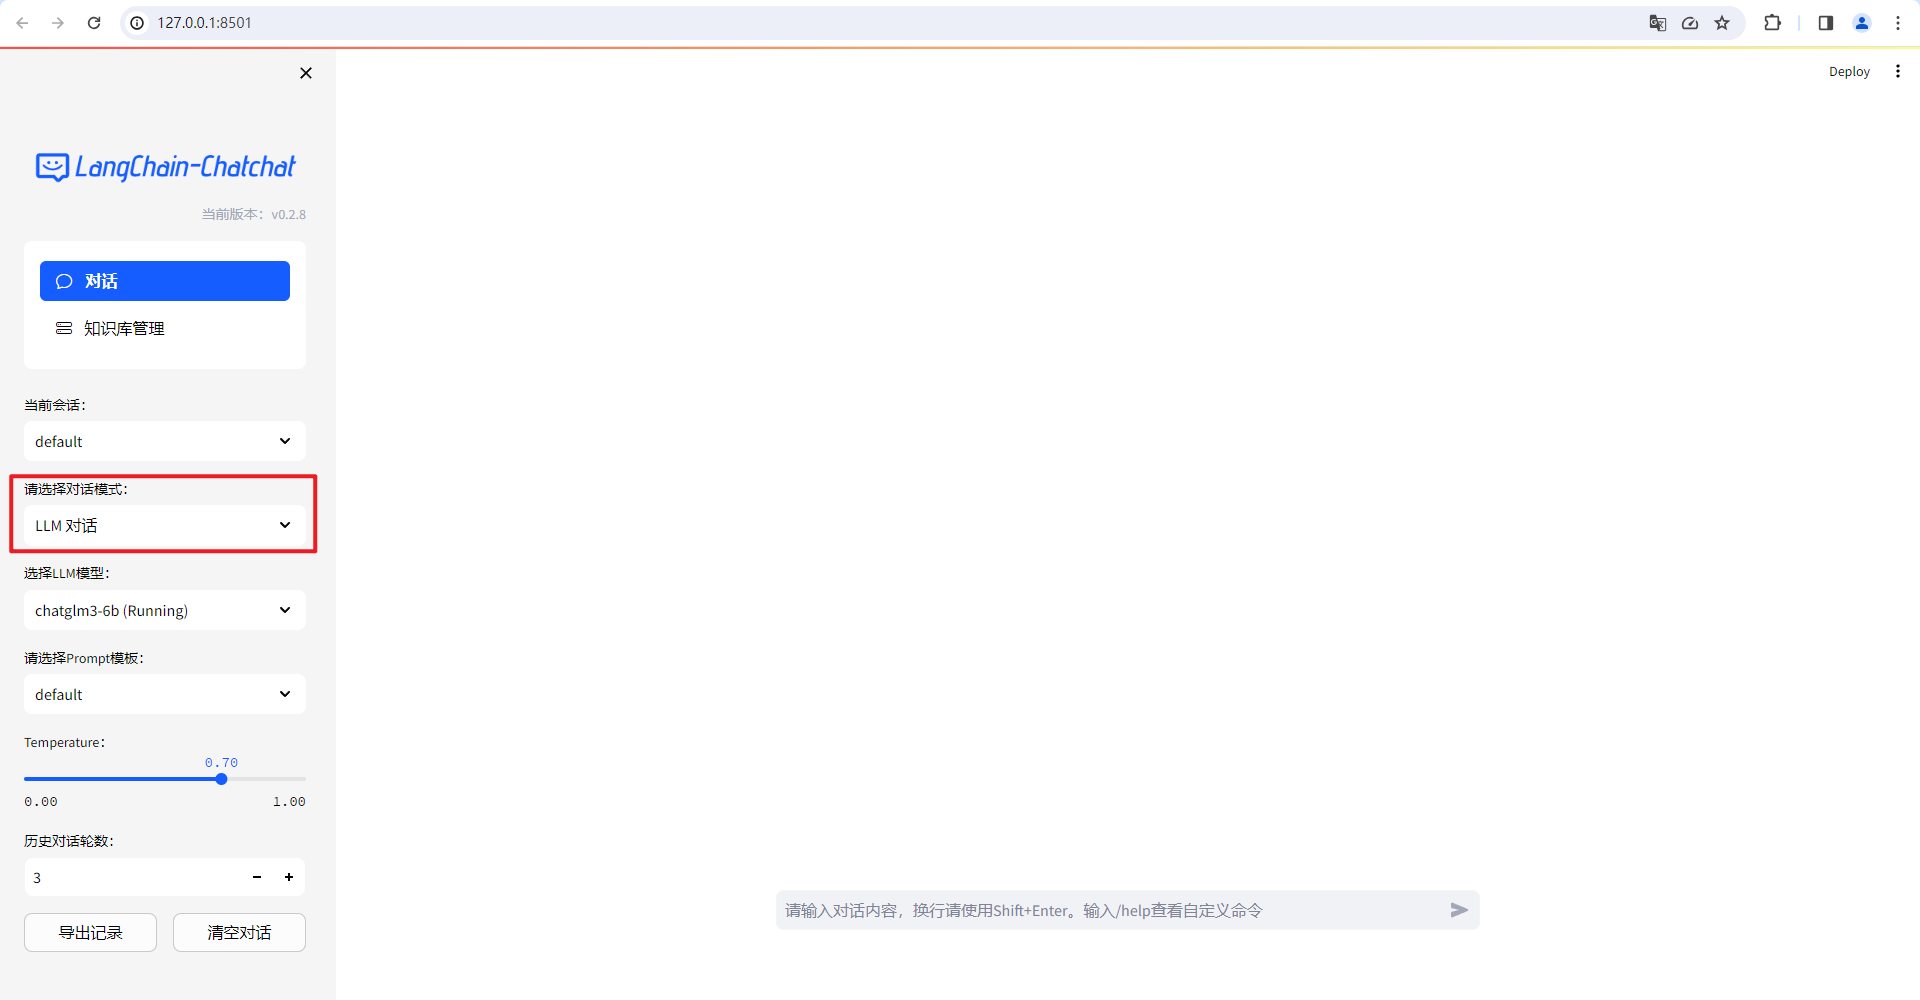
对话模式包括:LLM 对话,知识库问答,文件对话,搜索引擎问答,自定义 Agent 问答。
二.运行 Langchain-Chatchat-UI
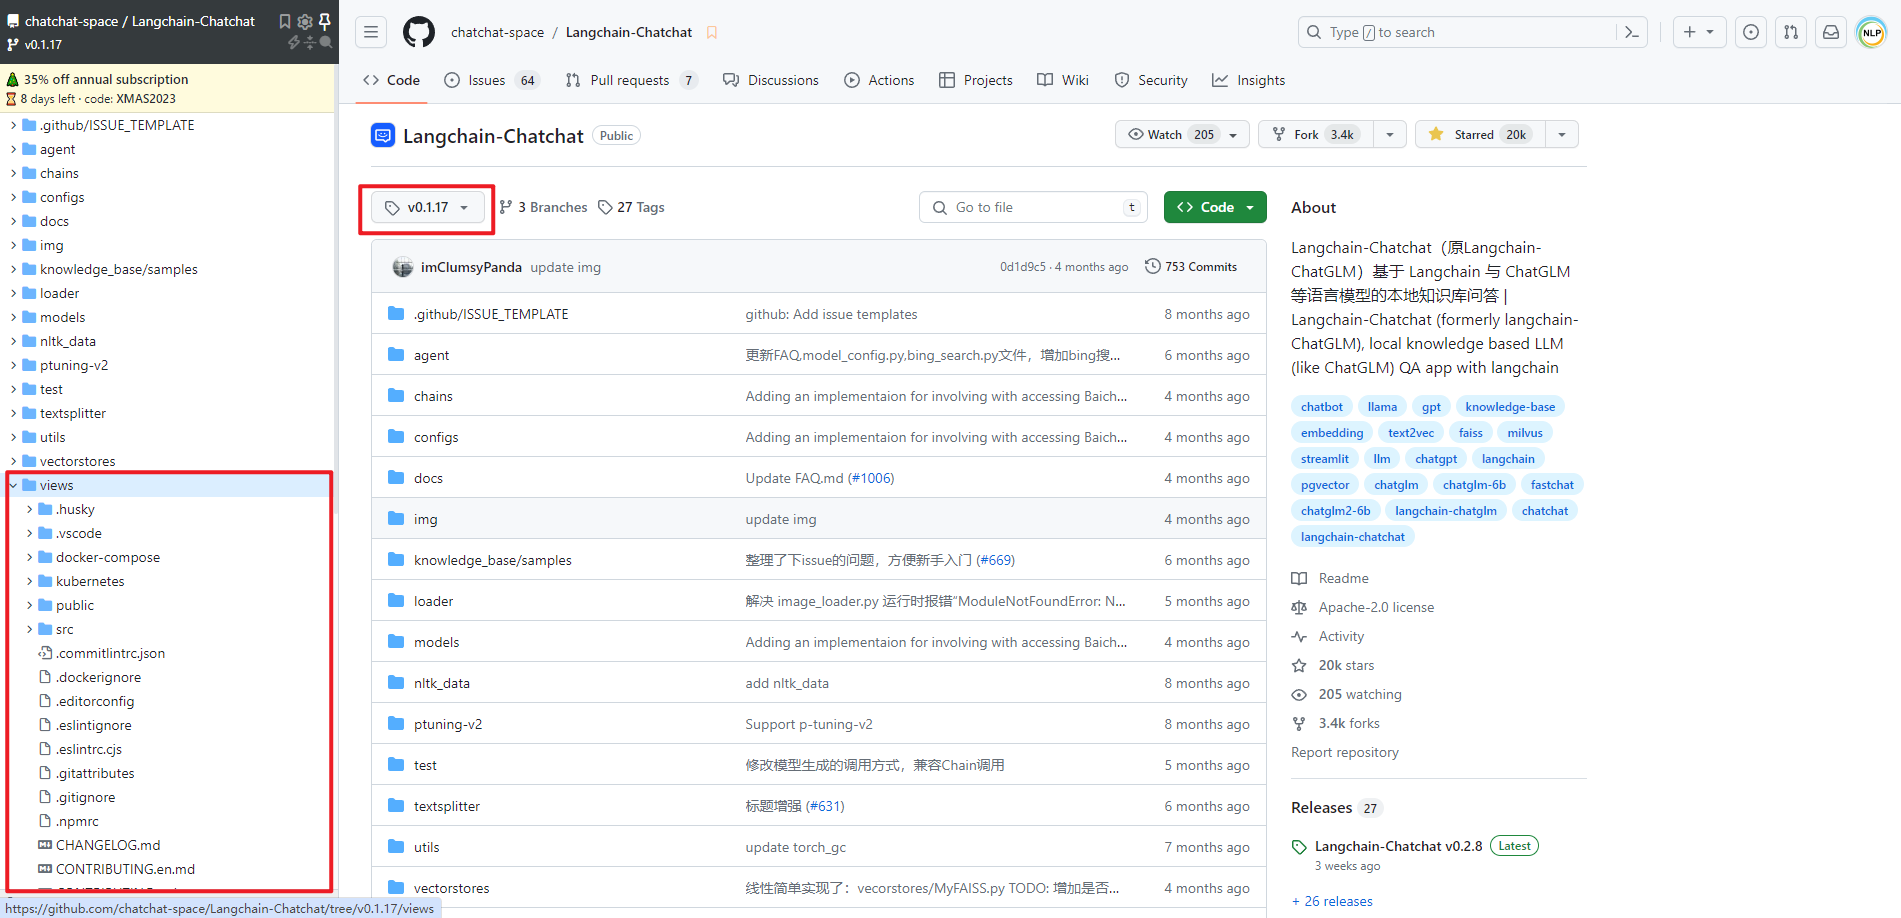
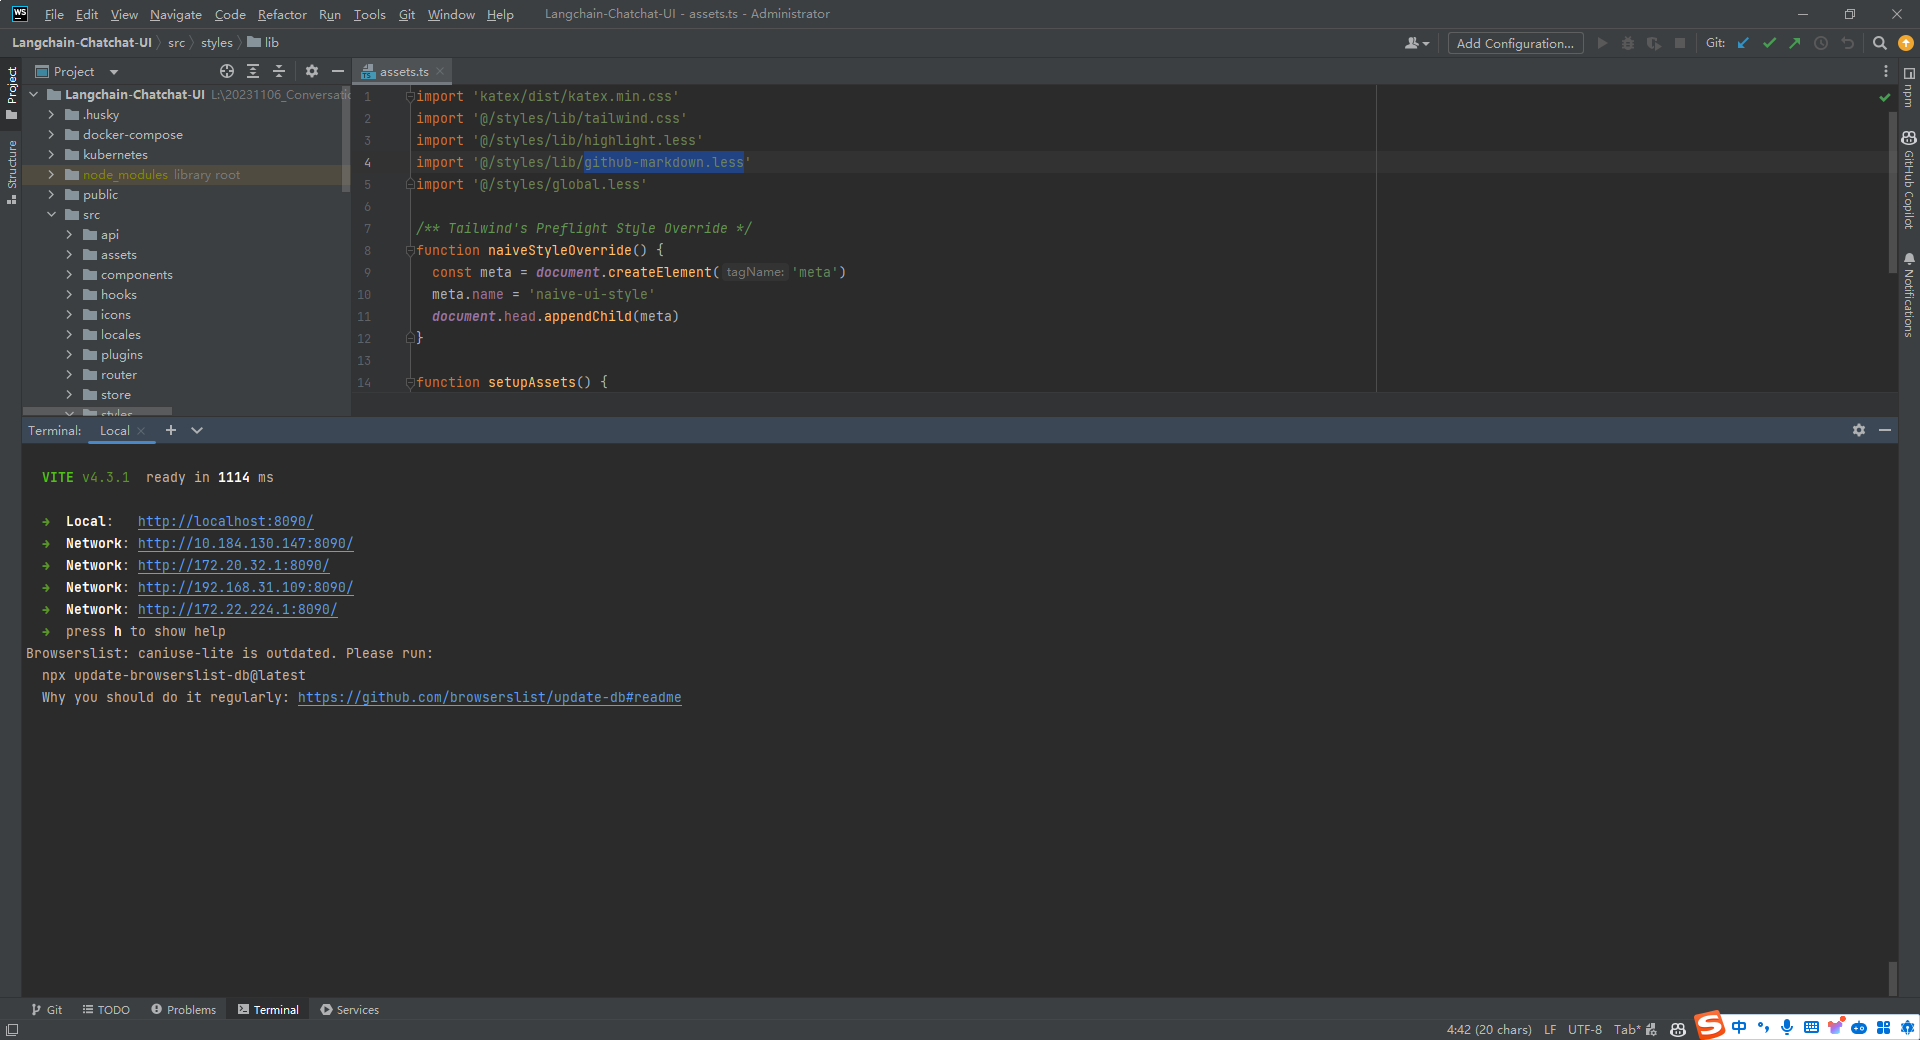
在 Langchain-Chatchat v0.1.17 版本及以前是有前后端分离的 Vue 项目的,但是 v0.2.0 后就没有了。所以本文使用的是 Langchain-Chatchat v0.1.17 版本中的 Vue 项目。运行前端项目基本命令就是 npm install,npm run dev。
1.不能找到模块 node:path
当执行 npm run dev 时报错,显示 Error: Cannot find module 'node:path'。如下所示:
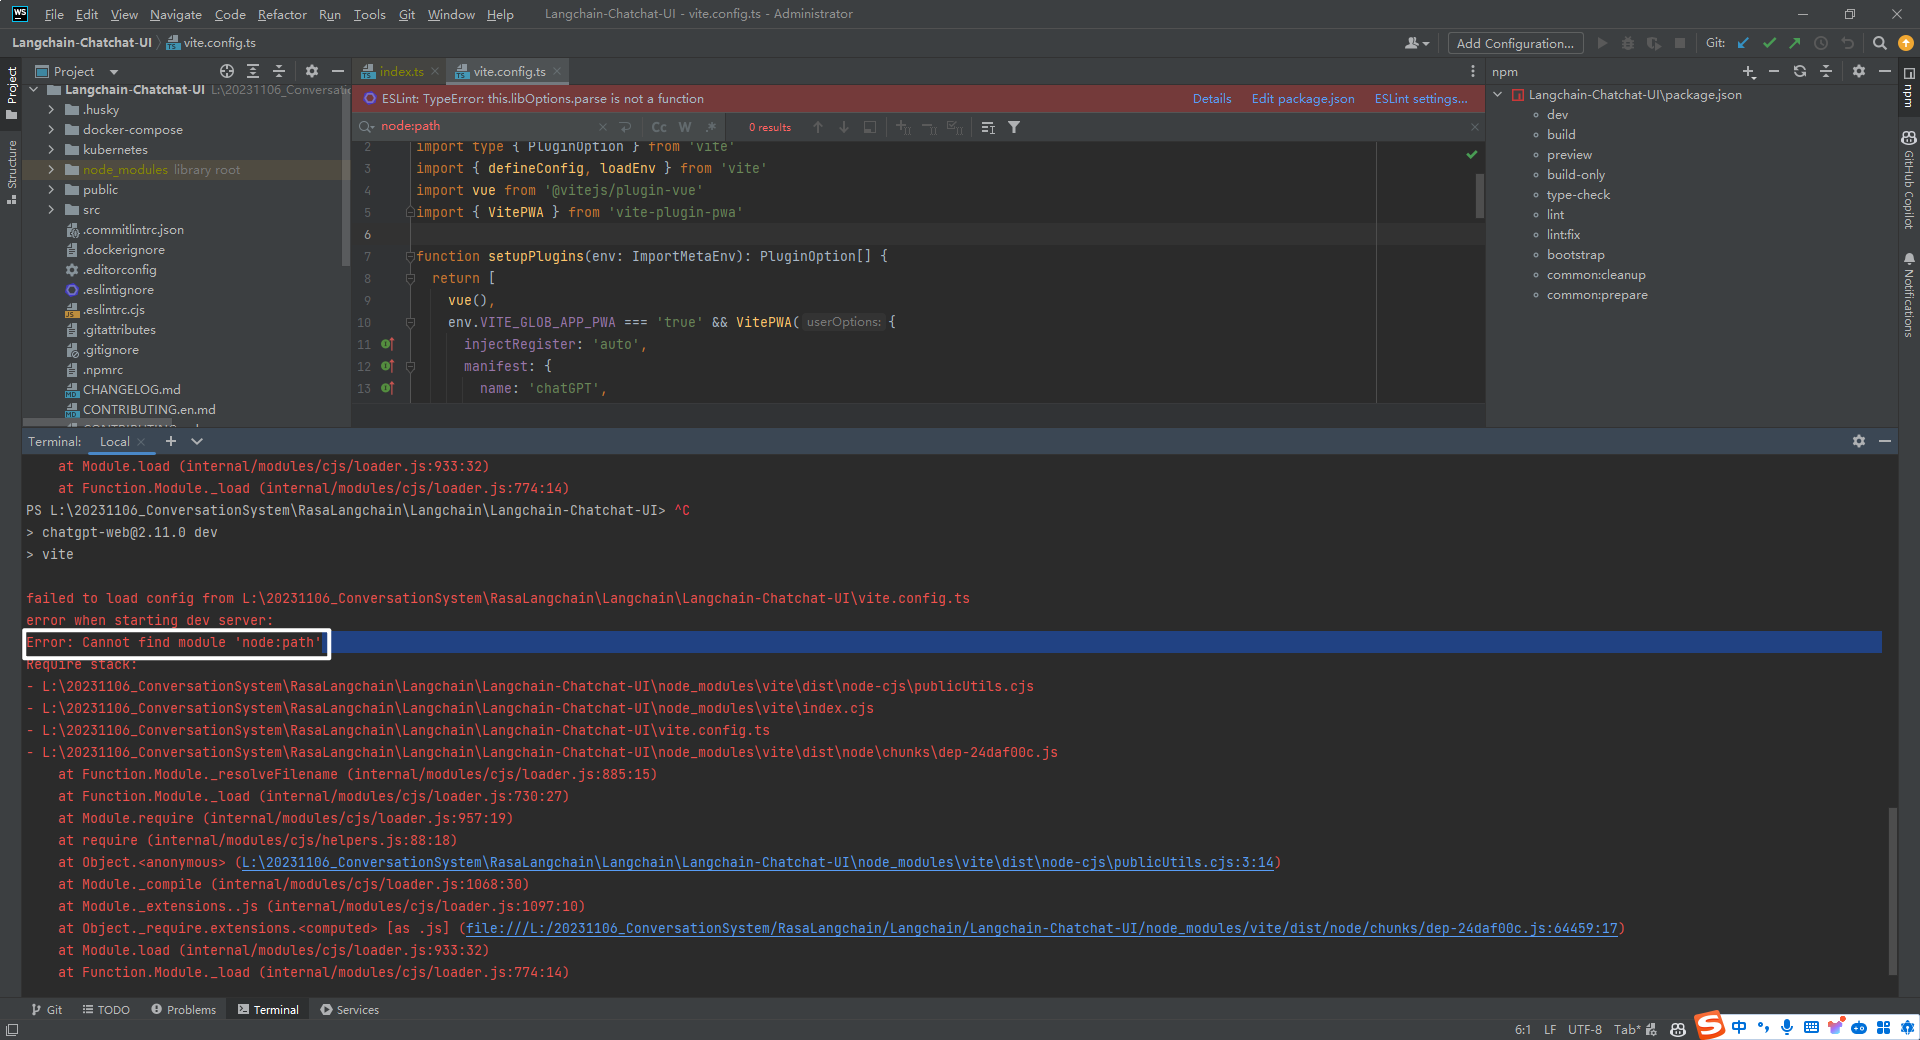
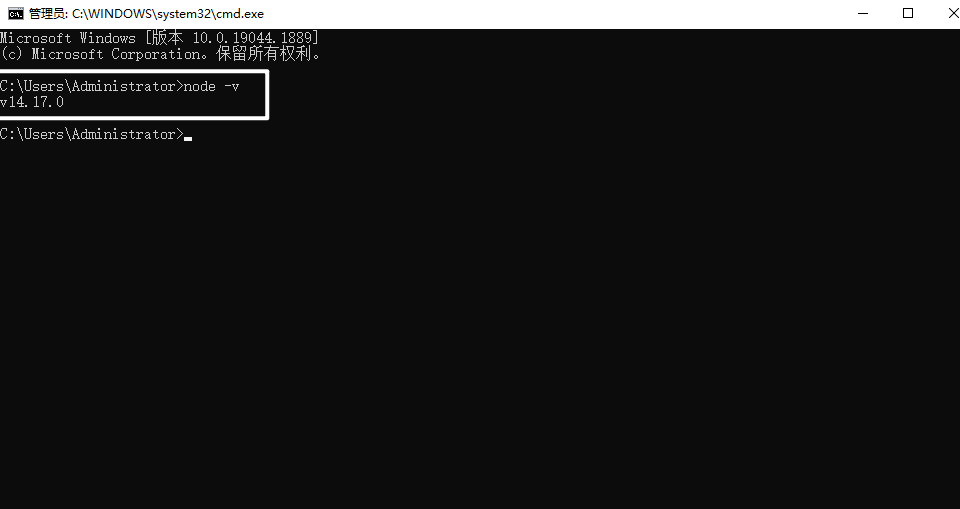
以前用的 Vue2+Node 14.17.0,更换为 node-v16.16.0 就好了。执行命令,如下所示:
npm install npm@6 -g
npm cache clear --force
npm install
npm run dev
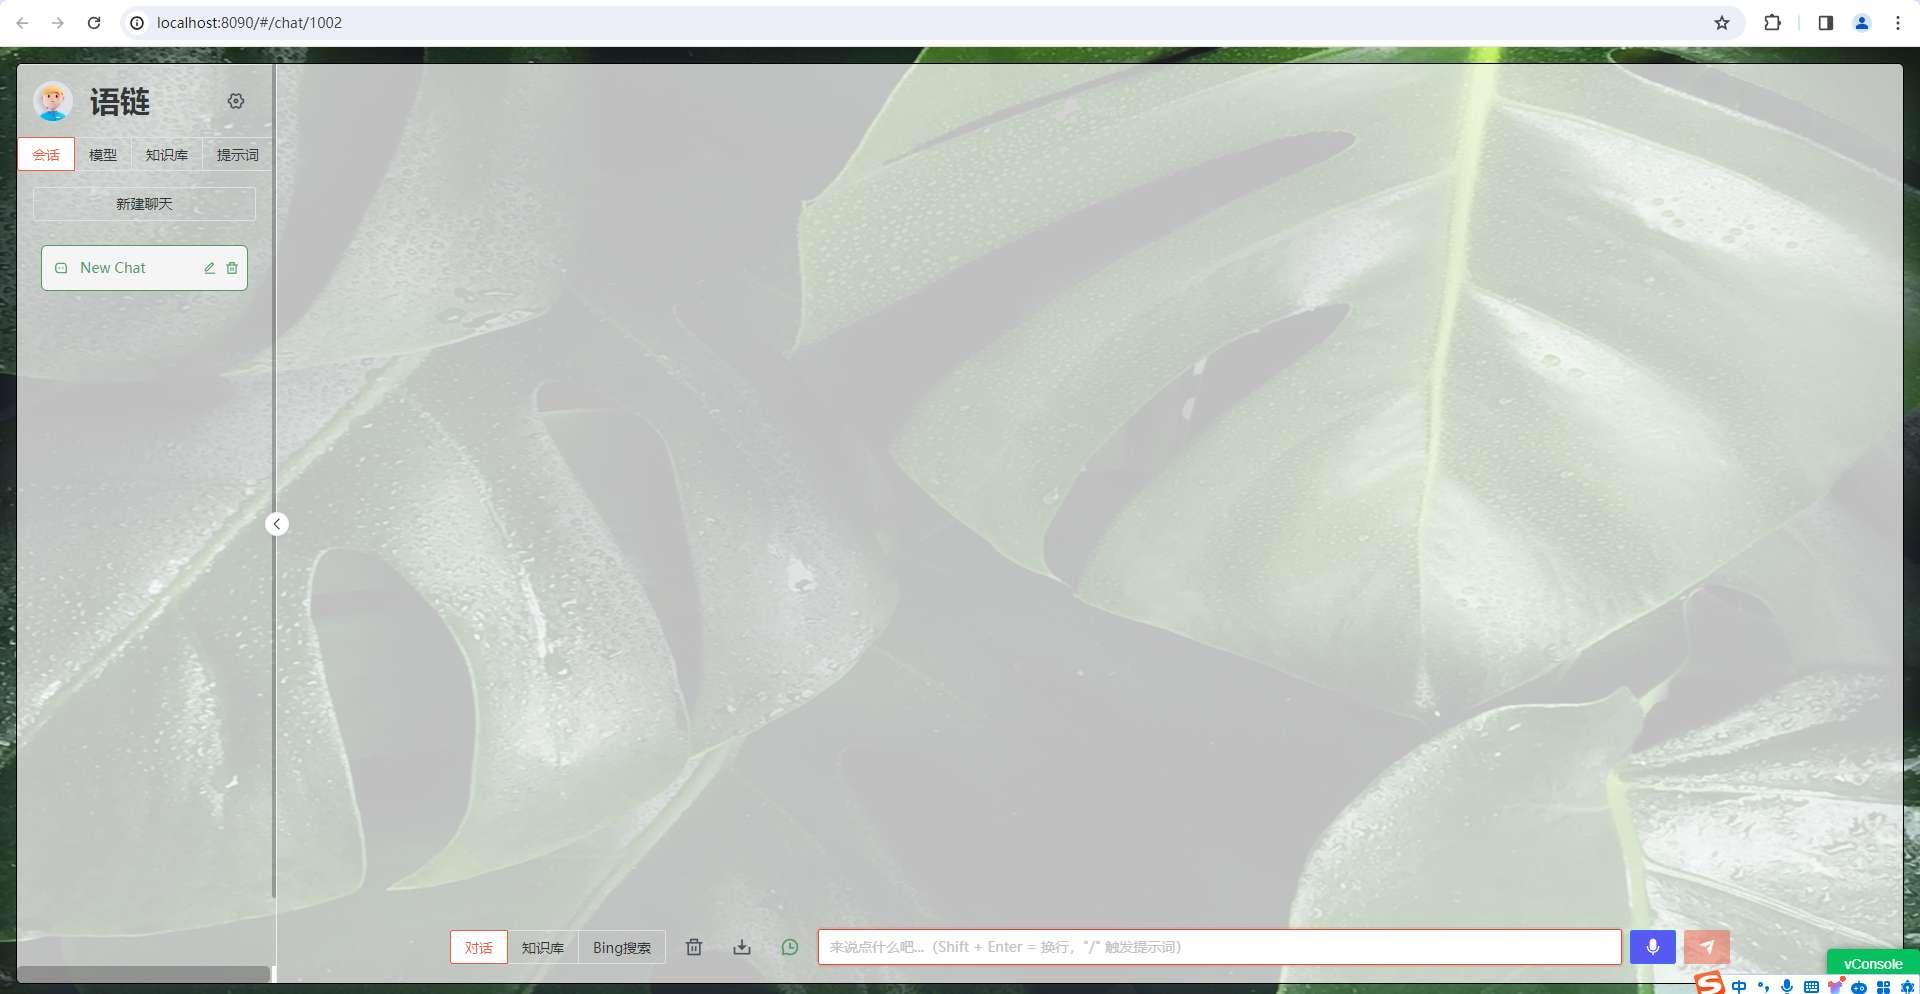
2.将前端 Vue 项目跑起来
这个是 Langchain-Chatchat v0.1.17 版本前端 Vue 的界面(Langchain-Chatchat v0.2.8 后端 API 接口有所调整,需要更新前端接口才能将其运行起来),如下所示:
3.遇到的问题
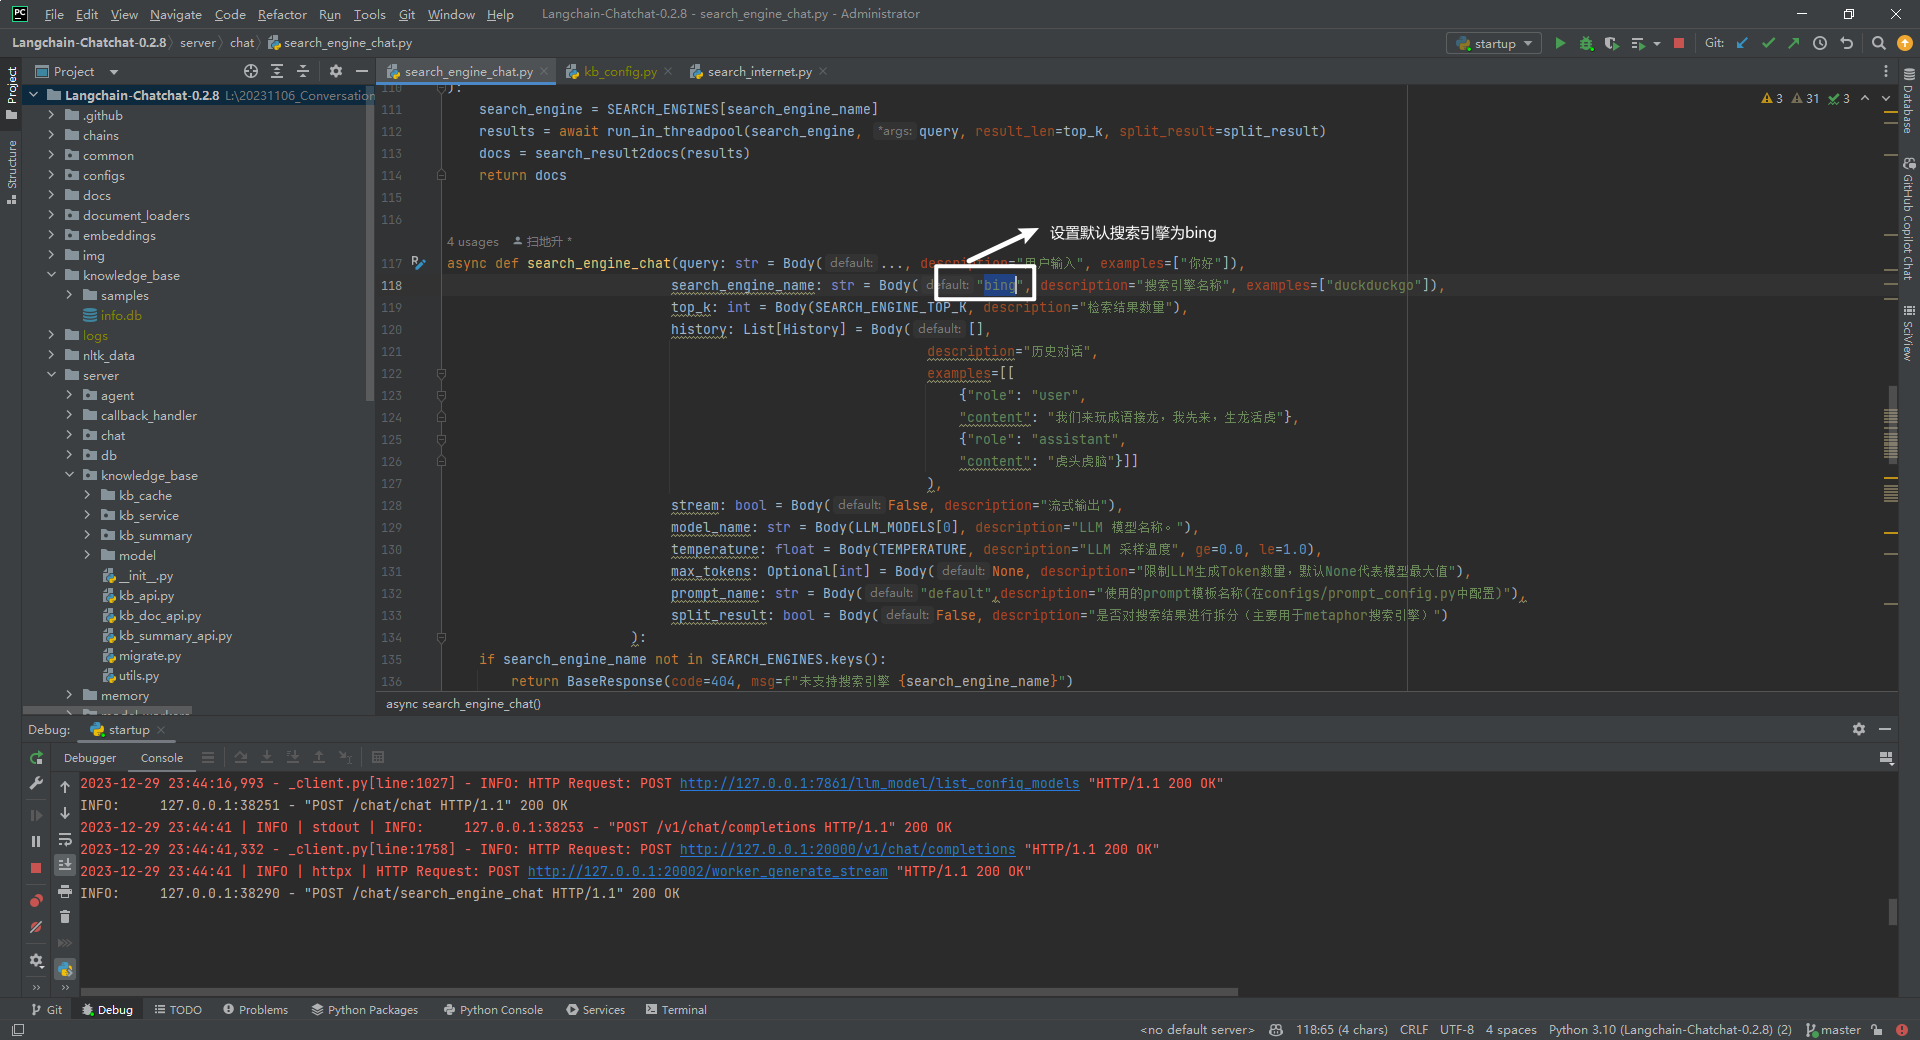
(1)搜索引擎接口
http://localhost:8090/api/chat/search_engine_chat
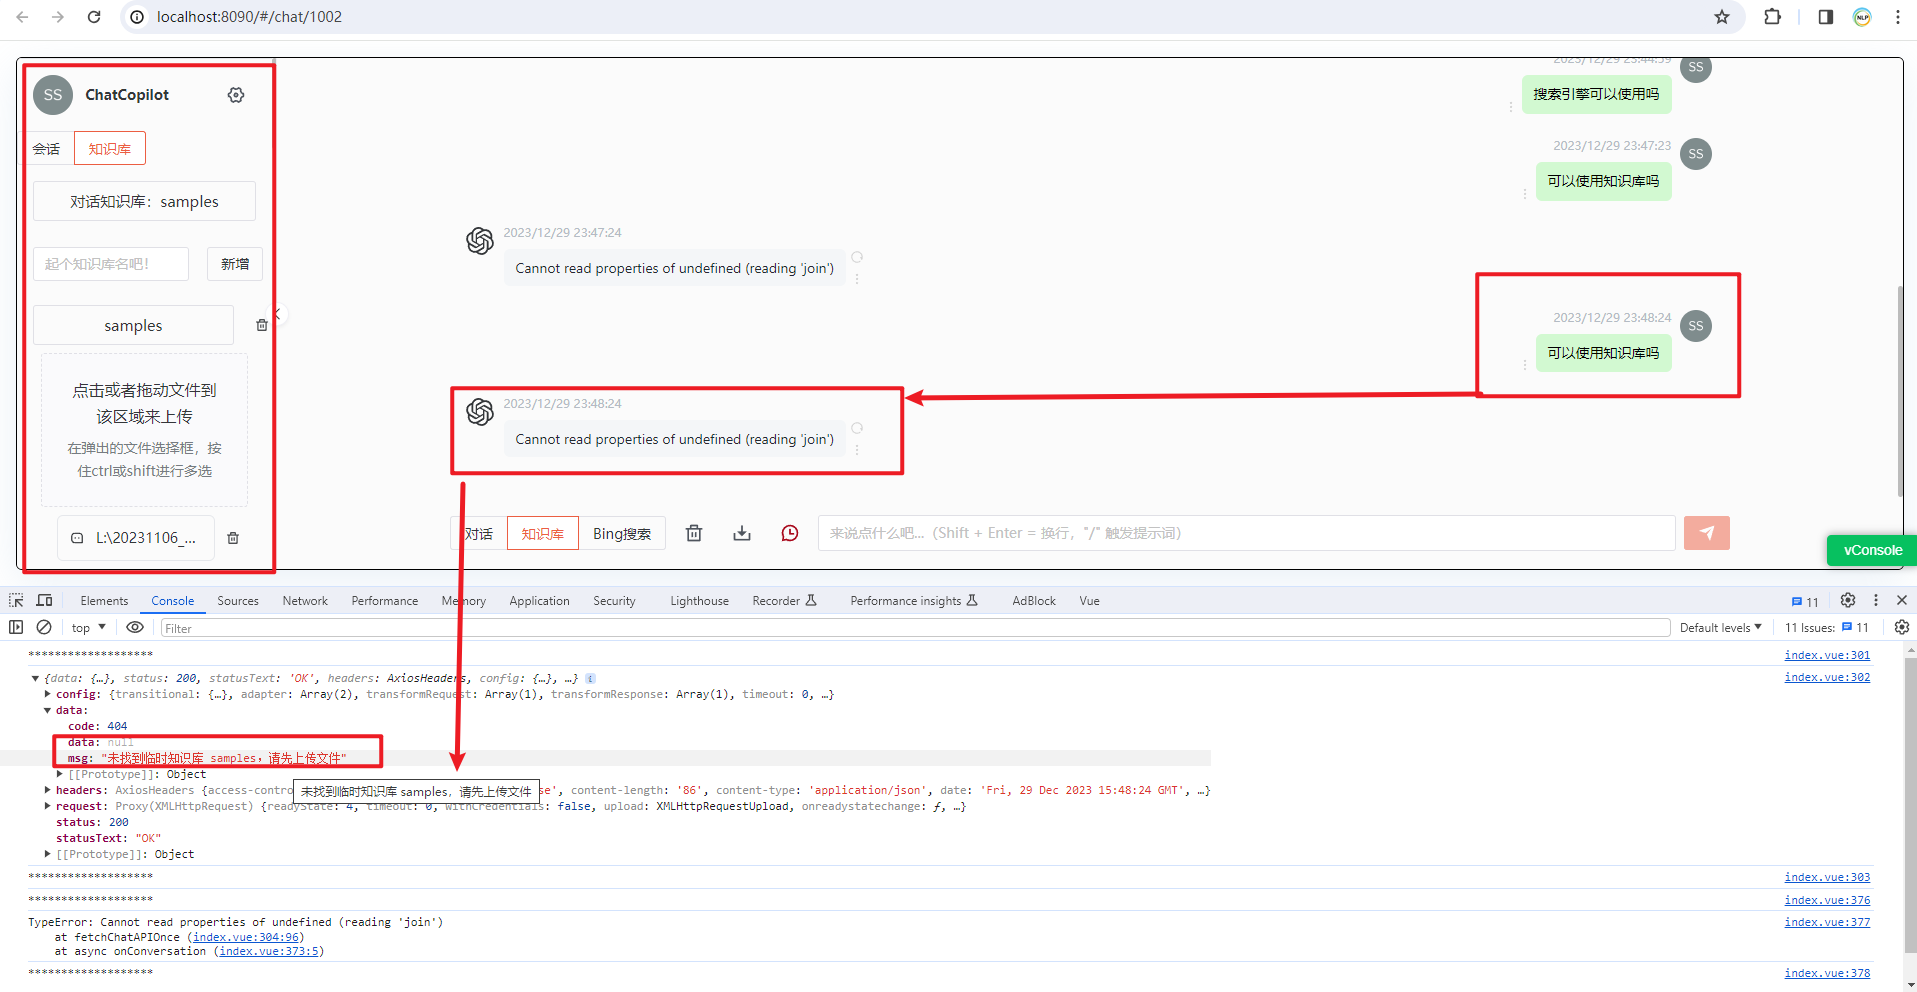
(2)知识库检索接口
http://localhost:8090/api/chat/file_chat
报错:未找到临时知识库 samples,请先上传文件,但是知识库是已经存在的。
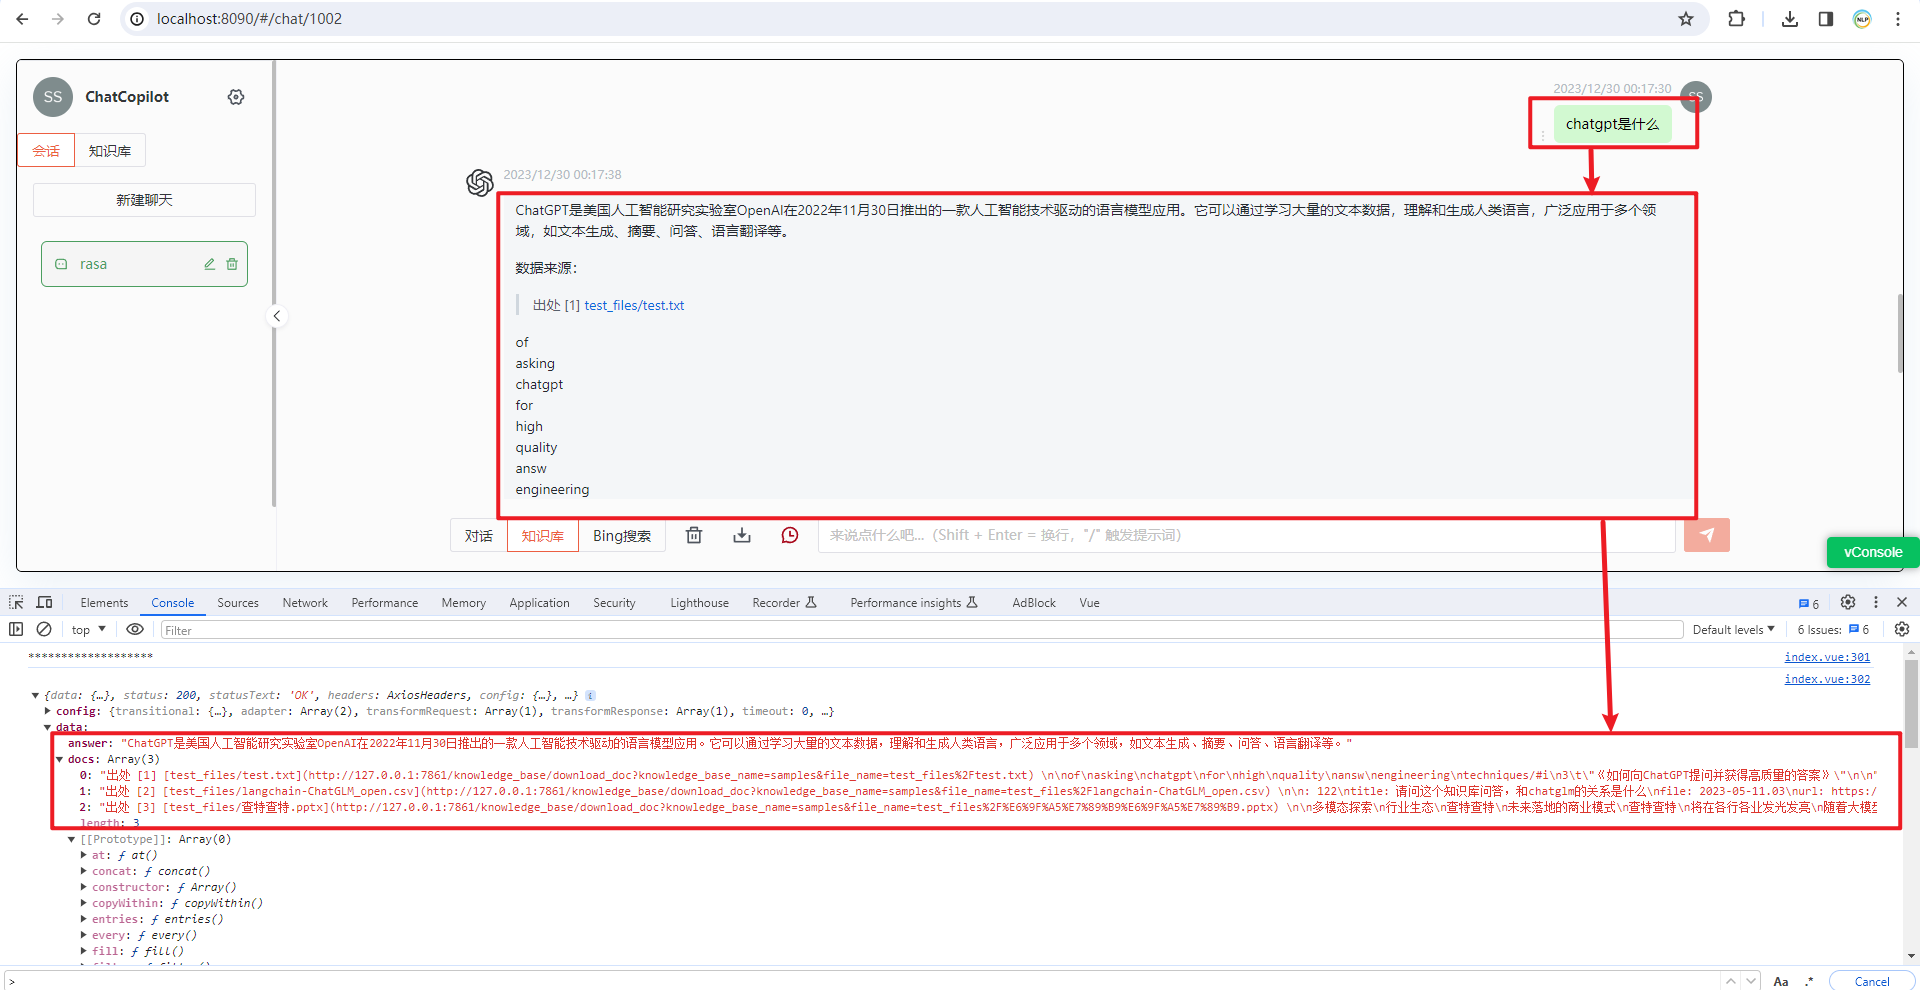
原因:应该调用 knowledge_base_chat 知识库对话接口,而 file_chat 是与临时文件进行对话的接口。
调用 knowledge_base_chat 成功后的信息,如下所示:
(3)文件上传接口
http://localhost:8090/api/knowledge_base/upload_docs
说明:经过一番折腾终于将 Langchain-Chatchat v0.1.17 版本前端 Vue 接口和 Langchain-Chatchat v0.2.8 后端 API 接口调通了(前端界面暂不开源,若有问题可以交流)。
参考文献
[1] https://nodejs.org/download/release/v16.16.0/
[2] https://github.com/chatchat-space/Langchain-Chatchat
[3] https://github.com/LetheSec/HuggingFace-Download-Accelerator
[4] https://pytorch.org/get-started/previous-versions/
NLP工程化
1.本公众号以对话系统为中心,专注于Python/C++/CUDA、ML/DL/RL和NLP/KG/DS/LLM领域的技术分享。
2.本公众号Roadmap可查看飞书文档:https://z0yrmerhgi8.feishu.cn/wiki/Zpewwe2T2iCQfwkSyMOcgwdInhf
NLP工程化

飞书文档

梳理Langchain-Chatchat-UI接口文档的更多相关文章
- SpringFox swagger2 and SpringFox swagger2 UI 接口文档生成与查看
依赖: <!-- https://mvnrepository.com/artifact/io.springfox/springfox-swagger2 --> <dependency ...
- TP框架整合Swagger UI接口文档
1.下载swagger ui:http://swagger.io/swagger-ui/: 2.在应用目录里新建一个目录xxx:如图 3.解压后把dist目录的所有文件拷贝到新建的目录里面: 4.在新 ...
- WebApi使用swagger ui自动生成接口文档
之前就写到.最近正在使用webapi.这里介绍一个实用的东西swageer ui现在开发都是前后端分开.我们这里是给前端提供api.有时候对于一个api的描述,并不想专门写一份文档.很浪费时间.swa ...
- Swagger UI教程 API 文档神器 搭配Node使用 web api 接口文档 (转)
http://www.68idc.cn/help/makewebs/qitaasks/20160621620667.html 两种方案 一.Swagger 配置 web Api 接口文档美化 二.通过 ...
- RESTful API接口文档规范小坑
希望给你3-5分钟的碎片化学习,可能是坐地铁.等公交,积少成多,水滴石穿,谢谢关注. 前后端分离的开发模式,假如使用的是基于RESTful API的七层通讯协议,在联调的时候,如何避免配合过程中出现问 ...
- Swagger+Spring mvc生成Restful接口文档
简介 Swagger 是一个规范和完整的框架,用于生成.描述.调用和可视化 RESTful 风格的 Web 服务.总体目标是使客户端和文件系统作为服务器以同样的速度来更新.文件的方法,参数和模型紧密集 ...
- 使用swagger实现web api在线接口文档
一.前言 通常我们的项目会包含许多对外的接口,这些接口都需要文档化,标准的接口描述文档需要描述接口的地址.参数.返回值.备注等等:像我们以前的做法是写在word/excel,通常是按模块划分,例如一个 ...
- asp.net core 使用 swagger 生成接口文档
参考地址:http://www.cnblogs.com/daxnet/p/6181366.html http://www.jianshu.com/p/fa5a9b76f3ed 微软参考文档:https ...
- .net core 使用swagger自动生成接口文档
前言 swagger是一个api文档自动生动工具,还集成了在线调试. 可以为项目自动生成接口文档, 非常的方便快捷 Swashbuckle.AspNetCore 是一个开源项目,用于生成 ASP.N ...
- ABP给WebApi添加SwaggerUI,生成可交互接口文档
在ABP模板项目中,通过SwaggerUI可以为我们的WebApi生成动态的可交互接口文档页面,从而可以很方便的测试调用我们的WebApi接口. 一.集成Swagger 右键项目YoYo.Web,打开 ...
随机推荐
- centos7离线安装docker和docker-compose
1.找一台可联网的centos7主机 在这台可以联网的机器上把离线包都下载好. 2.下载docker rpm安装包和相关依赖 ## 安装yum-utils包,添加docker yum源 sudo yu ...
- MySQL中的Statistics等待
[作者] 吴宙旭,携程数据库专家 [问题描述] 线上我们偶尔会碰到MySQL的状态是statistics. 但如果出现大量的statistics等待,会引起MySQL性能急剧下降.官方的文档对这个状态 ...
- TCP协议的秘密武器:流量控制与拥塞控制
TCP可靠性传输 相信大家都熟知TCP协议作为一种可靠传输协议,但它是如何确保传输的可靠性呢? 要实现可靠性传输,需要考虑许多因素,比如数据的损坏.丢失.重复以及分片顺序混乱等问题.如果不能解决这些问 ...
- JAVA动态增强一个BaseController的已经存在的接口
使用场景 前提场景 我们多个系统同时继承了某一个通用系统,通用系统的接口是不会允许随意改变的,其他子系统都依赖于Base系统的通用接口 目标需求场景 但是有一个业务,需要给某一个公共接口增加子系统独有 ...
- Linux系列教程——Linux发展介绍、Linux系统安装、查看Linux内核版本和系统版本、Centos7安装jdk1.8
文章目录 1 Linux发展介绍 零 什么是Linux 一 Linux前身 二 Linux诞生 三 开源文化 四 Linux系统特点 五 Linux分支 2 Linux系统安装 Linux虚拟机安装 ...
- mooc第四单元《管理团队》单元测试
第四单元<管理团队>单元测试 返回 本次得分为:6.00/10.00, 本次测试的提交时间为:2020-08-30, 如果你认为本次测试成绩不理想,你可以选择 再做一次 . 1 判断(2分 ...
- 数据重整:用Java实现精准Excel数据排序的实用策略
摘要:本文由葡萄城技术团队原创并首发.转载请注明出处:葡萄城官网,葡萄城为开发者提供专业的开发工具.解决方案和服务,赋能开发者. 前言 在数据处理或者数据分析的场景中,需要对已有的数据进行排序,在Ex ...
- CF1343C
题目简化和分析: 给您一个序列,您要在其中选择若干个数使得: 相邻两数异号 长度最大,总和最大 我们可以牢牢抓住长度且总和最大,这一特性. 说明我们必须在每一个连续的同号的子串中被迫选择最大的,以满足 ...
- 产品代码都给你看了,可别再说不会DDD(七):实体与值对象
这是一个讲解DDD落地的文章系列,作者是<实现领域驱动设计>的译者滕云.本文章系列以一个真实的并已成功上线的软件项目--码如云(https://www.mryqr.com)为例,系统性地讲 ...
- ts 终于搞懂TS中的泛型啦! | typescript 入门指南 04
大家好,我是王天~ 这篇文章是 ts入门指南系列中第四篇,主要讲解ts中的泛型应用,泛型在ts中是比较重要的概念,我花挺长时间才搞明白的,希望能帮助到大家 ~ ** ts 入门指南系列 ** Ts和J ...