
[Lua][Love Engine] 打砖块游戏实现过程与知识点
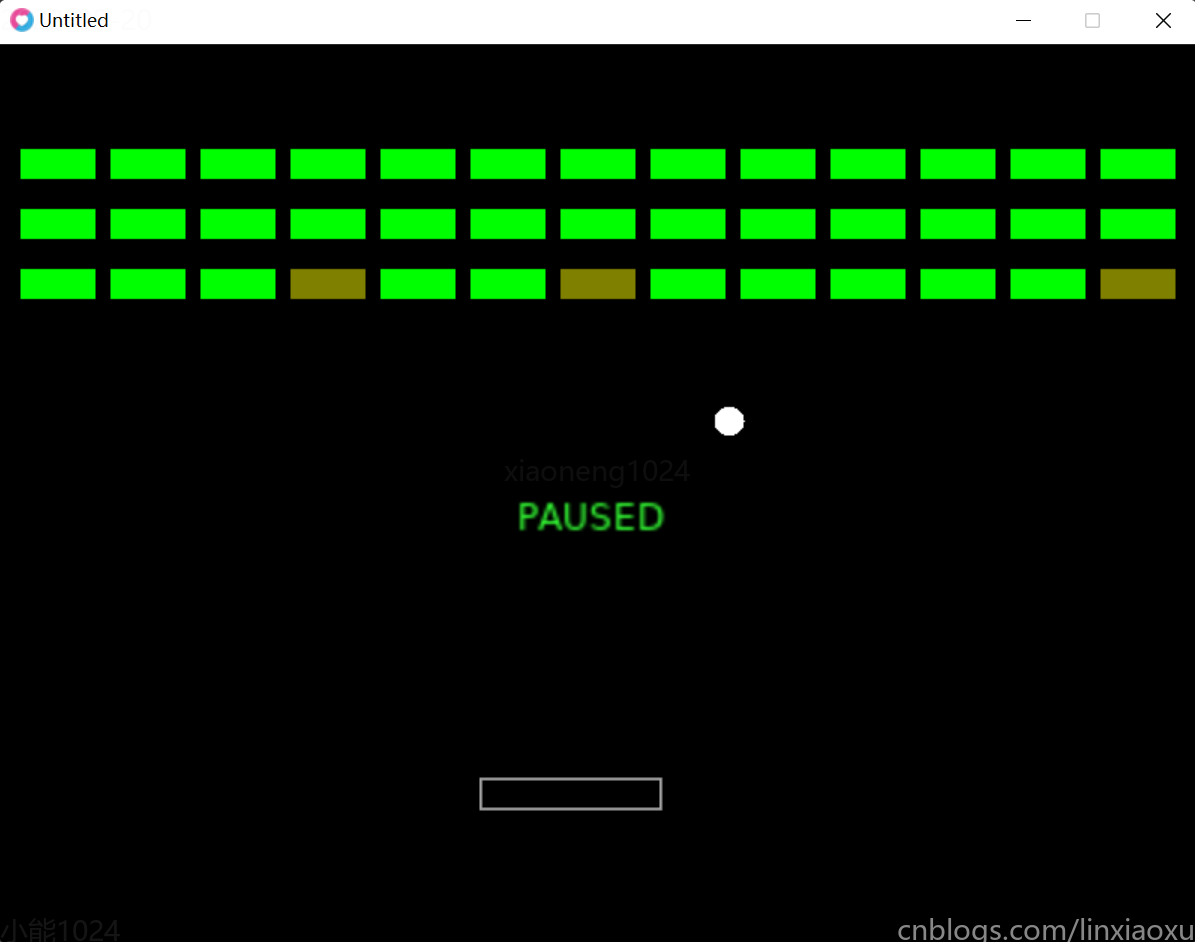
本文旨在根据LOVE2D官方文档和教程实现打砖块的游戏,记录部分实现过程和重要知识点
- 目标摧毁所有砖块
- 玩家控制球拍左右滑动反弹小球
- 小球摧毁砖块
- 小球保持在屏幕内
- 小球碰到屏幕底部,GAME OVER
引擎配置
-- conf.lua

love.conf = function(t)

    t.console = true

    t.window.width = 800

    t.window.height = 600

end
在加载引擎的时候回调该函数修改引擎基本参数,默认参数可看Config Files - LOVE (love2d.org)
物理世界
-- world.lua

local begin_contact_callback = function(fixture_a, fixture_b, contact)

end

local end_contact_callback = function(fixture_a, fixture_b, contact)

end

local pre_solve_callback = function(fixture_a, fixture_b, contact)

end

local post_solve_callback = function(fixture_a, fixture_b, contact)

end

local world = love.physics.newWorld(0, 0)

world:setCallbacks(begin_contact_callback, end_contact_callback, pre_solve_callback, post_solve_callback)

return world
建立了一个无重力的物理世界,为世界的物理碰撞绑定了四个回调函数,这四个回调函数依次的作用是
- 两个物理实体开始接触
- 接触未解除,每帧碰撞处理计算前
- 接触未解除,每帧碰撞处理计算后
- 两个物理实体结束接触
单一职责
按单一职责角度,main.lua 只负责创建游戏运行所必须的回调函数,而以下行为不属于这个职责范围
- 加载和保存所有实体
- 解决各类实体的绘制
- 保存按键映射
举个例子:main.lua的love.draw的回调函数的函数体负责了解释各类实体如何绘制的操作,如
love.draw = function()

   local ball_x, ball_y = ball.body:getWorldCenter()

   love.graphics.circle('fill', ball_x, ball_y, ball.shape:getRadius())

end
可以通过修改实体结构,让每个实体有对自身绘制行为的描述,将love.draw的一部分职责分担到各个实体上。如下述代码为ball实体添加了draw方法实现对自身绘图行为的描述。
-- entities/ball.lua

local world = require 'world'

local entity = {}

-- 设置body位置,形状将以该位置为中心,设置动态还是静态,即会不会受到其他物理实体的影响

entity.body = love.physics.newBody(world, 200, 200, 'dynamic')

entity.body:setMass(32) -- 设置质量kg

entity.body:setLinearVelocity(300, 300) -- 右下角匀速加速度

entity.shape = love.physics.newCircleShape(10) -- 创建一个圆形形状

entity.fixture = love.physics.newFixture(entity.body, entity.shape) -- 将body和形状进行绑定

entity.fixture:setRestitution(1) -- 设置弹性系数

entity.fixture:setUserData(entity) -- 设置用户数据,用于在碰撞回调时获取用户自定义信息来判断操作

-- 实体对自身绘图行为的描述

function entity:draw()

    pos_x, pos_y = self.body:getWorldCenter() -- 获取body的位置(也是圆心的位置)

    love.graphics.circle('fill', pos_x, pos_y, self.shape:getRadius()) -- 绘制这个圆,还要从形状那获取半径

end

return entity
实体列表
考虑到实体创建和实体管理较难维护,可以用一个实体列表来进行统一管理。
修改示例 ball.lua
可以把每个实体脚本包裹进一个函数中,给定位置参数生成并返回这个实体,上述代码将修改为
-- entities/ball.lua

local world = require 'world'

-- 导出一个函数,这个函数需要x,y位置参数,返回一个对象

return function(x, y)

    local entity = {}

    -- 设置body位置,形状将以该位置为中心,设置动态还是静态,即会不会受到物理系统的影响

    entity.body = love.physics.newBody(world, x, y, 'dynamic')

    entity.body:setMass(32) -- 设置质量kg

    entity.body:setLinearVelocity(300, 300) -- 右下角匀速加速度

    entity.shape = love.physics.newCircleShape(10) -- 创建一个圆形形状

    entity.fixture = love.physics.newFixture(entity.body, entity.shape) -- 将body和形状进行绑定

    entity.fixture:setRestitution(1) -- 设置弹性系数

    entity.fixture:setUserData(entity) -- 设置用户数据,用于在碰撞回调时获取用户自定义信息来判断操作

    -- 实体对自身绘图行为的描述

    function entity:draw()

        pos_x, pos_y = self.body:getWorldCenter() -- 获取body的位置(也是圆心的位置)

        love.graphics.circle('fill', pos_x, pos_y, self.shape:getRadius()) -- 绘制这个圆,还要从形状那获取半径

    end

    return entity -- 返回对象

end
其他修改示例
再修改其他实体代码统一成上述形式
boundary-bottom.lua
-- entities/boundary-bottom.lua

local world = require 'world'

return function(x, y)

    local entity = {}

    entity.body = love.physics.newBody(world, x, y, 'static')

    entity.shape = love.physics.newRectangleShape(800, 10)

    -- 形状将以body的位置为中心

    entity.fixture = love.physics.newFixture(entity.body, entity.shape)

    entity.fixture:setUserData(eneity)

    function entity:draw()

        love.graphics.polygon('line', self.body:getWorldPoints(self.shape:getPoints()))

    end

    return entity

end
boundary-vertical.lua
-- entities/boundary-vertical.lua

local world = require 'world'

return function(x, y)

    local entity = {}

    entity.body = love.physics.newBody(world, x, y, 'static')

    entity.shape = love.physics.newRectangleShape(10, 600)

    -- 形状将以body的位置为中心

    entity.fixture = love.physics.newFixture(entity.body, entity.shape)

    entity.fixture:setUserData(eneity)

    function entity:draw()

        love.graphics.polygon('line', self.body:getWorldPoints(self.shape:getPoints()))

    end

    return entity

end
boundary-top.lua
-- entities/boundary-top.lua

local world = require 'world'

return function(x, y)

    local entity = {}

    entity.body = love.physics.newBody(world, x, y, 'static')

    entity.shape = love.physics.newRectangleShape(800, 10)

    -- 形状将以body的位置为中心

    entity.fixture = love.physics.newFixture(entity.body, entity.shape)

    entity.fixture:setUserData(eneity)

    function entity:draw()

        love.graphics.polygon('line', self.body:getWorldPoints(self.shape:getPoints()))

    end

    return entity

end
brick.lua
-- entities/boundary-top.lua

local world = require 'world'

return function(x, y)

    local entity = {}

    entity.body = love.physics.newBody(world, x, y, 'static')

    entity.shape = love.physics.newRectangleShape(50, 20)

    entity.fixture = love.physics.newFixture(entity.body, entity.shape)

    entity.fixture:setUserData(entity)

    function entity:draw()

        love.graphics.polygon('fill', self.body:getWorldPoints(self.shape:getPoints()))

    end

    return entity

end
paddle.lua
-- entities/boundary-paddle.lua

local world = require 'world'

return function(x, y)

    local entity = {}

    entity.body = love.physics.newBody(world, x, y, 'static')

    entity.shape = love.physics.newRectangleShape(180, 20) -- 生成一个长方体多边形

    entity.fixture = love.physics.newFixture(entity.body, entity.shape)

    entity.fixture:setUserData(entity)

    function entity:draw()

        love.graphics.polygon('line', self.body:getWorldPoints(self.shape:getPoints()))

    end

    return entity

end
创建实体列表
-- main.lua

local boundary_bottom = require('entities/boundary-bottom')

local boundary_vertical = require('entities/boundary-vertical')

local boundary_top = require('entities/boundary-top')

local paddle = require 'entities.paddle'

local ball = require 'entities.ball'

local brick = require 'entities.brick'

local world = require 'world'

local entities = {boundary_bottom(400, 606), boundary_vertical(-6, 300), boundary_vertical(806, 300), boundary_top(400, -6),

        paddle(300, 500), ball(200, 200), brick(100, 100), brick(200, 100), brick(300, 100)}
直接调用实体创建函数创建各个实体,并放在同一个实体列表内,再修改love.draw遍历这个实体列表调用各个实体的draw行为,代码量大大减少
love.draw = function()

    for _, entity in ipairs(entities) do

        entity:draw()

    end

end
代码拆分 entities.lua
此时创建实体列表的相关代码还在main.lua内,将它独立成entities.lua
-- entities.lua

local boundary_bottom = require 'entities/boundary-bottom'

local boundary_vertical = require 'entities/boundary-vertical'

local boundary_top = require 'entities/boundary-top'

local paddle = require 'entities.paddle'

local ball = require 'entities.ball'

local brick = require 'entities.brick'

return {boundary_bottom(400, 606), boundary_vertical(-6, 300), boundary_vertical(806, 300), boundary_top(400, -6),

        paddle(300, 500), ball(200, 200), brick(100, 100), brick(200, 100), brick(300, 100)}
main.lua 只需导入 entities.lua 并使用即可
-- main.lua

local world = require 'world'

local entities = require 'entities'

love.draw = function()

    for _, entity in ipairs(entities) do

        entity:draw()

    end

end

love.update = function(dt)

     world:update(dt)

end
输入处理
输入系统
专门新建一个文件input.lua用于输入处理
-- input.lua

-- 存放输入系统一切变量和操作的表

local input = {}

-- 各个按键对应回调函数的映射

local press_functions = {}

local release_functions = {}

-- 初始值

input.left = false

input.right = false

input.paused = false

-- 根据key触发对应的映射函数

input.press = function(key)

    if press_functions[key] then

        press_functions[key]()

    end

end

input.release = function(key)

    if release_functions[key] then

        release_functions[key]()

    end

end

-- 如果离开当前程序窗口则暂停

input.focused = function(f)

    if not focused then

        input.paused = true

    end

end

press_functions.left = function()

    input.left = true

end

press_functions.right = function()

    input.right = true

end

press_functions.escape = function()

    love.event.quit()

end

press_functions.space = function()

    input.paused = not input.paused

end

release_functions.left = function()

    input.left = false

end

release_functions.right = function()

    input.right = false

end

return input
然后在main.lua导入input.lua
-- main.lua

local world = require 'world'

local entities = require 'entities'

local input = require 'input'

love.draw = function()

    for _, entity in ipairs(entities) do

        entity:draw()

    end

end

love.update = function(dt)

    if not paused then

        world:update(dt)

    end

end

love.focus = input.focused

love.keypressed = input.press

love.keyreleased = input.release
更新实体位置
监测输入后需要根据输入系统的变量实时更新实体位置,修改love.update,查询各个实体的update方法,若有则执行
love.update = function(dt)

    if not input.paused then

        for _, entity in ipairs(entities) do

            if entity.update then

                entity:update(dt)

            end

        end

        world:update(dt)

    end

end
修改paddle.lua的代码
-- entities/boundary-paddle.lua

local world = require 'world'

local input = require 'input'

return function(x, y)

    local entity = {}

    entity.body = love.physics.newBody(world, x, y, 'static')

    entity.shape = love.physics.newRectangleShape(180, 20) -- 生成一个长方体多边形

    entity.fixture = love.physics.newFixture(entity.body, entity.shape)

    entity.fixture:setUserData(entity)

    function entity:draw()

        love.graphics.polygon('line', self.body:getWorldPoints(self.shape:getPoints()))

    end

    function entity:update(dt)

        -- 两个按键都按了或都不按是不会动的

        if input.left and input.right or not input.left and not input.right then

            return

        end

        local self_x, self_y = self.body:getPosition()

        if input.left then

            -- 用时间增量去计算位置

            self.body:setPosition(self_x - 250 * dt, self_y)

        elseif input.right then

            self.body:setPosition(self_x + 250 * dt, self_y)

        end

    end

    return entity

end
由于paddle在创建的时候是静态实体,是不受其他物理实体影响的,两边空气墙真如同空气,需要手动代码限制,修改如下
        if input.left then

            -- 用时间增量去计算位置

            local new_x = math.max(self_x - 400 * dt, 90)

            self.body:setPosition(new_x, self_y)

        elseif input.right then

            local new_x = math.min(self_x + 400 * dt, 710)

            self.body:setPosition(new_x, self_y)

        end
去除摩擦力
虽然小球实体的弹力系数设置为1,但是在碰撞过程中会越来越慢,这是默认有摩擦力的问题
print(entity.fixture:getFriction())

-- 0.20000000298023
摩擦力是 fixture 的属性,可以使用 fixture:setFriction 进行设置,修改ball.lua,在创建实体的过程中添加如下代码
entity.fixture:setFriction(0) -- 小球受到的摩擦力为0
暂停显示文字
把文字当做一个实体 pause-text.lua ,当暂停时绘制这个实体
-- entities/pause-text.lua

local input = require('input')

return function()

    -- https://love2d.org/wiki/love.window.getMode

    local window_width, window_height = love.window.getMode()

    local entity = {}

    entity.draw = function(self)

        if input.paused then

            -- https://love2d.org/wiki/love.graphics.print 用到了coloredtext表

            love.graphics.print({{0.2, 1, 0.2, 1}, 'PAUSED'}, math.floor(window_width / 2) - 54,

                math.floor(window_height / 2), 0, 2, 2)

        end

    end

    return entity

end
在entities.lua创建这个实体并添加至列表中。只有当游戏暂停时会执行打印函数
三大刚体
static
静态刚体,零质量,零速度,即不会受到重力或速度影响,但是可以设置他的位置来进行移动
- 物理引擎并不认为这种刚体在移动
- 适用于固定位置的对象,地面、墙壁、任何你不希望角色碰撞的游戏对象
dynamic
动态刚体,有质量,可以设置速度,会受到重力影响
- 与三种刚体都有物理效果
kinematic
运动刚体,零质量,可以设置速度,不会受到重力的影响,但是可以设置速度来进行移动
- 这种运动刚体完全由脚本控制
球拍改为运动刚体
将body类型修改为kinematic,删除原先的重新设置位置方式,修改为修改速度来达到移动效果
-- entities/boundary-paddle.lua

local world = require 'world'

local input = require 'input'

return function(x, y)

    local window_width = love.window.getMode()

    local entity_width = 120

    local entity_height = 20

    local entity_speed = 600

    -- 计算一次边界

    local left_boundary = entity_width / 2 + 2

    local right_boundary = window_width - entity_width / 2 - 2

    local entity = {}

    entity.body = love.physics.newBody(world, x, y, 'kinematic')

    entity.shape = love.physics.newRectangleShape(entity_width, entity_height)

    entity.fixture = love.physics.newFixture(entity.body, entity.shape)

    entity.fixture:setUserData(entity)

    function entity:draw()

        love.graphics.polygon('line', self.body:getWorldPoints(self.shape:getPoints()))

    end

    function entity:update(dt)

        -- 两个按键都按是不会动的

        if input.left and input.right then

            return

        end

        local self_x = self.body:getPosition()

        if input.left and self_x > left_boundary then

            self.body:setLinearVelocity(-entity_speed, 0)

        elseif input.right and self_x < right_boundary then

            self.body:setLinearVelocity(entity_speed, 0)

        else

            self.body:setLinearVelocity(0, 0)

        end

    end

    return entity

end
防止小球速度过快
-- entities/ball.lua

local world = require 'world'

-- 导出一个函数,这个函数需要x,y位置参数,返回一个对象

return function(x, y)

    local entity_max_speed = 880

    local entity = {}

    -- 设置body位置,形状将以该位置为中心,设置动态还是静态,即会不会受到其他物理实体的影响

    entity.body = love.physics.newBody(world, x, y, 'dynamic')

    entity.body:setMass(32) -- 设置质量kg

    entity.body:setLinearVelocity(300, 300) -- 右下角匀速加速度

    entity.shape = love.physics.newCircleShape(10) -- 创建一个圆形形状

    entity.fixture = love.physics.newFixture(entity.body, entity.shape) -- 将body和形状进行绑定

    entity.fixture:setRestitution(1) -- 设置弹性系数

    entity.fixture:setUserData(entity) -- 设置用户数据,用于在碰撞回调时获取用户自定义信息来判断操作

    entity.fixture:setFriction(0) -- 小球受到的摩擦力为0

    -- 实体对自身绘图行为的描述

    function entity:draw()

        pos_x, pos_y = self.body:getWorldCenter() -- 获取body的位置(也是圆心的位置)

        love.graphics.circle('fill', pos_x, pos_y, self.shape:getRadius()) -- 绘制这个圆,还要从形状那获取半径

    end

    function entity:update()

        v_x, v_y = self.body:getLinearVelocity()

        local speed = math.abs(v_x) + math.abs(v_y)

        print(speed)

        -- 看看小球反弹之后的速度是否过快

        local vel_x_is_critical = math.abs(v_x) > entity_max_speed * 2

        local vel_y_is_critical = math.abs(v_y) > entity_max_speed * 2

        -- 如果反弹后某一方向移动速度过快则减慢速度

        if vel_x_is_critical or vel_y_is_critical then

            self.body:setLinearVelocity(v_x * .75, v_y * .75)

        end

        -- 如果整体速度过大,则设置阻尼

        if speed > entity_max_speed then

            self.body:setLinearDamping(0.1)

        else

            self.body:setLinearDamping(0)

        end

    end

    return entity -- 返回对象

end
销毁砖块
需要做以下四件事情
- 修改
world.lua处理碰撞的函数 brick.lua实体添加碰撞后的处理函数brick.lua实体添加一个属性用于表示生命值,如entity.healthmain.lua检查并删除生命值为0的实体
修改两个物体实体离开接触时的函数 end_contact_callback,检查两个物理实体各自是否有end_contact方法,如果有则执行
local end_contact_callback = function(fixture_a, fixture_b, contact)

    local entity_a = fixture_a:getUserData()

    local entity_b = fixture_b:getUserData()

    if entity_a.end_contact then

        entity_a.end_contact()

    end

    if entity_b.end_contact then

        entity_b.end_contact()

    end

end
修改brick.lua 添加生命值与end_contact方法,并修改draw行为,使其能在不同生命的时候显示不同颜色
-- entities/boundary-top.lua

local world = require 'world'

return function(x, y)

    local entity = {}

    entity.body = love.physics.newBody(world, x, y, 'static')

    entity.shape = love.physics.newRectangleShape(50, 20)

    entity.fixture = love.physics.newFixture(entity.body, entity.shape)

    entity.fixture:setUserData(entity)

    entity.health = 2

    local step = 1 / entity.health

    function entity:draw()

        local r, g, b, a = love.graphics.getColor()

        love.graphics.setColor({1 - step * entity.health, step * entity.health, 0, 1})

        love.graphics.polygon('fill', self.body:getWorldPoints(self.shape:getPoints()))

        love.graphics.setColor(r, g, b, a)

    end

    function entity:end_contact()

        self.health = self.health - 1

    end

    return entity

end
然后修改 main.lua 添加对各个实体生命值的检查
love.update = function(dt)

    if not input.paused then

        -- 运行实体的update

        for i, entity in ipairs(entities) do

            if entity.update then

                entity:update(dt)

            end

        end

        -- 检测实体health

        local index = 1

        while index <= #entities do

            if entities[index].health == 0 then

                local entity = table.remove(entities, index)

                entity.fixture:destroy()

            else

                index = index + 1

            end

        end

        world:update(dt)

    end

end
批量生成砖块
每生成一个砖块实体,需要调用一次brick,可以用函数批量生成,修改entities.lua
-- entities.lua

local boundary_bottom = require 'entities/boundary-bottom'

local boundary_vertical = require 'entities/boundary-vertical'

local boundary_top = require 'entities/boundary-top'

local paddle = require 'entities.paddle'

local ball = require 'entities.ball'

local brick = require 'entities.brick'

local pause_text = require 'entities.pause-text'

local entities = {boundary_bottom(400, 606), boundary_vertical(-6, 300), boundary_vertical(806, 300),

                  boundary_top(400, -6), paddle(300, 500), ball(200, 200), pause_text()}

local row_width = love.window.getMode() - 20

for number = 0, 38 do

    local brick_x = ((number * 60) % row_width) + 40

    local brick_y = (math.floor((number * 60) / row_width) * 40) + 80

    entities[#entities + 1] = brick(brick_x, brick_y)

end

return entities
状态管理
是否暂停、游戏胜利或失败这种在程序生命期间会动态变化的变量都称为状态。由于状态会越来越多,需要一种方式进行有效管理。需要做到以下几点
- 很容易就能找到和访问状态。就像在
main.lua导入了entities实体列表一样,轻松可得 - 状态数据只能有一份。如只有一个
paused变量,而不是每个文件里都有paused - 状态数据只有有明确需求时才能访问。在
ball.lua获取paused是无意义的
现在有哪些状态
- entities.lua
- 导出的实体列表里的每个实体对各自的状态负责,如每块砖都存储着自己的健康情况
- input.lua
- 当前暂停状态,左右按键的状态
- world.lua
- 导出的world负责整个物理空间的状态
实现状态管理,新建一个state.lua文件,用于存储游戏的大部分状态,比如将input.lua中的状态迁移到此文件,使input.lua专心于捕获和映射用户输入。world.lua和entities.lua没有迁移的必要,避免代码过于臃肿
-- state.lua

return {

    left = false,

    right = false,

    game_over = false,

    palette = {{1.0, 0.0, 0.0, 1.0}, -- red

    {0.0, 1.0, 0.0, 1.0}, -- green

    {0.4, 0.4, 1.0, 1.0}, -- blue

    {0.9, 1.0, 0.2, 1.0}, -- yellow

    {1.0, 1.0, 1.0, 1.0} -- white

    },

    paused = false,

    stage_cleared = false

}
再修改 input.lua
-- input.lua

local state = require 'state'

-- 各个按键对应回调函数的映射

local press_functions = {}

local release_functions = {}

press_functions.left = function()

    state.left = true

end

press_functions.right = function()

    state.right = true

end

press_functions.escape = function()

    love.event.quit()

end

press_functions.space = function()

    state.paused = not state.paused

end

release_functions.left = function()

    state.left = false

end

release_functions.right = function()

    state.right = false

end

return {

    press = function(key)

        print(key)

        if press_functions[key] then

            press_functions[key]()

        end

    end,

    release = function(key)

        if release_functions[key] then

            release_functions[key]()

        end

    end,

    focused = function(f)

        if not f then

            state.paused = true

        end

    end

}
修改main.lua
love.update = function(dt)

    if state.game_over or state.paused or state.stage_cleared then

        return

    end

    -- 运行实体的update

    for i, entity in ipairs(entities) do

        if entity.update then

            entity:update(dt)

        end

    end

    -- 检测实体health

    local index = 1

    while index <= #entities do

        if entities[index].health == 0 then

            local entity = table.remove(entities, index)

            entity.fixture:destroy()

        else

            index = index + 1

        end

    end

    world:update(dt)

end
修改pause-text.lua
-- entities/pause-text.lua

local input = require 'input'

local state = require 'state'

return function()

    -- https://love2d.org/wiki/love.window.getMode

    local window_width, window_height = love.window.getMode()

    local entity = {}

    entity.draw = function(self)

        if state.paused then

            -- https://love2d.org/wiki/love.graphics.print 用到了coloredtext表

            love.graphics.print({{0.2, 1, 0.2, 1}, 'PAUSED'}, math.floor(window_width / 2) - 54,

                math.floor(window_height / 2), 0, 2, 2)

        end

    end

    return entity

end
使用调色板为砖块上色
        love.graphics.setColor(state.palette[entity.health + 1])

        love.graphics.polygon('fill', self.body:getWorldPoints(self.shape:getPoints()))

        love.graphics.setColor(state.palette[5])
胜利与失败
复制pause-text.lua为game-over-text.lua,修改判断条件为 state.game_over
-- entities/game-over-text.lua

local input = require 'input'

local state = require 'state'

return function()

    -- https://love2d.org/wiki/love.window.getMode

    local window_width, window_height = love.window.getMode()

    local entity = {}

    entity.draw = function(self)

        if state.game_over then

            -- https://love2d.org/wiki/love.graphics.print 用到了coloredtext表

            love.graphics.print({{0.2, 1, 0.2, 1}, 'GAME OVER'}, math.floor(window_width / 2) - 54,

                math.floor(window_height / 2), 0, 2, 2)

        end

    end

    return entity

end
复制pause-text.lua为stage-clear-text.lua,修改判断条件为 state.stage_cleared
-- entities/boundary-bottom.lua

local world = require 'world'

return function(x, y)

    local entity = {}

    entity.body = love.physics.newBody(world, x, y, 'static')

    entity.shape = love.physics.newRectangleShape(800, 10)

    -- 形状将以body的位置为中心

    entity.fixture = love.physics.newFixture(entity.body, entity.shape)

    entity.fixture:setUserData(entity)

    function entity:draw()

        love.graphics.polygon('line', self.body:getWorldPoints(self.shape:getPoints()))

    end

    return entity

end
将新增的两个实体添加至实体列表
修改boundary-bottom.lua,添加end_contact事件处理函数修改全局状态“是否失败”
-- entities/boundary-bottom.lua

local world = require 'world'

local state = require 'state'

return function(x, y)

    local entity = {}

    entity.body = love.physics.newBody(world, x, y, 'static')

    entity.shape = love.physics.newRectangleShape(800, 10)

    -- 形状将以body的位置为中心

    entity.fixture = love.physics.newFixture(entity.body, entity.shape)

    entity.fixture:setUserData(entity)

    function entity:draw()

        love.graphics.polygon('line', self.body:getWorldPoints(self.shape:getPoints()))

    end

    function entity:end_contact()

        state.game_over = true

    end

    return entity

end
修改brick.lua 添加 entity.type = "brick",然后修改main.lua判断当前帧是否还有砖块
love.update = function(dt)

    if state.game_over or state.paused or state.stage_cleared then

        return

    end

    -- 运行实体的update

    local isBrick = false

    for i, entity in ipairs(entities) do

        if entity.type == "brick" then

            isBrick = true

        end

        if entity.update then

            entity:update(dt)

        end

    end

    -- 检测实体health

    local index = 1

    while index <= #entities do

        if entities[index].health == 0 then

            local entity = table.remove(entities, index)

            entity.fixture:destroy()

        else

            index = index + 1

        end

    end

    world:update(dt)

    if not isBrick then

        state.stage_cleared = true

    end

end

[Lua][Love Engine] 打砖块游戏实现过程与知识点的更多相关文章
- 【游戏开发】小白学Lua——从Lua查找表元素的过程看元表、元方法
引言 在上篇博客中,我们简单地学习了一下Lua的基本语法.其实在Lua中有一个还有一个叫元表的概念,不得不着重地探讨一下.元表在实际地开发中,也是会被极大程度地所使用到.本篇博客,就让我们从Lua查找 ...
- lua执行字节码的过程介绍
前面一篇文章中介绍了lua给下面代码生成最终的字节码的整个过程,这次我们来看看lua vm执行这些字节码的过程. foo = "bar" local a, b = "a& ...
- C/C++ Lua Parsing Engine
catalog . Lua语言简介 . 使用 Lua 编写可嵌入式脚本 . VS2010编译Lua . 嵌入和扩展: C/C++中执行Lua脚本 . 将C++函数导出到Lua引擎中: 在Lua脚本中执 ...
- cocos2dx 3.x for lua "异步加载"实现过程
在lua中,cocos2dx 建立的栈只能被一个线程(主线程)访问,如果在c++建立子线程,然后通过c++调用lua回调函数实现异步加载就会报错. 如果试图通过c++子线程直接实现加载资源,返回一个布 ...
- 学校项目过程中知识点 Java 2015/9/15 晚
##命令行运行Java程序1.文件Java的源代码存放在扩展名为“.java”的文件中:Java源文件编译后,得到“.class”的文件2.方法命令行下编译java源代码的方法:javac 文件名. ...
- lua多线程解决方案
直观的讲:lua并不支持多线程,lua语言本身具有携程功能,但携程仅仅是一种中继器. lua多线程的目的:有并发需求时,共享一些数据. 例如使用lua写一个并发服务器.用户登陆之后,用户数据储存在lu ...
- Redis之eval+lua实现初步
目录 目录 1 1. 前言 1 2. 执行方式 1 3. 执行过程 3 4. 使用原则 3 1. 前言 Redis的实现保证eval的执行是原子的,即使eval执行的lua超时,Redis也不会自动终 ...
- Linux内核设计第八周 ——进程的切换和系统的一般执行过程
Linux内核设计第八周 ——进程的切换和系统的一般执行过程 第一部分 知识点总结 第二部分 实验部分 1.配置实验环境,确保menu内核可以正常启动 2.进入gdb调试,在shedule和conte ...
- lua table remove元素的问题
当我在工作中使用lua进行开发时,发现在lua中有4种方式遍历一个table,当然,从本质上来说其实都一样,只是形式不同,这四种方式分别是: for key, value in pairs(tbtes ...
- 【quick-cocos2d-x】Lua 语言基础
版权声明:本文为博主原创文章,转载请注明出处. 使用quick-x开发游戏有两年时间了,quick-x是cocos2d-Lua的一个豪华升级版的框架,使用Lua编程.相比于C++,lua的开发确实快速 ...
随机推荐
- 2022-05-05:给定一个正数num,要返回一个大于num的数,并且每一位和相邻位的数字不能相等. 返回达标的数字中,最小的那个。 来自微软。
2022-05-05:给定一个正数num,要返回一个大于num的数,并且每一位和相邻位的数字不能相等. 返回达标的数字中,最小的那个. 来自微软. 答案2022-05-05: 从左往右看,是否有相邻两 ...
- .cur 图片加载提示 You may need an appropriate loader to handle this file type
最近一个gis 项目需要加载一个.cur的图标,但是编译时提示 You may need an appropriate loader to handle this file type, current ...
- 数据科学工具 Jupyter Notebook 教程(一)
ipython notebook 是一个基于浏览器的 python 数据分析工具,使用起来非常方便,具有极强的交互方式和富文本的展示效果.jupyter 是它的升级版,它的安装也非常方便,一般 Ana ...
- PE 结构的三种地址
三种地址 (一)VA(虚拟地址):PE 文件被 Windows 加载到内存后的地址. (二) RVA(相对虚拟地址):PE 文件虚拟地址相对于映射基地址(对于 EXE 文件来说,映射基地址是 ...
- python selenium自动化火狐浏览器开代理IP服务器
前言 Selenium是一款用于自动化测试Web应用程序的工具,它可以模拟用户在浏览器中的各种行为.而代理IP服务器则是一种可以帮助用户隐藏自己真实IP地址的服务器,使得用户可以在互联网上更加匿名地进 ...
- Vue3从入门到精通(二)
vue3 侦听器 在Vue3中,侦听器的使用方式与Vue2相同,可以使用watch选项或$watch方法来创建侦听器.不同之处在于,Vue3中取消了immediate选项,同时提供了新的选项和API. ...
- 使用 Easysearch 还原 Elasticsearch 快照数据
本文主要验证 Elasticsearch 快照在 Easysearch 中进行数据恢复. 准备测试数据 索引 别名 模版 生命周期策略 创建快照 PUT /_snapshot/my_backup { ...
- 【tvm解析】 Operator Strategy 机制
本文地址:https://www.cnblogs.com/wanger-sjtu/p/15082871.html Relay Operator Strategy是建立Relay IR与TOPI算子库的 ...
- 02-面试必会-SSM框架篇
01-什么是 Spring IOC 和 DI ? IOC : 控制翻转 , 它把传统上由程序代码直接操控的对象的调用权交给容 器,通过容器来实现对象组件的装配和管理.所谓的"控制反转&quo ...
- 2 opencv-python核心库模块core
core模块定义了opencv中的基础数据结构和基础运算,是整个库的核心模块.而mat数据结构是opencv中最重要的数据结构,是opencv中图像最常用的存储格式. 1 基本数据结构 opencv的 ...