
ActiveQq的代码实现
]从java代码开始再过渡到springboot
Java代码的实现
1.activemq这个消息中间件有两种形式
1. p2p(生产者,消费者)
特点:

生产者:
package com.lqh;

import org.apache.activemq.ActiveMQConnectionFactory;

import org.apache.activemq.command.ActiveMQQueue;

import javax.jms.*;

public class p2ppub {

public static void main(String[] args) throws Exception {

//   创建连接工厂

    ActiveMQConnectionFactory factory = new ActiveMQConnectionFactory("tcp://192.168.91.111:61616");

//    创建连接

    Connection connection = factory.createConnection();

//    创建会话 第一个参数就是指是否开启session事务如果开启了,需要手动提交session.commit
//    Session.AUTO_ACKNOWLEDGE  这个代表自动回执就是接收到消息后向对列应答成功
    Session session = connection.createSession(false, Session.AUTO_ACKNOWLEDGE);

//     创建生产者(指明消息队列的名字)

    Destination destination = new ActiveMQQueue("152-queue1");

    MessageProducer producer = session.createProducer(destination);

//    创建消息 使用会话创建

    TextMessage textMessage = session.createTextMessage("hello-152");

//    生产者发布消息

    producer.send(textMessage);

//    提交

//    session.commit();

//    关闭资源

    connection.close();

    session.close();

    producer.close();

}

}
消费者:
package com.lqh;

import org.apache.activemq.ActiveMQConnectionFactory;

import org.apache.activemq.command.ActiveMQQueue;

import javax.jms.*;

public class p2psub {

//    消费者

public static void main(String[] args) throws JMSException {

// 创建连接工厂

    ActiveMQConnectionFactory factory = new ActiveMQConnectionFactory("tcp://192.168.91.111:61616");

//    创建连接

    Connection connection = factory.createConnection();

    //    启动连接

    connection.start();

//    创建会话  是否开启事务 开启自动回执

    Session session = connection.createSession(false, Session.AUTO_ACKNOWLEDGE);

//    创建消费者 指定消费者的队列名字

    Destination destination = new ActiveMQQueue("152-queue1");

    MessageConsumer consumer = session.createConsumer(destination);

//    消费者获取到消息

    TextMessage receive = (TextMessage) consumer.receive();

    System.out.println(receive);

//    事务提交

//    session.commit();

//   资源释放

    connection.close();

    consumer.close();

    session.close();

}

}
2. 发布与订阅
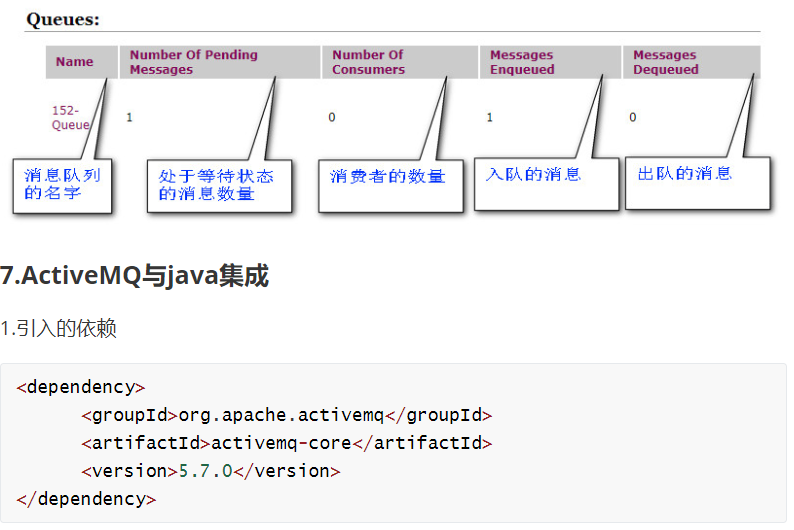
<dependency>
<groupId>org.apache.activemq</groupId>
<artifactId>activemq-core</artifactId>
<version>5.7.0</version>
</dependency>
pub 发布
package com.lqh;

import org.apache.activemq.ActiveMQConnectionFactory;

import org.apache.activemq.command.ActiveMQQueue;

import javax.jms.*;

public class p2ppub {

public static void main(String[] args) throws Exception {

//   创建连接工厂

    ActiveMQConnectionFactory factory = new ActiveMQConnectionFactory("tcp://192.168.91.111:61616");

//    创建连接

    Connection connection = factory.createConnection();

//    创建会话

    Session session = connection.createSession(false, Session.AUTO_ACKNOWLEDGE);

//     创建生产者(指明消息队列的名字)

    Destination destination = new ActiveMQQueue("152-queue1");

    MessageProducer producer = session.createProducer(destination);

//    创建消息 使用会话创建

    TextMessage textMessage = session.createTextMessage("hello-152");

//    生产者发布消息

    producer.send(textMessage);

//    提交

//    session.commit();

//    关闭资源

    connection.close();

    session.close();

    producer.close();

}

}
sub 订阅
package com.lqh;

import org.apache.activemq.ActiveMQConnectionFactory;

import org.apache.activemq.command.ActiveMQQueue;

import javax.jms.*;

public class p2psub {

//    消费者

public static void main(String[] args) throws JMSException {

// 创建连接工厂

    ActiveMQConnectionFactory factory = new ActiveMQConnectionFactory("tcp://192.168.91.111:61616");

//    创建连接

    Connection connection = factory.createConnection();

    //    启动连接

    connection.start();

//    创建会话  是否开启事务 开启自动回执

    Session session = connection.createSession(false, Session.AUTO_ACKNOWLEDGE);

//    创建消费者 指定消费者的队列名字

    Destination destination = new ActiveMQQueue("152-queue1");

    MessageConsumer consumer = session.createConsumer(destination);

//    消费者获取到消息

    TextMessage receive = (TextMessage) consumer.receive();

    System.out.println(receive);

//    事务提交

//    session.commit();

//   资源释放

    connection.close();

    consumer.close();

    session.close();

}

}
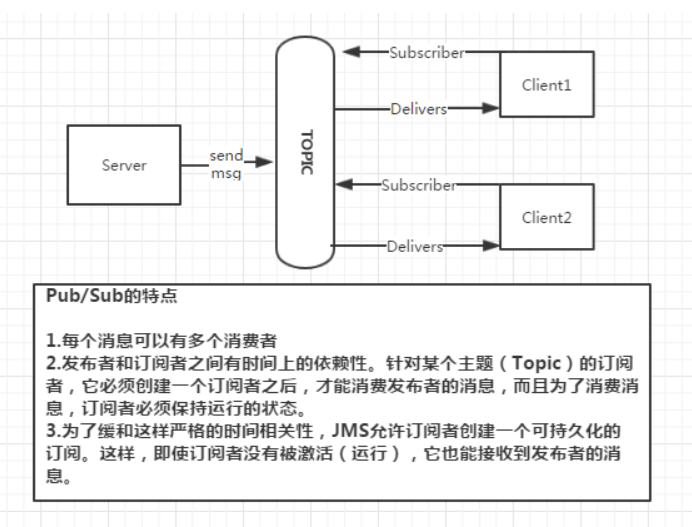
这个订阅与发布是需要先启动订阅者,再启动发布者这样消息才会发布出来然后程序才会截止。也就是pub/sub的特点
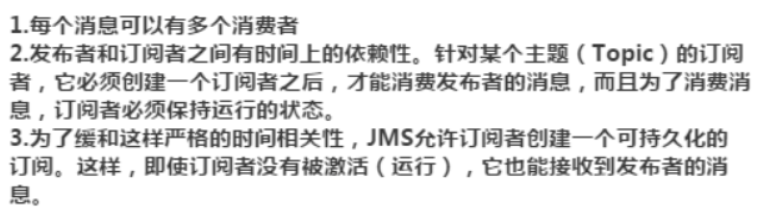
为了解决这个问题就采用了持久化 订阅者的持久化
package com.lqh;

import org.apache.activemq.ActiveMQConnectionFactory;

import org.apache.activemq.command.ActiveMQTopic;

import javax.jms.*;

public class DureableSub {

    public static void main(String[] args) throws JMSException {

//        创建一个连接工厂

        ActiveMQConnectionFactory factory = new ActiveMQConnectionFactory("tcp://192.168.91.111:61616");

//        2从工厂获取一个连接

        Connection connection = factory.createConnection();

        connection.setClientID("clinet111"); //给连接起一个名字随便起 (为一个标识id)

        connection.start();

//        3根据连接创建一个会话

        Session session = connection.createSession(false, Session.AUTO_ACKNOWLEDGE);

//        4.根据会话去创建一个可持久化订阅

        ActiveMQTopic destination=new ActiveMQTopic("151-Topic");

//        可持久化订阅  给当前消费者起一个id 这个id可以随便起

        TopicSubscriber consumer = session.createDurableSubscriber((Topic) destination, "anyname");

//        5.接收消息。

        TextMessage message = (TextMessage) consumer.receive();

        String text = message.getText();

        System.out.println(text);

        connection.close();

        session.close();

        consumer.close();

    }

}
为了使持久化生效需要先启动一次订阅者,和发布者做一个连接告诉activemq我当前是一个可持久化的订阅者 ,以后将这个信息保存起来为持久化之前topic的信息是不保存的,有订阅者将这个信息推出去没有就将这个信息删除了
例如:没有持久化前 只是启动分布者信息发布后没有订阅者,就会将信息删除
持久化后,即使没有订阅者消息发布后会将消息保存起来当消费者一启动就会将信息发布回来。
p2p中消费者需要访问才能消费
解决方法---监听器
使用springboot集成
       <dependency>

            <groupId>org.springframework.boot</groupId>

            <artifactId>spring-boot-starter-activemq</artifactId>

            <version>2.1.5.RELEASE</version>

        </dependency>
server.port=8989

spring.activemq.broker-url=tcp://192.168.91.111:61616
p2p 代码
package com.example.controller;

import org.apache.activemq.command.ActiveMQQueue;

import org.springframework.beans.factory.annotation.Autowired;

import org.springframework.jms.annotation.JmsListener;

import org.springframework.jms.core.JmsTemplate;

import org.springframework.web.bind.annotation.RequestMapping;

import org.springframework.web.bind.annotation.RestController;

import javax.jms.JMSException;

import javax.jms.Message;

import javax.jms.TextMessage;

@RestController

public class TestSubController {

   @Autowired

   JmsTemplate jmsTemplate;

    @RequestMapping("send")

   public void sendMsg(){

//        指定消息队列的名字

       ActiveMQQueue destination = new ActiveMQQueue("151-Topic");

       jmsTemplate.convertAndSend(destination,"hello");

   }

//   监听器当151-Topic消息队列发生了改变就会调用当前方法

    @JmsListener(destination = "151-Topic")

    public void receive(Message message) throws JMSException {

        TextMessage textMessage= (TextMessage) message;

        System.out.println(textMessage.getText());

    }

}
发布和订阅
package com.example.controller;

import org.apache.activemq.command.ActiveMQTopic;

import org.springframework.beans.factory.annotation.Autowired;

import org.springframework.jms.annotation.JmsListener;

import org.springframework.jms.core.JmsTemplate;

import org.springframework.web.bind.annotation.RequestMapping;

import org.springframework.web.bind.annotation.RestController;

import javax.jms.JMSException;

import javax.jms.Message;

import javax.jms.TextMessage;

@RestController

public class TestPubSubController {

    @Autowired

    private JmsTemplate jmsTemplate;

    @RequestMapping("pub")

    public String pub(String msg){

        ActiveMQTopic destination = new ActiveMQTopic("boot-topic");

        jmsTemplate.convertAndSend(destination,msg);

        return "publish success";

    }

    @RequestMapping("sub")

    public String sub(){

        ActiveMQTopic destination = new ActiveMQTopic("boot-topic");

        Object o = jmsTemplate.receiveAndConvert(destination);

        String s = o.toString();

        return s;

    }

    @JmsListener(destination = "boot-topic",containerFactory = "defaultJmsListenerContainerFactory")

    public void receive(Message message) throws JMSException {

        TextMessage textMessage= (TextMessage) message;

        System.out.println(textMessage.getText());

    }

}
因为springboot集成了activemq但是并没有实现持久化所以需要自定义持久化
package com.example.conf;

import org.apache.activemq.ActiveMQConnectionFactory;

import org.springframework.context.annotation.Bean;

import org.springframework.context.annotation.Configuration;

import org.springframework.jms.config.DefaultJmsListenerContainerFactory;

@Configuration

public class KeepSubConf {

    @Bean

    public DefaultJmsListenerContainerFactory defaultJmsListenerContainerFactory(){

        DefaultJmsListenerContainerFactory factory = new DefaultJmsListenerContainerFactory();

        factory.setConnectionFactory(activeMQConnectionFactory());

        factory.setClientId("client01");

        factory.setSubscriptionDurable(true);

        return  factory;

    }

    public ActiveMQConnectionFactory activeMQConnectionFactory(){

        ActiveMQConnectionFactory factory = new ActiveMQConnectionFactory("tcp://192.168.121.126:61616");

        return factory;

    }

}
///
ActiveQq的代码实现的更多相关文章
- 日期格式代码出现两次的错误 ORA-01810
错误的原因是使用了两次MM . 一.Oracle中使用to_date()时格式化日期需要注意格式码 如:select to_date('2005-01-01 11:11:21','yyyy-MM-dd ...
- 可爱的豆子——使用Beans思想让Python代码更易维护
title: 可爱的豆子--使用Beans思想让Python代码更易维护 toc: false comments: true date: 2016-06-19 21:43:33 tags: [Pyth ...
- iOS代码规范(OC和Swift)
下面说下iOS的代码规范问题,如果大家觉得还不错,可以直接用到项目中,有不同意见 可以在下面讨论下. 相信很多人工作中最烦的就是代码不规范,命名不规范,曾经见过一个VC里有3个按钮被命名为button ...
- Jquery的点击事件,三句代码完成全选事件
先来看一下Js和Jquery的点击事件 举两个简单的例子 <!DOCTYPE html PUBLIC "-//W3C//DTD XHTML 1.0 Transitional//EN&q ...
- redux-amrc:用更少的代码发起异步 action
很多人说 Redux 代码多,开发效率低.其实 Redux 是可以灵活使用以及拓展的,经过充分定制的 Redux 其实写不了几行代码.今天先介绍一个很好用的 Redux 拓展-- redux-amrc ...
- 编写高质量代码:改善Java程序的151个建议(第5章:数组和集合___建议75~78)
建议75:集合中的元素必须做到compareTo和equals同步 实现了Comparable接口的元素就可以排序,compareTo方法是Comparable接口要求必须实现的,它与equals方法 ...
- 使用 .NET WinForm 开发所见即所得的 IDE 开发环境,实现不写代码直接生成应用程序
直接切入正题,这是我09年到11年左右业余时间编写的项目,最初的想法很简单,做一个能拖拖拽拽就直接生成应用程序的工具,不用写代码,把能想到的业务操作全部封装起来,通过配置的方式把这些业务操作组织起来运 ...
- jsp前端实现分页代码
前端需要订一page类包装,其参数为 private Integer pageSize=10; //每页记录条数=10 private Integer totalCount; //总记录条数 priv ...
- 【开源】简单4步搞定QQ登录,无需什么代码功底【无语言界限】
说17号发超简单的教程就17号,qq核审通过后就封装了这个,现在放出来~~ 这个是我封装的一个开源项目:https://github.com/dunitian/LoTQQLogin ————————— ...
随机推荐
- 微信小程序全局数据globalData的使用问题
如果在A页面设置全局属性,但在B页面无法使用的话,可能是这个问题: app.js globalData: { helpPage:0, }, A页面 A(e) { getApp().globalData ...
- 【linux】less 命令详解
转自:https://www.cnblogs.com/GNblog/p/6932252.html less 工具也是对文件或其它输出进行分页显示的工具,应该说是linux正统查看文件内容的工具,功能极 ...
- Spring整合Quartz分布式定时任务
概述虽然单个Quartz实例能给予你很好的Job调度能力,但它不能满足典型的企业需求,如可伸缩性.高可靠性满足.假如你需要故障转移的能力并能运行日益增多的 Job,Quartz集群势必成为你应用的一部 ...
- 简陋的Excel到MYSQL的数据传输JAVA实现
实现从excel读取数据,使用的是jxl.jar(到处都有,请大家随意下载),其中封装好了通过excel提供的接口,对excel中的数据库进行读取的实现: 先为了熟悉其中的方法使用,做了以下的测试: ...
- SpringBoot2.x+mybatis plus3.x集成Activit7版本
最近在写一个开源项目ruoyi-vue-pro,暂时负责Activiti7工作流的搭建,接这个任务一个原因,是比较好奇Activiti7版本与先前的5.6版本究竟有什么区别,因为先前在工作当中,最开始 ...
- HashMap 为什么线程不安全?
作者:developer http://cnblogs.com/developer_chan/p/10450908.html 我们都知道HashMap是线程不安全的,在多线程环境中不建议使用,但是其线 ...
- Linux内核中的Workqueue机制分析
1. 什么是workqueue Linux中的workqueue(工作队列)主要是为了简化在内核创建线程而设计的.通过相应的工作队列接口,可以使开发人员只关心与特定功能相关的处理流程,而不必关心内核线 ...
- TCP协议和套接字
一.TCP通信概述,逻辑连接就是三次握手 二.客户端和服务端实现TCP协议通信基本步骤 1.客户端套接字对象 Socket 2.服务端套接字ServerSocket 客户端补充完整代码:除了创建各自的 ...
- Linux详细安装流程(直接看图)
准备工作:一台电脑.sentOS镜像文件. 一.首先打开虚拟机,点击文件--新建虚拟机 二.选择自定义,然后点击下一步
- 如何解决浮动元素高度塌陷---CSS
解决高度塌陷问题的方法: 方法一. //给父元素添加声明 overflow:hidden; 缺点:回隐藏溢出的元素: 方法二. 在浮动的元素下添加空div标签,并给该元素添加声明: clear:bot ...