Nginx虚拟主机、日志排错、模块配置
Nginx虚拟主机
三种方式
1. 基于多IP的方式
# 防止其他配置文件影响,将所有配置文件压缩

[root@web01 conf.d]# gzip Mario.conf

[root@web01 conf.d]# gzip chess.conf.gz

[root@web01 conf.d]# gzip default.conf.gz

# 编辑配置文件

[root@web01 ~]# cd /etc/nginx/conf.d

[root@web01 conf.d]# vim game.conf

server {

    listen 80;

    server_name 192.168.15.7;

    location / {

	root /opt/Super_Mario;

        index index.html;

    }

}

server {

    listen 80;

    server_name 172.16.1.7;

    location / {

        root /opt/chess;

        index index.html;

    }

}

# 测试配置文件

[root@web01 conf.d]# nginx -t

nginx: the configuration file /etc/nginx/nginx.conf syntax is ok

nginx: configuration file /etc/nginx/nginx.conf test is successfu

# 重启服务

[root@web01 conf.d]# systemctl restart nginx
2. 基于多端口的方式
# 编辑配置文件

[root@web01 conf.d]# vim game1.conf

server {

    listen 80;

    server_name 192.168.15.7;

    location / {

        root /opt/Super_Mario;

        index index.html;

    }

}

server {

    listen 81;

    server_name 192.168.15.7;

    location / {

        root /opt/chess;

        index index.html;

    }

}

~
3. 基于多域名的方式
# 编辑配置文件

[root@web01 conf.d]# vim game2.conf

server {

    listen 80;

    server_name www.Super_Mario.com;

    location / {

        root /opt/Super_Mario;

        index index.html;

    }

}

server {

    listen 80;

    server_name www.chesss.com;

    location / {

        root /opt/chess;

        index index.html;

    }

}

# 注意域名不能用chess
2和3其余步骤和1一样
Nginx日志
- nginx日志文件目录:/var/log/nginx/
- 排错方式:
- 网站排错
- 查看错误日志
Nginx配置文件配置项
- 相关文件:/etc/nginx/nginx.conf
- 主要配置项
 # 配置详解

 $remote_addr:客户端IP

 - :分隔符

 $remote_user:代表登录用户(没有就是-)

 [$time_local] :访问时间

 $request:请求方式、类型

$status :状态码

$body_bytes_sent :访问文件大小

$http_referer:访问域名

$http_user_agent:客户端标识

$http_x_forwarded_for:真实的客户端IP(在反向代理中生效)
Nginx模块
Nginx访问控制模块
[官网模块介绍](nginx documentation)
[ngx_http_access_module](Module ngx_http_access_module (nginx.org))
使用范围:http
,server,location,limit_except(http,server常用)
# 配置项:deny和allow,拒绝或者允许某些ip访问

deny:拒绝

allow:允许

# 语法:

Syntax:	deny address | CIDR | unix: | all;

Syntax:	allow address | CIDR | unix: | all;
# 官网示例:

location / {

    deny  192.168.1.1;

    allow 192.168.1.0/24;

    allow 10.1.1.0/16;

    allow 2001:0db8::/32;

    deny  all;

}

# 示例1:

允许192.168.15.1访问,不允许其他IP访问

# 修改game2.conf文件中的server

server {

    listen 80;

    server_name www.Super_Mario.com;

    allow 192.168.15.1;

    deny all;

    location / {

        root /opt/Super_Mario;

        index index.html;

    }

}

# 示例2:

允许192.168.15.0这个网段访问,不允许其他网段访问

allow 192.168.15.0/24;

deny all;

# 示例3:

只允许通过VPN来访问

allow 172.16.1.81;

deny all;
ngx_http_auth_basic_module
使用范围:http
,server,location,limit_except
语法:auth_basic string | off;(默认关闭)
# 官网示例:
location / {
auth_basic "closed site";
auth_basic_user_file conf/htpasswd;
}
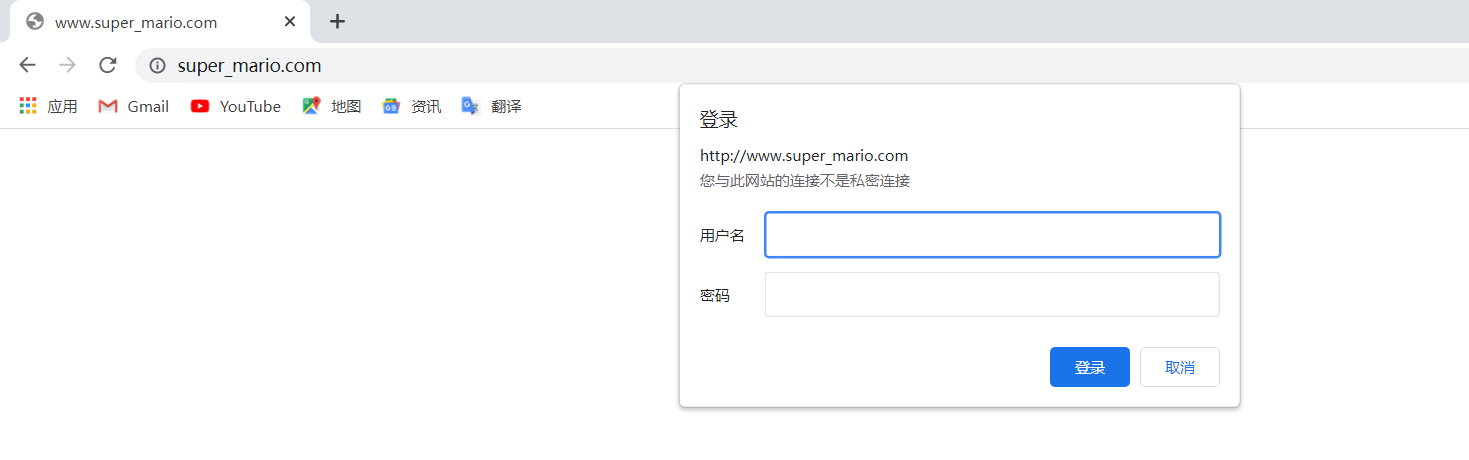
# 示例:访问之前需要登录
# 安装httpd-tools
[root@web01 conf.d]# yum install httpd-tools -y
# 生成用户名密码文件
[root@web01 conf.d]# htpasswd -c /etc/nginx/auth hammer
New password:
Re-type new password:
Adding password for user hammer
# 查看
[root@web01 conf.d]# cat /etc/nginx/auth
hammer:$apr1$fOHr21Vf$zpI/MVxQ452KzP0p10QI10
# 将密码文件路径加入配置
server {
listen 80;
server_name www.Super_Mario.com;
auth_basic "hello nginx";
auth_basic_user_file /etc/nginx/auth;
location / {
root /opt/Super_Mario;
index index.html;
}
}
[root@web01 conf.d]# nginx -t
nginx: the configuration file /etc/nginx/nginx.conf syntax is ok
nginx: configuration file /etc/nginx/nginx.conf test is successful
[root@web01 conf.d]# systemctl restart nginx
- ngx_http_autoindex_module
作用是目录索引~
使用范围:http, server, location
语法:autoindex on | off(默认关闭);

# 官网示例

location / {

    autoindex on;

}

# 示例:指定目录索引展示

[root@web01 games]# cd /etc/nginx/conf.d/

[root@web01 conf.d]# vim index.conf
Nginx状态监控模块
# stub_status需要一个独立的location

# 监控Nginx运行状态。

[root@web01 conf.d]# vim index.conf

server {

    listen 80;

    server_name 192.168.15.7;

    location / {

        stub_status;

    }

}
访问连接控制模块
1、控制Nginx连接数

	1、安装ab测试命令

	yum install httpd-tools -y

	2、ab 参数

		-n : 总共需要访问多少次

		-c : 每次访问多少个

[root@web01 conf.d]# vim game5.conf

# limit_req_zone $remote_addr zone=one:10m rate=1r/s;

limit_conn_zone $remote_addr zone=addr:10m;

server {

    listen 80;

    server_name 192.168.15.7;

    # limit_req zone=one burst=5;

    limit_conn addr 1;

    location / {

        root /opt/Super_Marie;

	index index.html;

    }

}

2、控制Nginx访问量

	1、连接池

		limit_req_zone $remote_addr zone=one:10m rate=1r/s;

		声明连接池       变量          名称  连接池的大小  速率

	2、限制数

案例1:要求每秒只能有一个访问。

[root@web01 conf.d]# vim game5.conf

limit_req_zone $remote_addr zone=one:10m rate=1r/s;

server {

    listen 80;

    server_name 192.168.15.7;

    limit_req zone=one burst=5;

    location / {

        root /opt/Super_Marie;

	index index.html;

    }

}
Nginx虚拟主机、日志排错、模块配置的更多相关文章
- Nginx虚拟主机流量状态模块(nginx-module-vts)使用说明文档(四)
装完NG,为了拿到各种状态指标,就要对NG做监控. Github 2.3k的开源项目nginx-module-vts没准真是你需求的. 链接数,qps,1xx.2xx,.3xx.4xx.5xx的响应数 ...
- Nginx虚拟主机 子文件单独配置
上一篇所有的server 全都配置在nginx.conf配置文件里,其实每个server 都可以单独做一个子文件 删除nginx.conf配置文件中的server及其余内容,加上如下图 创建保存每个虚 ...
- 6、架构--Nginx虚拟主机(基于多ip、端口、域名方式)、日志配置、Nginx模块(访问控制模块、状态监控模块、访问链接控制模块)
笔记 1.晨考 2.昨日问题 3.今日内容 1.Nginx虚拟主机 - 基于多IP的方式 - 基于多端口的方式 - 基于多域名的方式 2.日志配置 Nginx有非常灵活的日志记录模式,每个级别的配置可 ...
- Nginx网络架构实战学习笔记(一):Nginx简介、安装、信号控制、nginx虚拟主机配置、日志管理、location 语法、Rewrite语法详解
文章目录 nginx简介 nginx安装 nginx信号控制 nginx虚拟主机配置 日志管理 location 语法 精准匹配的一般匹配 正则匹配 总结 Rewrite语法详解 nginx简介 Ng ...
- Linux(7)- Nginx.conf主配置文件、Nginx虚拟主机/访问日志/限制访问IP/错误页面优化、Nginx反向代理、Nginx负载均衡
一.Nginx.conf主配置文件 Nginx主配置文件conf/nginx.conf是一个纯文本类型的文件,整个配置文件是以区块的形式组织的.一般,每个区块以一对大括号{}来表示开始与结束. 核心模 ...
- nginx之全局设置,location,虚拟主机,日志管理
nginx之全局设置,location,虚拟主机,日志管理 worker_processes 1;//子进程,cpu数*核数 ****************全局设置************** ** ...
- Nginx 虚拟主机 VirtualHost 配置
Nginx 是一个轻量级高性能的 Web 服务器, 并发处理能力强, 对资源消耗小, 无论是静态服务器还是小网站, Nginx 表现更加出色, 作为 Apache 的补充和替代使用率越来越高. 我在& ...
- nginx虚拟主机配置小结
nginx的安装在lnmp环境搭建中已经介绍过了,配置文件在安装目录下的conf子目录下,主要主要分成四部分:main(全局设置).server(主机设置).upstream(负载均衡服务器设置).l ...
- nginx虚拟主机配置
nginx虚拟主机配置 虚拟主机的概念虚拟主机,就是把一台物理服务器划分成多个"虚拟"的服务器,每一个虚拟主机都可以有独立的域名和独立的目录nginx虚拟主机的配置nginx的 ...
随机推荐
- Python 字典是如何解决哈希冲突的
本文主要翻译自 so 上面的问题 Why can a Python dict have multiple keys with the same hash? 下 Praveen Gollakota 的答 ...
- [ZJCTF 2019]Login
学了一段时间的堆溢出现在继续做题, 例行检查一下 64位的程序放入ida中 shift+f12查看程序函数 可以看到非常明显的后门程序 查看主函数 发现了程序给的账号和密码,但是没有看到明显的栈溢出漏 ...
- re正则表达式:import re ;re.search()
http://www.cnblogs.com/alex3714/articles/5161349.html re模块 常用正则表达式符号 1 2 3 4 5 6 7 8 9 10 11 12 13 1 ...
- 常用故障排查监控shell脚本
#!/bin/bash #ping_monitor.sh IP_ADDRESS=$1 if [ -n "$IP_ADDRESS" ] ; then while : do PING_ ...
- [react]react创建app,路由,mobx 全教程
1.创建app, npx create-react-app my-app Cmd Copy 2.进入项目目录 cd my-app Cmd Copy 3.启用配置文件(默认是不开启配置文件的) ya ...
- docker启动WARNING:IPv4 forwarding is disabled. Networking will not work.
docker启动容器报错IPv4 forwarding is disabled. Networking will not work. [root@localhost ~]# docker run -p ...
- 论文解读SDCN《Structural Deep Clustering Network》
前言 主体思想:深度聚类需要考虑数据内在信息以及结构信息. 考虑自身信息采用 基础的 Autoencoder ,考虑结构信息采用 GCN. 1.介绍 在现实中,将结构信息集成到深度聚类中通常需要解决以 ...
- git 命令之暂存相关指令。
git 命令之暂存相关指令. 1.git 代码暂存指令:git stash 2.git 代码暂存列表信息:git stash list 3.git 代码应用暂存代码:git stash apply s ...
- cmake之生成动态库
演示源码下载地址: https://github.com/mohistH/demo_cmake_dylib 把文仅为参考. 以实际情况为准 1.目录结构 │ CMakeLists.txt │ inde ...
- 【LeetCode】1086. High Five 解题报告(C++)
作者: 负雪明烛 id: fuxuemingzhu 个人博客:http://fuxuemingzhu.cn/ 目录 题目描述 题目大意 解题方法 大根堆 日期 题目地址:https://leetcod ...