在树莓派用C#+Winform实现传感器监测
最近学校里发了个任务,说要做一个科技节小发明,然后我就掏出我的树莓派准备大干一场。
调料
Raspberry Pi 3B+
树莓派GPIO扩展板
3.5寸电容触摸屏(GPIO接口)
土壤湿度传感器(GPIO接口)
光照传感器(GPIO接口)
由于作品已经交上去了 这里只能先放个以前的图
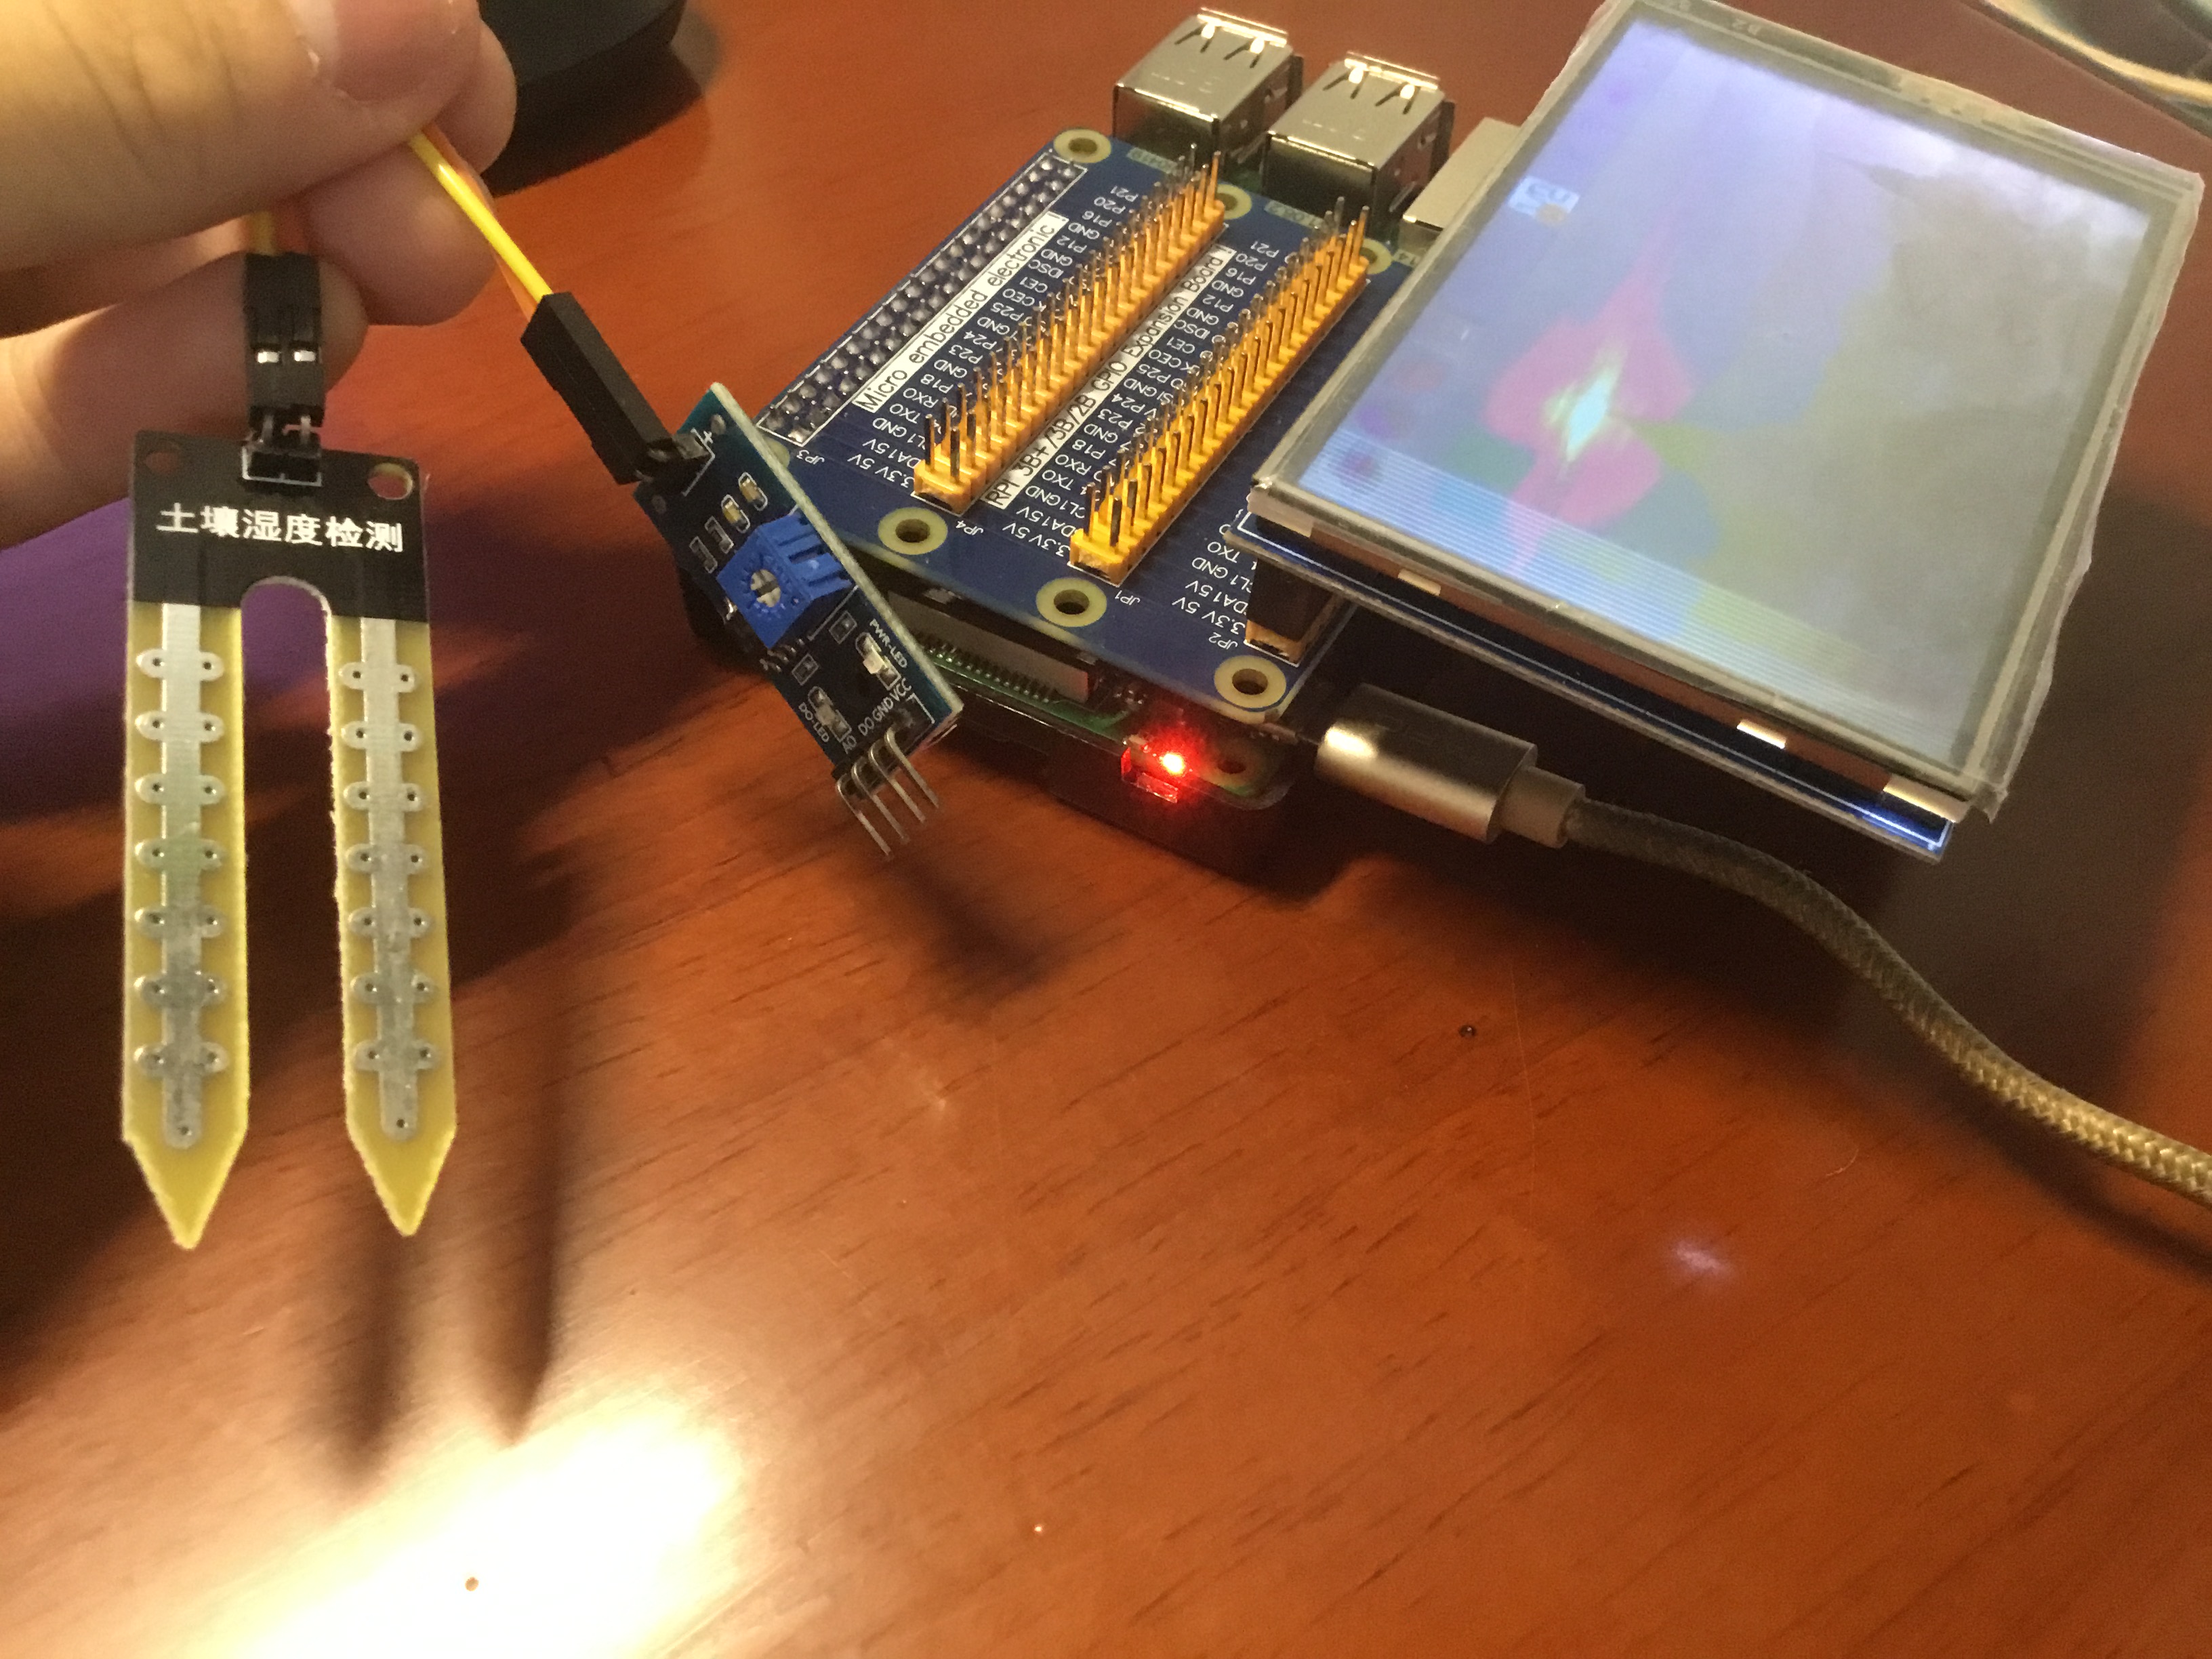
这里展示的是土壤湿度传感器,光照传感器道理一样
第一步 安装mono
树莓派不能直接运行C#图形化应用程序,去网上搜了一下解决方案,WPF框架是肯定没戏,不过我看到了一个叫mono的项目,可以在Linux平台运行Winform程序,还有这等好事?!赶紧整!
国际惯例哈,更新软件源
sudo apt-get update
然后执行安装命令
sudo apt-get install mono-complete -y
如果没法安装就检查你的软件源是否包含mono,我个人推荐清华大学的开源镜像站
最后我们检查是否安装成功
mono
如果不报错,就是安装成功了
第二步 探索GPIO
环境搭建好了,然而我对GPIO接口所知甚少,还是上网查查
连接传感器,首先是单片机和检测头的连接,母对母两条杜邦线搞定
然后是树莓派和单片机,VCC接3.3V或者5V,GND接树莓派GND,DO接任意GPIO空闲接口
树莓派的GPIO对应表可以在网上搜或者看下面的字符画

一开始使用CSDN上某个大佬的GPIO类
https://blog.csdn.net/weixin_30878361/article/details/97233437
结果测试了好久都抛异常,如果哪位大佬知道如何调用可以在评论区告诉我,感谢
于是我果断放弃了这个现成的类库,然后去读了下传感器的文档,发现文档里有一个很有意思的命令
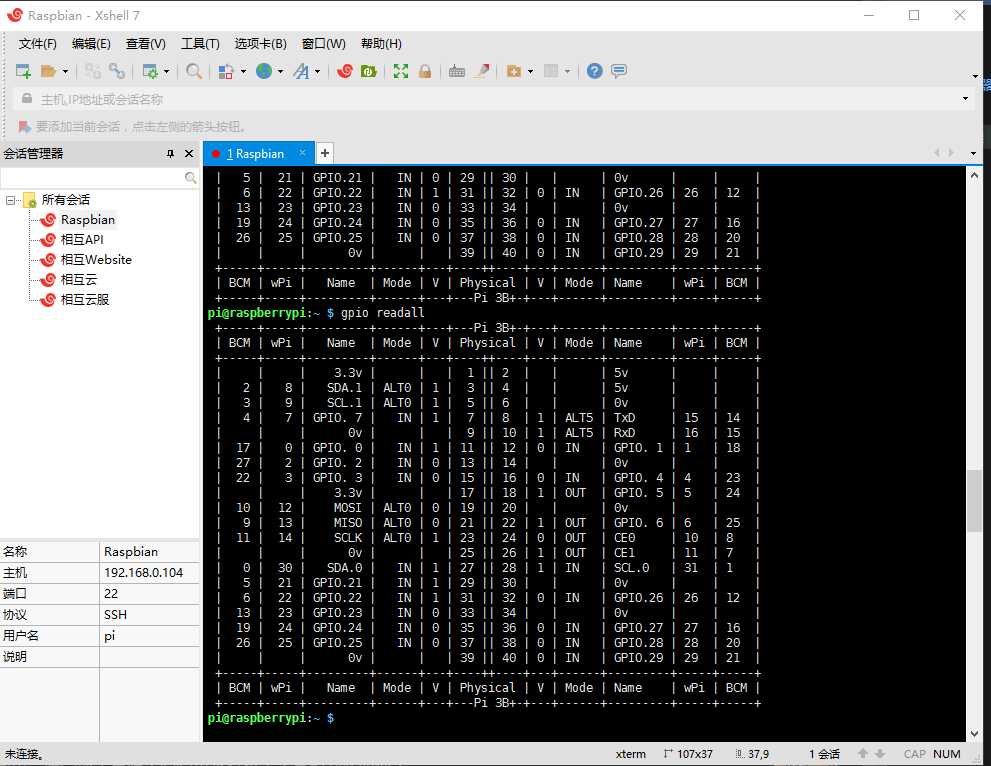
gpio readall
赶紧跑到树莓派终端上,运行它!
pi@raspberrypi:~ $ gpio readall
+-----+-----+---------+------+---+---Pi 3B+-+---+------+---------+-----+-----+
| BCM | wPi | Name | Mode | V | Physical | V | Mode | Name | wPi | BCM |
+-----+-----+---------+------+---+----++----+---+------+---------+-----+-----+
| | | 3.3v | | | 1 || 2 | | | 5v | | |
| 2 | 8 | SDA.1 | ALT0 | 1 | 3 || 4 | | | 5v | | |
| 3 | 9 | SCL.1 | ALT0 | 1 | 5 || 6 | | | 0v | | |
| 4 | 7 | GPIO. 7 | IN | 1 | 7 || 8 | 1 | ALT5 | TxD | 15 | 14 |
| | | 0v | | | 9 || 10 | 1 | ALT5 | RxD | 16 | 15 |
| 17 | 0 | GPIO. 0 | IN | 1 | 11 || 12 | 0 | IN | GPIO. 1 | 1 | 18 |
| 27 | 2 | GPIO. 2 | IN | 0 | 13 || 14 | | | 0v | | |
| 22 | 3 | GPIO. 3 | IN | 0 | 15 || 16 | 0 | IN | GPIO. 4 | 4 | 23 |
| | | 3.3v | | | 17 || 18 | 1 | OUT | GPIO. 5 | 5 | 24 |
| 10 | 12 | MOSI | ALT0 | 0 | 19 || 20 | | | 0v | | |
| 9 | 13 | MISO | ALT0 | 0 | 21 || 22 | 1 | OUT | GPIO. 6 | 6 | 25 |
| 11 | 14 | SCLK | ALT0 | 1 | 23 || 24 | 0 | OUT | CE0 | 10 | 8 |
| | | 0v | | | 25 || 26 | 1 | OUT | CE1 | 11 | 7 |
| 0 | 30 | SDA.0 | IN | 1 | 27 || 28 | 1 | IN | SCL.0 | 31 | 1 |
| 5 | 21 | GPIO.21 | IN | 0 | 29 || 30 | | | 0v | | |
| 6 | 22 | GPIO.22 | IN | 1 | 31 || 32 | 0 | IN | GPIO.26 | 26 | 12 |
| 13 | 23 | GPIO.23 | IN | 0 | 33 || 34 | | | 0v | | |
| 19 | 24 | GPIO.24 | IN | 0 | 35 || 36 | 0 | IN | GPIO.27 | 27 | 16 |
| 26 | 25 | GPIO.25 | IN | 0 | 37 || 38 | 0 | IN | GPIO.28 | 28 | 20 |
| | | 0v | | | 39 || 40 | 0 | IN | GPIO.29 | 29 | 21 |
+-----+-----+---------+------+---+----++----+---+------+---------+-----+-----+
| BCM | wPi | Name | Mode | V | Physical | V | Mode | Name | wPi | BCM |
+-----+-----+---------+------+---+---Pi 3B+-+---+------+---------+-----+-----+
从这里看可能不太直观哈,放个图
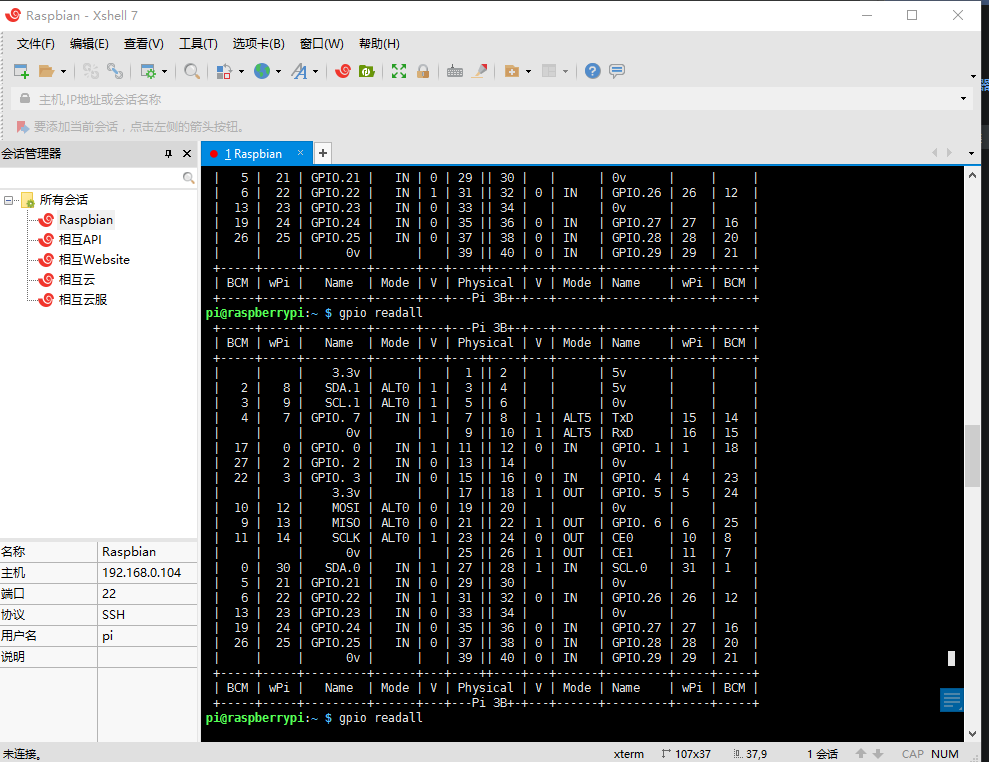
然后把传感器从水里拿出来,再次readall
pi@raspberrypi:~ $ gpio readall
+-----+-----+---------+------+---+---Pi 3B+-+---+------+---------+-----+-----+
| BCM | wPi | Name | Mode | V | Physical | V | Mode | Name | wPi | BCM |
+-----+-----+---------+------+---+----++----+---+------+---------+-----+-----+
| | | 3.3v | | | 1 || 2 | | | 5v | | |
| 2 | 8 | SDA.1 | ALT0 | 1 | 3 || 4 | | | 5v | | |
| 3 | 9 | SCL.1 | ALT0 | 1 | 5 || 6 | | | 0v | | |
| 4 | 7 | GPIO. 7 | IN | 1 | 7 || 8 | 1 | ALT5 | TxD | 15 | 14 |
| | | 0v | | | 9 || 10 | 1 | ALT5 | RxD | 16 | 15 |
| 17 | 0 | GPIO. 0 | IN | 1 | 11 || 12 | 0 | IN | GPIO. 1 | 1 | 18 |
| 27 | 2 | GPIO. 2 | IN | 0 | 13 || 14 | | | 0v | | |
| 22 | 3 | GPIO. 3 | IN | 0 | 15 || 16 | 0 | IN | GPIO. 4 | 4 | 23 |
| | | 3.3v | | | 17 || 18 | 1 | OUT | GPIO. 5 | 5 | 24 |
| 10 | 12 | MOSI | ALT0 | 0 | 19 || 20 | | | 0v | | |
| 9 | 13 | MISO | ALT0 | 0 | 21 || 22 | 1 | OUT | GPIO. 6 | 6 | 25 |
| 11 | 14 | SCLK | ALT0 | 1 | 23 || 24 | 0 | OUT | CE0 | 10 | 8 |
| | | 0v | | | 25 || 26 | 1 | OUT | CE1 | 11 | 7 |
| 0 | 30 | SDA.0 | IN | 1 | 27 || 28 | 1 | IN | SCL.0 | 31 | 1 |
| 5 | 21 | GPIO.21 | IN | 1 | 29 || 30 | | | 0v | | |
| 6 | 22 | GPIO.22 | IN | 1 | 31 || 32 | 0 | IN | GPIO.26 | 26 | 12 |
| 13 | 23 | GPIO.23 | IN | 0 | 33 || 34 | | | 0v | | |
| 19 | 24 | GPIO.24 | IN | 0 | 35 || 36 | 0 | IN | GPIO.27 | 27 | 16 |
| 26 | 25 | GPIO.25 | IN | 0 | 37 || 38 | 0 | IN | GPIO.28 | 28 | 20 |
| | | 0v | | | 39 || 40 | 0 | IN | GPIO.29 | 29 | 21 |
+-----+-----+---------+------+---+----++----+---+------+---------+-----+-----+
| BCM | wPi | Name | Mode | V | Physical | V | Mode | Name | wPi | BCM |
+-----+-----+---------+------+---+---Pi 3B+-+---+------+---------+-----+-----+

可以看到BCM为6,接口号29发生了变化,在水中是0,不在水中是1.
OK 搞清楚了,接下来就好办了
第三步 撰写代码
首先写个UI,没UI设计头脑的我就简单粗暴解决了

`namespace OpenEnvLite
{
partial class Form1
{
///
/// 必需的设计器变量。
///
private System.ComponentModel.IContainer components = null;
    /// <summary>

    /// 清理所有正在使用的资源。

    /// </summary>

    /// <param name="disposing">如果应释放托管资源,为 true;否则为 false。</param>

    protected override void Dispose(bool disposing)

    {

        if (disposing && (components != null))

        {

            components.Dispose();

        }

        base.Dispose(disposing);

    }

    #region Windows 窗体设计器生成的代码

    /// <summary>

    /// 设计器支持所需的方法 - 不要修改

    /// 使用代码编辑器修改此方法的内容。

    /// </summary>

    private void InitializeComponent()

    {

        this.title = new System.Windows.Forms.Label();

        this.土壤湿度 = new System.Windows.Forms.Label();

        this.土壤湿度显示 = new System.Windows.Forms.Label();

        this.亮度 = new System.Windows.Forms.Label();

        this.亮度显示 = new System.Windows.Forms.Label();

        this.label2 = new System.Windows.Forms.Label();

        this.label1 = new System.Windows.Forms.Label();

        this.button2 = new System.Windows.Forms.Button();

        this.SuspendLayout();

        //

        // title

        //

        this.title.AutoSize = true;

        this.title.Font = new System.Drawing.Font("宋体", 21.75F, System.Drawing.FontStyle.Regular, System.Drawing.GraphicsUnit.Point, ((byte)(134)));

        this.title.ForeColor = System.Drawing.Color.White;

        this.title.Location = new System.Drawing.Point(12, 36);

        this.title.Name = "title";

        this.title.Size = new System.Drawing.Size(187, 29);

        this.title.TabIndex = 1;

        this.title.Text = "土壤属性探测";

        //

        // 土壤湿度

        //

        this.土壤湿度.AutoSize = true;

        this.土壤湿度.Font = new System.Drawing.Font("宋体", 15.75F, System.Drawing.FontStyle.Regular, System.Drawing.GraphicsUnit.Point, ((byte)(134)));

        this.土壤湿度.ForeColor = System.Drawing.Color.White;

        this.土壤湿度.Location = new System.Drawing.Point(43, 89);

        this.土壤湿度.Name = "土壤湿度";

        this.土壤湿度.Size = new System.Drawing.Size(94, 21);

        this.土壤湿度.TabIndex = 6;

        this.土壤湿度.Text = "土壤湿度";

        //

        // 土壤湿度显示

        //

        this.土壤湿度显示.AutoSize = true;

        this.土壤湿度显示.Font = new System.Drawing.Font("宋体", 15.75F, System.Drawing.FontStyle.Regular, System.Drawing.GraphicsUnit.Point, ((byte)(134)));

        this.土壤湿度显示.ForeColor = System.Drawing.Color.White;

        this.土壤湿度显示.Location = new System.Drawing.Point(143, 89);

        this.土壤湿度显示.Name = "土壤湿度显示";

        this.土壤湿度显示.Size = new System.Drawing.Size(73, 21);

        this.土壤湿度显示.TabIndex = 7;

        this.土壤湿度显示.Text = "检测中";

        //

        // 亮度

        //

        this.亮度.AutoSize = true;

        this.亮度.Font = new System.Drawing.Font("宋体", 15.75F, System.Drawing.FontStyle.Regular, System.Drawing.GraphicsUnit.Point, ((byte)(134)));

        this.亮度.ForeColor = System.Drawing.Color.White;

        this.亮度.Location = new System.Drawing.Point(63, 110);

        this.亮度.Name = "亮度";

        this.亮度.Size = new System.Drawing.Size(52, 21);

        this.亮度.TabIndex = 8;

        this.亮度.Text = "亮度";

        //

        // 亮度显示

        //

        this.亮度显示.AutoSize = true;

        this.亮度显示.Font = new System.Drawing.Font("宋体", 15.75F, System.Drawing.FontStyle.Regular, System.Drawing.GraphicsUnit.Point, ((byte)(134)));

        this.亮度显示.ForeColor = System.Drawing.Color.White;

        this.亮度显示.Location = new System.Drawing.Point(143, 110);

        this.亮度显示.Name = "亮度显示";

        this.亮度显示.Size = new System.Drawing.Size(73, 21);

        this.亮度显示.TabIndex = 9;

        this.亮度显示.Text = "检测中";

        //

        // label2

        //

        this.label2.AutoSize = true;

        this.label2.Font = new System.Drawing.Font("宋体", 15.75F, System.Drawing.FontStyle.Regular, System.Drawing.GraphicsUnit.Point, ((byte)(134)));

        this.label2.ForeColor = System.Drawing.Color.White;

        this.label2.Location = new System.Drawing.Point(27, 174);

        this.label2.Name = "label2";

        this.label2.Size = new System.Drawing.Size(189, 21);

        this.label2.TabIndex = 10;

        this.label2.Text = " 微型土壤探测系统";

        //

        // label1

        //

        this.label1.AutoSize = true;

        this.label1.Cursor = System.Windows.Forms.Cursors.Default;

        this.label1.Font = new System.Drawing.Font("宋体", 15.75F, System.Drawing.FontStyle.Regular, System.Drawing.GraphicsUnit.Point, ((byte)(134)));

        this.label1.ForeColor = System.Drawing.Color.White;

        this.label1.Location = new System.Drawing.Point(27, 142);

        this.label1.Name = "label1";

        this.label1.Size = new System.Drawing.Size(189, 21);

        this.label1.TabIndex = 10;

        this.label1.Text = "相互科技 版权所有";

        //

        // button2

        //

        this.button2.BackColor = System.Drawing.Color.Black;

        this.button2.Font = new System.Drawing.Font("宋体", 12F, System.Drawing.FontStyle.Regular, System.Drawing.GraphicsUnit.Point, ((byte)(134)));

        this.button2.ForeColor = System.Drawing.Color.White;

        this.button2.Location = new System.Drawing.Point(191, 26);

        this.button2.Name = "button2";

        this.button2.Size = new System.Drawing.Size(74, 39);

        this.button2.TabIndex = 13;

        this.button2.Text = "刷新";

        this.button2.UseVisualStyleBackColor = false;

        this.button2.Click += new System.EventHandler(this.button2_Click);

        //

        // Form1

        //

        this.AutoScaleDimensions = new System.Drawing.SizeF(6F, 12F);

        this.AutoScaleMode = System.Windows.Forms.AutoScaleMode.Font;

        this.BackColor = System.Drawing.Color.Black;

        this.ClientSize = new System.Drawing.Size(266, 235);

        this.Controls.Add(this.button2);

        this.Controls.Add(this.label1);

        this.Controls.Add(this.label2);

        this.Controls.Add(this.亮度显示);

        this.Controls.Add(this.亮度);

        this.Controls.Add(this.土壤湿度显示);

        this.Controls.Add(this.土壤湿度);

        this.Controls.Add(this.title);

        this.ForeColor = System.Drawing.Color.White;

        this.FormBorderStyle = System.Windows.Forms.FormBorderStyle.None;

        this.Name = "Form1";

        this.StartPosition = System.Windows.Forms.FormStartPosition.CenterScreen;

        this.Text = "Form1";

        this.TopMost = true;

        this.ResumeLayout(false);

        this.PerformLayout();

    }

    #endregion

    private System.Windows.Forms.Label title;

    private System.Windows.Forms.Label 土壤湿度;

    private System.Windows.Forms.Label 土壤湿度显示;

    private System.Windows.Forms.Label 亮度;

    private System.Windows.Forms.Label 亮度显示;

    private System.Windows.Forms.Label label2;

    private System.Windows.Forms.Label label1;

    private System.Windows.Forms.Button button2;

}
}这是设计器代码 然后是主要代码using System;
using System.Collections.Generic;
using System.ComponentModel;
using System.Data;
using System.Drawing;
using System.Linq;
using System.Text;
using System.Threading;
using System.Windows.Forms;
using System.Globalization;
using System.IO;
using System.Diagnostics;
using System.Collections;
namespace OpenEnvLite
{
public partial class Form1 : Form
{
public Form1()
{
InitializeComponent();
}
    public static string Bash(string command)

    {

        var escapedArgs = command.Replace("\"", "\\\"");

        var process = new Process()

        {

            StartInfo = new ProcessStartInfo

            {

                FileName = "/bin/bash",

                Arguments = $"-c \"{escapedArgs}\"",

                RedirectStandardOutput = true,

                UseShellExecute = false,

                CreateNoWindow = true,

            }

        };

        process.Start();

        string result = process.StandardOutput.ReadToEnd();

        process.WaitForExit();

        process.Dispose();

        return result;

    }

    private void button2_Click(object sender, EventArgs e)

    {

        string SenseWater = Bash("gpio readall");

        if (SenseWater.Contains("|   5 |  21 | GPIO.21 |   IN | 0 | 29 |"))

        {

            土壤湿度显示.Text = "湿度正常";

        }

        else

        {

            土壤湿度显示.Text = "湿度过低";

        }

        string SenseLight = Bash("gpio readall");

        if (SenseLight.Contains("| 40 | 1 | IN   | GPIO.29 | 29  | 21  |"))

        {

            亮度显示.Text = "亮度过低";

        }

        else

        {

            亮度显示.Text = "亮度正常";

        }

    }

}
}
`
搞定!
如果要调节传感器的灵敏度可以用十字起子转动单片机上的电阻。
光敏电阻和湿度电阻道理是一样的。
最后导入exe文件到树莓派,使用mono运行
mono -run test.exe
test.exe换成自己程序的名字,运行后点击刷新可以正常显示
大功告成!
该项目在gayhub 啊不github开源:
https://github.com/fengye1003/OpenEnvLite
在树莓派用C#+Winform实现传感器监测的更多相关文章
- 在树莓派上读取DHT11温湿度传感器-python代码实现及常见问题(全面简单易懂)
最近由于自己的课题需要,想要用在树莓派上使用DHT11温湿度传感器来读取空气中温湿度,遇到了几个问题,解决之后也对之前的知识进行了回顾,总结,特整理如下,希望能给也在学习树莓派的小伙伴们带来一些帮助. ...
- 树莓派 LED+蜂鸣+声音传感器+红外模块组合打造声控/红外控制LED
昨天搞了控制LED,玩了第一个,剩下的就感觉很简单了,这里记录一下 先来几张照片 玩了蜂蜜模块才发现规律,一般这种模块,都会有三个针脚,VCC(3.3V或5V供电输出针脚).GNC(对应GPIO针脚的 ...
- 树莓派从 DHT11 温度湿度传感器读取数据
时序图参考厂家说明书:DHT11数字湿温度传感器的原理和应用范例 四个阵脚连接:VCC接3.3伏电源,Dout接GPIO口,我接的是物理12针脚,NC留空,GND接地. 波折1:电阻被错接进了VCC, ...
- 【.NET 与树莓派】六轴飞控传感器(MPU 6050)
所谓"飞控",其实是重力加速度计和陀螺仪的组合,因为多用于控制飞行器的平衡(无人机.遥控飞机).有同学会问,这货为什么会有六轴呢?咱们常见的不是X.Y.Z三轴吗?重力加速度有三轴, ...
- 树莓派外设、模块、传感器 —— 数码管(F3461BH)
1. 4 位 8 段(7+点)数码管 树莓派GPIO入门05-驱动数码管显示数字 其内部电路图及各个段的引脚控制如下: 共阳与共阴: 数码管从电源极性上分共阳和共阴两种.解释一下,如果数码管上每一个独 ...
- 《物联网框架ServerSuperIO教程》-22.Web端对传感器实时监测与控制。附:v3.6.8版本,支持WebSocket
1.ServerSuperIO v3.6.8更新内容 1.1 增加WebSocket服务端功能,支持自控模式.并发模式.单例模式,不支持轮询模式1.2 接收数据缓存与现有的IO实例分离.1.3 优化代 ...
- 常用Raspberry Pi周边传感器的使用教程
在Raspberry Pi 的使用和开发过程中,你可能时常需要一些硬件和传感器等来支持你的开发工作,例如,加入一个超声波测距的模块来让你的Raspberry Pi具备测距功能,加入一个测温模块以实现测 ...
- 利用树莓派来安装opencv从而来调动摄像头工作(没有坑,超超自己试过)
超超最近参加了学校里一位特别厉害的老师讲的课(两天,我就从一个小白然后了解了树莓派以及Arduino这些我之前都没有了解过的东西,由于结课的需要,我们需要自己设计一个创意以及完成作品)所以才有了这篇文 ...
- 常用Raspberry Pi周边传感器的使用教程(转)
转:http://bbs.xiaomi.cn/thread-7797152-1-1.html 在Raspberry Pi 的使用和开发过程中,你可能时常需要一些硬件和传感器等来支持你的开发工作,例如, ...
随机推荐
- MySQL-06-DQL语句
DQL sql文件下载链接: https://alnk-blog-pictures.oss-cn-shenzhen.aliyuncs.com/blog-pictures/world.sql selec ...
- 【笔记】scikit-learn中的Scaler(归一化)
scikit-learn中的数据归一化 在机器学习使用数据归一化的时候有一个重要的注意事项 我们对训练数据进行均值和方差的处理,得到mean_train以及std_train,但是在对测试数据进行归一 ...
- 玩转 pyocd
(一) pyocd (1) 什么是pyocd pyocd 是 arm 开发的一个 python 包(python package),该软件包可以使用多种USB调试器对 arm cortex-M 微 ...
- BUUCTF刷题系列(2)5.27日记
CTF-Bugku-安卓篇1signin Writeup Bugku安卓部分第一题,第七届山东省大学生网络安全技能大赛的题目,属于Android逆向分析.(常用工具:安卓模拟器.JEB.Cyberch ...
- 从一次netty 内存泄露问题来看netty对POST请求的解析
背景 最近生产环境一个基于 netty 的网关服务频繁 full gc 观察内存占用,并把时间维度拉的比较长,可以看到可用内存有明显的下降趋势 出现这种情况,按往常的经验,多半是内存泄露了 问题定位 ...
- 题解 Sequence
传送门 只会爆搜系列 关于「本质不同的子序列个数」:限定长度,无限制(就是这题) 无限制的柿子是(令 \(dp[i]\) 为以 \(i\) 为结尾的不同子序列个数) \(dp[i] = \sum dp ...
- 题解 Cicada 拿衣服
传送门 神仙题! 听@Yubai给我讲了半个下午,快%@Yubai 见到这些奇奇怪怪的题是不是应该试着证下状态数上界啊 首先观察题目里给的柿子,可以发现 \(or-and\) 单调增, \(min-m ...
- SpringBoot自定义请求参数转换器
需求 我们可能对接客户的系统的时候,虽然Spring为我们提供的很多方便的转换器,但是遇到还是可能遇到需要自定义请求参数转换器的情况. 日期转换器 SpringBoot默认是没有配置日期转换器的我们可 ...
- Nacos 服务注册的原理
Nacos 服务注册需要具备的能力: 服务提供者把自己的协议地址注册到Nacos server 服务消费者需要从Nacos Server上去查询服务提供者的地址(根据服务名称) Nacos Serve ...
- 【mysql】mysql简介及高手是如何练成的
1.什么是mysql MySQL 是一个关系型数据库管理系统,由瑞典MySQL AB 公司开发,目前属于Oracle 公司. Mysql 是开源的,可以定制的,采用了GPL 协议,你可以修改源码 ...