
[翻译] CRPixellatedView-用CIPixellate滤镜动态渲染UIView
CRPixellatedView-用CIPixellate滤镜动态渲染UIView

https://github.com/chroman/CRPixellatedView
本人测试的效果:
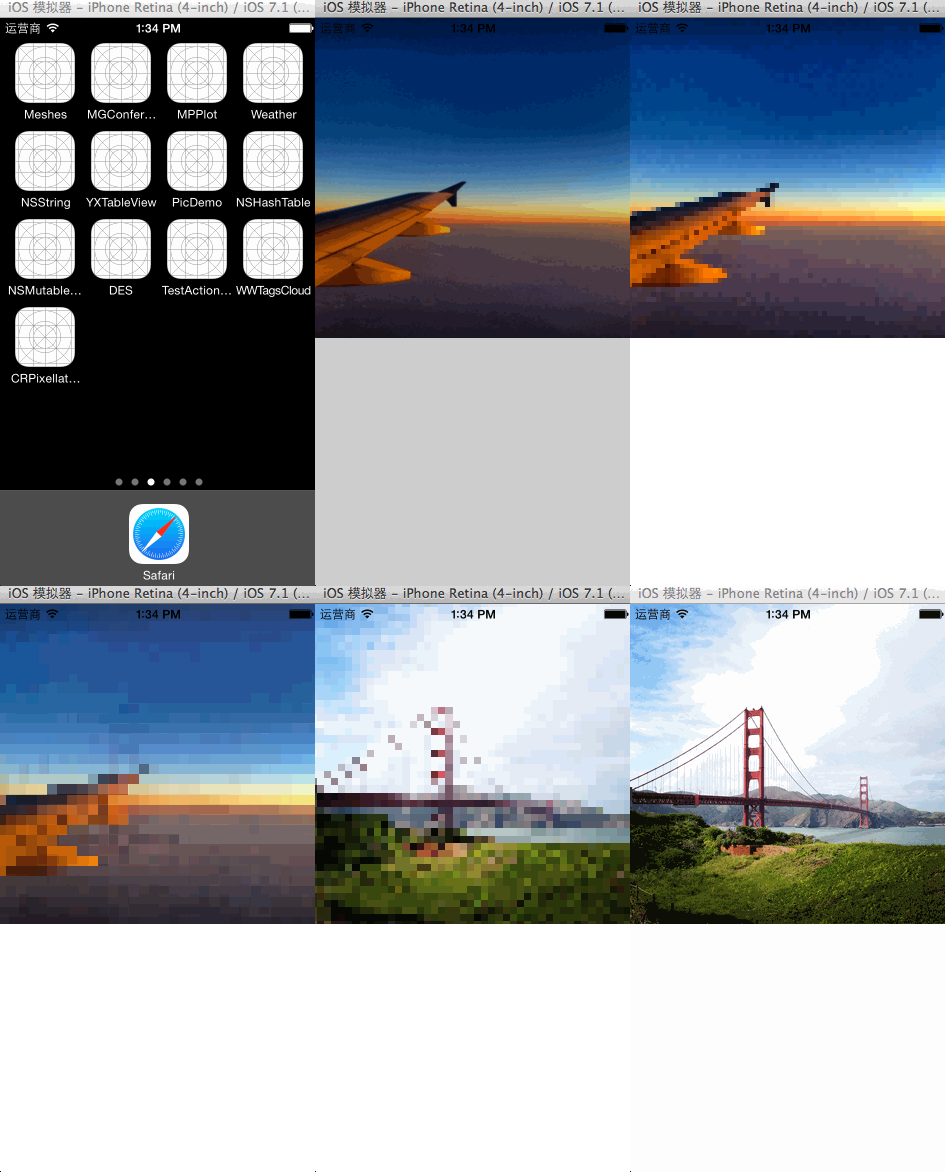
Usage
To use CRPixellatedView, create a CRPixellatedView, configure and animate!
要使用CRPixellatedView的话,创建一个CRPixellatedView,配置以及做动画!
An example of making a CRPixellatedView:
以下是一个使用CRPixellatedView的例子:
CRPixellatedView *pixellatedView = [[CRPixellatedView alloc] initWithFrame:CGRectMake(0, 0, 320, 320)];

pixellatedView.image = [UIImage imageNamed:@"Image"];

[self.view addSubview:pixellatedView]; // Add to your view

[pixellatedView animate];
You can configure this settings, customizable example:
以下是配置设置,自定义的例子:
CRPixellatedView *pixellatedView = [[CRPixellatedView alloc] initWithFrame:CGRectMake(0, 0, 320, 320)];

pixellatedView.image = [UIImage imageNamed:@"Image"];

pixellatedView.pixelScale = 20.0f;

pixellatedView.animationDuration = 0.8f;

[self.view addSubview:pixellatedView]; // Add to your view

[pixellatedView animateWithCompletion:^(BOOL finished) {

    NSLog(@"completed");

}];
Also, you can customize the animation effect using the reverse property:
以下是你使用反转效果的例子:
CRPixellatedView *pixellatedView = [[CRPixellatedView alloc] initWithFrame:CGRectMake(0, 0, 320, 320)];

pixellatedView.image = [UIImage imageNamed:@"Image"];

pixellatedView.pixelScale = 20.0f;

pixellatedView.animationDuration = 0.8f;

pixellatedView.reverse = YES; // Reverse effect

[self.view addSubview:pixellatedView]; // Add to your view

[pixellatedView animateWithCompletion:^(BOOL finished) {

    NSLog(@"completed");

}];
Examples
pixellatedView.reverse = YES; // Reverse effect


pixellatedView.reverse = NO; // (default)

pixellatedView.pixelScale = 30.0f;

核心的地方:
使用了3个CoreImage的滤镜用来重绘View:)

[翻译] CRPixellatedView-用CIPixellate滤镜动态渲染UIView的更多相关文章
- iOS给图片添加滤镜&使用openGLES动态渲染图片
给图片增加滤镜有这两种方式: CoreImage / openGLES 下面先说明如何使用CoreImage给图片添加滤镜, 主要为以下步骤: #1.导入CIImage格式的原始图片 #2.创建CIF ...
- iOS CoreImage图片处理动态渲染(滤镜)
// // ViewController.m // CoreImageOfDong // // Created by Dong on 15/6/30. // Copyright (c) 201 ...
- Django动态渲染多层菜单
为后续给菜单设置权限管理方便,通过给页面模版菜单动态渲染,通过数据菜单表进行匹配需要渲染的菜单 #Django表结构 class Menus(models.Model): name = models. ...
- 使用MVVM框架时,如何处理在页面动态渲染完之后需要发生的事件呢?
在项目实践过程中,当我们使用如avalon这样的MVVM框架时,通常会发现一直会有个问题. 过往的经验告诉我们,想在页面加载完之后处理些事件我们可以绑定document的ready方法或者使用jque ...
- JS动态修改页面EasyUI datebox不生效、EasyUI动态添加Class、EasyUI动态渲染解析解决方案
这是个小菜在实际工作中遇到的问题,相信很多EasyUI新手很可能也遇到这样的问题,因此小菜觉得有必要拿出来分享一下. 这个问题要从EasyUI的datebox组件说起,小菜用这个组件的时候,发现用$( ...
- vue + element 动态渲染、移除表单并添加验证
博客地址:https://ainyi.com/66 又接到新需求了吧~~ 背景 在一个大表单里,有可能会出现这种需求,用户可以自己操作动态添加.移除表单,更加个性化的效果. 常见于填写个人信息.附加内 ...
- 动态渲染页面爬取-Selenium & Splash
模拟浏览器的动机 JS动态渲染的页面不止Ajax一种 很多网页的Ajax接口含有加密参数,分析其规律的成本过高 通过对浏览器运行方式的模拟,我们将做到:可见即可爬 Python中常用的模拟浏览器运行的 ...
- iview 动态渲染menu时active-name无效的问题
动态渲染menu时,如果需要active-name,那么name只能绑定index,动态渲染的数组初始必须有一个空对象.否则无法使用active-name属性.注:仅限3.0版本,不排除新版本修复的可 ...
- vue使用动态渲染v-model输入框无法输入内容
最近使用ElementUI框架,在动态渲染表单的时候,表单框无法输入内容,但是绑定model的数据是会发生变化 解决方法: 将动态生成的表单对象,深拷贝到 data 对象中 <el-date-p ...
随机推荐
- django中有外键关系两张表的相互查找方法
两张通过外键联系的表,如何在一张表上根据另一张表上的属性查找满足条件的对象集? 1 平常查找表中数据的条件是python中已有的数据类型,通过名字可以直接查找.如果条件是表中外键列所对应表的某一列, ...
- mysql RC下不存在则插入
mysql版本:5.7 目的:在RC下,name列上仅有key索引,并发插入name时不出现重复数据 RC不加gap lock,并且复合select语句是不加锁的快照读,导致两个事务同时进行都可插入, ...
- 获得Spring容器
1. WebApplicationContext wac = ContextLoader.getCurrentWebApplicationCon; 2. ClassPathXmlApplication ...
- 【LeetCode题解】237_删除链表中的节点
目录 237_删除链表中的节点 描述 解法 思路 Java 实现 Python 实现 237_删除链表中的节点 描述 请编写一个函数,使其可以删除某个链表中给定的(非末尾)节点,你将只被给定要求被删除 ...
- hdu 3295 模拟过程。数据很水
An interesting mobile game Time Limit: 3000/1000 MS (Java/Others) Memory Limit: 65535/32768 K (Ja ...
- python 查询数据库返回的数据类型
self.conn=MySQLdb.connect(host='localhost',port=3306, user='keystone', passwd='OptValley@4312', db=s ...
- 百度Ueditor编辑器
百度的Ueditor编辑器出于安全性考虑,用户在html模式下粘贴进去的html文档会自动被去除样式和转义.虽然安全的,但是非常不方便. 1. ueditor.config.js 做出如下修改即可: ...
- WCF使用net.tcp绑定的配置实例
<system.serviceModel> <bindings> <basicHttpBinding> <!--默认http绑定的配置,这里提高了最大传输信息 ...
- CodeForces765A
A. Neverending competitions time limit per test:2 seconds memory limit per test:512 megabytes input: ...
- python 字符串居中
下面的代码可以让字符串居中,左对齐和右对齐,字符串长度设置为50,居中后左右补充空格,右对齐会在左侧补充空格 string1 = "Now I am here." print( s ...