
U3D之Editor扩展学习
Unity3D提供了强大的编辑器扩展机制,在项目开发中,如果可以将一些繁琐的工作放在编辑器扩展中进行,则会大大提高效率。本文对编辑器扩展进行了一些总结,希望对有兴趣编写编辑器扩展的开发人员有所帮助。当我们编写一个编辑器扩展时,一般可以从以下四个类继承:
1 . ScriptableObject
最常见的小功能扩展,一般不用窗口的编辑扩展,可以从这个类中继承,如以下代码所示:
using UnityEngine;

using UnityEditor;

using System.Collections;

public class AddChild : ScriptableObject

{

    [MenuItem ("GameObject/Add Child ^n")]

    static void MenuAddChild()

    {

        Transform[] transforms = Selection.GetTransforms(SelectionMode.TopLevel | SelectionMode.OnlyUserModifiable);

        foreach(Transform transform in transforms)

        {

            GameObject newChild = new GameObject("_Child");

            newChild.transform.parent = transform;

        }

    }

}
这个扩展脚本从菜单的“GameObject->Add Child”启动,功能是给Hierarchy窗口中选中的对GameObject添加一个名字为“_Child”的子GameObject,这样可以免去从Hierarchy窗口的根节点拖拽新创建的GameObject到当前选中节点的麻烦,因为在Unity3D编辑器中,创建一个EmptyObject会在Hierarchy窗口的根节点出现,无论当前选中的节点对象是哪个。
2 .ScriptableWizard
需要对扩展的参数进行设置,然后再进行功能触发的,可以从这个类进行派生。它已经定制好了四个消息响应函数,开发者对其进行填充即可。
(1) OnWizardUpdate
当扩展窗口打开时或用户对窗口的内容进行改动时,会调用此函数。一般会在这里面显示帮助文字和进行内容有效性验证;
(2)OnWizardCreate
这是用户点击窗口的Create按钮时进行的操作,从ScriptableWizard的名字可以看出,这是一种类似向导的窗口 ,而这种窗口我们在Visual Studio中经常会使用到,如下图:
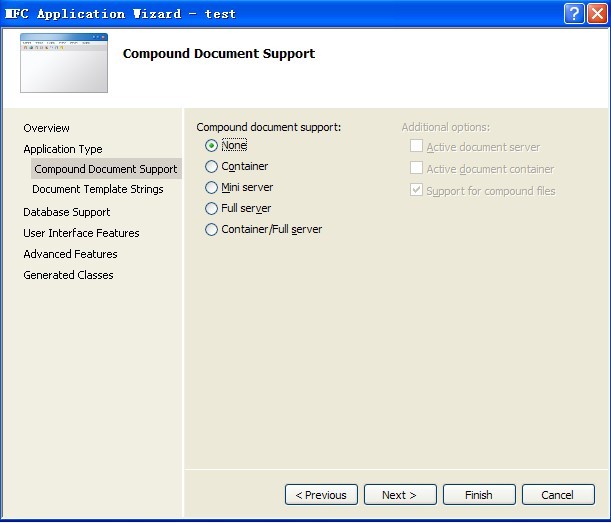
只不过Unity3D中的ScriptableWizard窗口只能进行小于或等于两个按钮的定制,一个就是所谓的Create按钮,另外一个则笼统称之为Other按钮。ScriptableWizard.DisplayWizard这个静态函数用于对ScriptableWizard窗口标题和按钮名字的定制。
(3) OnDrawGizmos
在窗口可见时,每一帧都会调用这个函数。在其中进行Gizmos的绘制,也就是辅助编辑的线框体。Unity的Gizmos类提供了DrawRayDrawLine ,DrawWireSphere ,DrawSphere ,DrawWireCube ,DrawCubeDrawIcon ,DrawGUITexture 功能。这个功能在Unity3D 的3.4版本中测试了一下,发现没有任何Gizmos绘制出来
(4) OnWizardOtherButton
本文在(2) 中已经提及,ScriptableWizard窗口最多可以定制两个按钮,一个是Create,另外一个称之为Other,这个函数会在other按钮被点击时调用。下面是一个使用ScriptableWizard进行编辑扩展的例子:
<span style="font-size: 18px;">using UnityEditor;

using UnityEngine;

using System.Collections;

/// <summary>

/// 对于选定GameObject,进行指定component的批量添加

/// </summary>

public class AddRemoveComponentsRecursively : ScriptableWizard

{

    public string componentType = null;

    /// <summary>

    /// 当没有任何GameObject被选中的时候,将菜单disable(注意,这个函数名可以随意取)

    /// </summary>

    /// <returns></returns>

    [MenuItem("GameObject/Add or remove components recursively...", true)]

    static bool CreateWindowDisabled()

    {

        return Selection.activeTransform;

    }

    /// <summary>

    /// 创建编辑窗口(注意,这个函数名可以随意取)

    /// </summary>

    [MenuItem("GameObject/Add or remove components recursively...")]

    static void CreateWindow()

    {

        // 定制窗口标题和按钮,其中第二个参数是Create按钮,第三个则属于other按钮

        // 如果不想使用other按钮,则可调用DisplayWizard的两参数版本

        ScriptableWizard.DisplayWizard<AddRemoveComponentsRecursively>(

            "Add or remove components recursivly",

            "Add", "Remove");

    }

    /// <summary>

    /// 窗口创建或窗口内容更改时调用

    /// </summary>

    void OnWizardUpdate()

    {

        helpString = "Note: Duplicates are not created";

        if (string.IsNullOrEmpty(componentType))

        {

            errorString = "Please enter component class name";

            isValid = false;

        }

        else

        {

            errorString = "";

            isValid = true;

        }

    }

    /// <summary>

    /// 点击Add按钮(即Create按钮)调用

    /// </summary>

    void OnWizardCreate()

    {

        int c = ;

        Transform[] ts = Selection.GetTransforms(SelectionMode.Deep);

        foreach (Transform t in ts)

        {

            if (t.gameObject.GetComponent(componentType) == null)

            {

                if (t.gameObject.AddComponent(componentType) == null)

                {

                    Debug.LogWarning("Component of type " + componentType + " does not exist");

                    return;

                }

                c++;

            }

        }

        Debug.Log("Added " + c + " components of type " + componentType);

    }

    /// <summary>

    /// 点击Remove(即other按钮)调用

    /// </summary>

    void OnWizardOtherButton()

    {

        int c = ;

        Transform[] ts = Selection.GetTransforms(SelectionMode.Deep);

        foreach (Transform t in ts)

        {

            if (t.GetComponent(componentType) != null)

            {

                DestroyImmediate(t.GetComponent(componentType));

                c++;

            }

        }

        Debug.Log("Removed " + c + " components of type " + componentType);

        Close();

    }

}</span>
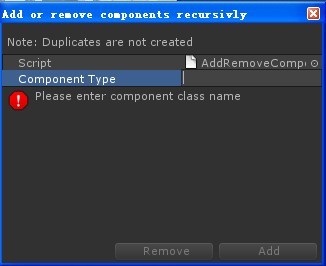
其运行窗口如下所示:
3 . EditorWindow
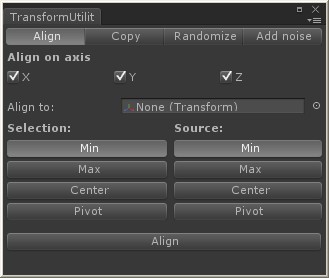
较复杂的功能,需要多个灵活的控件,实现自由浮动和加入其他窗口的tab,可以从这个类派生,这种窗口的窗体功能和Scene,Hierarchy等窗口完全一致。下面这个例子实现了GameObject的空间对齐和拷贝(也就是将GameObject A作为基准,选中其他的GameObject进行对准或空间位置拷贝),对齐和拷贝提高了了开发者摆放物件的效率;另外还有随机和噪声,后两者用于摆放大量同类物件的时候可以使用,比如一大堆散落的瓶子。
<span style="font-size: 18px;">// /////////////////////////////////////////////////////////////////////////////////////////////////////////
//
// Transform Utilities.
//
// This window contains four useful tools for asset placing and manipulation: Align, Copy, Randomize and Add noise.
//
// Put this into Assets/Editor and once compiled by Unity you find
// the new functionality in Window -> TransformUtilities, or simply press Ctrl+t (Cmd+t for Mac users)
//
// Developed by Daniel
// http://www.silentkraken.com
// e-mail: seth@silentkraken.com
//
// ///////////////////////////////////////////////////////////////////////////////////////////////////////// using UnityEngine;
using UnityEditor; public class TransformUtilitiesWindow : EditorWindow
{
//Window control values
public int toolbarOption = ;
public string[] toolbarTexts = {"Align", "Copy", "Randomize", "Add noise"}; private bool xCheckbox = true;
private bool yCheckbox = true;
private bool zCheckbox = true; private Transform source;
private float randomRangeMin = 0f;
private float randomRangeMax = 1f;
private int alignSelectionOption = ;
private int alignSourceOption = ; /// <summary>
/// Retrives the TransformUtilities window or creates a new one
/// </summary>
[MenuItem("Window/TransformUtilities %t")]
static void Init()
{
TransformUtilitiesWindow window = (TransformUtilitiesWindow)EditorWindow.GetWindow(typeof(TransformUtilitiesWindow));
window.Show();
} /// <summary>
/// Window drawing operations
/// </summary>
void OnGUI ()
{
toolbarOption = GUILayout.Toolbar(toolbarOption, toolbarTexts);
switch (toolbarOption)
{
case :
CreateAxisCheckboxes("Align");
CreateAlignTransformWindow();
break;
case :
CreateAxisCheckboxes("Copy");
CreateCopyTransformWindow();
break;
case :
CreateAxisCheckboxes("Randomize");
CreateRandomizeTransformWindow();
break;
case :
CreateAxisCheckboxes("Add noise");
CreateAddNoiseToTransformWindow();
break;
}
} /// <summary>
/// Draws the 3 axis checkboxes (x y z)
/// </summary>
/// <param name="operationName"></param>
private void CreateAxisCheckboxes(string operationName)
{
GUILayout.Label(operationName + " on axis", EditorStyles.boldLabel); GUILayout.BeginHorizontal();
xCheckbox = GUILayout.Toggle(xCheckbox, "X");
yCheckbox = GUILayout.Toggle(yCheckbox, "Y");
zCheckbox = GUILayout.Toggle(zCheckbox, "Z");
GUILayout.EndHorizontal(); EditorGUILayout.Space();
} /// <summary>
/// Draws the range min and max fields
/// </summary>
private void CreateRangeFields()
{
GUILayout.Label("Range", EditorStyles.boldLabel);
GUILayout.BeginHorizontal();
randomRangeMin = EditorGUILayout.FloatField("Min:", randomRangeMin);
randomRangeMax = EditorGUILayout.FloatField("Max:", randomRangeMax);
GUILayout.EndHorizontal();
EditorGUILayout.Space();
} /// <summary>
/// Creates the Align transform window
/// </summary>
private void CreateAlignTransformWindow()
{
//Source transform
GUILayout.BeginHorizontal();
GUILayout.Label("Align to: \t");
source = EditorGUILayout.ObjectField(source, typeof(Transform)) as Transform;
GUILayout.EndHorizontal(); string[] texts = new string[] { "Min", "Max", "Center", "Pivot" }; //Display align options
EditorGUILayout.BeginHorizontal();
EditorGUILayout.BeginVertical();
GUILayout.Label("Selection:", EditorStyles.boldLabel);
alignSelectionOption = GUILayout.SelectionGrid(alignSelectionOption, texts, );
EditorGUILayout.EndVertical();
EditorGUILayout.BeginVertical();
GUILayout.Label("Source:", EditorStyles.boldLabel);
alignSourceOption = GUILayout.SelectionGrid(alignSourceOption, texts, );
EditorGUILayout.EndVertical();
EditorGUILayout.EndHorizontal(); EditorGUILayout.Space(); //Position
if (GUILayout.Button("Align"))
{
if (source != null)
{
//Add a temporary box collider to the source if it doesn't have one
Collider sourceCollider = source.collider;
bool destroySourceCollider = false;
if (sourceCollider == null)
{
sourceCollider = source.gameObject.AddComponent<BoxCollider>();
destroySourceCollider = true;
} foreach (Transform t in Selection.transforms)
{
//Add a temporary box collider to the transform if it doesn't have one
Collider transformCollider = t.collider;
bool destroyTransformCollider = false;
if (transformCollider == null)
{
transformCollider = t.gameObject.AddComponent<BoxCollider>();
destroyTransformCollider = true;
} Vector3 sourceAlignData = new Vector3();
Vector3 transformAlignData = new Vector3(); //Transform
switch (alignSelectionOption)
{
case : //Min
transformAlignData = transformCollider.bounds.min;
break;
case : //Max
transformAlignData = transformCollider.bounds.max;
break;
case : //Center
transformAlignData = transformCollider.bounds.center;
break;
case : //Pivot
transformAlignData = transformCollider.transform.position;
break;
} //Source
switch (alignSourceOption)
{
case : //Min
sourceAlignData = sourceCollider.bounds.min;
break;
case : //Max
sourceAlignData = sourceCollider.bounds.max;
break;
case : //Center
sourceAlignData = sourceCollider.bounds.center;
break;
case : //Pivot
sourceAlignData = sourceCollider.transform.position;
break;
} Vector3 tmp = new Vector3();
tmp.x = xCheckbox ? sourceAlignData.x - (transformAlignData.x - t.position.x) : t.position.x;
tmp.y = yCheckbox ? sourceAlignData.y - (transformAlignData.y - t.position.y) : t.position.y;
tmp.z = zCheckbox ? sourceAlignData.z - (transformAlignData.z - t.position.z) : t.position.z; //Register the Undo
Undo.RegisterUndo(t, "Align " + t.gameObject.name + " to " + source.gameObject.name);
t.position = tmp; //Ugly hack!
//Unity needs to update the collider of the selection to it's new position
//(it stores in cache the collider data)
//We can force the update by a change in a public variable (shown in the inspector),
//then a call SetDirty to update the collider (it won't work if all inspector variables are the same).
//But we want to restore the changed property to what it was so we do it twice.
transformCollider.isTrigger = !transformCollider.isTrigger;
EditorUtility.SetDirty(transformCollider);
transformCollider.isTrigger = !transformCollider.isTrigger;
EditorUtility.SetDirty(transformCollider); //Destroy the collider we added
if (destroyTransformCollider)
{
DestroyImmediate(transformCollider);
}
} //Destroy the collider we added
if (destroySourceCollider)
{
DestroyImmediate(sourceCollider);
}
}
else
{
EditorUtility.DisplayDialog("Error", "There is no source transform", "Ok");
EditorApplication.Beep();
}
}
} /// <summary>
/// Creates the copy transform window
/// </summary>
private void CreateCopyTransformWindow()
{
//Source transform
GUILayout.BeginHorizontal();
GUILayout.Label("Copy from: \t");
source = EditorGUILayout.ObjectField(source, typeof(Transform)) as Transform;
GUILayout.EndHorizontal(); EditorGUILayout.Space(); //Position
if (GUILayout.Button("Copy Position"))
{
if (source != null)
{
foreach (Transform t in Selection.transforms)
{
Vector3 tmp = new Vector3();
tmp.x = xCheckbox ? source.position.x : t.position.x;
tmp.y = yCheckbox ? source.position.y : t.position.y;
tmp.z = zCheckbox ? source.position.z : t.position.z; Undo.RegisterUndo(t, "Copy position");
t.position = tmp;
}
}
else
{
EditorUtility.DisplayDialog("Error", "There is no source transform", "Ok");
EditorApplication.Beep();
}
} //Rotation
if (GUILayout.Button("Copy Rotation"))
{
if (source != null)
{
foreach (Transform t in Selection.transforms)
{
Vector3 tmp = new Vector3();
tmp.x = xCheckbox ? source.rotation.eulerAngles.x : t.rotation.eulerAngles.x;
tmp.y = yCheckbox ? source.rotation.eulerAngles.y : t.rotation.eulerAngles.y;
tmp.z = zCheckbox ? source.rotation.eulerAngles.z : t.rotation.eulerAngles.z;
Quaternion tmp2 = t.rotation;
tmp2.eulerAngles = tmp; Undo.RegisterUndo(t, "Copy rotation");
t.rotation = tmp2;
}
}
else
{
EditorUtility.DisplayDialog("Error", "There is no source transform", "Ok");
EditorApplication.Beep();
}
} //Local Scale
if (GUILayout.Button("Copy Local Scale"))
{
if (source != null)
{
foreach (Transform t in Selection.transforms)
{
Vector3 tmp = new Vector3();
tmp.x = xCheckbox ? source.localScale.x : t.localScale.x;
tmp.y = yCheckbox ? source.localScale.y : t.localScale.y;
tmp.z = zCheckbox ? source.localScale.z : t.localScale.z; Undo.RegisterUndo(t, "Copy local scale");
t.localScale = tmp;
}
}
else
{
EditorUtility.DisplayDialog("Error", "There is no source transform", "Ok");
EditorApplication.Beep();
}
}
} /// <summary>
/// Creates the Randomize transform window
/// </summary>
private void CreateRandomizeTransformWindow()
{
CreateRangeFields(); //Position
if (GUILayout.Button("Randomize Position"))
{
foreach (Transform t in Selection.transforms)
{
Vector3 tmp = new Vector3();
tmp.x = xCheckbox ? Random.Range(randomRangeMin, randomRangeMax) : t.position.x;
tmp.y = yCheckbox ? Random.Range(randomRangeMin, randomRangeMax) : t.position.y;
tmp.z = zCheckbox ? Random.Range(randomRangeMin, randomRangeMax) : t.position.z; Undo.RegisterUndo(t, "Randomize position");
t.position = tmp;
}
} //Rotation
if (GUILayout.Button("Randomize Rotation"))
{
foreach (Transform t in Selection.transforms)
{
Vector3 tmp = new Vector3();
tmp.x = xCheckbox ? Random.Range(randomRangeMin, randomRangeMax) : t.rotation.eulerAngles.x;
tmp.y = yCheckbox ? Random.Range(randomRangeMin, randomRangeMax) : t.rotation.eulerAngles.y;
tmp.z = zCheckbox ? Random.Range(randomRangeMin, randomRangeMax) : t.rotation.eulerAngles.z;
Quaternion tmp2 = t.rotation;
tmp2.eulerAngles = tmp; Undo.RegisterUndo(t, "Randomize rotation");
t.rotation = tmp2;
}
} //Local Scale
if (GUILayout.Button("Randomize Local Scale"))
{
foreach (Transform t in Selection.transforms)
{
Vector3 tmp = new Vector3();
tmp.x = xCheckbox ? Random.Range(randomRangeMin, randomRangeMax) : t.localScale.x;
tmp.y = yCheckbox ? Random.Range(randomRangeMin, randomRangeMax) : t.localScale.y;
tmp.z = zCheckbox ? Random.Range(randomRangeMin, randomRangeMax) : t.localScale.z; Undo.RegisterUndo(t, "Randomize local scale");
t.localScale = tmp;
}
}
} /// <summary>
/// Creates the Add Noise To Transform window
/// </summary>
private void CreateAddNoiseToTransformWindow()
{
CreateRangeFields(); //Position
if (GUILayout.Button("Add noise to Position"))
{
foreach (Transform t in Selection.transforms)
{
Vector3 tmp = new Vector3();
tmp.x = xCheckbox ? Random.Range(randomRangeMin, randomRangeMax) : ;
tmp.y = yCheckbox ? Random.Range(randomRangeMin, randomRangeMax) : ;
tmp.z = zCheckbox ? Random.Range(randomRangeMin, randomRangeMax) : ; Undo.RegisterUndo(t, "Add noise to position");
t.position += tmp;
}
} //Rotation
if (GUILayout.Button("Add noise to Rotation"))
{
foreach (Transform t in Selection.transforms)
{
Vector3 tmp = new Vector3();
tmp.x = xCheckbox ? t.rotation.eulerAngles.x + Random.Range(randomRangeMin, randomRangeMax) : ;
tmp.y = yCheckbox ? t.rotation.eulerAngles.y + Random.Range(randomRangeMin, randomRangeMax) : ;
tmp.z = zCheckbox ? t.rotation.eulerAngles.z + Random.Range(randomRangeMin, randomRangeMax) : ; Undo.RegisterUndo(t, "Add noise to rotation");
t.rotation = Quaternion.Euler(tmp);
}
} //Local Scale
if (GUILayout.Button("Add noise to Local Scale"))
{
foreach (Transform t in Selection.transforms)
{
Vector3 tmp = new Vector3();
tmp.x = xCheckbox ? Random.Range(randomRangeMin, randomRangeMax) : ;
tmp.y = yCheckbox ? Random.Range(randomRangeMin, randomRangeMax) : ;
tmp.z = zCheckbox ? Random.Range(randomRangeMin, randomRangeMax) : ; Undo.RegisterUndo(t, "Add noise to local scale");
t.localScale += tmp;
}
}
}
}</span>
其窗口如下图所示:
4. Editor
对某自定义组件进行观察的Inspector窗口,可以从它派生。如下代码所示:
代码片段1定义了一个名为Star的组件:
<span style="font-size: 18px;">using System;

using UnityEngine;

[RequireComponent(typeof(MeshFilter), typeof(MeshRenderer))]

public class Star : MonoBehaviour {

    [Serializable]

    public class Point {

        public Color color;

        public Vector3 offset;

    }

    public Point[] points;

    public int frequency = ;

    public Color centerColor;

    private Mesh mesh;

    private Vector3[] vertices;

    private Color[] colors;

    private int[] triangles;

    void Start () {

        GetComponent<MeshFilter>().mesh = mesh = new Mesh();

        mesh.name = "Star Mesh";

        if(frequency < ){

            frequency = ;

        }

        if(points == null || points.Length == ){

            points = new Point[]{ new Point()};

        }

        int numberOfPoints = frequency * points.Length;

        vertices = new Vector3[numberOfPoints + ];

        colors = new Color[numberOfPoints + ];

        triangles = new int[numberOfPoints * ];

        float angle = -360f / numberOfPoints;

        colors[] = centerColor;

        for(int iF = , v = , t = ; iF < frequency; iF++){

            for(int iP = ; iP < points.Length; iP += , v += , t += ){

                vertices[v] = Quaternion.Euler(0f, 0f, angle * (v - )) * points[iP].offset;

                colors[v] = points[iP].color;

                triangles[t] = v;

                triangles[t + ] = v + ;

            }

        }

        triangles[triangles.Length - ] = ;

        mesh.vertices = vertices;

        mesh.colors = colors;

        mesh.triangles = triangles;

    }

}</span>
代码片段2定义了对Star组件进行观测的Inspector窗口:
<span style="font-size: 18px;">using UnityEditor;

using UnityEngine;

[CustomEditor(typeof(Star))]

public class StarInspector : Editor {

    private static GUIContent

        insertContent = new GUIContent("+", "duplicate this point"),

        deleteContent = new GUIContent("-", "delete this point"),

        pointContent = GUIContent.none;

    private static GUILayoutOption

        buttonWidth = GUILayout.MaxWidth(20f),

        colorWidth = GUILayout.MaxWidth(50f);

    private SerializedObject star;

    private SerializedProperty

        points,

        frequency,

        centerColor;

    void OnEnable () { … }

    public override void OnInspectorGUI () {

        star.Update();

        GUILayout.Label("Points");

        for(int i = ; i < points.arraySize; i++){

            EditorGUILayout.BeginHorizontal();

            SerializedProperty point = points.GetArrayElementAtIndex(i);

            EditorGUILayout.PropertyField(point.FindPropertyRelative("offset"), pointContent);

            EditorGUILayout.PropertyField(point.FindPropertyRelative("color"), pointContent, colorWidth);

            if(GUILayout.Button(insertContent, EditorStyles.miniButtonLeft, buttonWidth)){

                points.InsertArrayElementAtIndex(i);

            }

            if(GUILayout.Button(deleteContent, EditorStyles.miniButtonRight, buttonWidth)){

                points.DeleteArrayElementAtIndex(i);

            }

            EditorGUILayout.EndHorizontal();

        }

        EditorGUILayout.PropertyField(frequency);

        EditorGUILayout.PropertyField(centerColor);

        star.ApplyModifiedProperties();

    }

}</span>
其Inspector窗口如下图所示:

说到这里,大家对ScriptableObject, ScriptableWizard, EditorWindow和Editor应该都有应有了一定了解。其中EditorWindow和Editor都继承了ScriptableObject,而ScritableWizard则继承了EditorWindow派。在实际开发应用中,应该根据需求的特点,灵活使用这四个类进行编辑器扩展。
参考资料:
1. http://catlikecoding.com/unity/tutorials/star/
2. http://www.unifycommunity.com/wiki
3. http://www.blog.silentkraken.com/2010/02/06/transformutilities/
4.http://unity3d.com/support/documentation/ScriptReference
转:http://blog.csdn.net/jjiss318/article/details/7435708
U3D之Editor扩展学习的更多相关文章
- 《PHP扩展学习系列》系列分享专栏
<PHP扩展学习系列>系列分享专栏 <PHP扩展学习系列>已整理成PDF文档,点击可直接下载至本地查阅https://www.webfalse.com/read/20177 ...
- PHP中操作任意精度大小的GMP扩展学习
对于各类开发语言来说,整数都有一个最大的位数,如果超过位数就无法显示或者操作了.其实,这也是一种精度越界之后产生的精度丢失问题.在我们的 PHP 代码中,最大的整数非常大,我们可以通过 PHP_INT ...
- PHP中非常好玩的Calendar扩展学习
为什么说这个 Calendar 扩展很好玩呢?因为你基本用不到它!这个扩展是一套关于日期历法的扩展,但是对于我们来说,它没有农历的相关操作,所以对于我们中国人来说这个扩展并没有什么实际的作用.不过这并 ...
- PHP中的MySQLi扩展学习(六)MySQLI_result对象操作
在之前的文章中,我们就已经接触过 MYSQLI_result 相关的内容.它的作用其实就是一个查询的结果集.不过在 PDO 中,一般直接通过 query() 或者 PDOStatement 对象进行查 ...
- PHP中的MySQLi扩展学习(五)MySQLI_STMT对象操作
就像 PDO 中的 PDO_Statment 对象一样,MySQLI_STMT 对象也是一个预处理语句所形成的对象,专门用来操作 MySQLi 所生成的预处理语句的.其实操作方式之类也都比较相似,不外 ...
- PHP中的MySQLi扩展学习(四)mysqli的事务与预处理语句
对于 MySQLi 来说,事务和预处理语句当然是它之所以能够淘汰 MySQL(原始) 扩展的资本.我们之前也已经学习过了 PDO 中关于事务和预处理语句相关的内容.所以在这里,我们就不再多讲理论方面的 ...
- PHP中的MySQLi扩展学习(三)mysqli的基本操作
我们继续 MySQLi 扩展的学习,上篇文章中提到过,MySQLi 的扩展相对于 PDO 来说功能更加的丰富,所以我们依然还会在学习过程中穿插各种 MySQLi 中好玩的方法函数.不过,今天的主角是 ...
- PHP中的MySQLi扩展学习(二)mysqli类的一些少见的属性方法
虽说是少见的一些属性方法,但是可能还是有不少同学在日常的开发中使用过,这里只是学习了可能相对来说我们用得比较少的一些 mysqli 的属性或方法.就当是扩展一下自己的知识体系. 切换用户 首先就是切换 ...
- PHP中的MySQLi扩展学习(一)MySQLi介绍
关于 PDO 的学习我们告一段落,从这篇文章开始,我们继续学习另外一个 MySQL 扩展,也就是除了 PDO 之外的最核心的 MySQLi 扩展.可以说它的祖先,也就是 MySQL(原始) 扩展是我们 ...
随机推荐
- 【HBase】zookeeper在HBase中的应用
转自:http://support.huawei.com/ecommunity/bbs/10242721.html Zookeeper在HBase中的应用 HBase部署相对是一个较大的动作,其依赖于 ...
- Linux中添加快捷
执行操作比较快捷: 1.R3 CGP平台下OMU系统中: Linux 版本:2.6.16.60-0.21-bigsmp vi /etc/profile 2.R2 Linux版本2.6.5-7.244- ...
- C++ 指针二维数组, C++二维指针数组笔记
C++ 二维动态数组 一. 已知第一维 #include <iostream> using namespace std; int main(int argc, char const *ar ...
- 【转】【WPF】关于依赖属性的ValidateValueCallback,PropertyChangedCallback和CoerceValueCallback的执行顺序
三个回调对应依赖属性的验证过程,改变过程和强制转换过程. class Dobj : DependencyObject { //依赖属性包装 public int MyProperty { get { ...
- Spring Boot使用Servlet、Filter或Listener的方式
根据官方文档说明,有两种方式可以在你的Spring Boot应用中使用Servlet.Filter或Listener. 其一:将Servlet.Filter或Listener注册成Spring Bea ...
- Java如何格式化月份?
在Java中,如何以MMMM格式格式化时间? 这个示例使用SimpleDateFormat('MMMM')构造函数和SimpleDateFormat类的sdf.format(date)方法来格式化月份 ...
- (原)从mp4,flv文件中解析出h264和aac,送解码器解码失败
转载请注明出处:http://www.cnblogs.com/lihaiping/p/5285166.html 今天在做本地文件解码测试,发现从mp4,flv文件中读出来的帧数据,h264和aac帧直 ...
- NPOI 2.1.1 系列(2) 使用NPOI读取List或者datatable数据生成 Excel文档 ;Npoi生成 xlsx 2007以上文档
结合上一篇文章 NPOI 2.1.1 系列(1) 使用NPOI读取 Excel文档 ;NpoiExcelHelper 导入导出 2003格式 2007格式的 Excel; Npoi 导出 xlsx ...
- [mysql]ERROR 1364 (HY000): Field 'ssl_cipher' doesn't have a default value
From: http://m.blog.csdn.net/blog/langkeziju/13511411 我的MySQL版本为5.6.14版本,是二进制包安装的(虽然是二进制包安装的,但是以下问题同 ...
- ZooKeeper简述
一.简介 ZooKeeper是一个高性能,分布式的,开源分布式应用协调服务.它提供了简单原始的功能,分布式应用可以基于它实现更高级的服务,比如同步,集群管理,命名空间,配置维护等.ZooKeeper使 ...