
Linux系统——PXE高效能批量网络装机
PXE:Pre-boot Excution Environment,预启动执行环境,石油Intel公司开发的网络引导技术,工作在Client、Server模式,允许客户机通过网络从远程服务器下载阴道镜像,并记载安装文件或者整个操作系统。
搭建PXE网络体系,必须要满足一下条件:
1. 客户机的网卡支持PXE协议(集成BOOTROM芯片),且主板支持网络引导。
2. 网络中有一台DHCP服务器,一边为客户机分配地址、指定引导文件位置
服务器通过TFTP简单文件传输协议提供引导镜像文件的下载。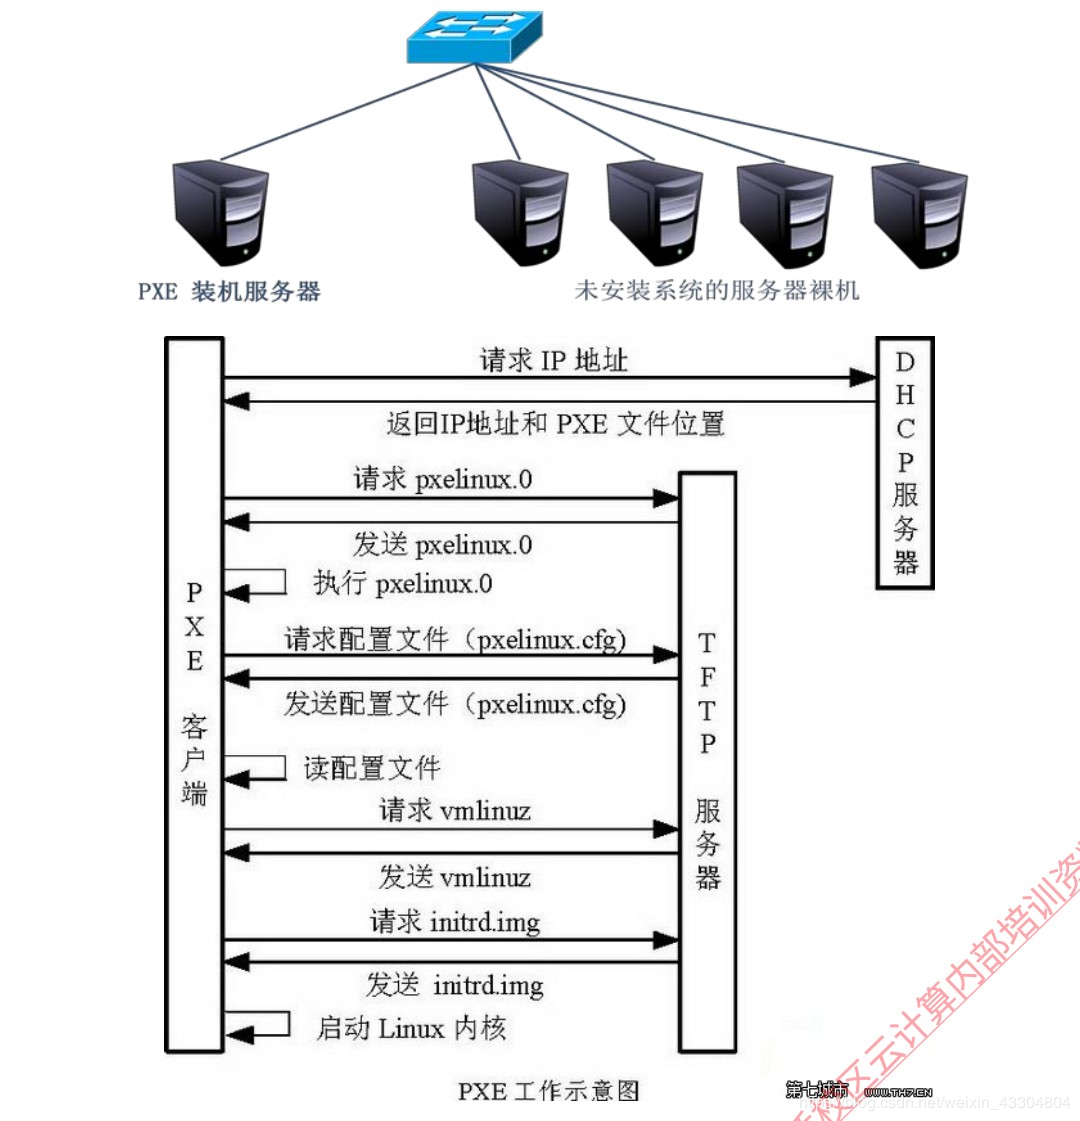
工作过程:
工作站开机后,PXE BootROM(自启动芯片)获得控制权之前先做自我测试,然后以广播形式发出一个请求FIND帧。如果服务器收到工作站所送出的要求,就会送回DHCP回应,内容包括用户端的IP地址,预设通讯通道及开机应许昂文件。否则,服务器会忽略这个要求。工作站收到服务器发回的响应后则会回应一个帧,以请求传送启动所需文件。之后,将有更多的讯息在工作站与服务器之间作应答,用以决定启动参数。BootROM由TFTP通信协议从服务器下载开机映像档,这个映像档就是软盘的映像文件。工作站树勇TFTP协议接受启动文件后,将控制权转交启动快,引导操作系统,完成远程启动。
#### 搭建PXE远程安装服务器
1. 安装并启动TFTP服务
```
[root@localhost ~]# mkdir -p /var/ftp/centos6
[root@localhost ~]# cd /var/ftp/centos6/
[root@localhost centos6]# cp -rp /media/cdrom/* .
[root@localhost ~]# mount /dev/sr0 /media/cdrom
mount: block device /dev/sr0 is write-protected, mounting read-only
[root@localhost ~]# yum -y install tftp-server
[root@localhost centos6]# vim /etc/xinetd.d/tftp
# default: off
# description: The tftp server serves files using the trivial file transfer \
# protocol. The tftp protocol is often used to boot diskless \
# workstations, download configuration files to network-aware printers, \
# and to start the installation process for some operating systems.
service tftp
{
socket_type = dgram
protocol = udp
wait = no # 无需等待,同一时刻可以多个客户端连接
user = root
server = /usr/sbin/in.tftpd
server_args = -s /var/lib/tftpboot #tftp服务的根目录
disable = no #开启tftp服务
per_source = 11
cps = 100 2
flags = IPv4
}
```
2. 启动tftp
```
[root@localhost centos6]# /etc/init.d/xinetd start
Starting xinetd: [ OK ]
[root@localhost centos6]# chkconfig tftp on
```
3. 准备Linux内核、初始化镜像文件
```
[root@localhost ~]# cd /var/ftp/centos6/isolinux/
[root@localhost isolinux]# ls
boot.cat initrd.img memtest vesamenu.c32
boot.msg isolinux.bin splash.jpg vmlinuz
grub.conf isolinux.cfg TRANS.TBL
[root@localhost isolinux]# cp vmlinuz initrd.img /var/lib/tftpboot/
[root@localhost isolinux]# ls /var/lib/tftpboot/
initrd.img vmlinuz
```
4. 准备PXE引导程序、启动菜单文件
准备引导程序
```
[root@localhost isolinux]# yum -y install syslinux
[root@localhost isolinux]# cp /usr/share/syslinux/pxelinux.0 /var/lib/tftpboot/
[root@localhost isolinux]# ls /var/lib/tftpboot/
initrd.img pxelinux.0 vmlinuz
[root@localhost isolinux]#
```
准备启动菜单
```
[root@localhost ~]# cp /var/ftp/centos6/isolinux/isolinux.cfg /var/lib/tftpboot/
[root@localhost ~]# cd /var/lib/tftpboot/
[root@localhost tftpboot]# chmod 644 isolinux.cfg
[root@localhost tftpboot]# vim isolinux.cfg
default linux #改个名字
prompt 0 #不进行交互
#timeout 600
display boot.msg
#menu background splash.jpg
#menu title Welcome to CentOS 6.5!
#menu color border 0 #ffffffff #00000000
#menu color sel 7 #ffffffff #ff000000
#menu color title 0 #ffffffff #00000000
#menu color tabmsg 0 #ffffffff #00000000
#menu color unsel 0 #ffffffff #00000000
#menu color hotsel 0 #ff000000 #ffffffff
#menu color hotkey 7 #ffffffff #ff000000
#menu color scrollbar 0 #ffffffff #00000000
label linux
menu label ^Install or upgrade an existing system
menu default
kernel vmlinuz
append initrd=initrd.img
label text #对原数据进行更改
menu label Install system with ^basic video driver
kernel vmlinuz
append text initrd=initrd.img xdriver=vesa nomodeset #对原数据进行更改
label rescue
menu label ^Rescue installed system
kernel vmlinuz
append rescue initrd=initrd.img rescue #对原数据进行更改
label local
menu label Boot from ^local drive
localboot 0xffff
label memtest86
menu label ^Memory test
kernel memtest
append -
[root@localhost tftpboot]# cd /var/lib/tftpboot/
[root@localhost tftpboot]# mkdir pxelinux.cfg
[root@localhost tftpboot]# mv isolinux.cfg ./pxelinux.cfg/default
```
5. 安装并启动DHCP服务(pxe服务端)
```
[root@localhost tftpboot]# yum -y install dhcp
[root@localhost tftpboot]# cp /usr/share/doc/dhcp*/dhcpd.conf.sample .
[root@localhost tftpboot]# cat dhcpd.conf.sample > /etc/dhcp/dhcpd.conf
[root@localhost tftpboot]# vim /etc/dhcp/dhcpd.conf
# dhcpd.conf
#
# Sample configuration file for ISC dhcpd
#
# option definitions common to all supported networks...
option domain-name "www.yunjisuan.com";
option domain-name-servers 192.168.239.2;
default-lease-time 21600;
max-lease-time 43200;
# Use this to enble / disable dynamic dns updates globally.
#ddns-update-style none;
# If this DHCP server is the official DHCP server for the local
# network, the authoritative directive should be uncommented.
#authoritative;
# Use this to send dhcp log messages to a different log file (you also
# have to hack syslog.conf to complete the redirection).
log-facility local7;
# No service will be given on this subnet, but declaring it helps the
# DHCP server to understand the network topology.
# This is a very basic subnet declaration.
subnet 192.168.239.0 netmask 255.255.255.0 {
range 192.168.239.100 192.168.239.200;
option routers 192.168.239.2;
next-server 192.168.239.132; #PXE的IP地址
filename "pxelinux.0";
}
[root@localhost tftpboot]# /etc/init.d/dhcpd start
Starting dhcpd: [ OK ]
[root@localhost tftpboot]# netstat -antup | grep 67
udp 0 0 0.0.0.0:67 0.0.0.0:* 1528/dhcpd
[root@localhost tftpboot]# yum -y install vsftpd
[root@localhost tftpboot]# /etc/init.d/vsftpd start
Starting vsftpd for vsftpd: [ OK ]
```
6. 测试连接ftp功能(pxe客户端)
```
[root@localhost ~]# mount /dev/sr0 /media/cdrom
mount: block device /dev/sr0 is write-protected, mounting read-only
[root@localhost ~]# yum -y install ftp
[root@localhost ~]# ftp 192.168.239.132
Connected to 192.168.239.132 (192.168.239.132).
220 (vsFTPd 2.2.2)
Name (192.168.239.132:root): ftp
331 Please specify the password.
Password: #密码为空
230 Login successful.
Remote system type is UNIX.
Using binary mode to transfer files.
ftp> ls
227 Entering Passive Mode (192,168,239,132,90,93).
150 Here comes the directory listing.
drwxr-xr-x 7 0 0 4096 Dec 02 15:32 centos6
drwxr-xr-x 2 0 0 4096 Mar 22 2017 pub
226 Directory send OK.
ftp> cd centos6
250 Directory successfully changed.
ftp> ls
227 Entering Passive Mode (192,168,239,132,90,223).
150 Here comes the directory listing.
-r--r--r-- 1 0 0 14 Nov 29 2013 CentOS_BuildTag
dr-xr-xr-x 3 0 0 4096 Nov 29 2013 EFI
-r--r--r-- 1 0 0 212 Nov 27 2013 EULA
-r--r--r-- 1 0 0 18009 Nov 27 2013 GPL
dr-xr-xr-x 2 0 0 282624 Nov 29 2013 Packages
-r--r--r-- 1 0 0 1354 Nov 27 2013 RELEASE-NOTES-en-US.html
-r--r--r-- 1 0 0 1706 Nov 27 2013 RPM-GPG-KEY-CentOS-6
-r--r--r-- 1 0 0 1730 Nov 27 2013 RPM-GPG-KEY-CentOS-Debug-6
-r--r--r-- 1 0 0 1730 Nov 27 2013 RPM-GPG-KEY-CentOS-Security-6
-r--r--r-- 1 0 0 1734 Nov 27 2013 RPM-GPG-KEY-CentOS-Testing-6
-r--r--r-- 1 0 0 3380 Nov 29 2013 TRANS.TBL
dr-xr-xr-x 3 0 0 4096 Nov 29 2013 images
dr-xr-xr-x 2 0 0 4096 Nov 29 2013 isolinux
dr-xr-xr-x 2 0 0 4096 Nov 29 2013 repodata
226 Directory send OK.
ftp> exit
221 Goodbye.
```
7. 新建虚拟机进行验证
(1)调整BIOS,一边从网络引导(不调整默认从网络引导)
在工具栏的【虚拟机】选项,选择【电源】,点击【打开电源时进入固件】进入BIOS界面,将network boot from Intel E1000调整到第一位

(2)自动获取IP地址,并指向centos安装源
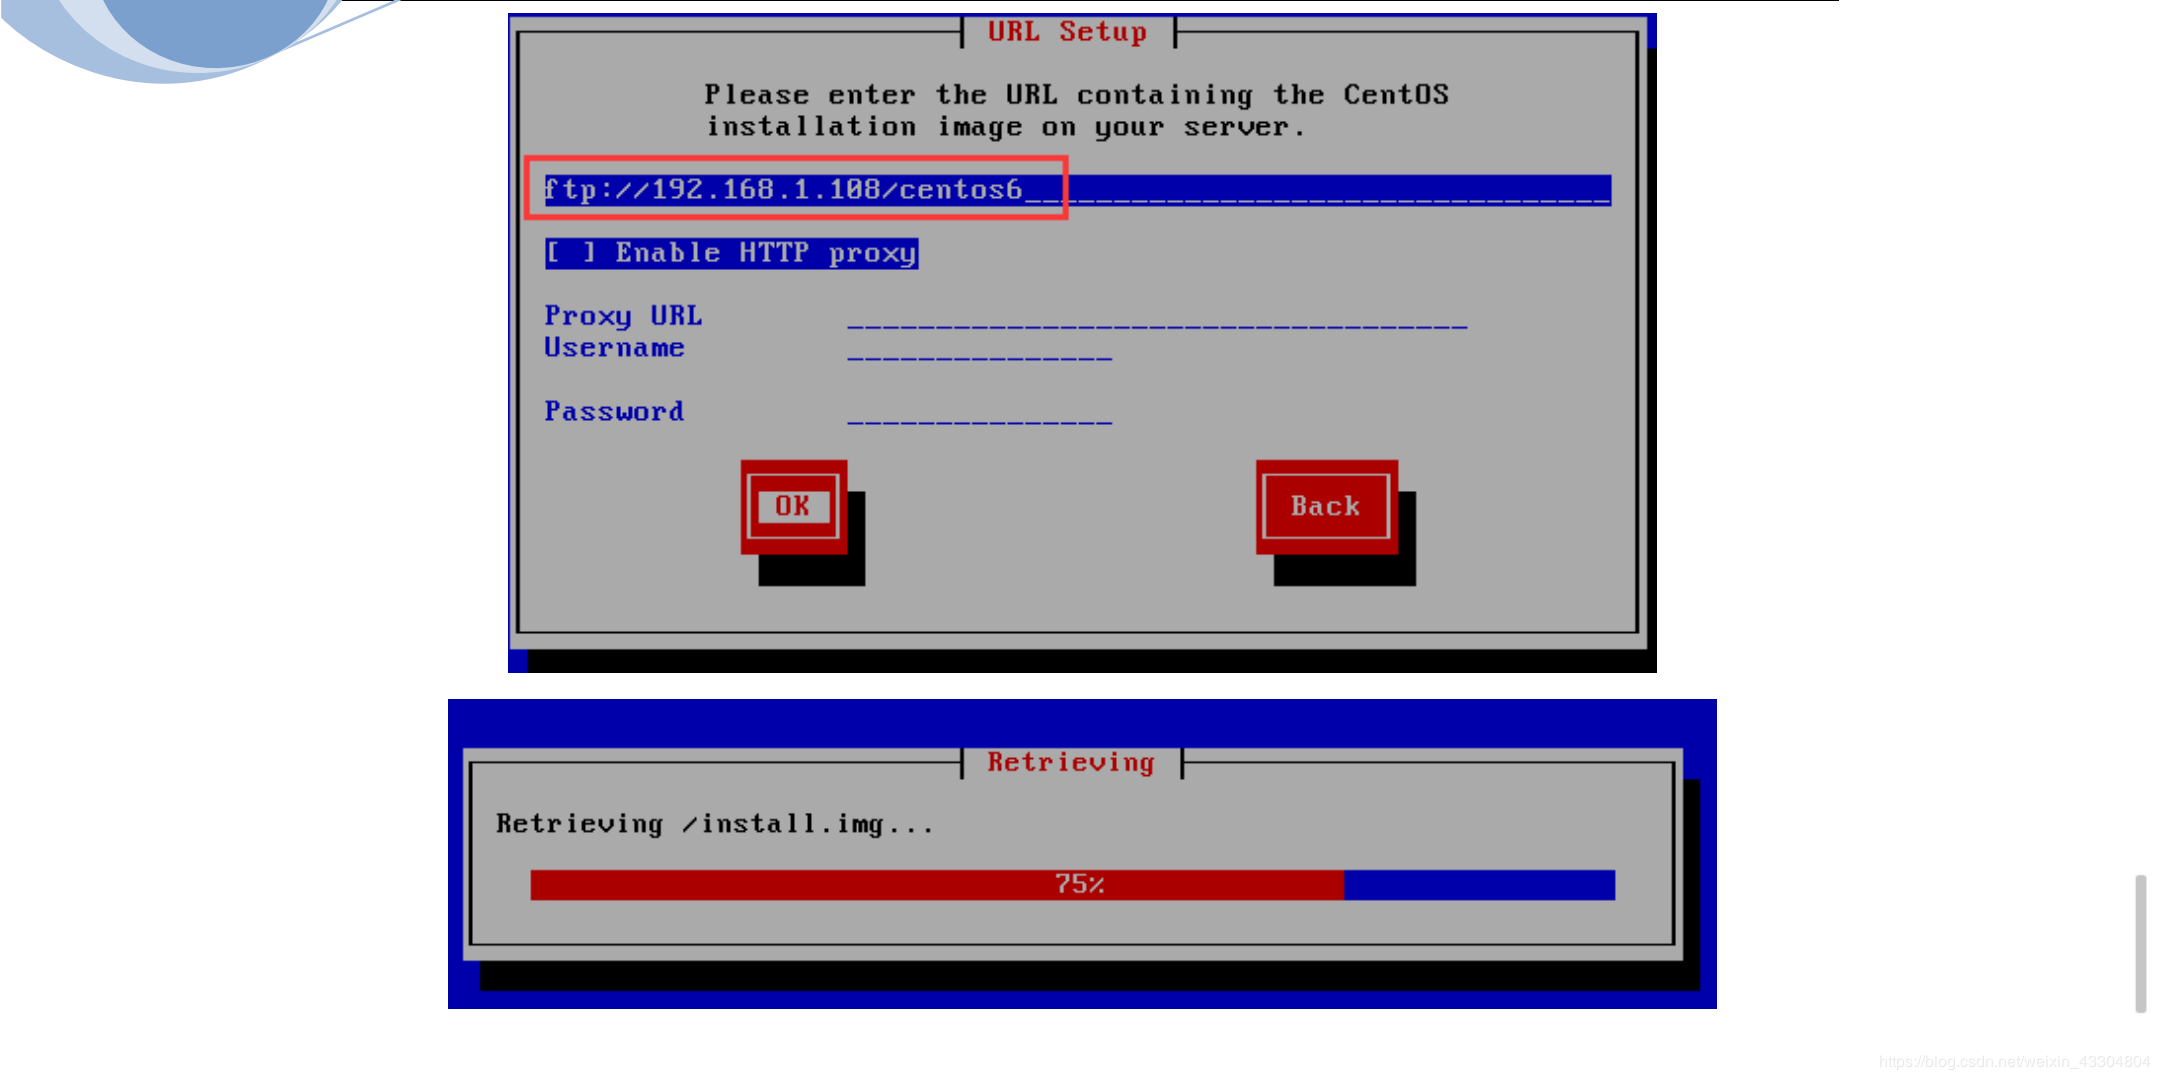
在URL setup输入ftp的URL(连接对方的IP地址),进行正常装机
#### 实现kickstart无人值守安装
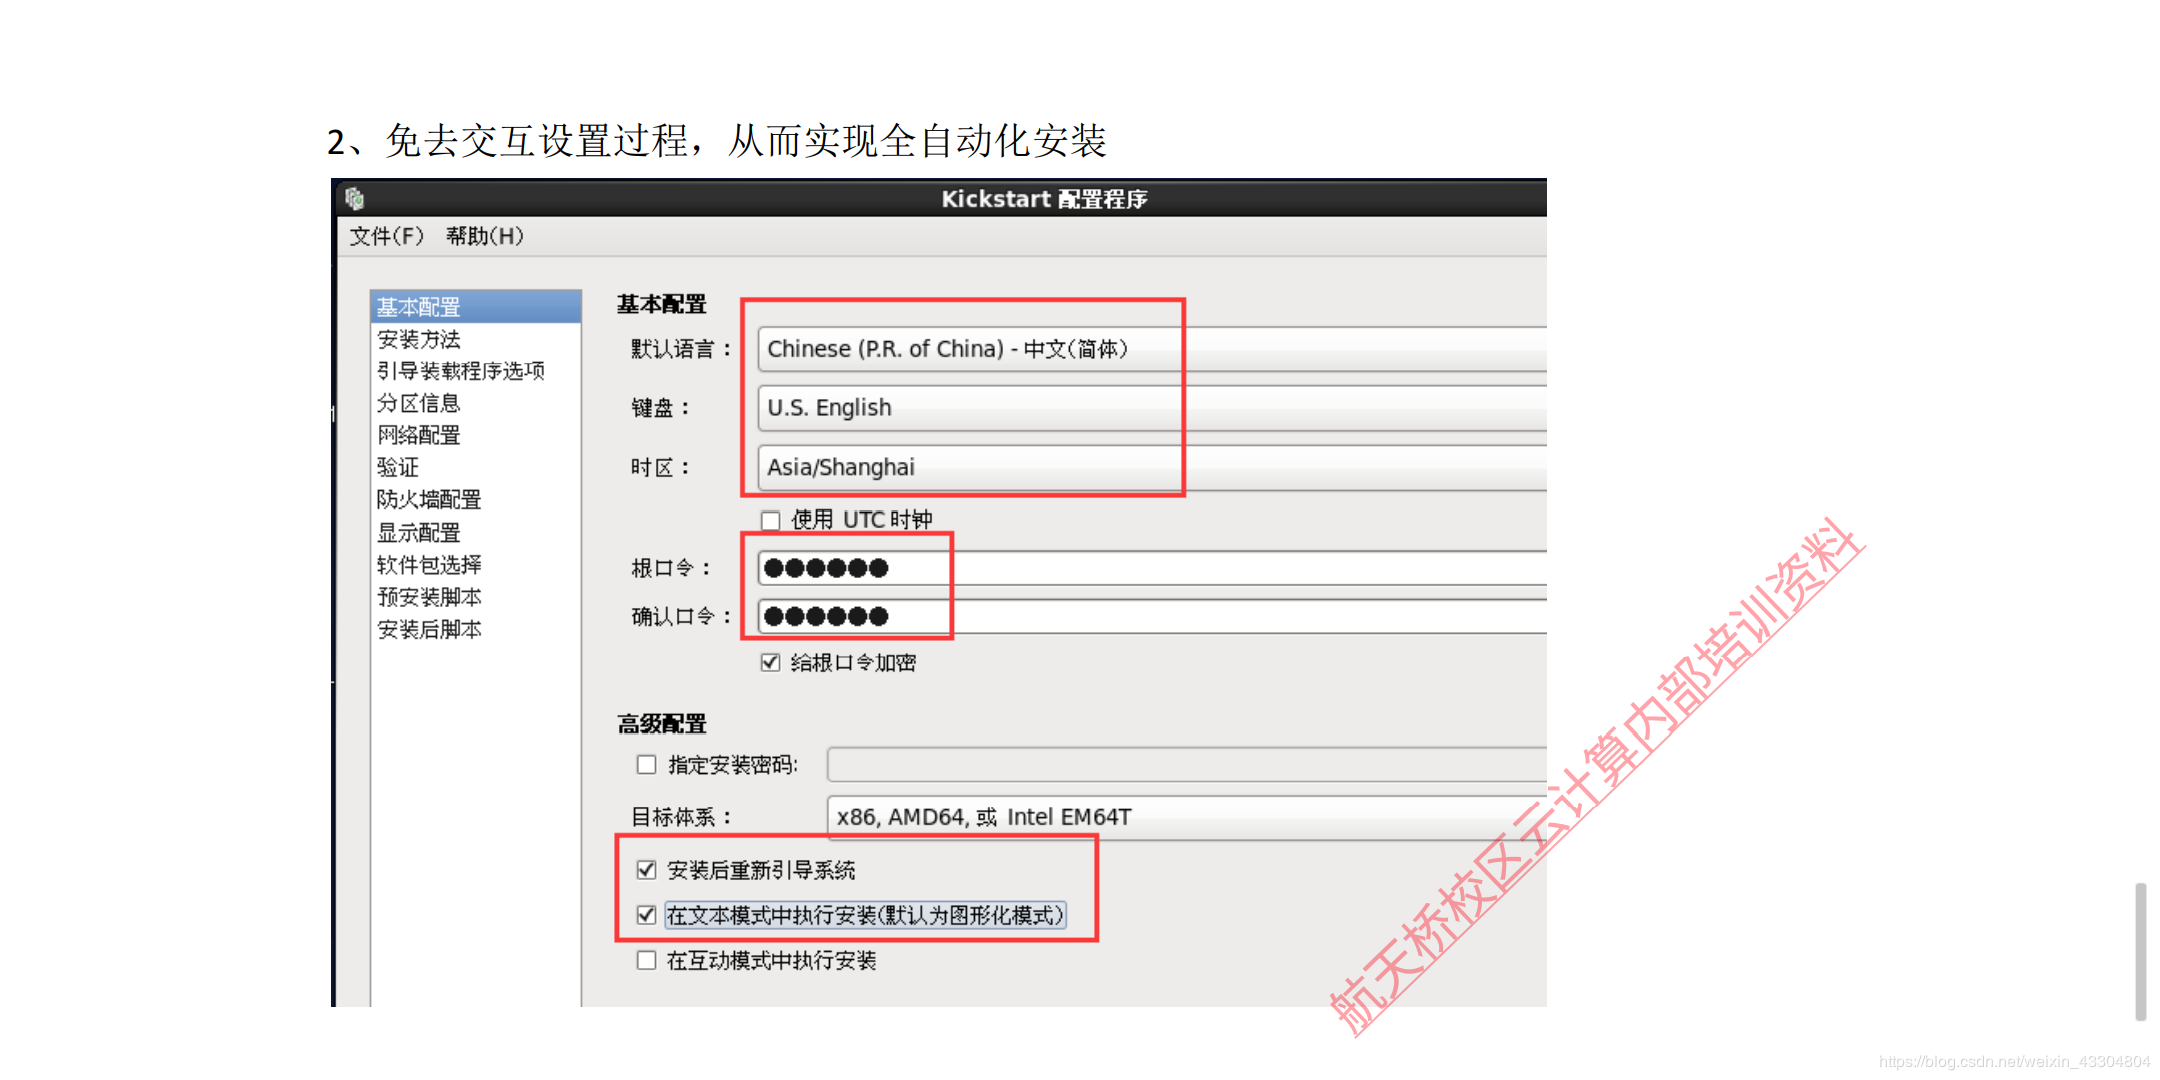
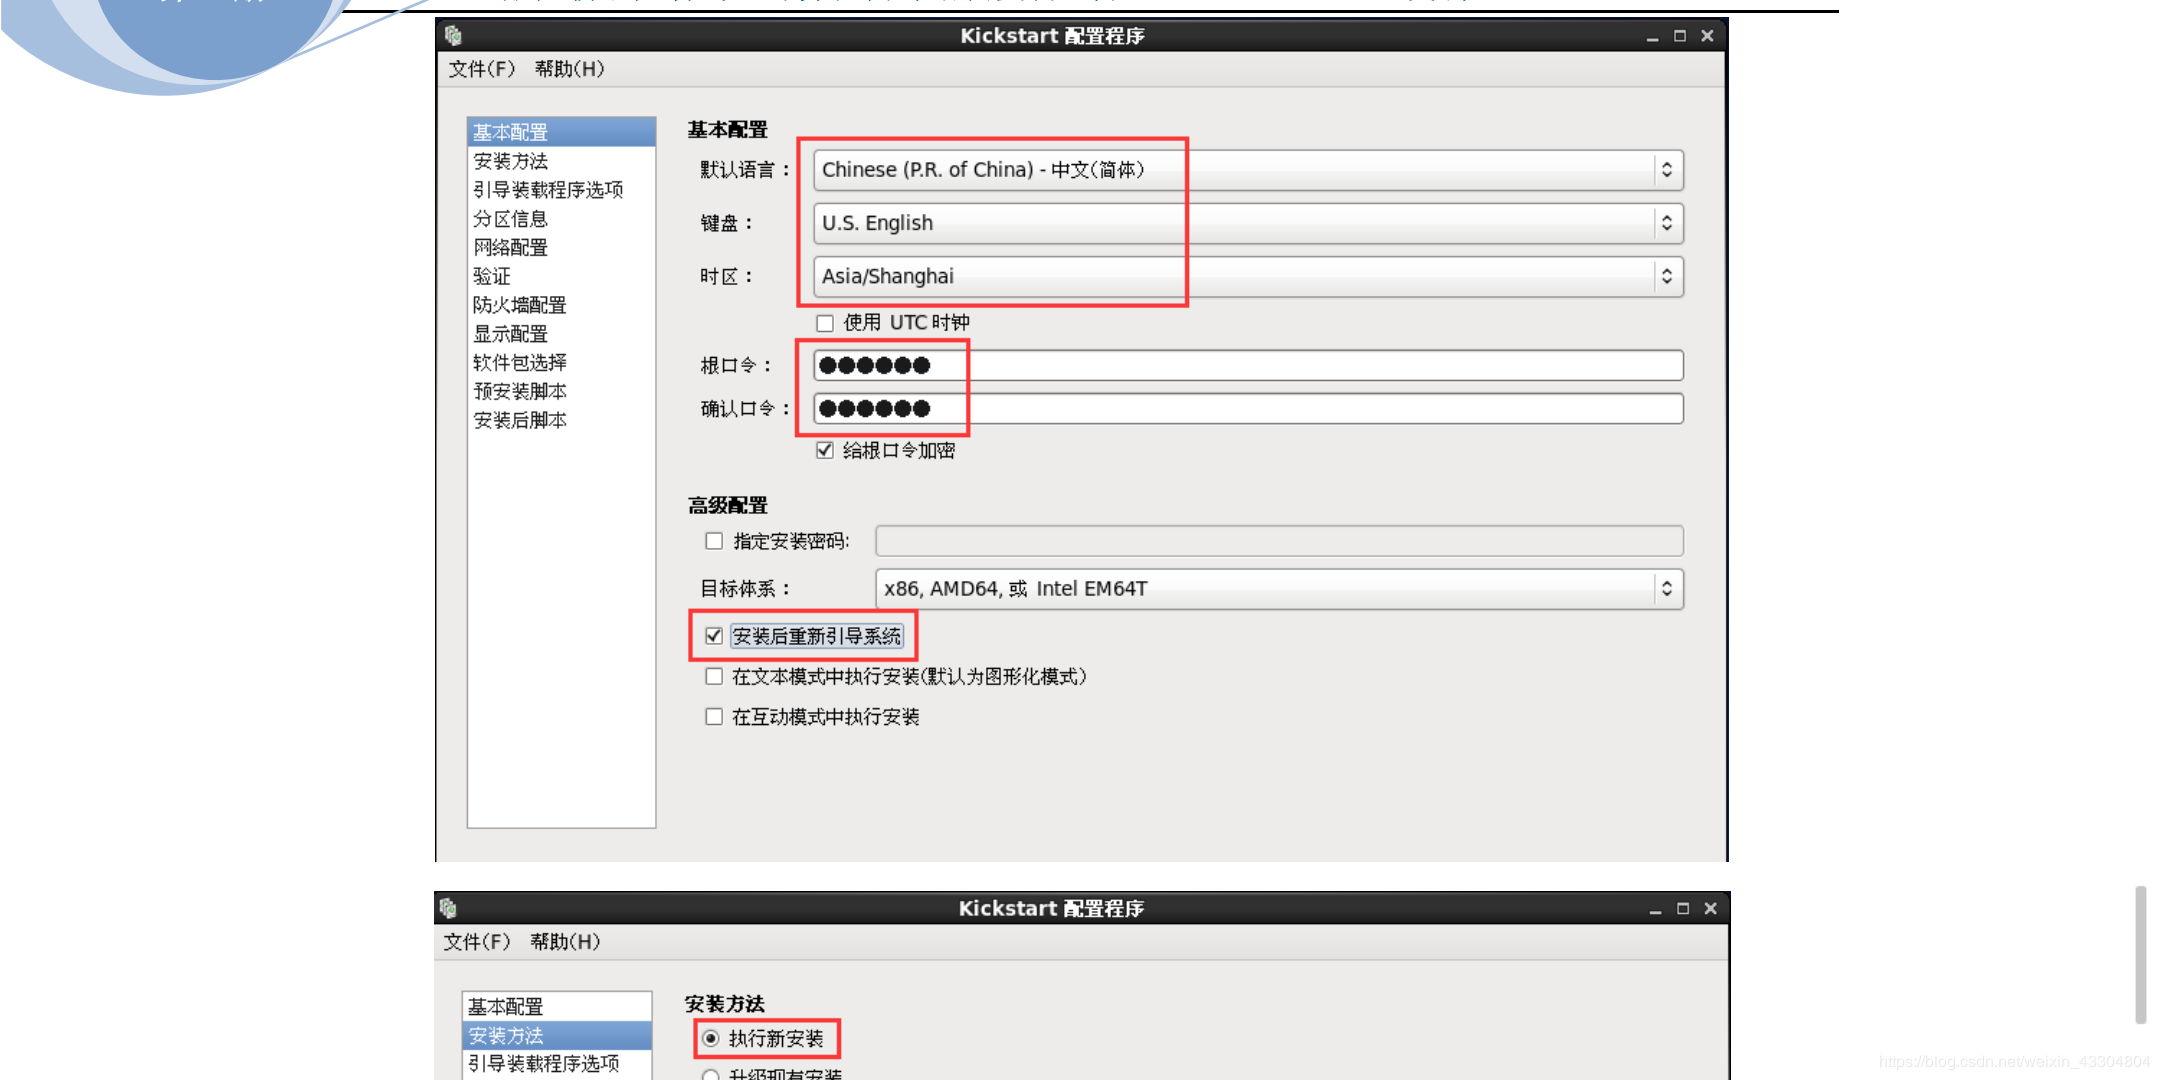
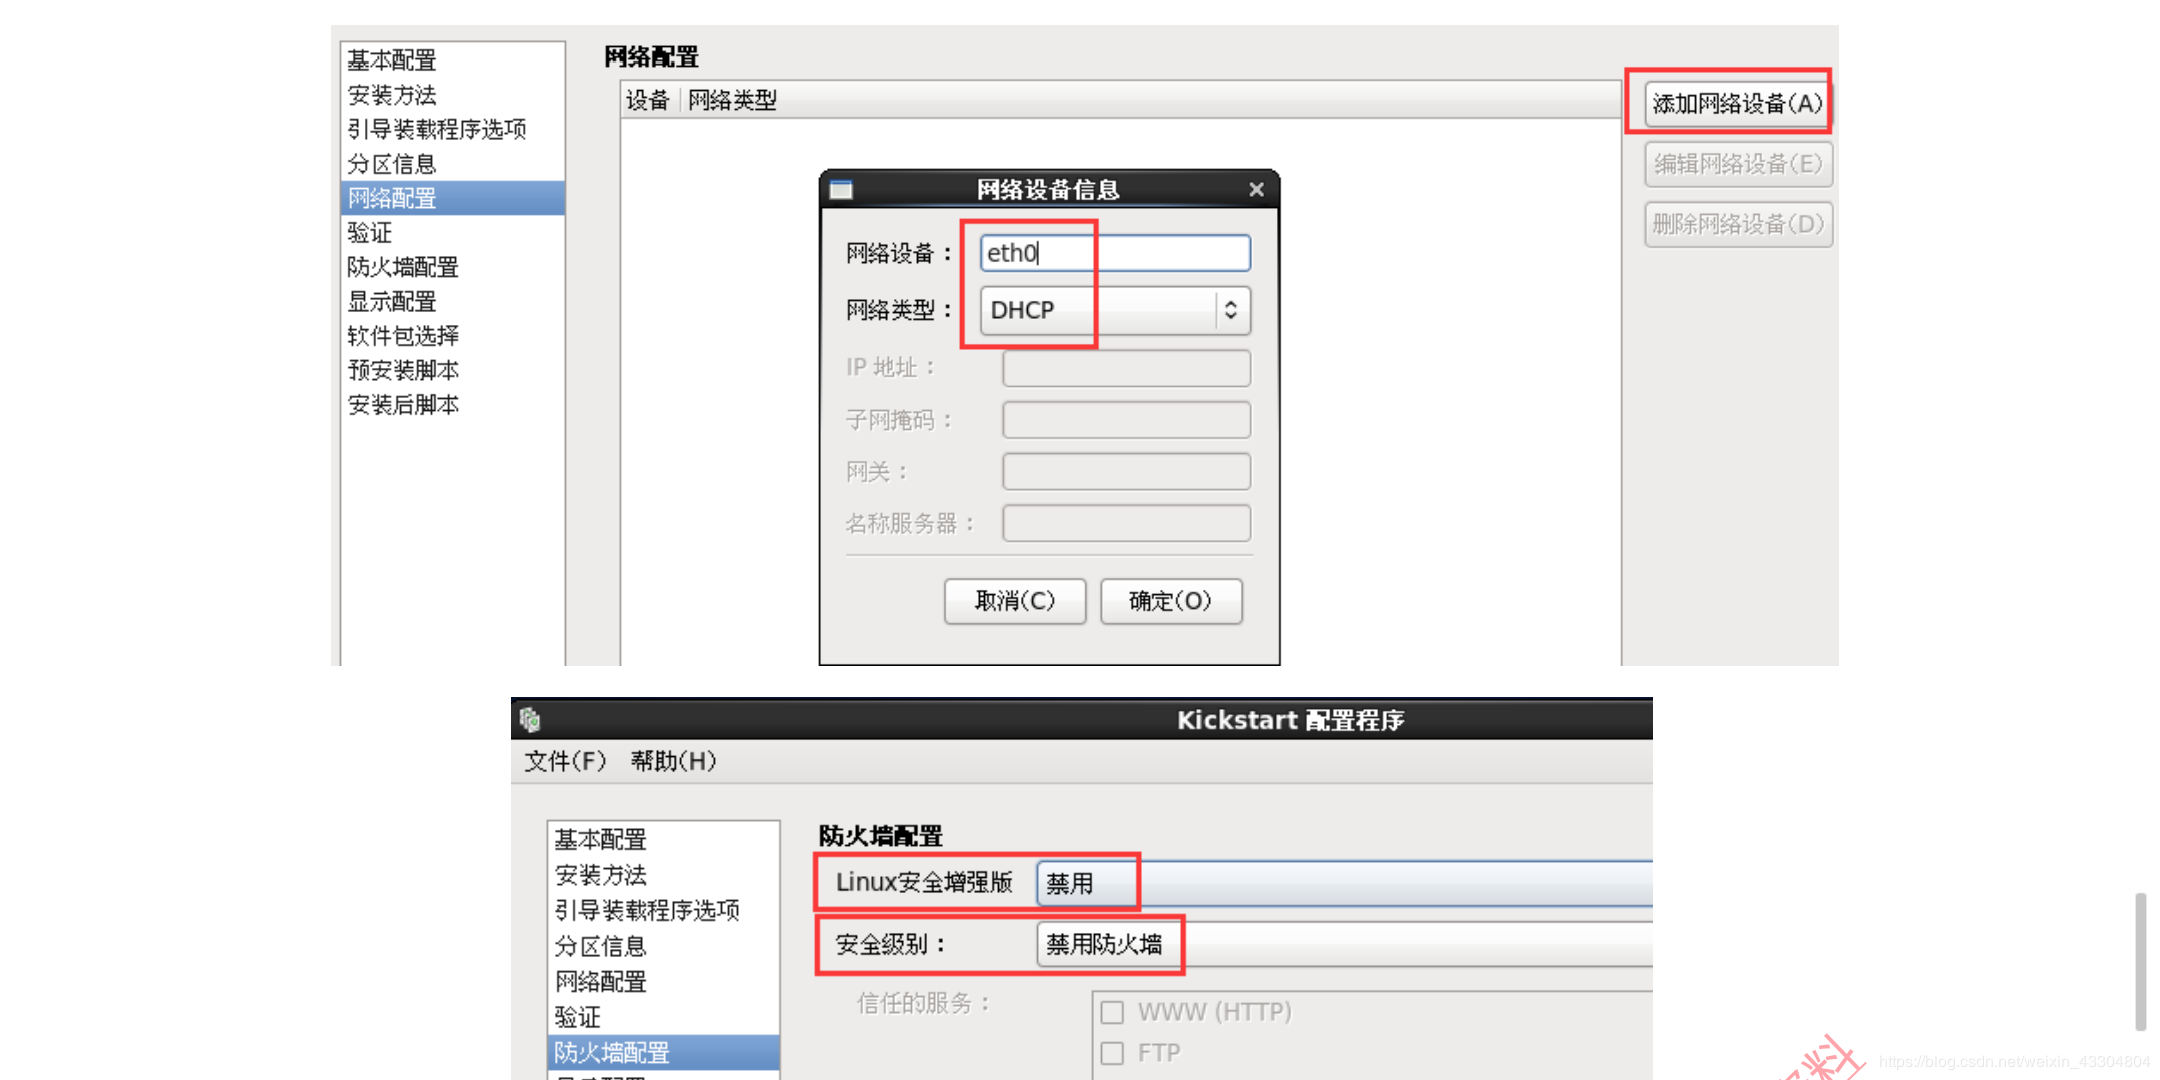
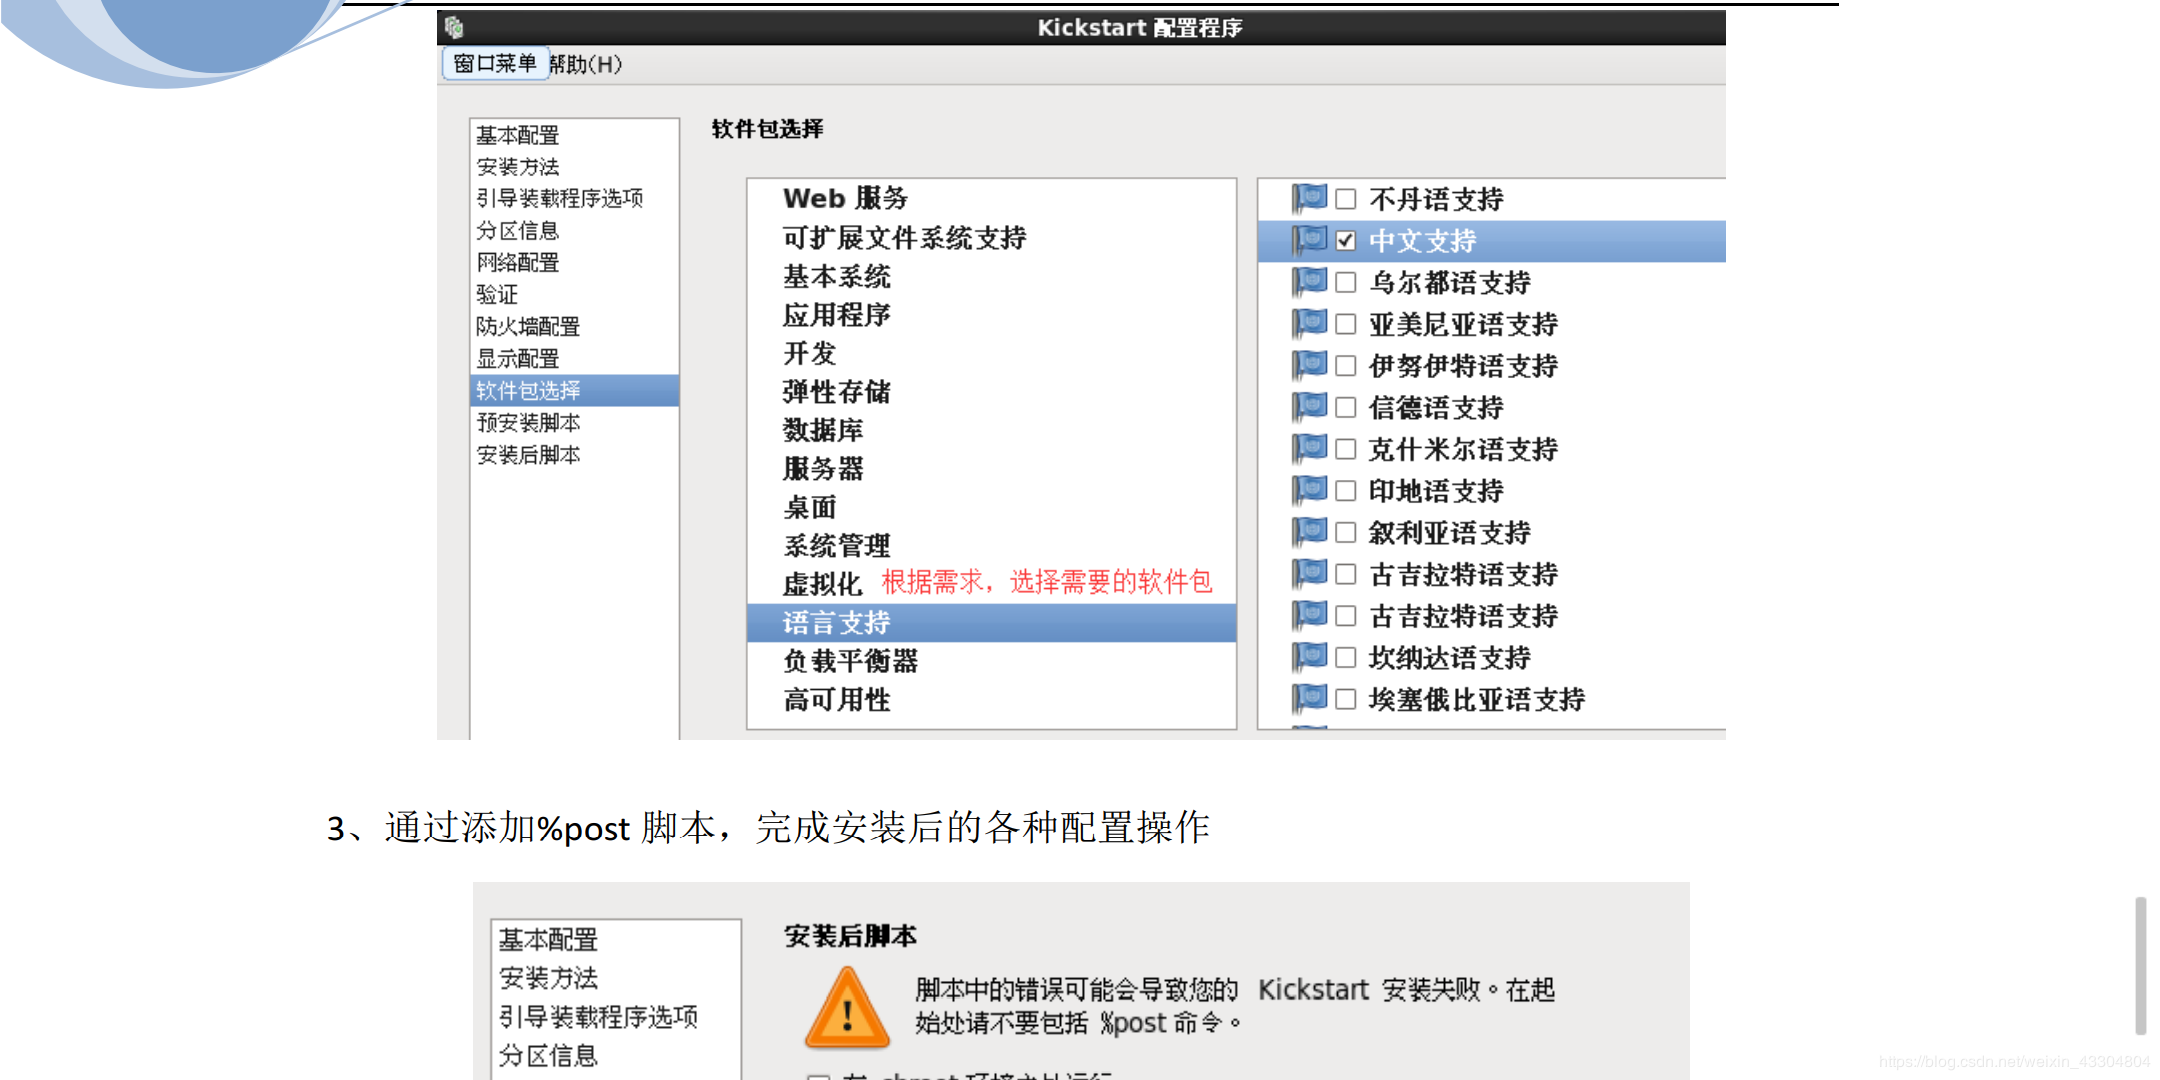
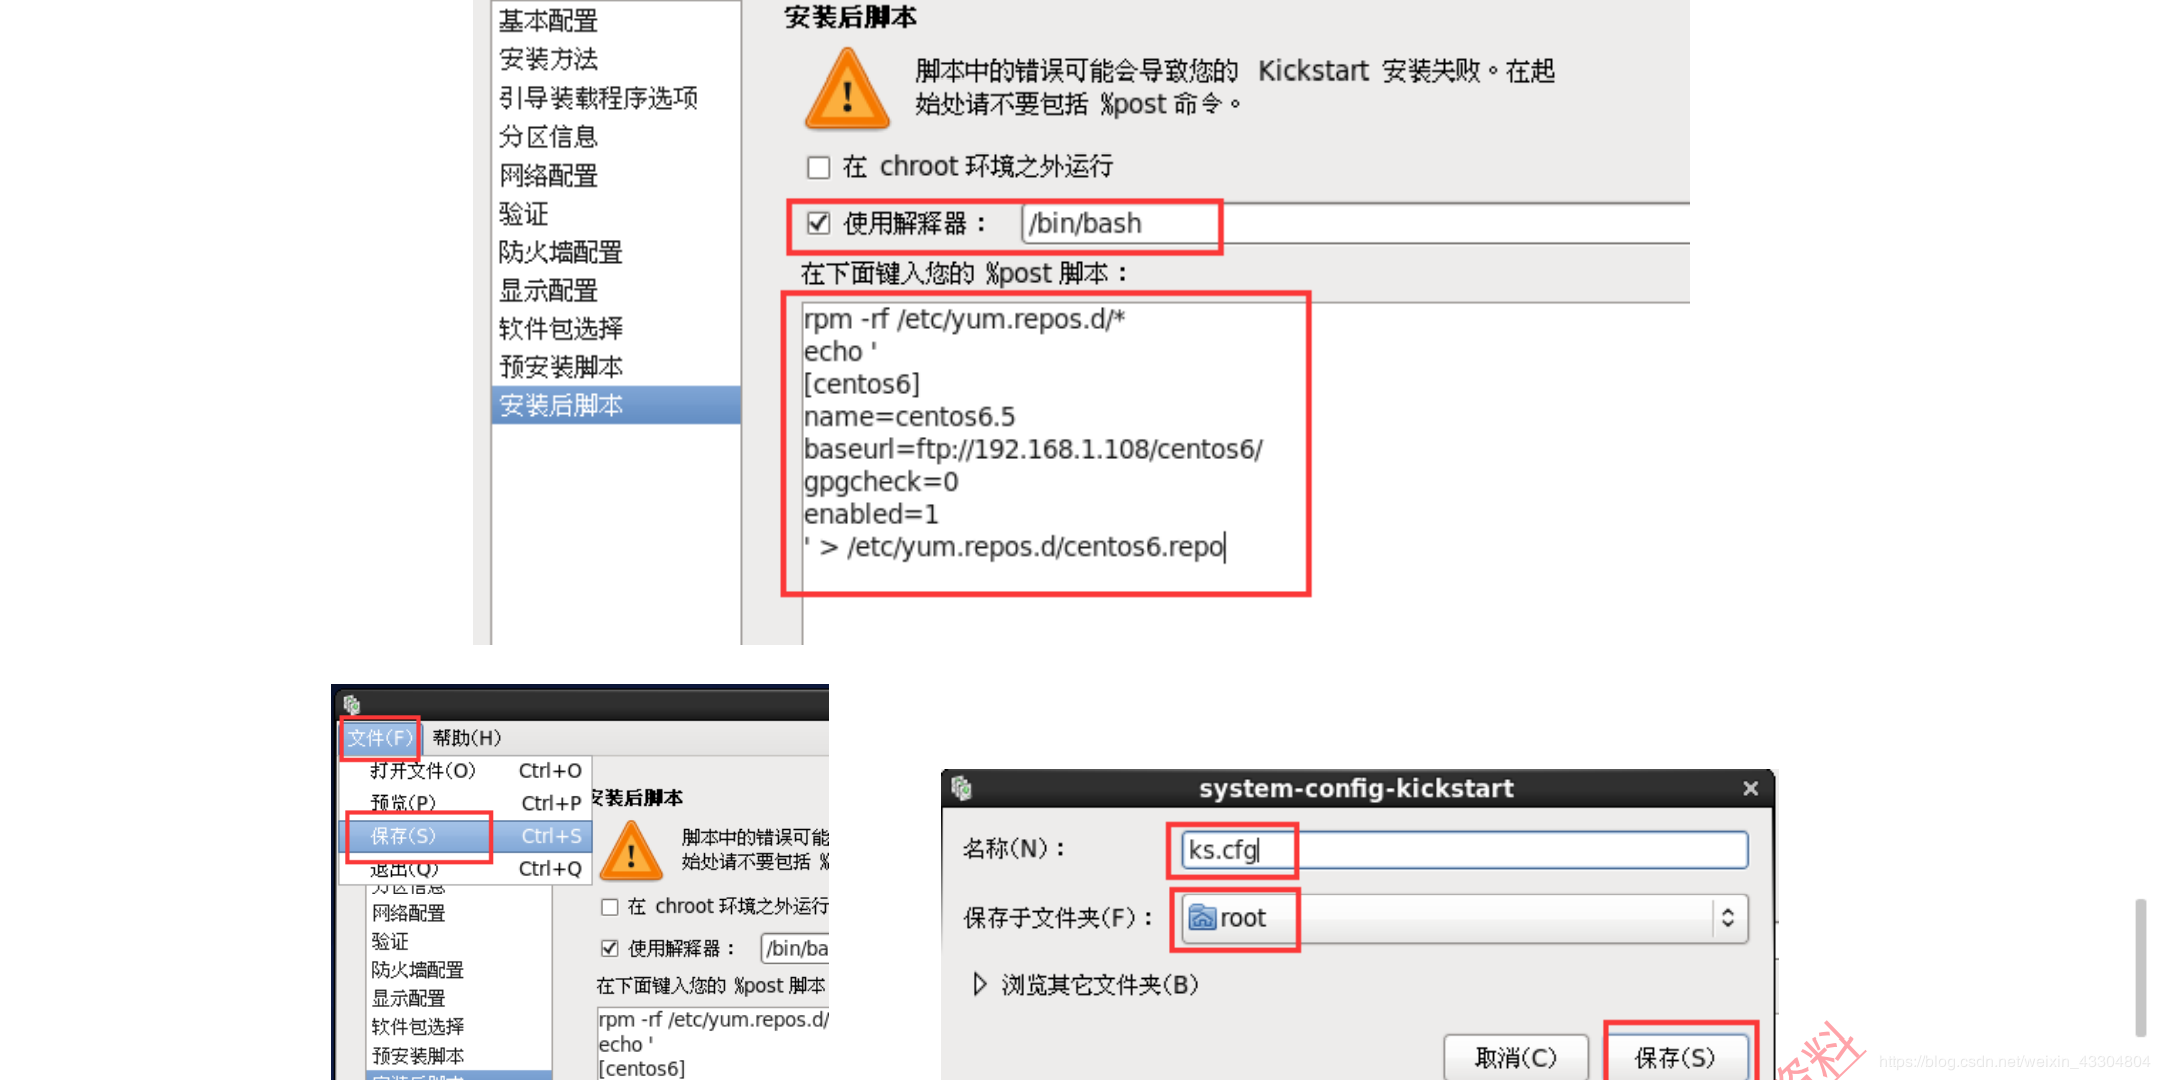
1. 创建应答文件
```
[root@localhost ~]# mount /dev/sr0 /media/cdrom
[root@localhost ~]# yum -y install system-config-kickstart
```


Linux系统——PXE高效能批量网络装机的更多相关文章
- Linux网络服务第六章PXE高效能批量网络装机
1.IP地址配置 2.关闭防火墙以及selinux状态如下 systemctl stop firewalld Iptables -F Setenforce 0 三.部署FTP服务 1.安装F ...
- PXE高效能批量网络装机
PXE简绍 PXE(preboot execute environment,预启动执行环境)是由Intel公司开发的最新技术,工作于Client/Server的网络模式,支持工作站通过网络从远端服务器 ...
- 项目(三)PXE高效能批量网络装机
PXE:预启动执行环境 PXE是由intel公司开发的网络引导技术,工作在Client/Server模式,允许客户机通过网络从远程服务器下载引导镜像,并加载安装文件或者整个操作系统. 若要搭建PXE网 ...
- 教你 PXE高效批量网络装机
PXE高效批量网络装机一.PXE概述① PXE (Preboot eXcution Environment)② PXE批量部署的优点③ 服务端④ 客户端二.部署PXE远程安装服务搭建PXE远程安装服务 ...
- PXE高效批量网络装机
PXE高效批量网络装机 一.PXE概述 1)PXE (Preboot eXcution Environment) ...
- Linux系统——MHA-Atlas-MySQL高可用集群
Linux系统——MHA-Atlas-MySQL高可用集群 MHA MHA介绍MHA(Master High Availability)目前在MySQL高可用方面是一个相对成熟的解决方案,是一套优秀的 ...
- linux 系统负载高 如何检查
1:load Average 1.1:什么是Load?什么是Load Average? Load 就是对计算机干活多少的度量(WikiPedia:the system Load is a mea ...
- linux系统PXE+Kickstart自动安装系统
一.PXEPXE(Pre-boot Execution Environment,预启动执行环境)是由Intel公司开发的最新技术,工作于Client/Server的网络模式,支持工作站通过网络从远端服 ...
- Linux 系统下10个查看网络与监听的命令
下面列出来的10个基础的每个linux用户都应该知道的网络和监控命令.网络和监控命令类似于这些: hostname, ping, ifconfig, iwconfig, netstat, nslook ...
随机推荐
- 异构GoldenGate 12c 双向复制配置
1.配置window,添加checkpoint表(本文windows和linux互为source和target) GGSCI (WIN-GM5PVS1CILH) 1> view param ./ ...
- vue2.0笔记《一》列表渲染
内容中包含 base64string 图片造成字符过多,拒绝显示
- 【黑金原创教程】【FPGA那些事儿-驱动篇I 】实验十:PS/2模块④ — 普通鼠标
实验十:PS/2模块④ - 普通鼠标 学习PS/2键盘以后,接下来就要学习 PS/2 鼠标.PS/2鼠标相较PS/2键盘,驱动难度稍微高了一点点,因为FPGA(从机)不仅仅是从PS/2鼠标哪里读取数据 ...
- TFS Build做Web应用持续集成发布的一个技巧
由于面向接口编程的关系,许多实现往往是动态注入运行,在一个项目中直接引用实现dll编译是不合理的.通常我们会在Post Build Event中添加一些xcopy命令将运行时才需要的dll复制到输出目 ...
- Sublime PlantUML环境配置
参考[http://www.jianshu.com/p/e92a52770832]在安装中遇到不少问题,总结一次成功的步骤如下 一.安装步骤: 1)准备java 环境 jdk1.7 2)安装Subl ...
- windows中安装pip,setuptools,django等
1,安装Python3.6 (下载exe文件,双击安装) 注意设置环境变量,让Python的在任意位置都可以执行 .Python 下载地址:https://www.python.org/do ...
- jQuery:find()方法与children()方法的区别
1:children及find方法都用是用来获得element的子elements的,两者都不会返回 text node,就像大多数的jQuery方法一样. 2:children方法获得的仅仅是元素一 ...
- 【CF913G】Power Substring 数论+原根
[CF913G]Power Substring 题意:T组询问,每次给定一个数a,让你求一个k,满足$2^k$的10进制的后$min(100,length(k))$位包含a作为它的子串.你只需要输出一 ...
- spark脚本日志输出级别设置
import org.apache.log4j.{ Level, Logger } Logger.getLogger("org").setLevel(Level.WARN) Log ...
- 9.11 Django关于母版语言的灵活用法
2018-9-11 12:45:38 还是这个连接 : http://www.cnblogs.com/liwenzhou/p/7931828.html 注意: 这节讲的是 母版语言的灵活用法! 可 ...