
个人笔记之json实现模糊查询
1:首先创建一个项目如:(说明:此项目是在eclipse创建的)

2.在创建相对应的包如:
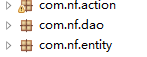
3.创建写好相对应的配置文件如:
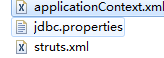
applicationContext.xml具体内容如下:
<?xml version="1.0" encoding="UTF-8"?>
<beans xmlns="http://www.springframework.org/schema/beans"
xmlns:context="http://www.springframework.org/schema/context"
xmlns:tx="http://www.springframework.org/schema/tx"
xmlns:xsi="http://www.w3.org/2001/XMLSchema-instance"
xsi:schemaLocation="
http://www.springframework.org/schema/beans
http://www.springframework.org/schema/beans/spring-beans.xsd
http://www.springframework.org/schema/context
http://www.springframework.org/schema/context/spring-context-4.0.xsd
http://www.springframework.org/schema/tx
http://www.springframework.org/schema/tx/spring-tx-4.0.xsd
">
<!--自动注入processor解释器(此行不写)-->
<context:annotation-config></context:annotation-config>
<!--自动扫描包-->
<context:component-scan base-package="com.nf"></context:component-scan>
<!--加载JDBC的配置文件-->
<context:property-placeholder location="classpath:jdbc.properties"></context:property-placeholder>
<bean id="myDataSource" class="com.mchange.v2.c3p0.ComboPooledDataSource">
<property name="driverClass" value="${driverClass}"></property>
<property name="jdbcUrl" value="${jdbcUrl}"></property>
<property name="user" value="${user}"></property>
<property name="password" value="${password}"></property>
<!--几个个性化的信息-->
<!--每300秒检查所有连接池中空闲的连接-->
<property name="idleConnectionTestPeriod" value="300"></property>
<!--最大的空闲时间-->
<property name="maxIdleTime" value="2000"></property>
<!--最大连接数-->
<property name="maxPoolSize" value="5"></property>
</bean>
<!--构造SessionFactory,需要3项内容:1.连接 2.配置 3.实体类映射关系-->
<bean id="sessionFactory" class="org.springframework.orm.hibernate5.LocalSessionFactoryBean">
<!--1.数据库连接池-->
<property name="dataSource" ref="myDataSource"></property>
<!--2.相关hibernate的配置信息-->
<property name="hibernateProperties">
<props>
<prop key="hibernate.dialect">org.hibernate.dialect.MySQL57InnoDBDialect</prop>
<prop key="hibernate.show_sql">true</prop>
<prop key="hibernate.format_sql">true</prop>
<prop key="hibernate.connection.autocommit">false</prop>
<prop key="hibernate.hbm2ddl.auto">update</prop>
</props>
</property>
<!--3.实体类映射关系-->
<property name="packagesToScan" value="com.nf"></property>
</bean>
<!--事务管理器配置,Hibernate单数据源事务-->
<bean id="defaultTransactionManager" class="org.springframework.orm.hibernate5.HibernateTransactionManager">
<property name="sessionFactory" ref="sessionFactory"></property>
</bean>
<!--使用注解annotation定义事务-->
<tx:annotation-driven transaction-manager="defaultTransactionManager" ></tx:annotation-driven>
</beans>
 具体内容如下:(这是与MySQL数据库连接的配置)
#database information
driverClass=com.mysql.cj.jdbc.Driver
jdbcUrl=jdbc:mysql://localhost:3306/lib?serverTimezone=UTC
user=root
password=
struts.xml配置文件如下:
<?xml version="1.0" encoding="UTF-8"?>
<!DOCTYPE struts PUBLIC
"-//Apache Software Foundation//DTD Struts Configuration 2.5//EN"
"http://struts.apache.org/dtds/struts-2.5.dtd">
<struts>
<constant name="struts.objectFactory" value="spring"></constant>
<package name="myPackage" extends="struts-default,json-default">
<action name="bookAction_*" class="bookAction" method="{1}">
<result type="json" name="jsonOK">
<param name="root">jsonMap</param>
</result>
<allowed-methods>getAllBook,getLikeBook</allowed-methods>
</action>
</package>
</struts>
配置web.xml过滤文件
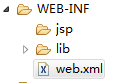
web.xml具体内容如下:
<?xml version="1.0" encoding="UTF-8"?>
<web-app xmlns:xsi="http://www.w3.org/2001/XMLSchema-instance"
xmlns="http://xmlns.jcp.org/xml/ns/javaee"
xsi:schemaLocation="http://xmlns.jcp.org/xml/ns/javaee http://xmlns.jcp.org/xml/ns/javaee/web-app_3_1.xsd"
id="WebApp_ID" version="3.1">
<display-name>Archetype Created Web Application</display-name>
<!--2个struts的过滤器-->
<filter>
<filter-name>struts-prepare</filter-name>
<filter-class>org.apache.struts2.dispatcher.filter.StrutsPrepareFilter</filter-class>
</filter>
<filter>
<filter-name>struts-execute</filter-name>
<filter-class>org.apache.struts2.dispatcher.filter.StrutsExecuteFilter</filter-class>
</filter>
<filter-mapping>
<filter-name>struts-prepare</filter-name>
<url-pattern>/*</url-pattern>
</filter-mapping>
<filter-mapping>
<filter-name>struts-execute</filter-name>
<url-pattern>/*</url-pattern>
</filter-mapping>
<!--1个spring的监听器-->
<context-param>
<param-name>contextConfigLocation</param-name>
<param-value>classpath:applicationContext.xml</param-value>
</context-param>
<listener>
<listener-class>org.springframework.web.context.ContextLoaderListener</listener-class>
</listener>
</web-app>
4.在web目录下创建个js文件夹来存放这俩个js文件(注:这俩个文件是第三方的js文件):
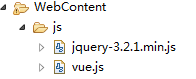

在webContext目录下建个jsp文件,如:test.jsp
(具体内容如下:)
<%@ page language="java" contentType="text/html; charset=UTF-8"
pageEncoding="UTF-8"%>
<!DOCTYPE html PUBLIC "-//W3C//DTD HTML 4.01 Transitional//EN" "http://www.w3.org/TR/html4/loose.dtd">
<html>
<head>
<meta http-equiv="Content-Type" content="text/html; charset=UTF-8">
<title>Insert title here</title>
</head>
<body>
<table border="1px" id="myView">
<tr>
<td colspan="3">
<span>请输入书名:</span>
<input name="bookName" id="bookName"/>
<img src="img/se.png" v-on:click="queryBook">
</td>
</tr>
<tr>
<th>ID</th>
<th>书名</th>
<th>价格</th>
</tr>
<tr v-for="book in bookList">
<td>{{book.id}}</td>
<td>{{book.name}}</td>
<td>{{book.price}}</td>
</tr>
</table>
</body>
<script src="${pageContext.request.contextPath}/js/vue.js"></script>
<script src="${pageContext.request.contextPath}/js/jquery-3.2.1.min.js"></script>
<script type="text/javascript">
//bookList不能为空,否则会跟view绑定失败
var clientInput = {bookName:''};//此JSON目的用于提交给服务器查询用的
var myModel = {bookList:[]};
var myViewModel = new Vue({
el:"#myView" ,
data:myModel,
methods{
queryBook : function(){
clientInput.bookName = $("#bookName").val() ;
$.ajax({
url:bookAction_getListBook,//url路径
type:"GET",//传送方式
data:clientInput,//传送给后台的数据
dataType:json,
timeout:2000,//响应时间,这里是2秒
success:funtion(result){//成功会执行,并把结果响应给后台
myModel.bookList = result.bookList ;
},
error: funtion(){
alert("服务器忙,请稍后再试") ;
}
});
}
}
}) ;
/*
var myViewModel = new Vue({
el:'#myView',
data:myModel
});
*/
//写成函数的目的,为了【复用】
function getData(){
$.ajax({
url:"bookAction_getAllBook", //后端的API地址
type:'GET', //http:POST/GET
//data:postData, //指客户端提交给后台的参数
dataType:'json', //服务端返回类型text,json
timeout:3000,
success:function(result){
//alert(result);
//$.extend(true, result, myModel);
//失败
//myViewModel.data = result;
//失败
//myModel = result;
myModel.bookList = result.bookList ;
},
error:function(){
alert('服务器忙,请不要说脏话,理论上大家都是文明人');
}
});
}
getData();
</script>
</html>
6.开始在src目录下写后台代码了
先从 开始:
开始:
创建Book.java文件
具体内容如下:
package com.nf.entity;
import javax.persistence.*;
@Entity
@Table(name = "book")
public class Book {
private Integer id;
private String name;
private Integer price;
@Id
@GeneratedValue(strategy= GenerationType.IDENTITY)
@Column(name="id")
public Integer getId() {
return id;
}
public void setId(Integer id) {
this.id = id;
}
@Column(name = "name",length = 50,nullable = false)
public String getName() {
return name;
}
public void setName(String name) {
this.name = name;
}
@Column(name = "price",nullable = false)
public Integer getPrice() {
return price;
}
public void setPrice(Integer price) {
this.price = price;
}
}
然后在创建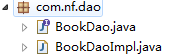 dao模层,
先创建个BookDao接口,具体内容如下:
package com.nf.dao;
import com.nf.entity.Book;
import java.util.List;
public interface BookDao {
public List<Book> getAllBook();//查询全部数据
pulblic List<Book> getLikeBook(String bookName) ;
}
在创建个BookDaoImpl类并实现BookDao接口,内容如下:
package com.nf.dao;
import com.nf.entity.Book;
import org.hibernate.Session;
import org.hibernate.SessionFactory;
import org.hibernate.query.Query;
import org.springframework.beans.factory.annotation.Autowired;
import org.springframework.context.annotation.Scope;
import org.springframework.stereotype.Repository;
import java.util.List;
@Repository
@Scope("prototype")
public class BookDaoImpl implements BookDao {
@Autowired
private SessionFactory sessionFactory;
public List<Book> getAllBook() {
Session session = sessionFactory.getCurrentSession();
Query<Book> query = session.createQuery("from Book", Book.class);
List<Book> bookList = query.getResultList();
return bookList;
}
public List<Book> getLikeBook(String bookName){
Session session = sessionFactory.getCurrentSession() ;
Query<Book> q = session.createQuery("from Book where name like : name",Book.class) ;
q.setParameter("name","%"+bookName+"%") ;
List<Book> bookList = q.getResultList() ;
return bookList ;
}
}
最后写 模块
模块
(具体内容如下:)
package com.nf.action;
import com.nf.entity.Book;
import com.nf.service.BookService;
import com.opensymphony.xwork2.ActionContext;
import com.opensymphony.xwork2.ActionSupport;
import org.springframework.beans.factory.annotation.Autowired;
import org.springframework.context.annotation.Scope;
import org.springframework.stereotype.Controller;
import java.util.HashMap;
import java.util.List;
import java.util.Map;
@Controller
@Scope("prototype")
public class BookAction extends ActionSupport {
private String bookName = null ;
public String getBookName() {
return bookName;
}
public void setBookName(String bookName) {
this.bookName = bookName;
}
private Map<String,Object> jsonMap = new HashMap();
public Map<String, Object> getJsonMap() {
return jsonMap;
}
public void setJsonMap(Map<String, Object> jsonMap) {
this.jsonMap = jsonMap;
}
@Autowired
private BookService bookService;
public String getAllBook(){
List<Book> bookList = bookService.getAllBook();
jsonMap.put("bookList", bookList);
return "jsonOK";
}
public String getListBook(){
List<Book> bookList = bookService.getListBook(bookName) ;
jsonMap.put("bookList",bookList) ;
return "jsonOk" ;
}
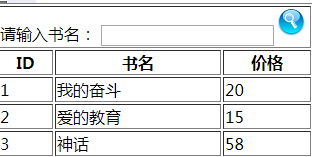
当查询全部是效果图:
(当根据模糊查询来查的)也就是输入书名来查找效果图:
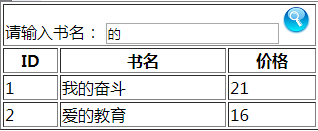
//根据书名的来查询(如:输入‘’的‘’字,就会根据的字来查询到有‘’的‘’的书名的书)
//坚持比努力可拍,一天一天的坚持,会迎来结果的那一天!
//个人的理解笔记,请勿喷!
}
个人笔记之json实现模糊查询的更多相关文章
- Bootstrap-table学习笔记(二)——前后端分页模糊查询
在使用过程中,一边看文档一边做,遇到了一些困难的地方,在此记录一下,顺便做个总结: 1,前端分页 2,后端分页 3,模糊查询 前端分页相当简单,在我添加了2w条测试数据的时候打开的很流畅,没有卡顿. ...
- [原创]java WEB学习笔记23:MVC案例完整实践(part 4)---模糊查询的设计与实现
本博客为原创:综合 尚硅谷(http://www.atguigu.com)的系统教程(深表感谢)和 网络上的现有资源(博客,文档,图书等),资源的出处我会标明 本博客的目的:①总结自己的学习过程,相当 ...
- JavaScript根据Json数据来做的模糊查询功能
类似于百度搜索框的模糊查找功能 需要有有已知数据,实现搜索框输入字符,然后Js进行匹配,然后可以通过鼠标点击显示的内容,把内容显示在搜索框中 当然了,正则只是很简单的字符匹配,不具备多么复杂的判断 & ...
- 可以执行全文搜索的原因 Elasticsearch full-text search Kibana RESTful API with JSON over HTTP elasticsearch_action es 模糊查询
https://www.elastic.co/guide/en/elasticsearch/guide/current/getting-started.html Elasticsearch is a ...
- 模糊查询基于select遍历json文件自动填充的实现
HTML页面 <tr> <td align="left"><span>案由</span> <input type=" ...
- Mysql里查询字段为Json格式的数据模糊查询以及分页方法
public void datagrid(CustomFormEntity customForm,HttpServletRequest request, HttpServletResponse res ...
- Oracle学习笔记_07_模糊查询
附录:参考资料 1.Oracle sql语言模糊查询--like后面的通配符 2.oracle sql语言模糊查询--通配符like的使用教程
- 3、jeecg 笔记之 模糊查询
1.前言 jeecg 考虑到默认模糊查询的话,会增加系统压力,导致查询慢,本来系统就挺那啥的... 2.方式一之实体赋值 实体重新赋值查询,用 * %% * 实现,我们知道 sql 中通常使用 % 去 ...
- Mybatis 模糊查询 like【笔记】Could not set parameters for mapping
当使用mybatis 做模糊查询时如果这样写 会报 Could not set parameters for mapping: ParameterMapping{property='keywords' ...
随机推荐
- Android基础知识04—Activity活动之间传递数据
------活动之间传递数据------ 向下一个活动传递数据: Intent中提供了一系列的putExtra()方法,可以把数据暂存到Intent中,启动另一个活动的时候就可以取出来. 代码: (存 ...
- keepalived实现nginx高可用
keepalived是什么 keepalived直译就是保持存活,在网络里面就是保持在线了,也就是所谓的高可用或热备,用来防止单点故障(单点故障是指一旦某一点出现故障就会导致整个系统架构的不可用)的发 ...
- Django数据库操作性能相关
Django数据库操作性能相关 案例: 现在我们的数据库中有两张表如下: 1.职员表: class UserInfo(models.Model): name = models.CharField(ma ...
- python 基础一
Python安装 Python --:安装时可以勾选 PATH环境变量,安装后无需再设置环境变量; Python 交互下 exit().quit()----可以退出交互环境; Pyhton 安装库与卸 ...
- sublime中安装package control总是失败
今天下载了个sublime编辑器,要运行vue文件,想让vue也能高亮显示,在网上搜了一下如何安装.但总是提示控制器没有安装Package Control:There are no packages ...
- How the Intelligent Digital Mesh Will Transform Every Business Layer
The "intelligent digital mesh" is the definitive package for tomorrow's titans of business ...
- java对象类型转换和多态性
html { font-family: sans-serif } body { margin: 0 } article,aside,details,figcaption,figure,footer,h ...
- Eddy's picture(最小生成树)
Eddy's picture Time Limit: 2000/1000 MS (Java/Others) Memory Limit: 65536/32768 K (Java/Others) Tota ...
- sersync实现数据实时同步
1.1 第一个里程碑:安装sersync软件 1.1.1 将软件上传到服务器当中并解压 1.上传软件到服务器上 rz -E 为了便于管理上传位置统一设置为 /server/tools 中 2.解压软件 ...
- JavaScript 语言精粹读书笔记
最近在看 赵泽欣 / 鄢学鹍 翻译的 蝴蝶书, 把一些读后感言记录在这里. 主要是把作者的建议跟 ES5/ES5.1/ES6 新添加的功能进行了对比 涉及到的一些定义 IIFE: Immediatel ...