day4 RHCE
12、实现一个web服务器
[root@server0 ~]# yum install httpd -y

[root@server0 ~]# rpm -ql httpd      查看httpd产生的配置文件

/usr/share/doc/httpd-2.4.6/httpd-manual.conf

/usr/share/doc/httpd-2.4.6/httpd-vhosts.conf

[root@server0 ~]# vim /etc/httpd/conf.d/vhost-server0.conf

<Directory "/var/www/html">               网页文件存放的目录

        <RequireAll>                      控制特定主机(HOSTNAME)访问

                Require all granted                    允许所有主机访问

                Require not host .my133t.com           允许所有主机访问

        </RequireAll>

</Directory>

<VirtualHost *:80>               虚拟主机,基于域名的,监听80端口

        DocumentRoot "/var/www/html"

        ServerName server0.example.com

</VirtualHost>

[root@server0 ~]# wget -O /var/www/html/index.html http://classroom.example.com/materials/station.html

[root@server0 ~]# systemctl restart httpd

[root@server0 ~]# systemctl enable httpd

[root@server0 conf.d]# firewall-cmd --permanent --add-service=http

[root@server0 conf.d]# firewall-cmd --permanent --add-rich-rule='rule family=ipv4 source address=172.25.0.0/24 service name=http accept'

[root@server0 conf.d]# firewall-cmd --permanent --add-rich-rule='rule family=ipv4 source address=172.17.10.0/24 service name=http reject'

[root@server0 conf.d]# firewall-cmd --reload
测试,浏览器访问server0.example.com

[root@server0 ~]# lab examrhce grade

[root@server0 ~]# firefox server0.example.com
13、配置安全web服务 (https协议,mod_ssl服务)
[root@server0 ~]# yum install mod_ssl -y

[root@server0 ~]# rpm -ql mod_ssl           查看mod_ssl生成的文件

/etc/httpd/conf.d/ssl.conf

[root@server0 ~]# cd /etc/httpd/conf.d/

[root@server0 conf.d]# cp ssl.conf ssl.conf.bak   备份配置文件

[root@server0 conf.d]# vim ssl.conf

<Directory "/var/www/html">

	<RequireAll>

		Require all granted

		Require not host .my133t.com

	</RequireAll>

</Directory>

107 SSLCertificateFile /etc/pki/tls/certs/server0.crt

115 SSLCertificateKeyFile /etc/pki/tls/private/server0.key

129 SSLCACertificateFile /etc/pki/tls/certs/example-ca.crt

查看密钥证书的保存路径后,再到目录下载文件

[root@server0 ~]# cd /etc/pki/tls/

[root@server0 tls]# ll

[root@server0 tls]# cd certs/

[root@server0 certs]# wget http://classroom.example.com/pub/tls/certs/server0.crt

[root@server0 certs]# wget http://classroom.example.com/pub/example-ca.crt

[root@server0 certs]# cd ..

[root@server0 tls]# cd private/

[root@server0 private]# wget http://classroom.example.com/pub/tls/private/server0.key

[root@server0 ~]# wget -O /etc/pki/tls/certs/server0.crt http://classroom.example.com/pub/tls/certs/server0.crt

[root@server0 ~]# wget -O /etc/pki/tls/private/server0.key http://classroom.example.com/pub/tls/private/server0.key

[root@server0 ~]# wget -O /etc/pki/tls/certs/example-ca.crt http://classroom.example.com/pub/example-ca.crt

[root@server0 conf.d]# systemctl restart httpd.service

[root@server0 conf.d]# systemctl enable httpd.service

[root@server0 ~]# firewall-cmd --permanent --add-service=https    https协议安全

[root@server0 ~]# firewall-cmd --reload
小技巧:

如果配置文件没有备份,配置文件不能还原,写的乱七八糟

删除配置文件,remove服务httpd ,重新安装,

就会生成新的配置文件
14、配置虚拟主机
[root@server0 ~]# mkdir /var/www/virtual

[root@server0 ~]# cd /var/www/virtual

[root@server0 virtual]# wget http://classroom.example.com/materials/www.html

[root@server0 virtual]# mv www.html index.html

[root@server0 ~]# id floyd

[root@server0 ~]# useradd floyd

[root@server0 ~]# setfacl -m u:floyd:rwx /var/www/virtual/

[root@server0 ~]# getfacl /var/www/virtual/

[root@server0 conf.d]# cp vhost-server0.conf vhost-www0.conf

[root@server0 ~]# vim /etc/httpd/conf.d/vhost-www0.conf

<Directory "/var/www/virtual">          注意virtual

        <RequireAll>

                Require all granted

                Require not host .my133t.com

        </RequireAll>

</Directory>

<VirtualHost *:80>

        DocumentRoot "/var/www/virtual"   注意virtual

        ServerName www0.example.com       注意www0.example

</VirtualHost>

[root@server0 ~]# systemctl restart httpd

[root@server0 ~]# firefox www0.example.com
15、配置web内容的访问
[root@server0 ~]# mkdir -pv /var/www/virtual/private

[root@server0 ~]# cd /var/www/virtual/private

[root@server0 private]# wget http://classroom.example.com/materials/private.html

[root@server0 private]# mv private.html index.html

[root@server0 ~]# vim /etc/httpd/conf.d/vhost-www0.conf

###追加以下内容

<Directory "/var/www/virtual/private">               注意virtual

	Require all denied              注意没有<Requireall>

	Require local

</Directory>

[root@server0 ~]# systemctl restart httpd

[root@server0 ~]# firefox www0.example.com/private/index.html
16、实现动态Web内容
[root@server0 ~]# yum install mod_wsgi -y #python模块
[root@server0 ~]# mkdir -pv /var/www/webapp
root@server0 ~]# cd /var/www/webapp
[root@server0 ~]# wget http://classroom.example.com/materials/webinfo.wsgi [root@server0 webapp]# getenforce #selinux
Enforcing
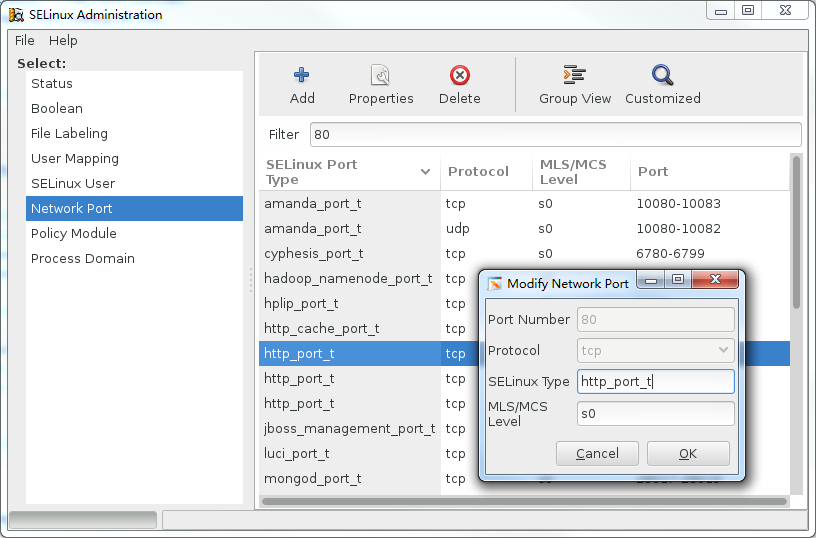
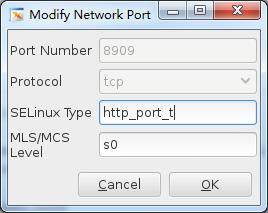
[root@server0 webapp]# semanage port -l | grep http 查看80端口设置
[root@server0 webapp]# semanage port -a -t http_port_t -p tcp 8908 注册端口失败(内存不足,server0内存设置为2G)
Killed 关机 shutdown 安全关机 shutdown -c (立即关机)
init 0
reboot 重启 [root@server0 ~]# semanage port -a -t http_port_t -p tcp 8908
Full path required for exclude: net:[4026532575].
Full path required for exclude: net:[4026532575].
[root@server0 webapp]# semanage port -l | grep 8908 [root@server0 conf.d]# rpm -ql mod_wsgi
/usr/share/doc/mod_wsgi-3.4/README #参考文档
WSGIScriptAlias /wsgi/ /usr/local/wsgi/scripts/
[root@server0 conf.d]# cat vhost-server0.conf
[root@server0 ~]# vim /etc/httpd/conf.d/vhost-webapp0.conf Listen 8908 注意listen
<Directory "/var/www/webapp"> 注意webapp
Require all granted
</Directory>
<VirtualHost *:8908>
DocumentRoot "/var/www/webapp"
ServerName webapp0.example.com
WSGIScriptAlias / /var/www/webapp/webinfo.wsgi 注意格式
</VirtualHost> [root@server0 ~]# firewall-cmd --permanent --add-rich-rule='rule family=ipv4 source address=172.25.0.0/24 port port=8908 protocol=tcp accept
[root@server0 ~]# firewall-cmd --reload
[root@server0 ~]# systemctl restart httpd [root@server0 webapp]# firefox http://webapp0.example.com:8908/
图形界面配置端口  (内存设置2G,注册成功)

[root@server0 ~]#  yum install policycoreutils-gui.x86_64 -y

[root@server0 ~]# system-config-selinux
day4 RHCE的更多相关文章
- 红帽RHEL7版本RHCE认证学习及考试经历
RHCE是红帽公司推出的Linux系统的中级认证,考试全部采取上机形式,在考察考生的基础理论知识的同时还能考察实践动手操作能力,在Linux领域的价值是不可否认的,所以对于期望从事相关行业的同学们在上 ...
- 【转】RHCE 7系列—RHCE考试
本篇主要以RHCE练习题为线索,介绍其中涉及的知识点. 红色引用的字为题目要求(不是正式题目,难度略低于正式题目) In serverX or desktopX 1. (lab teambridge ...
- RHCE 系列(二):如何进行包过滤、网络地址转换和设置内核运行时参数
正如第一部分(“设置静态网络路由”)提到的,在这篇文章(RHCE 系列第二部分),我们首先介绍红帽企业版 Linux 7(RHEL)中包过滤和网络地址转换(NAT)的原理,然后再介绍在某些条件发生变化 ...
- RHCE 系列(一):如何设置和测试静态网络路由
RHCE(Red Hat Certified Engineer,红帽认证工程师)是红帽公司的一个认证,红帽向企业社区贡献开源操作系统和软件,同时它还给公司提供训练.支持和咨询服务. 这个 RHCE 是 ...
- python_way,day4 内置函数(callable,chr,随机验证码,ord),装饰器
python_way,day4 1.内置函数 - 下 制作一个随机验证码 2.装饰器 1.内置函数 - 下 callable() #对象能否被调用 chr() #10进制数字对应的ascii码表中的内 ...
- Spark菜鸟学习营Day4 单元测试程序的编写
Spark菜鸟学习营Day4 单元测试程序的编写 Spark相比于传统代码是比较难以调试的,单元测试的编写是非常必要的. Step0:需求分析 在测试案例编写前,需完成需求分析工作,明确程序所有的输入 ...
- Spark Tungsten揭秘 Day4 内存和CPU优化使用
Spark Tungsten揭秘 Day4 内存和CPU优化使用 今天聚焦于内存和CPU的优化使用,这是Spark2.0提供的关于执行时的非常大的优化部分. 对过去的代码研究,我们会发现,抽象的提高, ...
- Catalyst揭秘 Day4 analyzer解析
Catalyst揭秘 Day4 analyzer解析 今天继续解析catalyst,主要讲一下analyzer,在sql语句的处理流程中,analyzer是在sqlparse的基础上,把unresol ...
- Kakfa揭秘 Day4 Kafka中分区深度解析
Kakfa揭秘 Day4 Kafka中分区深度解析 今天主要谈Kafka中的分区数和consumer中的并行度.从使用Kafka的角度说,这些都是至关重要的. 分区原则 Partition代表一个to ...
随机推荐
- mac使用指南--软件安装部分
最近因为开发需要,换了个mac,发现和Windows下面的操作和习惯真是千差万别啊,在这里记录一下,有需要的也可以参考一下. 安装前强烈建议根据个人习惯设置好触控板!!!什么单击双击选中拖拽的统统设好 ...
- UVa 12230 - Crossing Rivers(数学期望)
链接: https://uva.onlinejudge.org/index.php?option=com_onlinejudge&Itemid=8&page=show_problem& ...
- 笔试面试之C++
7 类B是类A的公有派生类, 类A和类B中都定义了虚函数func(), p 是一个指向类A对象的指针,则p->A::func()将() A 调用类A中的函数 B 调用类B中的函数 C 根据p所指 ...
- 【Vue.js】高仿饿了么外卖App(一)
1.架构从传统的MVC向REST API+前端MV*迁移 参考链接: http://blog.csdn.net/broadview2006/article/details/8615055 http:/ ...
- GPS-Graph Processing System Graph Coloring算法分析 (三)
HamaWhite 原创,转载请注明出处!欢迎大家增加Giraph 技术交流群: 228591158 Graph coloring is the problem of assignin ...
- Owin+ASP.NET Identity浅析系列(五)接入第三方登录
在今天,读书有时是件“麻烦”事.它需要你付出时间,付出精力,还要付出一份心境.--仅以<Owin+ASP.NET Identity浅析系列>来祭奠那逝去的…… OK,用户角色实现后,我们回 ...
- Monkeyrunner测试环境搭建
Monkey手机APP压力测试,是对手机发送伪随机命令,对手机进行按键,触摸等操作,MonkeyRunner是对其发送重复操作的命令,是Monkey的进阶版,可以设置重复的操作或者是重现步骤等.相比较 ...
- l2-loss,l2正则化,l2范数,欧式距离
欧式距离: l2范数: l2正则化: l2-loss(也叫平方损失函数): http://openaccess.thecvf.com/content_cvpr_2017/papers/Li_Mimic ...
- HDU 2544最短路 (迪杰斯特拉算法)
传送门: http://acm.hdu.edu.cn/showproblem.php?pid=2544 最短路 Time Limit: 5000/1000 MS (Java/Others) Me ...
- Node.js 上传图片并保存
Node.js 上传图片并保存 依赖 package.json 文件 { "name": "demo", "version": " ...