
第七节:WebApi与Unity整合进行依赖注入和AOP的实现
一. IOC和DI
1. 通过Nuget引入Unity程序集。
PS:【版本:5.8.6】
2. 新建DIFactory类,用来读取Unity的配置文件并创建Unity容器,需要注意的是DIFactory类需要声明成单例。
PS:这里采用静态构造函数(必须是无参的)的形式来实现单例,MVC框架的那个框架采用的是 双if+lock锁的形式实现的单例,结果都一样。
代码分享:
      /// <summary>

     /// 依赖注入工厂(单例的 采用静态构造函数)

     /// 读取Unity的配置文件,并创建Unity容器

     /// 需要引入程序集“System.Configuration”

     /// </summary>

     public class DIFactory

     {

         private static IUnityContainer _Container = null;

         static DIFactory()

         {

             //1. 固定的4行代码读取配置文件

             ExeConfigurationFileMap fileMap = new ExeConfigurationFileMap();

             fileMap.ExeConfigFilename = Path.Combine(AppDomain.CurrentDomain.BaseDirectory + "CfgFiles\\UnityConfig.xml");//找配置文件的路径

             Configuration configuration = ConfigurationManager.OpenMappedExeConfiguration(fileMap, ConfigurationUserLevel.None);

             UnityConfigurationSection section = (UnityConfigurationSection)configuration.GetSection(UnityConfigurationSection.SectionName);

             //2. Unity层次的步骤

             _Container = new UnityContainer();

             //加载节点的名称为"apiContainer"

             section.Configure(_Container, "apiContainer");

         }

         /// <summary>

         /// 对外开放函数,用来获取Unity容器

         /// </summary>

         /// <returns></returns>

         public static IUnityContainer GetContainer()

         {

             return _Container;

         }

     }
3. 新建UnityDependencyResolver类,用来自定义控制器实例化工厂.
特别注意:该类这里实现的是IDependencyResolver接口,来自WebApi下的程序集,而非MVC,所以和MVC下的写法有区别.
代码分享:
   public class UnityDependencyResolver : IDependencyResolver

     {

         private IUnityContainer _IUnityContainer = null;

         public UnityDependencyResolver(IUnityContainer unityContainer)

         {

             this._IUnityContainer = unityContainer;

         }

         /// <summary>

         /// 获取单个服务

         /// </summary>

         /// <param name="serviceType"></param>

         /// <returns></returns>

         public object GetService(Type serviceType)

         {

             try

             {

                 return this._IUnityContainer.Resolve(serviceType);

             }

             catch (ResolutionFailedException ex)//因为会累计构造多个对象,很多是没有去扩展,直接null就行

             {

                 return null;

             }

         }

         public IEnumerable<object> GetServices(Type serviceType)

         {

             try

             {

                 return this._IUnityContainer.ResolveAll(serviceType);

             }

             catch (ResolutionFailedException)

             {

                 return new List<object>();

             }

         }

         public IDependencyScope BeginScope()//每次请求

         {

             var child = this._IUnityContainer.CreateChildContainer();

             return new UnityDependencyResolver(child);

         }

         public void Dispose()

         {

             this._IUnityContainer.Dispose();

         }

     }
UnityDependencyResolver
4. 新建CfgFiles文件夹和UnityConfig.xml文件,该xml文件需要改属性为“始终复制”。
代码分享:
<configuration>

  <configSections>

    <section name="unity" type="Microsoft.Practices.Unity.Configuration.UnityConfigurationSection, Unity.Configuration"/>

  </configSections>

  <unity>

    <!-- unity容器配置注册节点-->

    <containers>

      <container name="apiContainer">

        <!--  type中的两个参数分别是:类型名称和DLL程序集的名称 -->

        <!--  mapTo中的两个参数分别是:类型名称和DLL程序集的名称 -->

        <!--

          分析:这里我们需要使用的是TestService,但不直接使用它,而是使用它的接口,即将【mapTo】里的类型注册给【type】里的类型

        -->

        <register type="WebApiBasic.Interface.ITestService,01-WebApiBasic" mapTo="WebApiBasic.Service.TestService,01-WebApiBasic"/>

        <register type="WebApiBasic.Interface.ITestService2,01-WebApiBasic" mapTo="WebApiBasic.Service.TestService2,01-WebApiBasic"/>

      </container>

    </containers>

  </unity>

</configuration>
5. 在WebApiConfig文件中进行配置,把webapi的DependencyResolver换成自己的Unity版本的
config.DependencyResolver = new UnityDependencyResolver(DIFactory.GetContainer());

6. 新建Service文件夹和Interface文件夹,分别创建TestService类和ITestService接口,并去UnityConfig.xml文件中进行注册(上述xml里已经注册好了)。
代码如下:
  public class TestService : ITestService

     {

         public string GetInfor()

         {

             return "我是ypf";

         }

     }
  public interface ITestService

     {

         string GetInfor();

     }
7. 在控制器中进行构造函数的注入,注入TestService对象。
public class EighthController : ApiController

    {

        private ITestService _ITestService = null;

        public EighthController(ITestService testService)

        {

            this._ITestService = testService;

        }

        [HttpGet]

        public string GetInfor()

        {

            var result = _ITestService.GetInfor();

            return result;

        }

    }
8. 利用PostMan进行测试 http://localhost:2131/api/Eighth/GetInfor, 测试成功。

二. AOP
1. 通过Nuget引入Unity.Interception程序集,同时会自动把它依赖的Unity.Abstractions程序集引入。
PS:【版本:5.5.3】
2. 新增TestService2类和ITestService2接口,用来测试AOP。
代码如下:
  public interface ITestService2

     {

         string GetInfor2();

     }

 public class TestService2 : ITestService2

     {

         public string GetInfor2()

         {

             return "我是ypf2";

         }

     }
3. 新建AOP文件夹,并新建LogBeforeBehavior类,实现IInterceptionBehavior接口,在Invoke中写AOP相关的代码。
     /// <summary>

     /// Unity为我们提供了一个IInterceptionBehavior接口需要实现这个接口

     /// 接口为我们提供了三个方式(GetRequiredInterfaces、Invoke、WillExecute)实现

     /// WillExecute表示是否执行该行为,如果是false这个方法被调用时,不会被捕捉。因为我们总是要执行的,所以为true

     /// GetRequiredInterfaces将你想要的接口类型和行为联系起来,我们暂时不需要,所以返回Type.EmptyTypes

     /// Invoke执行方式接口,我们主要使用它

     /// </summary>

     public class LogBeforeBehavior : IInterceptionBehavior

     {

         public bool WillExecute

         {

             get { return true; }

         }

         public IEnumerable<Type> GetRequiredInterfaces()

         {

             return Type.EmptyTypes;

         }

         public IMethodReturn Invoke(IMethodInvocation input, GetNextInterceptionBehaviorDelegate getNext)

         {

             Console.WriteLine("我是方法执行前执行的业务");

             //下面这句话表示这里执行方法

             var result = getNext()(input, getNext);

             return result;

         }

     }
4. 在UnityConifig.xml文件中配置AOP相关的代码,并且给TestService2注入的代码配置AOP相关的LogAopBehavior类。
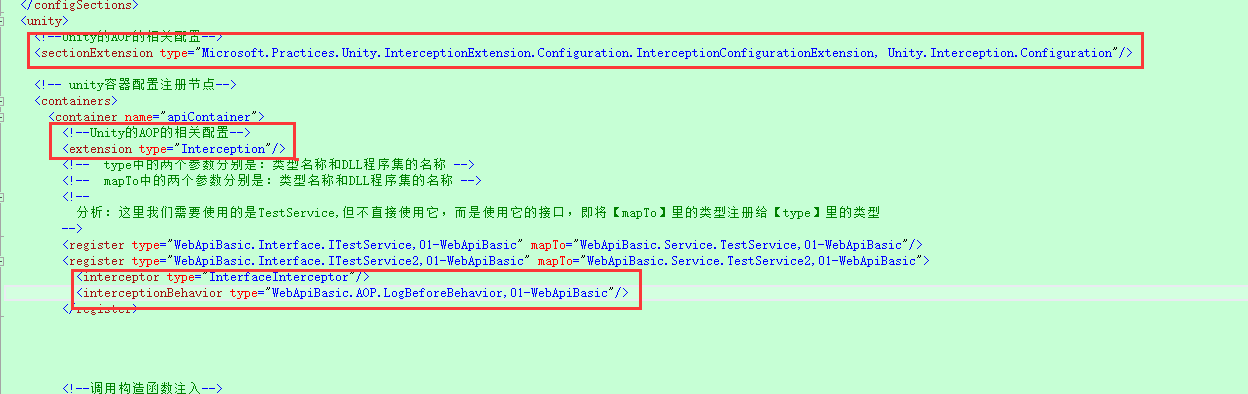
代码分享:
 <configuration>

   <configSections>

     <section name="unity" type="Microsoft.Practices.Unity.Configuration.UnityConfigurationSection, Unity.Configuration"/>

   </configSections>

   <unity>

     <!--Unity的AOP的相关配置-->

     <sectionExtension type="Microsoft.Practices.Unity.InterceptionExtension.Configuration.InterceptionConfigurationExtension, Unity.Interception.Configuration"/>

     <!-- unity容器配置注册节点-->

     <containers>

       <container name="apiContainer">

         <!--Unity的AOP的相关配置-->

         <extension type="Interception"/>

         <!--  type中的两个参数分别是:类型名称和DLL程序集的名称 -->

         <!--  mapTo中的两个参数分别是:类型名称和DLL程序集的名称 -->

         <!--

           分析:这里我们需要使用的是TestService,但不直接使用它,而是使用它的接口,即将【mapTo】里的类型注册给【type】里的类型

         -->

         <register type="WebApiBasic.Interface.ITestService,01-WebApiBasic" mapTo="WebApiBasic.Service.TestService,01-WebApiBasic"/>

         <register type="WebApiBasic.Interface.ITestService2,01-WebApiBasic" mapTo="WebApiBasic.Service.TestService2,01-WebApiBasic">

           <interceptor type="InterfaceInterceptor"/>

           <interceptionBehavior type="WebApiBasic.AOP.LogBeforeBehavior,01-WebApiBasic"/>

         </register>

       </container>

     </containers>

   </unity>

 </configuration>
5. 用PostMan进行测试 http://localhost:2131/api/Eighth/GetInfor2 ,通过加断点,发现:执行方法前,先进入了LogBeforeBehavior类中进行执行了。
!
- 作 者 : Yaopengfei(姚鹏飞)
- 博客地址 : http://www.cnblogs.com/yaopengfei/
- 声 明1 : 本人才疏学浅,用郭德纲的话说“我是一个小学生”,如有错误,欢迎讨论,请勿谩骂^_^。
- 声 明2 : 原创博客请在转载时保留原文链接或在文章开头加上本人博客地址,否则保留追究法律责任的权利。
第七节:WebApi与Unity整合进行依赖注入和AOP的实现的更多相关文章
- 构建ASP.NET MVC4+EF5+EasyUI+Unity2.x注入的后台管理系统(6)-Unity 2.x依赖注入by运行时注入[附源码]
原文:构建ASP.NET MVC4+EF5+EasyUI+Unity2.x注入的后台管理系统(6)-Unity 2.x依赖注入by运行时注入[附源码] Unity 2.x依赖注入(控制反转)IOC,对 ...
- 在MVC5和webAPI下是用Autofac依赖注入
很多书本中都提到依赖注入,控制反转等概念,这些都是为了实现松耦合层.组件和类目的. 常见的是使用Repository类分离Controller和Model的直接联系.而为了解除Repository类和 ...
- 依赖注入及AOP简述(七)——FQCN请求模式
2.2. FQCN请求模式 为了弥补纯字符串请求模式中的类型安全问题,全类名(FQCN)请求模式就应运而生了.其思想便是,在向容器请求依赖对象的时候,不是通过字符串的标识符.而是通过被请求的依赖 ...
- ABP+AdminLTE+Bootstrap Table权限管理系统第四节--仓储,服务,服务接口及依赖注入
在ABP框架中,仓储,服务,这块算是最为重要一块之一了.ABP框架提供了创建和组装模块的基础,一个模块能够依赖于另一个模块,一个程序集可看成一个模块, 一个模块可以通过一个类来定义这个模块,而给定义这 ...
- EntLib Unity父类的依赖注入问题
Unity的注入有3种方式:构造函数.[Dependency]属性.[InjectionMethod]方法.这3种方式涉及到的interface或class都会去Registrations里找,找不到 ...
- 用Unity实现的依赖注入
第一步:添加引用 上面那两个玩意 第二步:在app_start中添加unityconfig 上面那个玩意 第三步:在global.asax文件中进行初始化 如上面的,在application_star ...
- 第六节:SignalR完结篇之依赖注入和分布式部署
一. SignalR中DI思想的应用 DI,即依赖注入,它是一种不负责创建其自己的依赖项对象的一种模式,通常用来降低代码之间的耦合性,广泛应用于架构设计,是必不可少的一种思想. 下面结合一个需求来说一 ...
- 【转】Unity+单例模式的依赖注入
http://www.cnblogs.com/floyd/archive/2009/06/17/1505117.html
- [IoC容器Unity]第三回:依赖注入
1.引言 上节介绍了,Unity的Lifetime Managers生命周期,Unity具体实现依赖注入包含构造函数注入.属性注入.方法注入,所谓注入相当赋值,下面一个一个来介绍. 2.构造函数注入 ...
随机推荐
- JavaScript作用域链的理解
前言 作用域是JavaScript一个很重要的概念,想要学好JavaScript就需要理解javascript作用域和作用域链的工作原理.这篇文章对JavaScript作用域链和作用域链做一个简单的介 ...
- 启动Hadoop总是需要输入密码的问题.
start-all.sh 总是需要输入当前密码. 一开始以为是权限不够. 1.修改sudo配置文件 sudo visudo 增加 hduser ALL=(ALL) NOPASSWD:ALL 解决了 权 ...
- day 16 包的导入
包的认识 '''包通过文件夹来管理一系列功能相近的模块包:一系列模块的集合体重点:包中一定有一个专门用来管理包中所有模块的文件包名:存放一系列模块的文件夹名字包名(包对象)存放的是管理模块的那个文件 ...
- Linux内核入门到放弃-Ext2数据结构-《深入Linux内核架构》笔记
Ext2文件系统 物理结构 结构概观 块组是该文件系统的基本成分,容纳了文件系统的其他结构.每个文件系统都由大量块组组成,在硬盘上相继排布: ----------------------------- ...
- 二十六、css3改变checkbox复选框的样式
<!DOCTYPE html> <html> <head> <meta charset="UTF-8"> <title> ...
- Day8 信号检测与估值
检测:接收机或处理器根据在[0,T]内观测到的信号r(t)的统计特性,按照一定准则 判断信源发送的是某个已知信号集中的哪个信号. 如:调制信号的检测问题 估计:接收机或处理器根据在[0,T]内观测到的 ...
- js01-javascript语法标准和数据类型
语法规则 (1)JavaScript对换行.缩进.空格不敏感. 备注:每一条语句末尾要加上分号,虽然分号不是必须加的,但是为了程序今后要压缩,如果不加分号,压缩之后将不能运行. (2)所有的符号,都是 ...
- SpringCloud学习笔记:声明式调用Feign(4)
1. Feign简介 Feign采用声明式API接口的风格,将Java HTTP客户端绑定到它的内部. Feign的首要目标是简化Java HTTP客户端调用过程. 2.Feign客户端示例 Feig ...
- 转 spring注解式参数校验
转自: https://blog.csdn.net/jinzhencs/article/details/51682830 转自: https://blog.csdn.net/zalan01408980 ...
- Fixing “Did you mean to run dotnet SDK commands?” error when running dotnet –version
I recently installed the dotnet 1.11.0 Windows Server Hosting package which apparently installs the ...