
Angular 任务列表页
新建一个任务Module
$ ng g m task
功能:项目列表显示,增加,修改,删除项目。邀请其它人员加入项目。
单一性原则:希望搭建多个组件,每个组件负责自己的功能。
一、task相关组件
$ ng g c task/task-home
$ ng g c task/task-list
$ ng g c task/task-item
$ ng g c task/task-header
$ ng g c task/new-task
$ ng g c task/copy-task
$ ng g c task/new-task-list
需要把NewTaskComponent和CopyTaskComponent放在entryComponents中。
@NgModule({

  declarations: [

    TaskHomeComponent,

    TaskListComponent,

    TaskItemComponent,

    TaskHeaderComponent,

    NewTaskComponent,

    CopyTaskComponent

  ],

  imports: [SharedModule, TaskRoutingModule],

  entryComponents:[NewTaskComponent,CopyTaskComponent]

})
三、TaskHome
<div class="task-list">

  <app-task-list *ngFor="let list of lists" class="list-container">

    <app-task-header [header]="list.name"> </app-task-header>

    <app-task-item *ngFor="let task of list.tasks"> </app-task-item>

  </app-task-list>

</div>

<button

  class="ab-buttonmad-fab fab-button"

  mat-fab

  type="button"

  (click)="openNewProjectDialog()"

>

  <mat-icon>add</mat-icon>

</button>
TaskHome中处理新建任务,修改任务,移动任务,删除任务列表:
<app-task-header [header]="list.name"

(newTask)="lauchNewTaskDialog()"

(moveAll)="lauchCopyTaskDialog()"

(deleteList)="lauchConfirmDialog()"

> </app-task-header>

  lauchNewTaskDialog() {

    // this.dialog.open(NewTaskComponent);

    const dialogRef = this.dialog.open(NewTaskComponent,{data:{title:'新建任务'}});

  }

  lauchCopyTaskDialog(){

    const dialogRef = this.dialog.open(CopyTaskComponent,{data:{lists:this.lists}});

  }

  launchUpdateTaskDialog(task){

    const dialogRef = this.dialog.open(NewTaskComponent,{data:{title:'修改任务',task:task}});

  }

  lauchConfirmDialog(){

    const dialogRef = this.dialog.open(ConfirmDialogComponent,{data:{title:'删除任务列表',content:'您确定要删除该任务列表吗?'}});

  }
四、TaskList
app-task-list组件里面是可以放内容的。
<mat-list>

  <ng-content>

  </ng-content>

</mat-list>
list里面内容不去管。
五、Header
<div mat-subheader class="fill">

  <div class="header-container">

    <h3>{{header}}</h3>

  </div>

  <div>

    <div class="fill">

      <button mat-button>

        <mat-icon>add_circle_outine</mat-icon>

        <span>新任务</span>

      </button>

    </div>

  </div>

  <div>

    <button mat-icon-button [matMenuTriggerFor]="menu">

      <mat-icon>keyboard_arrow_down</mat-icon>

    </button>

  </div>

</div>

<mat-menu #menu="matMenu">

  <button mat-menu-item>

    <mat-icon>

      mode_edit

    </mat-icon>

    <span>

      修改列表名称

    </span>

  </button>

  <button mat-menu-item>

    <mat-icon svgIcon="move">

    </mat-icon>

    <span>

      移动列表所有内容

    </span>

  </button>

  <button mat-menu-item>

    <mat-icon>

      delete_forever

    </mat-icon>

    <span>

      删除列表

    </span>

  </button>

</mat-menu>

六、ListItem
1、通过优先级不同让任务有一个不同颜色的边框。
  .priority-normal {

    border-left: 3px solid #A6A6A6;

  }

  .priority-important {

    border-left: 3px solid #FFAF38;

  }

  .priority-emergency {

    border-left: 3px solid red;

  }
<mat-list-item class="container"

[ngClass]="{

  'priority-normal':item.priority===3,

  'priority-important':item.priority===2,

  'priority-emergency':item.priority===1

}">

2、list超出后显示...,鼠标移上去后给出提示。
从
    <div class="content" mat-line [ngClass]="{'completed':item.completed}">

      {{item.desc}}

    </div>
改为:
    <div class="content" mat-line [ngClass]="{'completed':item.completed}">

      <span [matTooltip]="item.desc">{{item.desc}}</span>

    </div>
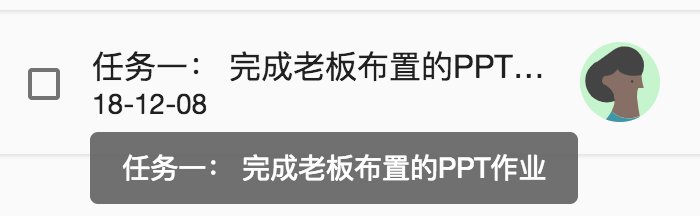
全部布局
<mat-list-item class="container" [ngClass]="{

  'priority-normal':item.priority===3,

  'priority-important':item.priority===2,

  'priority-emergency':item.priority===1

}">

  <mat-checkbox [checked]="item.completed" class="status"> </mat-checkbox>

  <div class="content" mat-line [ngClass]="{'completed':item.completed}">

    <span [matTooltip]="item.desc">{{item.desc}}</span>

  </div>

  <div class="bottom-bar" mat-line>

    <span class="due-date" *ngIf="item.dueDate">

      {{item.dueDate | date:"yy-MM-dd"}}

    </span>

    <mat-icon *ngIf="item.reminder">

      alarm

    </mat-icon>

  </div>

  <mat-icon [svgIcon]="avatar" mat-list-avatar class="avatar">

  </mat-icon>

</mat-list-item>
mat-icon.avatar {

  overflow: hidden;

  width: 64px;

  height: 64px;

  border-radius: 50%;

  margin: 12px;

  order:;

}

.completed {

  opacity: 0.64;

  color: #d9d9d9;

  text-decoration: line-through;

}

.priority-normal {

  border-left: 3px solid #a6a6a6;

}

.priority-important {

  border-left: 3px solid #ffaf38;

}

.priority-emergency {

  border-left: 3px solid red;

}

.checkbox-section {

  border: 0 solid #a6a6a6;

}

.duedate {

  background-color: #ff4f3e;

  color: #fff;

}

.alarm {

  font-size: 18px;

}

.bottom-bar {

  margin-top: 3px;

  margin-bottom: 2px;

  font-size: 10px;

  width: 100%;

  order:;

}

.status {

  order: -1;

}

.content {

  order:;

  width: 100%;

  padding: 5px;

}

.container {

  width: 100%;

  border-radius: 3px;

  box-shadow: 0 1px 2px rgba(0, 0, 0, 0.1);

}

.drag-start {

  opacity: 0.5;

  border: #ff525b dashed 2px;

}

:host {

  width: 100%;

}
七、NewTask
1、任务优先级:
<mat-radio-group>

      <mat-radio-button *ngFor="let priority of priorities" [value]="priority.value">

        {{priority.label}}

      </mat-radio-button>

</mat-radio-group>
export class NewTaskComponent implements OnInit {

  priorities = [

    {

      label: '紧急',

      value: 1

    },

    {

      label: '重要',

      value: 2

    },

    {

      label: '普通',

      value: 3

    }

  ];

  constructor() { }

  ngOnInit() {

  }

}
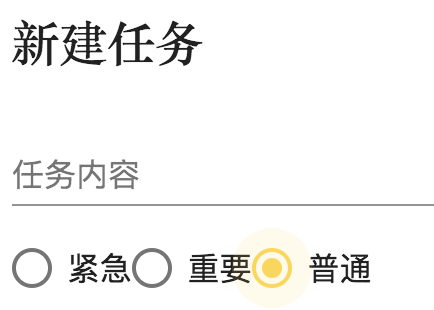
2、任务截止日期
    <mat-form-field class="full-width">

      <input type="text" [matDatepicker]="dueDatepicker" matInput [matDatepicker]="" placeholder="任务截止日期">

      <mat-datepicker-toggle matSuffix [for]="dueDatepicker"></mat-datepicker-toggle>

    </mat-form-field>

    <mat-datepicker #dueDatepicker></mat-datepicker>
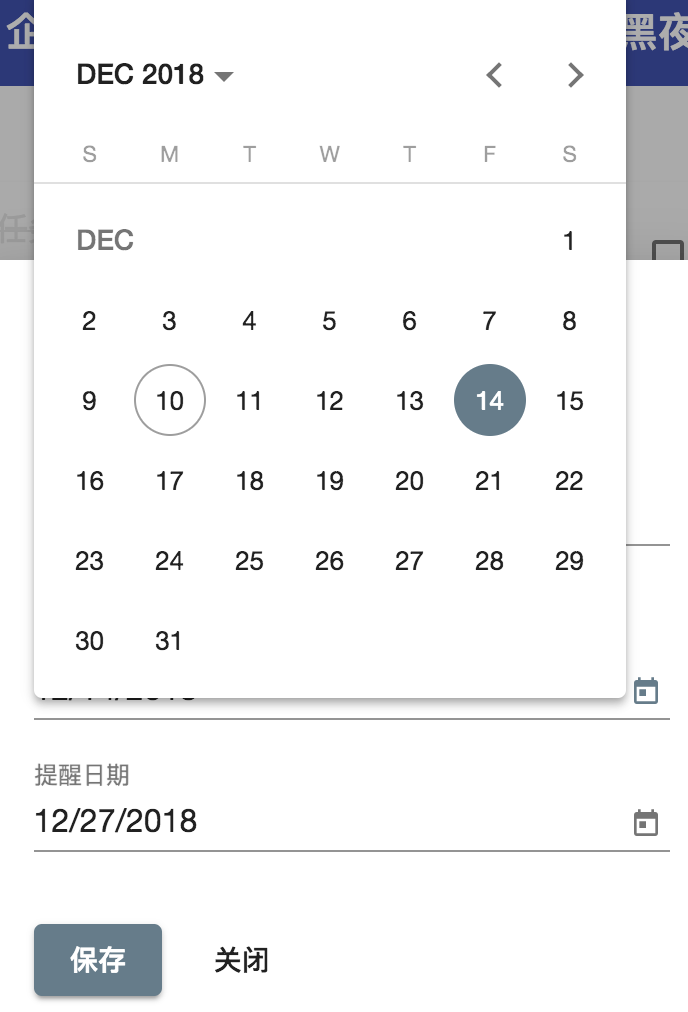
3、调起NewTask组件
在header中把新建任务的事件发射出来
<button mat-button (click)="onNewTaskClick()">

        <mat-icon>add_circle_outine</mat-icon>

        <span>新任务</span>

</button>

  @Output() newTask= new EventEmitter<void>() ;

  onNewTaskClick(){

    this.newTask.emit();

  }
在TaskHome中监听
<app-task-header [header]="list.name" (newTask)="lauchNewTaskDialog()"> </app-task-header>

  lauchNewTaskDialog() {

    this.dialog.open(NewTaskComponent);

  }
4、修改任务
taskHome中去监听taskItem的click事件
    <app-task-item *ngFor="let task of list.tasks" [item]="task" (taskClick)="launchUpdateTaskDialog(task)"> </app-task-item>

  launchUpdateTaskDialog(task){

    const dialogRef = this.dialog.open(NewTaskComponent,{data:{title:'修改任务',task:task}});

  }
修改NewTask组件,首先需要有一个title
title:'';

constructor(@Inject(MAT_DIALOG_DATA) private data: any) {

    this.title = this.data.title;

    console.log(JSON.stringify(this.data.task));

}

  <h2 md-dialog-title>{{title}}</h2>
在新建任何和修改任务时候都会传入title,新建任务时候不会传入task
  lauchNewTaskDialog() {

    // this.dialog.open(NewTaskComponent);

    const dialogRef = this.dialog.open(NewTaskComponent,{data:{title:'新建任务'}});

  }

  launchUpdateTaskDialog(task){

    const dialogRef = this.dialog.open(NewTaskComponent,{data:{title:'修改任务',task:task}});

  }
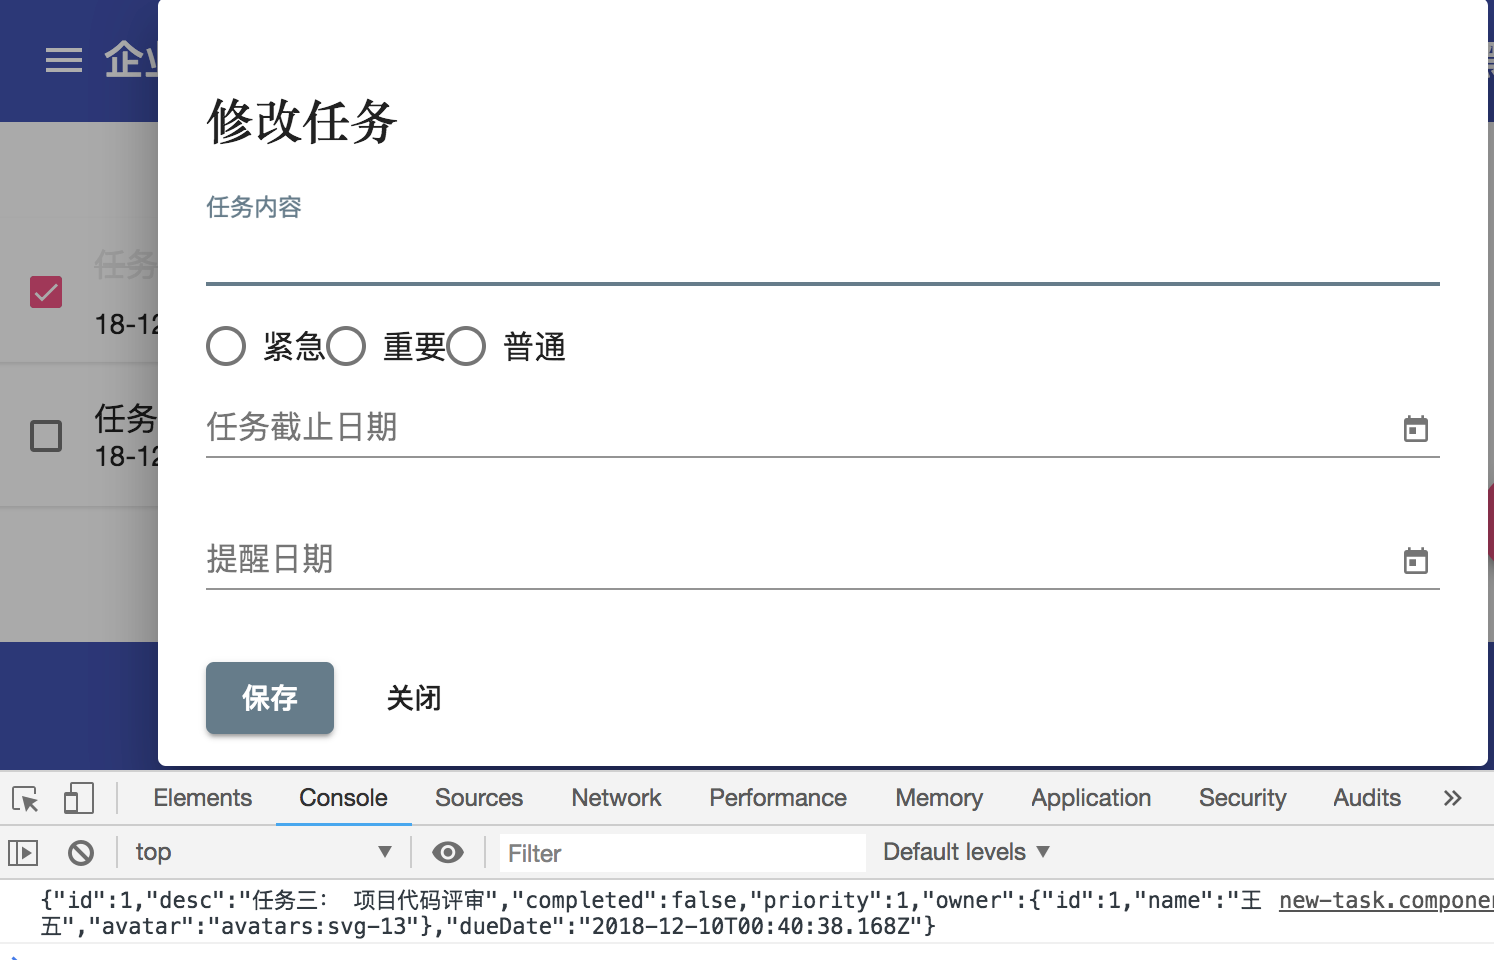
问题:点击checkbox的时候也会弹出修改任务对话框。
解决:
  <mat-checkbox [checked]="item.completed" class="status" (click)="onCheckBoxClick($event)"> </mat-checkbox>

  onCheckBoxClick(event: Event): void {

    event.stopPropagation();

  }
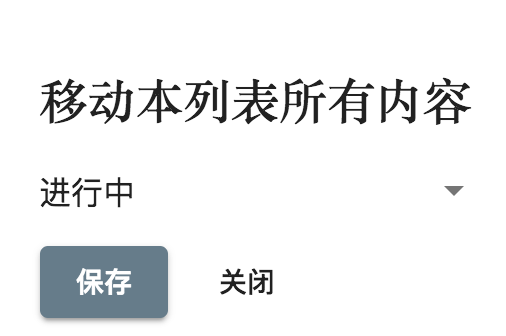
八、移动内容
<mat-select placeholder="请选择目标列表">

      <mat-option *ngFor="let list of lists" [value]="list">{{list.name}}</mat-option>

</mat-select>

export class CopyTaskComponent implements OnInit {

  lists: any[];

  constructor(@Inject(MAT_DIALOG_DATA) private data: any,

  public dialogRef: MatDialogRef<CopyTaskComponent>) { }

  ngOnInit() {

    this.lists = this.data.lists;

  }

}
九、新建,修改任务列表
新建任务列表和改名字用的同一个Component
<form>

  <h2 md-dialog-title>新建项目列表</h2>

    <div mat-dialog-content>

      <mat-form-field class="full-width">

        <input type="text" matInput placeholder="列表名称">

      </mat-form-field>

    </div>

    <div mat-dialog-actions>

      <button type="button" mat-raised-button color="primary" (click)="onSave()">保存</button>

      <button type="button" mat-button mat-dialog-close>关闭</button>

    </div>

</form>
import { Component, OnInit, Inject } from '@angular/core';

import { MAT_DIALOG_DATA, MatDialogRef } from '@angular/material';

@Component({

  selector: 'app-new-task-list',

  templateUrl: './new-task-list.component.html',

  styleUrls: ['./new-task-list.component.scss']

})

export class NewTaskListComponent implements OnInit {

  title='';

  constructor(@Inject(MAT_DIALOG_DATA) private data,

  private dialogRef: MatDialogRef<NewTaskListComponent>) { }

  ngOnInit() {

  }

  onSave(){

    this.dialogRef.close(this.title);

  }

}
在TaskHome组件中去处理事件
  launchEditListDialog() {

    const dialogRef = this.dialog.open(NewTaskListComponent, {

      data: { title: "更改列表名称" }

    });

    dialogRef.afterClosed().subscribe(result => console.log(result));

  }

  launchNewListDialog() {

    const dialogRef = this.dialog.open(NewTaskListComponent, {

      data: { title: "新建列表名称" }

    });

    dialogRef.afterClosed().subscribe(result => console.log(result));

  }
十、数据结构的演变
1、
lists=[

    {

      "id":1,

      "name": "待办",

      "tasks" :[

        {

          id:1,

          desc: '任务一: 去星巴克买咖啡',

          owner:{

            id:1,

            name:'张三',

            avatar:'avatars:svg-11'

          },

          dueDate: new Date()

        },

        {

          id:2,

          desc: '任务一: 完成老板布置的PPT作业',

          owner:{

            id:2,

            name:'李四',

            avatar:'avatars:svg-12'

          },

          dueDate: new Date()

        }

      ]

    },

    {

      "id":2,

      "name": "进行中",

      "tasks" :[

        {

          id:1,

          desc: '任务三: 项目代码评审',

          owner:{

            id:1,

            name:'王五',

            avatar:'avatars:svg-13'

          },

          dueDate: new Date()

        },

        {

          id:2,

          desc: '任务一: 制定项目计划',

          owner:{

            id:2,

            name:'李四',

            avatar:'avatars:svg-12'

          },

          dueDate: new Date()

        }

      ]

    }

  ]
2、每一个任务Item都加一个完成状态completed
lists = [

    {

      id: 1,

      name: "待办",

      tasks: [

        {

          id: 1,

          desc: "任务一: 去星巴克买咖啡",

          completed: true,

          owner: {

            id: 1,

            name: "张三",

            avatar: "avatars:svg-11"

          },

          dueDate: new Date()

        },

        {

          id: 2,

          desc: "任务一: 完成老板布置的PPT作业",

          completed: false,

          owner: {

            id: 2,

            name: "李四",

            avatar: "avatars:svg-12"

          },

          dueDate: new Date()

        }

      ]

    },

    {

      id: 2,

      name: "进行中",

      tasks: [

        {

          id: 1,

          desc: "任务三: 项目代码评审",

          completed: false,

          owner: {

            id: 1,

            name: "王五",

            avatar: "avatars:svg-13"

          },

          dueDate: new Date()

        },

        {

          id: 2,

          desc: "任务一: 制定项目计划",

          completed: false,

          owner: {

            id: 2,

            name: "李四",

            avatar: "avatars:svg-12"

          },

          dueDate: new Date()

        }

      ]

    }

  ];
3、有些任务加reminder
import { Component, OnInit } from "@angular/core";

@Component({

  selector: "app-task-home",

  templateUrl: "./task-home.component.html",

  styleUrls: ["./task-home.component.scss"]

})

export class TaskHomeComponent implements OnInit {

  constructor() {}

  ngOnInit() {}

  lists = [

    {

      id: 1,

      name: "待办",

      tasks: [

        {

          id: 1,

          desc: "任务一: 去星巴克买咖啡",

          completed: true,

          owner: {

            id: 1,

            name: "张三",

            avatar: "avatars:svg-11"

          },

          dueDate: new Date(),

          reminder: new Date()

        },

        {

          id: 2,

          desc: "任务一: 完成老板布置的PPT作业",

          completed: false,

          owner: {

            id: 2,

            name: "李四",

            avatar: "avatars:svg-12"

          },

          dueDate: new Date()

        }

      ]

    },

    {

      id: 2,

      name: "进行中",

      tasks: [

        {

          id: 1,

          desc: "任务三: 项目代码评审",

          completed: false,

          owner: {

            id: 1,

            name: "王五",

            avatar: "avatars:svg-13"

          },

          dueDate: new Date()

        },

        {

          id: 2,

          desc: "任务一: 制定项目计划",

          completed: false,

          owner: {

            id: 2,

            name: "李四",

            avatar: "avatars:svg-12"

          },

          dueDate: new Date()

        }

      ]

    }

  ];

}
4、为每个任务添加优先级priority
lists = [

    {

      id: 1,

      name: "待办",

      tasks: [

        {

          id: 1,

          desc: "任务一: 去星巴克买咖啡",

          completed: true,

          priority: 3,

          owner: {

            id: 1,

            name: "张三",

            avatar: "avatars:svg-11"

          },

          dueDate: new Date(),

          reminder: new Date()

        },

        {

          id: 2,

          desc: "任务一: 完成老板布置的PPT作业",

          completed: false,

          priority: 2,

          owner: {

            id: 2,

            name: "李四",

            avatar: "avatars:svg-12"

          },

          dueDate: new Date()

        }

      ]

    },

    {

      id: 2,

      name: "进行中",

      tasks: [

        {

          id: 1,

          desc: "任务三: 项目代码评审",

          completed: false,

          priority: 1,

          owner: {

            id: 1,

            name: "王五",

            avatar: "avatars:svg-13"

          },

          dueDate: new Date()

        },

        {

          id: 2,

          desc: "任务一: 制定项目计划",

          completed: false,

          priority: 2,

          owner: {

            id: 2,

            name: "李四",

            avatar: "avatars:svg-12"

          },

          dueDate: new Date()

        }

      ]

    }

  ];
十一、创建一个快速创建任务的模块
$ ng g c task/quick-task
Angular 任务列表页的更多相关文章
- Angular单页应用&AngularJS内部实现原理
回顾 自定义指令 登录后获取登录信息session 首先在登录验证的时候保存一个user 在学生管理页面中运用ajax调用获取到登录的用户信息 对注销按钮添加点击事件:调用ajax在表现层给user赋 ...
- AnjularJs的增删改查(单页网站)
2016.6.4 学习文献: 你的第一个AngularJS应用:https://segmentfault.com/a/1190000000347412 AngularJS 提交表单的方式:http:/ ...
- ApacheCN Angular 译文集 20211114 更新
Angular 专家级编程 零.前言 一.架构概述和在 Angular 中构建简单应用 二.将 AngularJS 应用迁移到 Angular 应用 三.使用 Angular CLI 生成具有最佳实践 ...
- 使用Jenkins配置Git和Maven的自动化构建
Jenkins是一个开源的持续集成工具,应用Jenkins搭建持续集成环境,可以进行自动构建.自动编译和部署,非常方便. 在服务器比较少的情况下,Jenkins的优势并不明显,但是随着项目发展,服务器 ...
- 快速搭建Web环境 Angularjs + Express3 + Bootstrap3
快速搭建Web环境 Angularjs + Express3 + Bootstrap3 AngularJS体验式编程系列文章, 将介绍如何用angularjs构建一个强大的web前端系统.angula ...
- jenkins学习之自动打包构建nodejs应用
上一节记录了下jenkins在centos下的安装,这节继续,说下怎么使用jenkins和nodejs进行自动打包更新服务. 创建任务 创建任务比较简单,这里我们创建自由风格项目: General信息 ...
- vue2.0与实战开发
慕课网实战 百度云 web前端实战: Node.js入门到企业Web开发中的应用 Web前端性能优化 让你的页面飞起来 前端跳槽面试必备技巧 前端JavaScript面试技巧全套 node.JS 线上 ...
- 转载《分布式任务调度平台XXL-JOB》
<分布式任务调度平台XXL-JOB> 博文转自 https://www.cnblogs.com/xuxueli/p/5021979.html 一.简介 1.1 概述 XXL-J ...
- 分布式任务调度平台XXL-JOB
<分布式任务调度平台XXL-JOB> 一.简介 1.1 概述 XXL-JOB是一个轻量级分布式任务调度框架,其核心设计目标是开发迅速.学习简单.轻量级.易扩展.现已开放源代码并 ...
随机推荐
- 洛谷P4643 [国家集训队]阿狸和桃子的游戏(思维题+贪心)
思维题,好题 把每条边的边权平分到这条边的两个顶点上,之后就是个sb贪心了 正确性证明: 如果一条边的两个顶点被一个人选了,一整条边的贡献就凑齐了 如果分别被两个人选了,一作差就抵消了,相当于谁都没有 ...
- nodejs+express创建一个简单的服务器
//首先安装express //1.引入express const express = require('express'); //2.创建服务器对象 let server = express(); ...
- 获取windows凭证管理器明文密码
1.运行cmdkey /list查看windows保存凭证 方法1.mimikaz mimikatz vault::cred 2.利用powershell尝试获取 windows 普通凭据类型中的明文 ...
- Kubernetes之canal的网络策略(NetworkPolicy)
安装要求: 1.我们这里安装的是3.3的版本.kubernetes的要求: 支持的版本 1.10 1.11 1.12 2.CNI插件需要启用,Calico安装为CNI插件.必须通过传递--networ ...
- VMware 安装Linux系统 CentOS
VMware 安装Linux系统 CentOS 1. 下载镜像系统 centos镜像下载地址:https://www.centos.org/download/ 选择DVD下载即可 linux各版本下 ...
- linux路由表
Linux 内核的路由表通过 route 命令查看 Linux 内核的路由表: [root@VM_139_74_centos ~]# routeKernel IP routing tableDesti ...
- To making it count.
- How do you take your caviar, sir? 鱼子酱还要吗,先生? - No caviar for me, thanks. Never did like it much. ...
- [算法竞赛入门经典]Message Decoding,ACM/ICPC World Finals 1991,UVa213
Description Some message encoding schemes require that an encoded message be sent in two parts. The ...
- Bootstrap常用样板
http://blog.csdn.net/Star_449/article/details/76098292 1.图片样式 1.1..img-responsive: 直接为图片添加该样式,可以实现响应 ...
- Oracle问题整合
1.安装Oracle和ado.net连接Oracle 在“环境变量”的“系统变量”中[必须添加]: ORACLE_HOME = C:\instantclient_11_2 TNS_ADMIN = C: ...